2002 NISSAN PATHFINDER reset
[x] Cancel search: resetPage 140 of 288

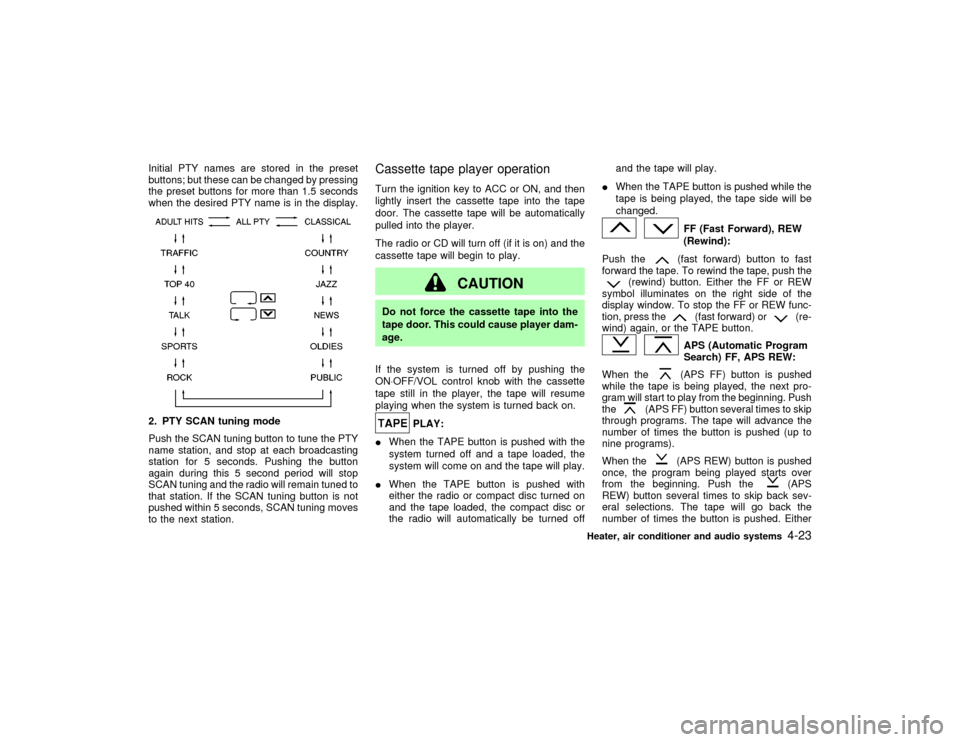
Initial PTY names are stored in the preset
buttons; but these can be changed by pressing
the preset buttons for more than 1.5 seconds
when the desired PTY name is in the display.2. PTY SCAN tuning mode
Push the SCAN tuning button to tune the PTY
name station, and stop at each broadcasting
station for 5 seconds. Pushing the button
again during this 5 second period will stop
SCAN tuning and the radio will remain tuned to
that station. If the SCAN tuning button is not
pushed within 5 seconds, SCAN tuning moves
to the next station.
Cassette tape player operationTurn the ignition key to ACC or ON, and then
lightly insert the cassette tape into the tape
door. The cassette tape will be automatically
pulled into the player.
The radio or CD will turn off (if it is on) and the
cassette tape will begin to play.
CAUTION
Do not force the cassette tape into the
tape door. This could cause player dam-
age.
If the system is turned off by pushing the
ON×OFF/VOL control knob with the cassette
tape still in the player, the tape will resume
playing when the system is turned back on.
PLAY:
IWhen the TAPE button is pushed with the
system turned off and a tape loaded, the
system will come on and the tape will play.
IWhen the TAPE button is pushed with
either the radio or compact disc turned on
and the tape loaded, the compact disc or
the radio will automatically be turned offand the tape will play.
IWhen the TAPE button is pushed while the
tape is being played, the tape side will be
changed.
FF (Fast Forward), REW
(Rewind):
Push the(fast forward) button to fast
forward the tape. To rewind the tape, push the
(rewind) button. Either the FF or REW
symbol illuminates on the right side of the
display window. To stop the FF or REW func-
tion, press the
(fast forward) or
(re-
wind) again, or the TAPE button.
APS (Automatic Program
Search) FF, APS REW:
When the(APS FF) button is pushed
while the tape is being played, the next pro-
gram will start to play from the beginning. Push
the
(APS FF) button several times to skip
through programs. The tape will advance the
number of times the button is pushed (up to
nine programs).
When the
(APS REW) button is pushed
once, the program being played starts over
from the beginning. Push the
(APS
REW) button several times to skip back sev-
eral selections. The tape will go back the
number of times the button is pushed. Either
Heater, air conditioner and audio systems
4-23
Z
01.9.21/R50-D/V5
X
Page 144 of 288

AUDIO button (BASS, TREBLE, FADER,
BALANCE):
Press the AUDIO button to change the select-
ing mode as follows:
BASS,TREBLE,FADER,BALANCE,
BASS
To adjust Bass, Treble, Fader, Balance, press
the AUDIO button until the desired mode
BASS, TREBLE, FADER or BALANCE ap-
pears in the display.
Press the
or
button to adjust Bass
and Treble to the desired level. Use the
or
button to adjust Fader or Bal-
ance modes. Fader adjusts the sound level
between the front and rear speakers and Bal-
ance adjusts the sound level between the right
and left speakers.
After 10 seconds, the radio or cassette tape
display reappears. Once the sound quality is
set to the desired level, press the AUDIO
button repeatedly until the radio or cassette
tape display appears.
Radio/Cassette tape priority modeIn this mode, the radio station illuminates in the
display during radio operation. During cassette
tape operation, TAPE illuminates in the dis-
play.
FM-AM radio operation
FM-AM band select:
Pushing the FM-AM band select button will
change the band as follows:
AM,AM (preset station),FM1,FM2,
FM (preset station),AM
When FM/AM band select button is pushed
while the ignition switch is in the ACC or ON,
the radio will come on at the station last
played.
The last station played will also come on when
the power knob is turned to ON.
If a compact disc or tape is playing when the
FM/AM band select button is turned to ON, the
compact disc or tape will automatically be
turned off and the last radio station played will
come on.
The FM stereo indicator, ST illuminates during
FM stereo reception. When the stereo broad-
cast signal is weak, the radio automatically
changes from stereo to monaural reception.
TUNE (Tuning):WARNING
The radio should not be tuned while
driving so full attention may be given to
vehicle operation.
Use these buttons for manual tuning. To move
quickly through the channels, hold either of the
TUNE buttons down for more than 0.5 sec-
onds.
SCAN tuning:
Push the SCAN tuning button then SCAN will
illuminate in the display window. SCAN tuning
begins from high to low or low to high frequen-
cies and stops at each broadcasting station for
5 seconds. Pushing the button again during
this 5 second period stops SCAN tuning and
the radio remains tuned to that station.
If any of the SEEK/SCAN tuning buttons are
not pushed within 5 seconds, SCAN tuning
moves to the next station.
Station memory (and preset) operations:
Twelve stations can be set for the FM band
(six for FM1, six for FM2) and six stations can
Heater, air conditioner and audio systems
4-27
Z
01.9.21/R50-D/V5
X
Page 145 of 288

be set for the AM band.
1. Tune to the desired station using the SCAN
or TUNE buttons.
2. Select the desired station and keep pushing
any of the desired station memory buttons
(1 to 6) until a beep sound is heard. (The
radio mutes when the select button is
pushed.)
3. The indicator ch2 will come on and the
sound will resume. Memorizing is now com-
plete.
4. Other station select buttons can be set in
the same manner.
If the battery cable is disconnected, or if the
radio fuse opens, the radio memory is can-
celled. In that case, reset the desired stations.
Program type:
When PTY button is pressed during FM mode,
the PTY name of the current tuned station is
displayed. During this time if the PTY data
code is zero, or the data is unreadable; the
display will show NONE.
1. PTY selection mode
PTY name selection can be done by the
up/down TUNE button
or
in the
PTY selection mode.It is possible to shift the PTY name by one
step, with one push of the up/down tuning
button
or
.
PTY name selection can also be achieved by
pressing the preset buttons.
Initial PTY names are stored in the preset
buttons; but these can be changed by pressing
the preset buttons for more than 1.5 seconds
when the desired PTY name is in the display.
2. PTY SEEK tuning
After selecting a PTY name, push the
TUNE button
or
within 10 sec-
onds. Tuning to the PTY station will start. If
you do not push the TUNE button within the
10 second period, the PTY mode will be
canceled.
3. PTY SCAN tuning mode
Push the SCAN tuning button to tune the
PTY name station, and stop at each broad-
casting station for 5 seconds. Pushing the
button again during this 5 second period will
stop SCAN tuning and the radio will remain
tuned to that station. If the SCAN tuning
button is not pushed within 5 seconds,
SCAN tuning moves to the next station.
Cassette tape player operationTurn the ignition key to ACC or ON, then
carefully insert a cassette tape into the tape
door.
The cassette tape automatically pulls into the
player. The word TAPE and moving digital
squares illuminate on the right side of the
display window.
4-28
Heater, air conditioner and audio systems
Z
01.9.21/R50-D/V5
X
Page 147 of 288

ªMODEº select switchPush the mode select switch to change the
mode in the sequence of AM, FM1, FM2, CD
player, CD autochanger and Tape.Volume control switchesPush the upper or lower side switch to in-
crease or decrease the volume.
Tuning
Memory change (radio):
Push the tuning switch
or
for lessthan 1.5 seconds to change the preset radio
channels.
Seek tuning (radio):
Push the tuning switch
or
for more
than 1.5 seconds to seek the next or previous
radio station.
APS (Automatic Program Search) FF, APS
REW (tape or CD changer):
Push the tuning switch
or
for less
1.5 seconds to return to the beginning of the
present program or skip to the next program.
Push several times to skip back or skip
through programs.
This system searches for the blank intervals
between selections. If there is a blank interval
within one program or there is no interval
between programs, the system may not stop in
the desired or expected location.
FF REW (tape or CD changer):
Push the tuning switch
or
for more
than 1.5 seconds to rewind or fast forward the
tape or to change the playing disc up or down.
In CD player operation, pushing the tuning
switch changes the track up or down.
To stop the FF or REW function, press the
or
button for more than 1.5 sec-
onds again.
SAA0464
STEERING WHEEL SWITCH FOR
AUDIO CONTROL (if so equipped)4-30
Heater, air conditioner and audio systems
Z
01.9.21/R50-D/V5
X
Page 162 of 288

Shift lock releaseIf the battery charge is low, the select lever
may not be moved from the P position even
with the brake pedal depressed and the select
lever button pushed.
To move the select lever, remove the shift lock
cover using a flat-bladed screwdriver, and
push the shift lock release button and select
lever button. The select lever can be moved to
N (Neutral).
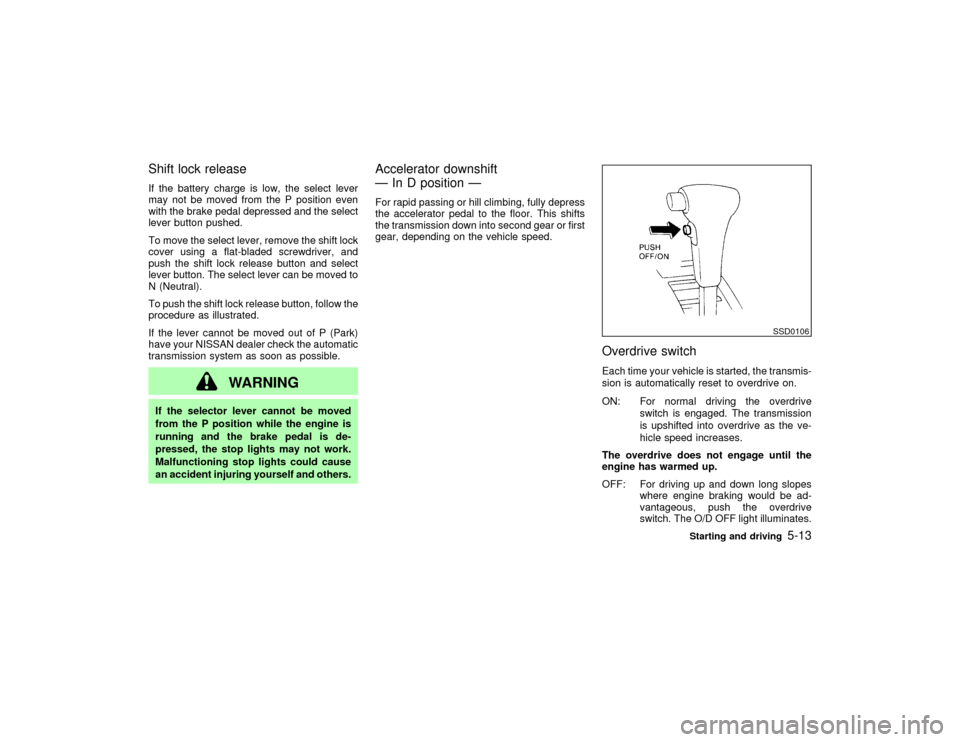
To push the shift lock release button, follow the
procedure as illustrated.
If the lever cannot be moved out of P (Park)
have your NISSAN dealer check the automatic
transmission system as soon as possible.
WARNING
If the selector lever cannot be moved
from the P position while the engine is
running and the brake pedal is de-
pressed, the stop lights may not work.
Malfunctioning stop lights could cause
an accident injuring yourself and others.
Accelerator downshift
Ð In D position ÐFor rapid passing or hill climbing, fully depress
the accelerator pedal to the floor. This shifts
the transmission down into second gear or first
gear, depending on the vehicle speed.
Overdrive switchEach time your vehicle is started, the transmis-
sion is automatically reset to overdrive on.
ON: For normal driving the overdrive
switch is engaged. The transmission
is upshifted into overdrive as the ve-
hicle speed increases.
The overdrive does not engage until the
engine has warmed up.
OFF: For driving up and down long slopes
where engine braking would be ad-
vantageous, push the overdrive
switch. The O/D OFF light illuminates.
SSD0106
Starting and driving
5-13
Z
01.9.21/R50-D/V5
X
Page 167 of 288

accelerator pedal. Your vehicle will maintain
the set speed.
ITo pass another vehicle,depress the
accelerator pedal. When you release the
pedal, the vehicle will return to the previ-
ously set speed.
IThe vehicle may not maintain the set speed
when going up or down steep hills. If this
happens, drive without the cruise control.
To cancel the preset speed,follow any of
these three methods:
a) Push the cancel switch; The SET light will
go out.
b) Tap the brake pedal; The SET light will go
out.
c) Turn the main switch off. Both the CRUISE
indicator and SET indicator lights will go
out.
IIf you depress the brake pedal while push-
ing the RES/ACCEL set switch and reset at
the cruising speed, turn the main switch off
once and then turn it on again.
IThe cruise control will automatically be can-
celled if the vehicle slows down more than
8 MPH (13 km/h) below the set speed.
IDepress the clutch pedal (manual transmis-sion), or move the selector lever to N posi-
tion (automatic transmission). The SET
light will go out.
To reset at a faster cruising speed,follow
either of these three methods:
a) Depress the accelerator pedal. When the
vehicle attains the desired speed, push and
release the COAST/SET switch.
b) Push and hold the RES/ACCEL set switch.
When the vehicle attains the speed you
desire, release the switch.
c) Push, then quickly release the RES/
ACCEL set switch. Each time you do this,
the set speed will increase by about 1 MPH
(1.6 km/h).
To reset at a slower cruising speed,follow
either of these three methods:
a) Lightly tap the brake pedal. When the ve-
hicle attains the desired speed, push the
COAST/SET switch and release it.
b) Push and hold the COAST/SET switch.
Release the switch when the vehicle slows
down to the desired speed.
c) Push, then quickly release the COAST/
SET switch. Each time you do this, the set
speed will decrease by about 1 MPH (1.6
km/h).To resume the preset speed,push and re-
lease the RES/ACCEL set switch. The vehicle
will resume the last set cruising speed when
the vehicle speed is over 25 MPH (40 km/h).
PrecautionsIThe CRUISE indicator may sometimes
blink when the cruise control switch (Main
switch) is turned ON while pushing the
RES/ACCEL switch or COAST/SET switch
or CANCEL switch (located on the steering
wheel). To properly set the cruise control
system perform the steps above in the
order indicated. (This is a fail-safe mode.
Turn the main switch OFF and turn it ON
again without pushing the set switch to
return to normal operation.)
IIf the cruise control system malfunctions, it
will cancel automatically. The SET indicator
in the meter assembly will then blink to
warn the driver.
IWhen the SET indicator blinks, turn the
cruise control switch (Main switch) OFF and
have the system checked by your NISSAN
dealer.
5-18
Starting and driving
Z
01.9.21/R50-D/V5
X
Page 274 of 288

You may notify NISSAN by contact-
ing our Consumer Affairs Depart-
ment, toll-free, at 1-800-NISSAN-1.
In Hawaii call (808) 836-0888.
Due to legal requirements in some states/
areas, your vehicle may be required to be in
what is called the ready condition for an
Inspection/Maintenance (I/M) test of the emis-
sion control system.
The vehicle is set to the ready condition when
it is driven through certain driving patterns.
Usually, the ready condition can be obtained
by ordinary usage of the vehicle.
If a powertrain system component is repaired
or the battery is disconnected, the vehicle may
be reset to a not ready condition. Before taking
the I/M test, drive the vehicle through the
following pattern to set the vehicle to the ready
condition. If you cannot or do not want to
perform the driving pattern, an NISSAN dealer
can conduct it for you.
WARNING
Always drive the vehicle in a safe and
prudent manner according to traffic con-
ditions, and obey all traffic laws.
1. Start the engine when the engine coolant
temperature gauge needle points to C. Al-
low the engine to idle until the gauge needlepoints between the C and H (normal oper-
ating temperature).
2. Accelerate the vehicle to 55 MPH (88
km/h), then quickly release the accelerator
pedal completely and keep it released for at
least 6 seconds.
3. Quickly depress the accelerator pedal for a
moment, then drive the vehicle at a speed
of 53 to 60 MPH (86 to 96 km/h) for at least
5 minutes.
4. Stop the vehicle.
5. Accelerate the vehicle to 35 MPH (55 km/h)
and maintain the speed for 20 seconds.
6. Repeat steps 4 and 5 at least 3 times.
7. Accelerate the vehicle to 55 MPH (88 km/h)
and maintain the speed for at least 3 min-
utes.
8. Stop the vehicle (shift lever in the ªPº or ªNº
position).
9. Rev the engine up between 2,500 and
3,500 rpm and hold it for 3 consecutive
minutes, then release the accelerator pedal
completely.
10.Wait 5 second at idle.
11.Rev the engine up between 2,000 andREADINESS FOR INSPECTION/
MAINTENANCE (I/M) TEST (US
only)
Technical and consumer information
9-23
Z
01.9.21/R50-D/V5
X