2002 NISSAN PATHFINDER Power window switch
[x] Cancel search: Power window switchPage 53 of 288

2 Instruments and controlsInstrument panel ....................................................... 2-2
Meters and gauges ................................................... 2-3
Speedometer and odometer ................................ 2-3
Tachometer .......................................................... 2-4
Engine coolant temperature gauge ...................... 2-4
Fuel gauge ........................................................... 2-5
Compass and outside temperature display (if so
equipped) .................................................................. 2-6
Outside temperature display ................................ 2-6
Compass display .................................................. 2-7
Warning/indicator lights and audible reminders ........ 2-9
Checking bulbs ..................................................... 2-9
Warning lights....................................................... 2-9
Indicator lights .................................................... 2-13
Audible reminders .............................................. 2-15
Security systems ..................................................... 2-15
Vehicle security system ...................................... 2-15
Nissan vehicle immobilizer system .................... 2-17
Windshield wiper and washer switch ...................... 2-18
Rear window wiper and washer switch................... 2-18
Glass hatch and outside mirror (if so equipped)
defogger switch ...................................................... 2-19
Headlight and turn signal switch ............................. 2-19
Headlight switch ................................................. 2-20Turn signal switch .............................................. 2-22
Fog light switch (if so equipped) ............................. 2-23
Front fog light switch .......................................... 2-23
Hazard warning flasher switch ................................ 2-23
Horn......................................................................... 2-24
Heated seats (if so equipped) ................................. 2-24
Clock ....................................................................... 2-25
Adjusting the time............................................... 2-25
Power outlet (if so equipped) .................................. 2-25
Cigarette lighter and ashtray (if so equipped) ........ 2-26
Storage .................................................................... 2-27
Tray .................................................................... 2-27
Coin box (if so equipped) ................................... 2-27
Glasses case ...................................................... 2-28
Cup holders ........................................................ 2-28
Glove box ........................................................... 2-29
Console box ....................................................... 2-30
Luggage hooks ................................................... 2-32
Cargo net............................................................ 2-33
Tonneau cover (if so equipped) ......................... 2-33
Luggage rack (if so equipped) ........................... 2-34
Windows .................................................................. 2-35
Power windows .................................................. 2-35
Sunroof (if so equipped) ......................................... 2-36
Z
01.9.21/R50-D/V5
X
Page 55 of 288

Driver's supplemental air bag (P.1-10)Cruise control
switch (P.5-17)
Outside mirror remote control
(P.3-15) Headlight/dimmer/turn signal switch (P.2-19)
Front fog light switch (P.2-23)
Steering switch for audio control
(P.4-30)Meters/gauges (P.2-3)Windshield
and rear
window wiper/
washer
switch
(P.2-18)
Hazard warning
flasher switch
(P.2-23)Center ventilator (P.4-2)
Heater/air conditioner control (P.4-2)Compass/outside air temperature display (P.2-6)
Passenger supplemental air bag (P.1-10)
Side ventilator (P.4-2)
Glove box (P.2-29)
Power outlet (P.2-25) or Cigarette lighter (P.2-26)
Radio (P.4-11)/CD player (P.4-13) or Navigation system* Glass hatch/
outside mirror
defogger switch
(P.2-19) Ignition switch/steering
lock (P.5-6)
Heated seat switch (P.2-24)
or 4WD shift switch (P.5-24) Tilting steering wheel
adjust lever (P.3-14) Fuse box cover (P.8-28)/
Tray (P.2-27)Clock (P.2-25)
Instrument brightness control
(P.2-21)
SIC1438
See the page indicated in parentheses for operating details.
*: Refer to the separate Navigation System Owner's Manual.
Security indicator
light (P.2-15)
Hood release handle (P.3-9)Heated seat switch (P.2-24) (4WD shift switch equipped models)
INSTRUMENT PANEL2-2
Instruments and controls
Z
01.9.21/R50-D/V5
X
Page 74 of 288

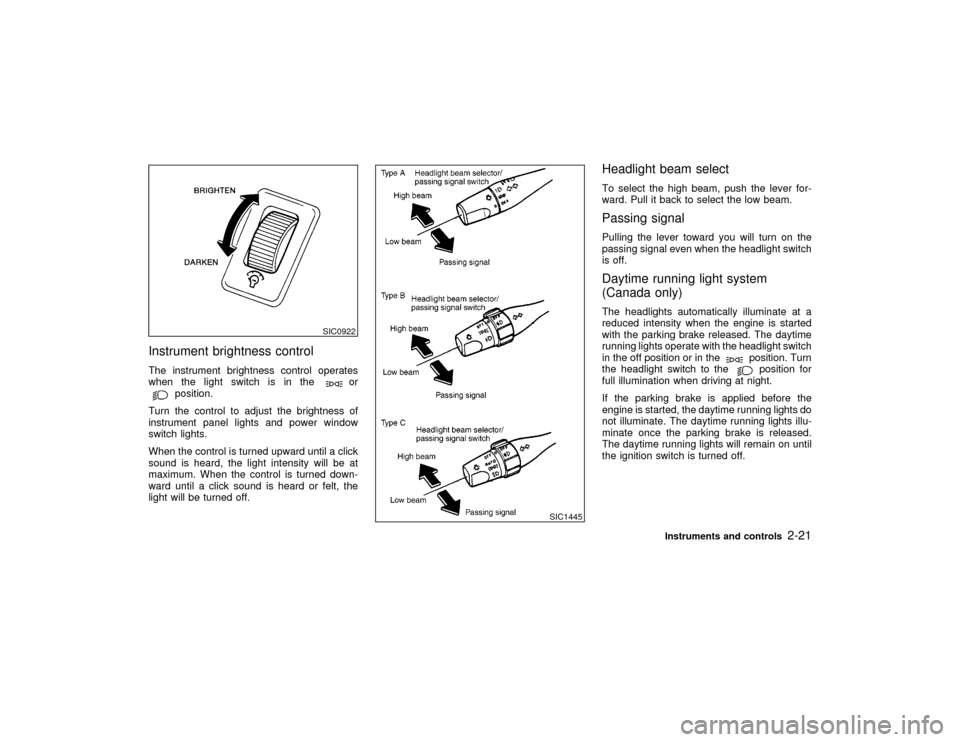
Instrument brightness controlThe instrument brightness control operates
when the light switch is in the
or
position.
Turn the control to adjust the brightness of
instrument panel lights and power window
switch lights.
When the control is turned upward until a click
sound is heard, the light intensity will be at
maximum. When the control is turned down-
ward until a click sound is heard or felt, the
light will be turned off.
Headlight beam selectTo select the high beam, push the lever for-
ward. Pull it back to select the low beam.Passing signalPulling the lever toward you will turn on the
passing signal even when the headlight switch
is off.Daytime running light system
(Canada only)The headlights automatically illuminate at a
reduced intensity when the engine is started
with the parking brake released. The daytime
running lights operate with the headlight switch
in the off position or in the
position. Turn
the headlight switch to theposition for
full illumination when driving at night.
If the parking brake is applied before the
engine is started, the daytime running lights do
not illuminate. The daytime running lights illu-
minate once the parking brake is released.
The daytime running lights will remain on until
the ignition switch is turned off.
SIC0922
SIC1445
Instruments and controls
2-21
Z
01.9.21/R50-D/V5
X
Page 79 of 288

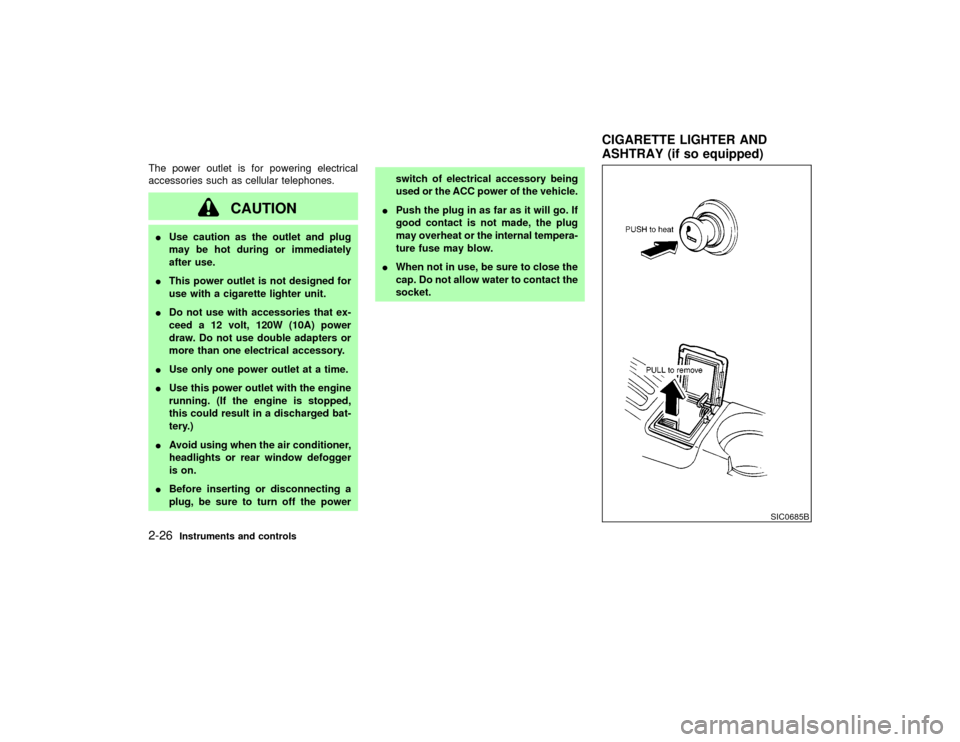
The power outlet is for powering electrical
accessories such as cellular telephones.
CAUTION
IUse caution as the outlet and plug
may be hot during or immediately
after use.
IThis power outlet is not designed for
use with a cigarette lighter unit.
IDo not use with accessories that ex-
ceed a 12 volt, 120W (10A) power
draw. Do not use double adapters or
more than one electrical accessory.
IUse only one power outlet at a time.
IUse this power outlet with the engine
running. (If the engine is stopped,
this could result in a discharged bat-
tery.)
IAvoid using when the air conditioner,
headlights or rear window defogger
is on.
IBefore inserting or disconnecting a
plug, be sure to turn off the powerswitch of electrical accessory being
used or the ACC power of the vehicle.
IPush the plug in as far as it will go. If
good contact is not made, the plug
may overheat or the internal tempera-
ture fuse may blow.
IWhen not in use, be sure to close the
cap. Do not allow water to contact the
socket.
SIC0685B
CIGARETTE LIGHTER AND
ASHTRAY (if so equipped)
2-26
Instruments and controls
Z
01.9.21/R50-D/V5
X
Page 88 of 288

POWER WINDOWS
WARNING
IMake sure that all passengers have
their hands, etc. inside the vehicle
before closing the windows. Use the
window lock switch to prevent unex-
pected use of the power windows.
IDo not leave children unattended in-
side the vehicle. They could unknow-ingly activate switches or controls
and become trapped in a window.
Unattended children could become
involved in serious accidents.
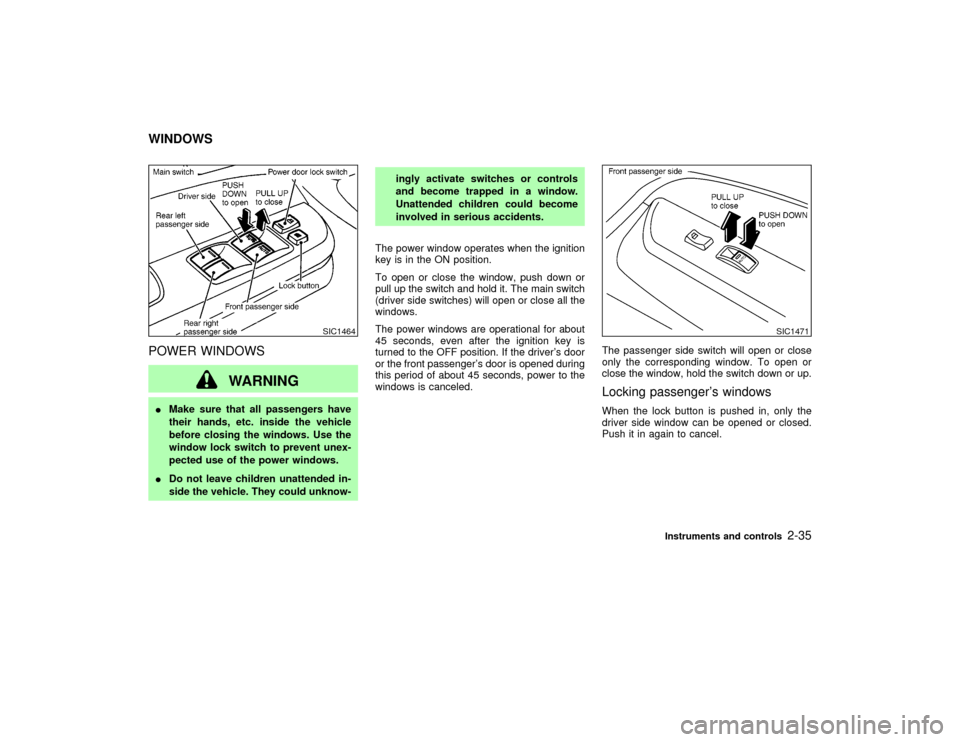
The power window operates when the ignition
key is in the ON position.
To open or close the window, push down or
pull up the switch and hold it. The main switch
(driver side switches) will open or close all the
windows.
The power windows are operational for about
45 seconds, even after the ignition key is
turned to the OFF position. If the driver's door
or the front passenger's door is opened during
this period of about 45 seconds, power to the
windows is canceled.The passenger side switch will open or close
only the corresponding window. To open or
close the window, hold the switch down or up.
Locking passenger's windowsWhen the lock button is pushed in, only the
driver side window can be opened or closed.
Push it in again to cancel.
SIC1464
SIC1471
WINDOWS
Instruments and controls
2-35
Z
01.9.21/R50-D/V5
X
Page 89 of 288

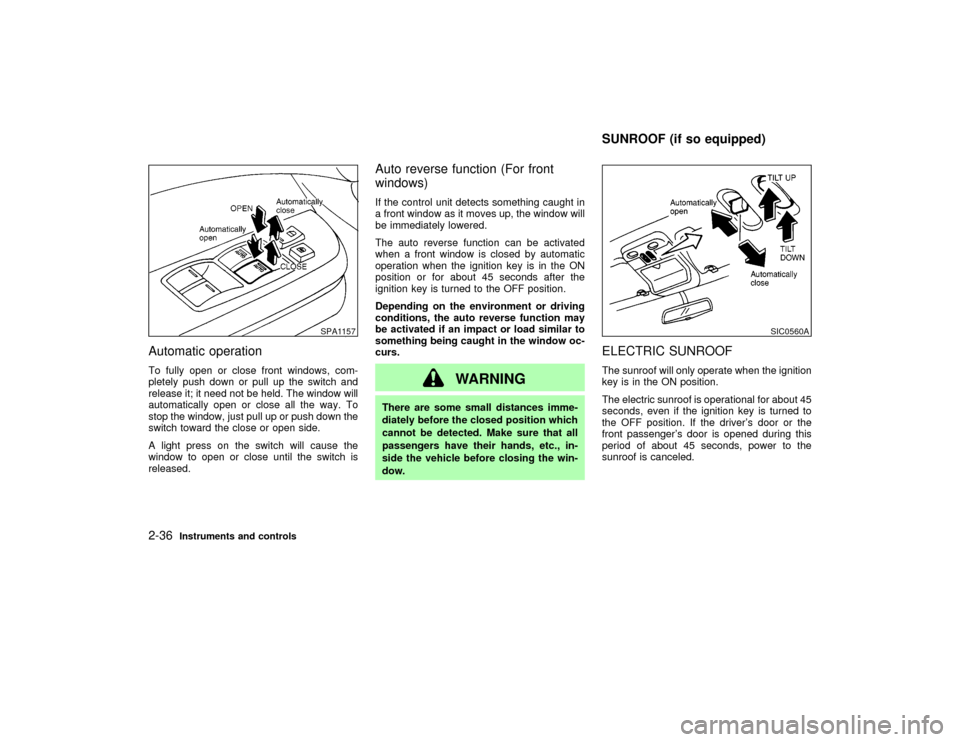
Automatic operationTo fully open or close front windows, com-
pletely push down or pull up the switch and
release it; it need not be held. The window will
automatically open or close all the way. To
stop the window, just pull up or push down the
switch toward the close or open side.
A light press on the switch will cause the
window to open or close until the switch is
released.
Auto reverse function (For front
windows)If the control unit detects something caught in
a front window as it moves up, the window will
be immediately lowered.
The auto reverse function can be activated
when a front window is closed by automatic
operation when the ignition key is in the ON
position or for about 45 seconds after the
ignition key is turned to the OFF position.
Depending on the environment or driving
conditions, the auto reverse function may
be activated if an impact or load similar to
something being caught in the window oc-
curs.
WARNING
There are some small distances imme-
diately before the closed position which
cannot be detected. Make sure that all
passengers have their hands, etc., in-
side the vehicle before closing the win-
dow.
ELECTRIC SUNROOFThe sunroof will only operate when the ignition
key is in the ON position.
The electric sunroof is operational for about 45
seconds, even if the ignition key is turned to
the OFF position. If the driver's door or the
front passenger's door is opened during this
period of about 45 seconds, power to the
sunroof is canceled.
SPA1157
SIC0560A
SUNROOF (if so equipped)
2-36
Instruments and controls
Z
01.9.21/R50-D/V5
X
Page 100 of 288

3 Pre-driving checks and adjustmentsKeys .......................................................................... 3-2
Doors ......................................................................... 3-2
Locking with key ................................................... 3-3
Front window open/close with key ....................... 3-3
Locking with inside lock knob............................... 3-3
Locking with power door lock switch (if so
equipped).............................................................. 3-4
Child safety rear door lock ................................... 3-4
Remote keyless entry system ................................... 3-5
How to use remote keyless entry system ............ 3-5
Battery replacement ............................................. 3-8
Hood .......................................................................... 3-9
Rear door ................................................................ 3-10
Key operation ..................................................... 3-10
Spare tire carrier (if so equipped) ........................... 3-10Glass hatch ............................................................. 3-11
Key operation ..................................................... 3-11
Fuel filler lid ............................................................. 3-12
Opener operation ............................................... 3-12
Fuel filler cap ...................................................... 3-12
Steering wheel ........................................................ 3-14
Tilt operation....................................................... 3-14
Sun visors ............................................................... 3-14
Using the sun visors ........................................... 3-14
Mirrors ..................................................................... 3-15
Inside mirror ....................................................... 3-15
Outside mirrors ................................................... 3-15
Automatic seat positioner (if so equipped) ............. 3-16
Automatic seat positioner operation ................... 3-16
Cancel switch ..................................................... 3-18
Z
01.9.21/R50-D/V5
X
Page 129 of 288

from a station transmitter, the signals will tend
to fade and/or drift.
Static and flutter: During signal interference
from buildings, large hills or due to antenna
position, usually in conjunction with increased
distance from the station transmitter, static or
flutter can be heard. This can be reduced by
adjusting the treble control counterclockwise
to reduce treble response.
Multipath reception: Because of the reflective
characteristics of FM signals, direct and re-
flected signals reach the receiver at the same
time. The signals may cancel each other,
resulting in momentary flutter or loss of sound.
The radio has an FM Diversity reception sys-
tem, which employs two antennas if so
equipped. One is a rod type antenna; the other
is an antenna printed on the window. This
system automatically switches to the antenna
which is receiving less noise.
For additional information, see ªAntennaº later
in this section.AM RADIO RECEPTIONAM signals, because of their low frequency,
can bend around objects and skip along the
ground. In addition, the signals can be
bounced off the ionosphere and bent back to
earth. Because of these characteristics. AMsignals are also subject to interference as they
travel from transmitter to receiver.
Fading: Occurs while the vehicle is passing
through freeway underpasses or in areas with
many tall buildings. It can also occur for sev-
eral seconds during ionospheric turbulence
even in areas where no obstacles exist.
Static: Caused by thunderstorms, electrical
power lines, electric signs and even traffic
lights.
AUDIO OPERATION
PRECAUTIONS
Cassette playerITo maintain good quality sound,
NISSAN recommends using cassette
tapes of 60 minutes or shorter in length.
ICassette tapes should be removed from
the player when not in use. Store cas-
settes in their protective cases and away
from direct sunlight, heat, dust, mois-
ture and magnetic sources.
IDirect sunlight can cause the cassette to
become deformed. The use of deformed
cassettes may cause the cassette to jam
in the player.
IDo not use cassettes with labels whichare peeling and loose. If used, the label
could jam in the player.
IIf a cassette has loose tape, insert a
pencil through one of the cassette hubs
and rewind the tape firmly around the
hubs. Loose tape may cause tape jam-
ming and wavering sound quality.
IOver a period of time, the playback
head, capstan and pinch roller may col-
lect a tape coating residue as the tape is
played. This residue accumulation can
cause weak or wavering sound, and
should be removed periodically with a
head cleaning tape. If the residue is not
removed periodically, the player may
need to be disassembled for cleaning.
4-12
Heater, air conditioner and audio systems
Z
01.9.21/R50-D/V5
X