Page 37 of 247
2. Route the seat belt tongue through the child
restraint and insert it into the buckle until
you hear and feel the latch engage.
Be sure to follow the child restraint manu-
facturer's instructions for belt routing.3. Pull on the shoulder belt until all of the belt
is fully extended. At this time, the belt
retractor is in the automatic locking mode
(child restraint mode). It reverts back to
emergency locking mode when the belt is
fully retracted.
SSS0156
SSS0046
SSS0045A
1-32
Seats, restraints and supplemental air bag systems
Z
01.9.21/A33-D/V5.0
X
Page 38 of 247
4. Allow the belt to retract. Pull up on the belt
to remove any slack in the belt.5. Before placing the child in the child re-
straint, use force to tilt the child restraint
from side to side, and tug it forward to make
sure that it is securely held in place.
6. Check that the retractor is in the automatic
locking mode by trying to pull more belt out
of the retractor. If you cannot pull any more
belt webbing out of the retractor, the belt is
in the automatic locking mode.
7. Check to make sure that the child restraint
is properly secured prior to each use. If the
belt is not locked, repeat steps 3 through 6.
After the child restraint is removed and the
seat belt is allowed to wind back into theretractor, the automatic locking mode (child
restraint mode) is canceled; the seat belt only
locks during a sudden stop or impact.
SSS0109
SSS0110Seats, restraints and supplemental air bag systems
1-33
Z
01.9.21/A33-D/V5.0
X
Page 41 of 247

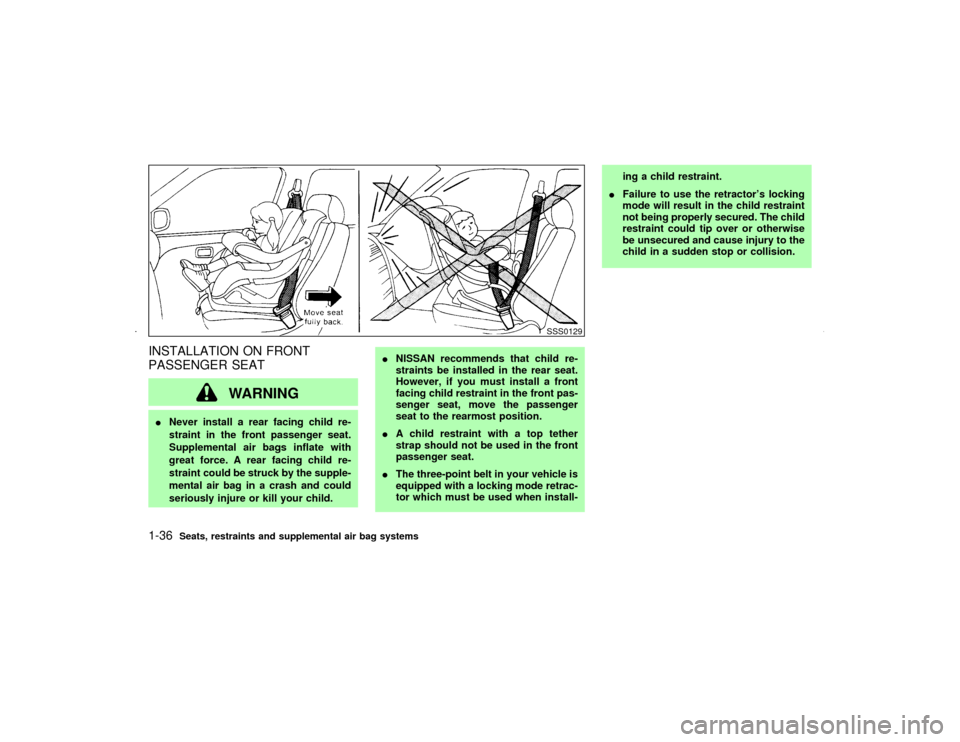
INSTALLATION ON FRONT
PASSENGER SEAT
WARNING
INever install a rear facing child re-
straint in the front passenger seat.
Supplemental air bags inflate with
great force. A rear facing child re-
straint could be struck by the supple-
mental air bag in a crash and could
seriously injure or kill your child.INISSAN recommends that child re-
straints be installed in the rear seat.
However, if you must install a front
facing child restraint in the front pas-
senger seat, move the passenger
seat to the rearmost position.
IA child restraint with a top tether
strap should not be used in the front
passenger seat.
IThe three-point belt in your vehicle is
equipped with a locking mode retrac-
tor which must be used when install-ing a child restraint.
IFailure to use the retractor's locking
mode will result in the child restraint
not being properly secured. The child
restraint could tip over or otherwise
be unsecured and cause injury to the
child in a sudden stop or collision.
SSS0129
1-36
Seats, restraints and supplemental air bag systems
Z
01.9.21/A33-D/V5.0
X
Page 42 of 247
Front facingIf you must install a child restraint in the front
seat, follow these steps:
1. Position the child restraint on the front
passenger seat.It should be placed in a
front facing direction only.Move the seat
to the rearmost position. Always follow the
child restraint manufacturer's instructions.
Child restraints for infants must be used
in the rear facing direction and therefore
must not be used in the front seat.2. Route the seat belt tongue through the child
restraint and insert it into the buckle until
you hear and feel the latch engage. Be sure
to follow the child restraint manufacturer's
instructions for belt routing.3. Pull on the shoulder belt until all of the belt
is fully extended. At this time, the belt
retractor is in the automatic locking mode
(child restraint mode). It reverts back to
emergency locking mode when the belt is
fully retracted.
SSS0135
SSS0055
SSS0113
Seats, restraints and supplemental air bag systems
1-37
Z
01.9.21/A33-D/V5.0
X
Page 43 of 247
4. Allow the belt to retract. Pull up on the belt
to remove any slack in the belt.5. Before placing the child in the child re-
straint, use force to tilt the child restraint
from side to side, and tug it forward to make
sure that it is securely held in place.
6. Check that the retractor is in the automatic
locking mode by trying to pull more belt out
of the retractor. If you cannot pull any more
belt webbing out of the retractor, the belt is
in the automatic locking mode.
7. Check to make sure that the child restraint
is properly secured prior to each use. If the
lap belt is not locked, repeat steps 3
through 6.
After the child restraint is removed and theseat belt is allowed to wind back into the
retractor, the automatic locking mode (child
restraint mode) is canceled; the seat belt only
locks during a sudden stop or impact.
SSS0056
SSS0114
1-38
Seats, restraints and supplemental air bag systems
Z
01.9.21/A33-D/V5.0
X
Page 72 of 247

WARNING
IProperly secure all cargo to help pre-
vent it from sliding or shifting.
IBe sure to secure hooks into the
retainers. The cargo restrained in the
net must not exceed 30 lb (13.6 kg) or
the net may not stay secured.
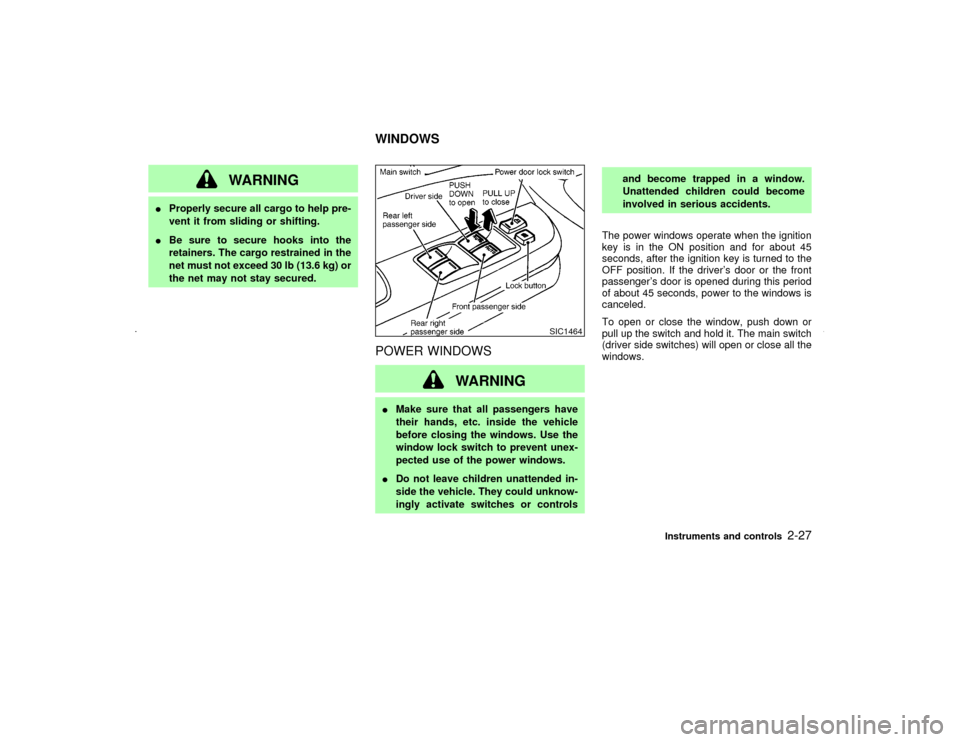
POWER WINDOWS
WARNING
IMake sure that all passengers have
their hands, etc. inside the vehicle
before closing the windows. Use the
window lock switch to prevent unex-
pected use of the power windows.
IDo not leave children unattended in-
side the vehicle. They could unknow-
ingly activate switches or controlsand become trapped in a window.
Unattended children could become
involved in serious accidents.
The power windows operate when the ignition
key is in the ON position and for about 45
seconds, after the ignition key is turned to the
OFF position. If the driver's door or the front
passenger's door is opened during this period
of about 45 seconds, power to the windows is
canceled.
To open or close the window, push down or
pull up the switch and hold it. The main switch
(driver side switches) will open or close all the
windows.
SIC1464
WINDOWS
Instruments and controls
2-27
Z
01.9.21/A33-D/V5.0
X
Page 75 of 247

sunroof is opened. However, it must be closed
manually.
WARNING
IIn an accident you could be thrown
from the vehicle through an open
sunroof. Always use seat belts and
child restraints.
IDo not allow anyone to stand up or
extend any portion of their body out
of the opening while the vehicle is in
motion or while the sunroof is clos-
ing.
CAUTION
IRemove water drops, snow, ice or
sand from the sunroof before open-
ing.
IDo not place any heavy object on the
sunroof or surrounding area.If the sunroof does not closeHave your NISSAN dealer check and repair
the sunroof.The digital clock displays time when the igni-
tion key is in ACC or ON.
If the power supply is disconnected, the clock
will not indicate the correct time. Readjust the
time.
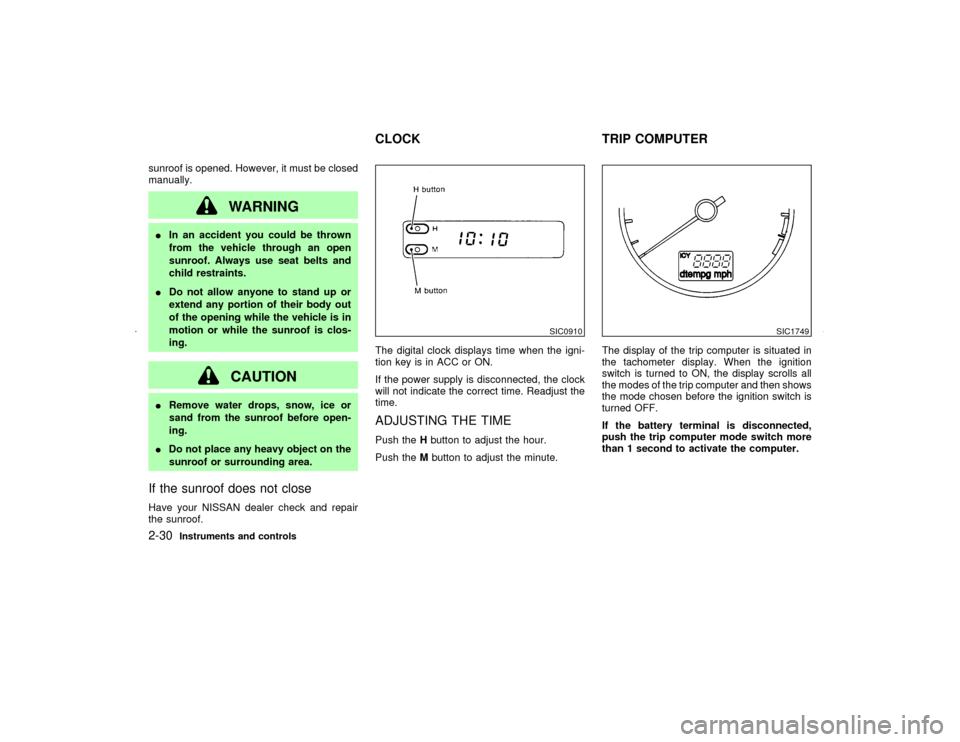
ADJUSTING THE TIMEPush theHbutton to adjust the hour.
Push theMbutton to adjust the minute.The display of the trip computer is situated in
the tachometer display. When the ignition
switch is turned to ON, the display scrolls all
the modes of the trip computer and then shows
the mode chosen before the ignition switch is
turned OFF.
If the battery terminal is disconnected,
push the trip computer mode switch more
than 1 second to activate the computer.
SIC0910
SIC1749
CLOCK TRIP COMPUTER
2-30
Instruments and controls
Z
01.9.21/A33-D/V5.0
X
Page 86 of 247

3 Pre-driving checks and adjustmentsKeys .......................................................................... 3-2
Doors ......................................................................... 3-2
Locking with key ................................................... 3-3
Front window open/close with key ....................... 3-3
Locking with inside lock knob............................... 3-3
Locking with power door lock switch.................... 3-4
Child safety rear door lock ................................... 3-4
Remote keyless entry system ................................... 3-4
How to use remote keyless entry system ............ 3-5
Battery replacement ............................................. 3-8
Hood ........................................................................ 3-10
Trunk lid .................................................................. 3-10
Opener operation ............................................... 3-11
Key operation ..................................................... 3-11Interior trunk lid release ..................................... 3-12
Fuel filler lid ............................................................. 3-12
Opener operation ............................................... 3-12
Fuel filler cap ...................................................... 3-13
Steering wheel ........................................................ 3-14
Tilt operation....................................................... 3-14
Sun visors ............................................................... 3-14
Mirrors ..................................................................... 3-15
Automatic anti-glare inside mirror ...................... 3-15
Outside mirrors ................................................... 3-15
Automatic seat positioner (if so equipped) ............. 3-16
Automatic seat positioner operation (A/T models
only) .................................................................... 3-16
Procedure for storing memory............................ 3-17
Z
01.9.21/A33-D/V5.0
X