2002 NISSAN FRONTIER ECU
[x] Cancel search: ECUPage 203 of 273
7. Refill engine with a recommended oil
through the oil filler opening then install
the oil filler cap securely.
See ``Capacities and recommended
fuel/lubricants'' in the ``Technical and
consumer information'' section for drain
and refill capacity.
The drain and refill capacity depends on
the oil temperature and drain time. Use
these specifications for reference only.
Always use the dipstick to determine
when the proper amount of oil is in the
engine.
8. Start the engine. Check for leakage
around the drain plug and oil filter. Cor-
rect as required.
9. Turn the engine off and wait several
minutes. Check the oil level with the
dipstick. Add engine oil if necessary.
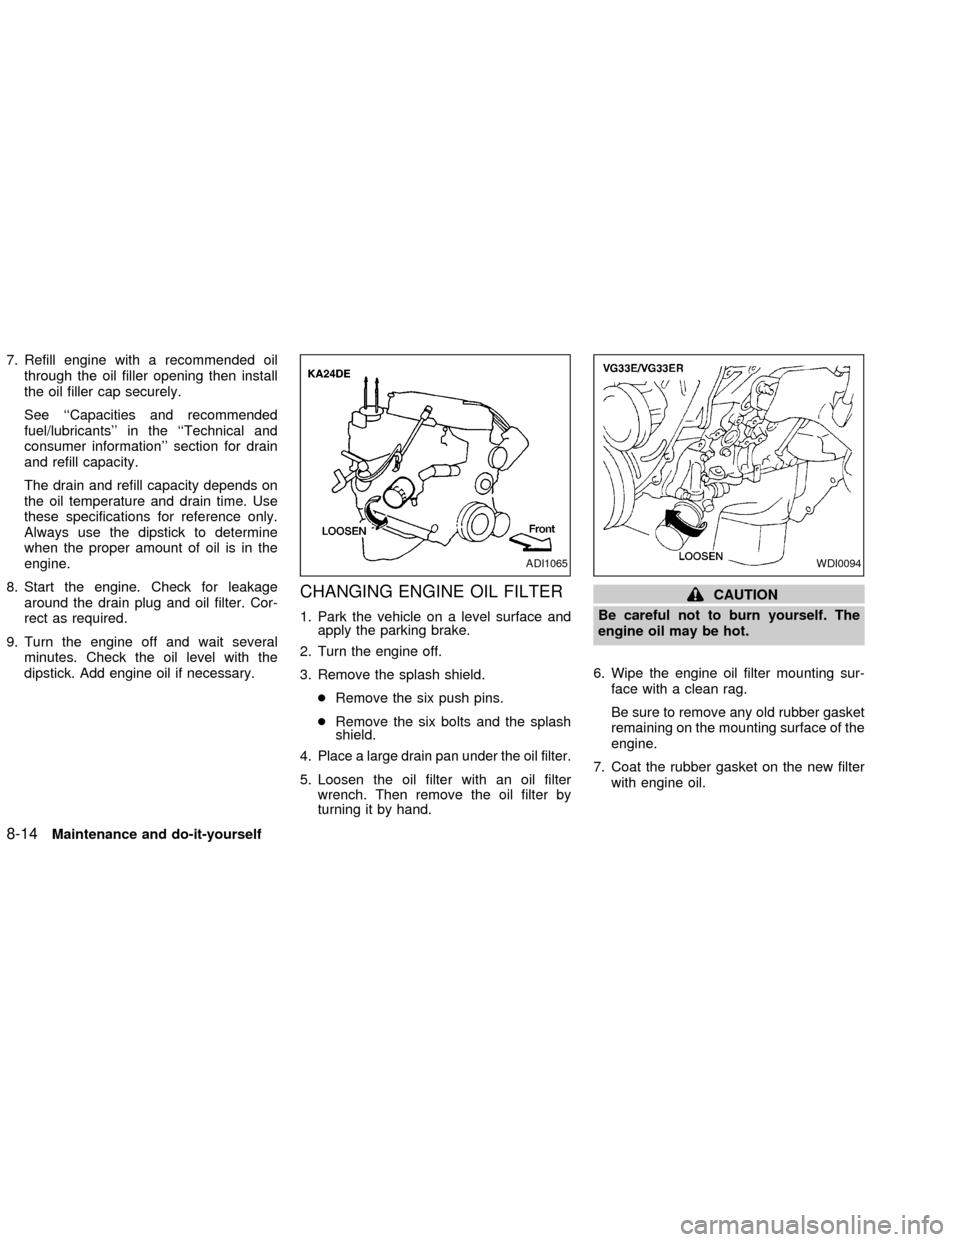
CHANGING ENGINE OIL FILTER
1. Park the vehicle on a level surface and
apply the parking brake.
2. Turn the engine off.
3. Remove the splash shield.
cRemove the six push pins.
cRemove the six bolts and the splash
shield.
4.
Place a large drain pan under the oil filter.
5. Loosen the oil filter with an oil filter
wrench. Then remove the oil filter by
turning it by hand.
CAUTION
Be careful not to burn yourself. The
engine oil may be hot.
6. Wipe the engine oil filter mounting sur-
face with a clean rag.
Be sure to remove any old rubber gasket
remaining on the mounting surface of the
engine.
7. Coat the rubber gasket on the new filter
with engine oil.
ADI1065WDI0094
8-14Maintenance and do-it-yourself
ZX
Page 207 of 273
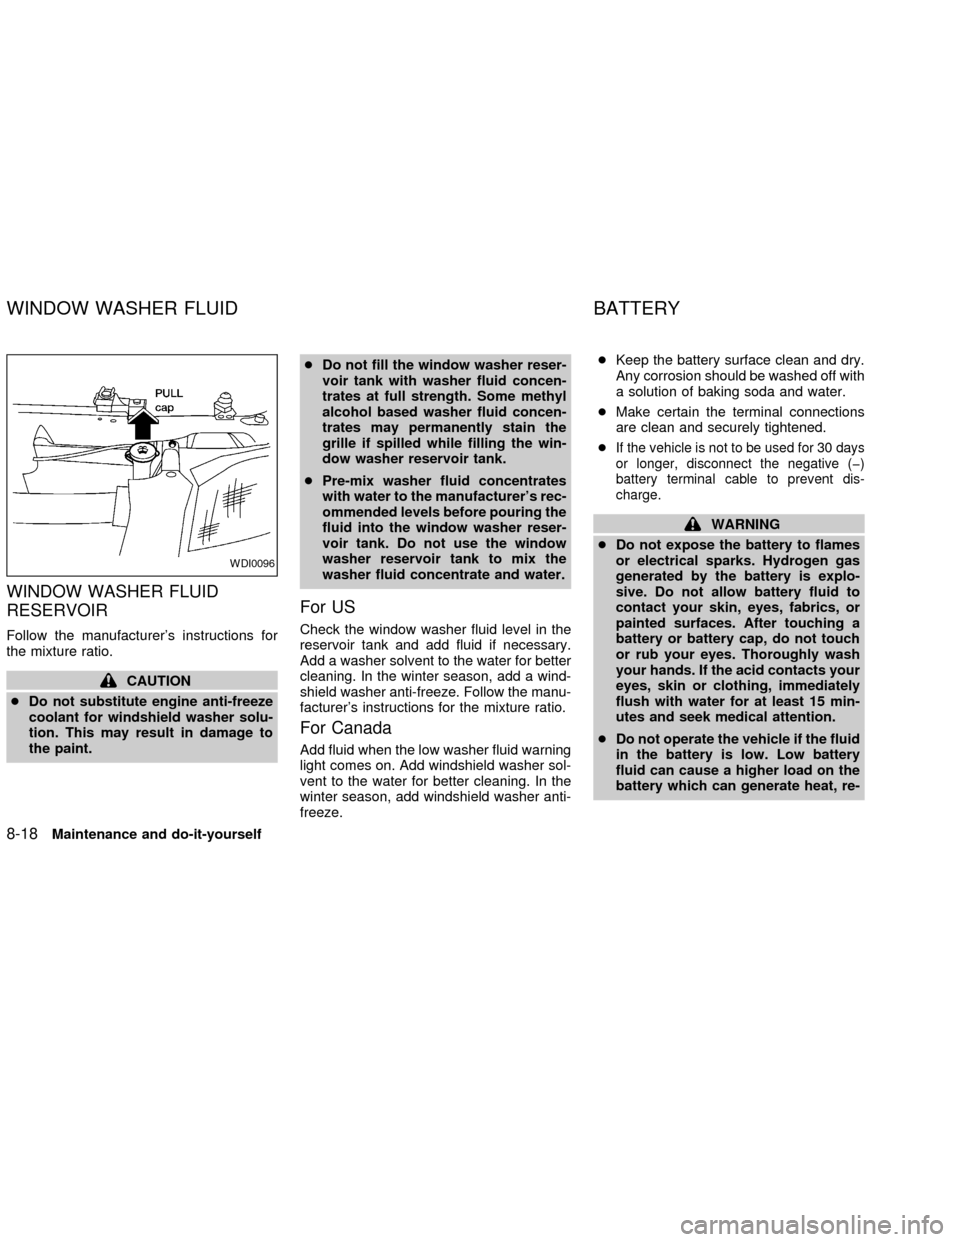
WINDOW WASHER FLUID
RESERVOIR
Follow the manufacturer's instructions for
the mixture ratio.
CAUTION
cDo not substitute engine anti-freeze
coolant for windshield washer solu-
tion. This may result in damage to
the paint.cDo not fill the window washer reser-
voir tank with washer fluid concen-
trates at full strength. Some methyl
alcohol based washer fluid concen-
trates may permanently stain the
grille if spilled while filling the win-
dow washer reservoir tank.
cPre-mix washer fluid concentrates
with water to the manufacturer's rec-
ommended levels before pouring the
fluid into the window washer reser-
voir tank. Do not use the window
washer reservoir tank to mix the
washer fluid concentrate and water.
For US
Check the window washer fluid level in the
reservoir tank and add fluid if necessary.
Add a washer solvent to the water for better
cleaning. In the winter season, add a wind-
shield washer anti-freeze. Follow the manu-
facturer's instructions for the mixture ratio.
For Canada
Add fluid when the low washer fluid warning
light comes on. Add windshield washer sol-
vent to the water for better cleaning. In the
winter season, add windshield washer anti-
freeze.cKeep the battery surface clean and dry.
Any corrosion should be washed off with
a solution of baking soda and water.
cMake certain the terminal connections
are clean and securely tightened.
c
If the vehicle is not to be used for 30 days
or longer, disconnect the negative (þ)
battery terminal cable to prevent dis-
charge.
WARNING
cDo not expose the battery to flames
or electrical sparks. Hydrogen gas
generated by the battery is explo-
sive. Do not allow battery fluid to
contact your skin, eyes, fabrics, or
painted surfaces. After touching a
battery or battery cap, do not touch
or rub your eyes. Thoroughly wash
your hands. If the acid contacts your
eyes, skin or clothing, immediately
flush with water for at least 15 min-
utes and seek medical attention.
cDo not operate the vehicle if the fluid
in the battery is low. Low battery
fluid can cause a higher load on the
battery which can generate heat, re-
WDI0096
WINDOW WASHER FLUID BATTERY
8-18Maintenance and do-it-yourself
ZX
Page 210 of 273
WARNING
Be sure the engine and ignition switch
are off and that the parking brake is
engaged securely.
CAUTION
Be sure to use the correct socket to
remove the spark plugs. An incorrect
socket can damage the spark plugs.
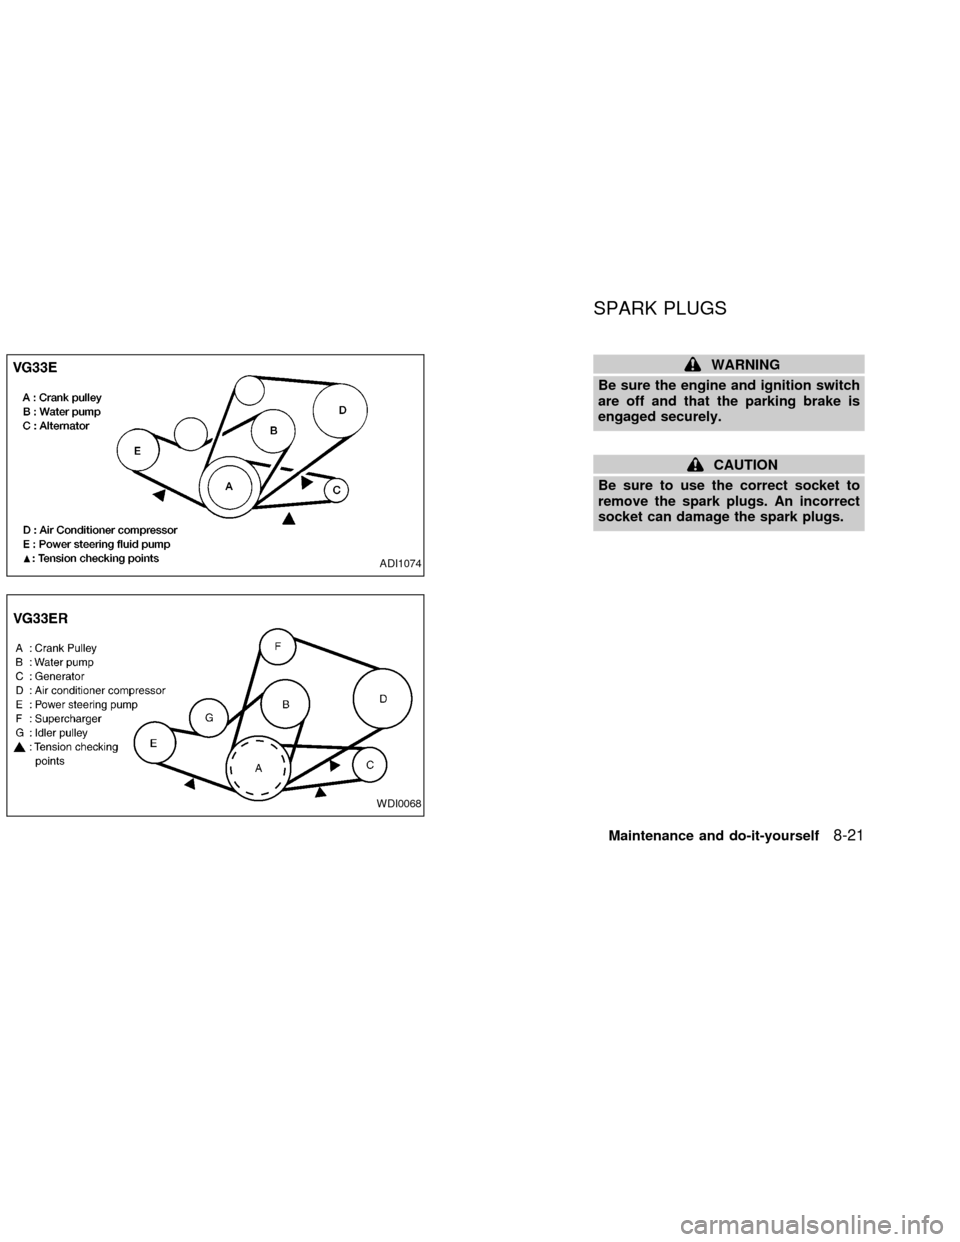
ADI1074
WDI0068
SPARK PLUGS
Maintenance and do-it-yourself8-21
ZX
Page 219 of 273

Replace the battery in the keyfob as follows:
1. Open the lid using a coin.
2.
Replace the battery with a new one.
Recommended battery: Toshiba CR2025
or equivalent.
3. Close the lid securely.
4. Press the LOCK button, then the UN-
LOCK button two or three times to check
the keyfob operation.
If the battery is removed for any reason
other than replacement, perform step 4
above.
cAn improperly disposed battery can
hurt the environment. Always confirm
local regulations for battery disposal.
cThe keyfob is water-resistant; how-
ever, if it does get wet, immediately
wipe completely dry.
cThe operational range of the keyfob
extends to approximately 33 ft (10 m)
from the vehicle. This range may vary
with conditions.
LPD0081
KEYFOB BATTERY
REPLACEMENT
8-30Maintenance and do-it-yourself
ZX
Page 228 of 273
rating and availability. Replacement
tires may have a lower speed rating
than the factory equipped tires, and
may not match the potential maxi-
mum vehicle speed. Never exceed
the maximum speed rating of the
tire.
cFor additional information regarding
tires, refer to ``Important Tire Safety
Information'' in the Warranty Infor-
mation Booklet (US) or ``Tire Safety
Information'' in the Warranty and
Roadside Assistance Information
booklet (Canada).
All season tires
NISSAN specifies All Season tires on some
models to provide good performance for
use all year around, including snowy and icy
road conditions. All Season Tires are iden-
tified by ``ALL SEASON'' and/or ``M&S'' on
the tire sidewall. Snow tires have better
snow traction than All Season tires and may
be more appropriate in some areas.
Summer tires
NISSAN specifies summer tires on some
models to provide superior performance ondry roads. Summer tire performance in
snow and ice will be substantially reduced.
Summer tires do not have the tire traction
rating ``M&S'' on the tire sidewall.
If you plan to operate your vehicle in snowy
or icy conditions, NISSAN recommends the
use of ``SNOW'' or ``ALL SEASON'' tires on
all four wheels.
Snow tires
If snow tires are needed, it is necessary to
select tires equivalent in size and load rating
to the original equipment tires. If you do not,
it can adversely affect the safety and han-
dling of your vehicle.
If you install snow tires, they must be the
same size, brand, construction and tread
pattern on all four wheels.
Generally, snow tires will have lower speed
ratings than factory equipped tires and may
not match the potential maximum vehicle
speed. Never exceed the maximum speed
rating of the tire.
For additional traction on icy roads, studded
tires may be used. However, some U.S.
States and Canadian provinces prohibit
their use. Check local, state and provinciallaws before installing studded tires. Skid
and traction capabilities of studded snow
tires on wet or dry surfaces may be poorer
than that of non-studded snow tires.
TIRE CHAINS
Use of tire chains may be prohibited accord-
ing to location. Check the local laws before
installing tire chains. When installing tire
chains, make sure they are the proper size
for the tires on your vehicle and are installed
according to the chain manufacturer's sug-
gestions.Use only SAE class ``S'' chains.
Other types may damage your vehicle. Use
chain tensioners when recommended by
the tire chain manufacturer to ensure a tight
fit. Loose end links of the tire chain must be
secured or removed to prevent the possibil-
ity of whipping action damage to the fenders
or undercarriage. If possible, avoid fully
loading your vehicle when using tire chains.
In addition, drive at a reduced speed. Oth-
erwise, your vehicle may be damaged
and/or vehicle handling and performance
may be adversely affected.
Never install tire chains on a TEMPORARY
USE ONLY spare tire.
Maintenance and do-it-yourself
8-39
ZX
Page 234 of 273

9 Technical and consumer information
Capacities and recommended fuel/lubricants ........9-2
Fuel recommendation ........................................9-4
Engine oil and oil filter recommendation ...........9-6
Recommended SAE viscosity number ..............9-7
Air conditioner system refrigerant and
lubricant recommendations ...............................9-8
Specifications .........................................................9-9
Engine ...............................................................9-9
Wheels and tires..............................................9-10
Dimensions and weights .................................9-11
When traveling or registering your vehicle in
another country ....................................................9-12
Vehicle identification ............................................9-12
Vehicle identification number (VIN)
plate .................................................................9-12
Vehicle identification number
(chassis number) .............................................9-12
Engine serial number ......................................9-13
F.M.V.S.S. certification label ...........................9-13
Emission control information label ..................9-14
Tire placard......................................................9-14
Air conditioner specification label ....................9-14Installing front license plate..................................9-15
Vehicle loading information ..................................9-15
Terms...............................................................9-15
Determining vehicle payload capacity .............9-16
Securing the load ............................................9-16
Loading tips .....................................................9-17
Truck-camper loading information........................9-17
Payload weight capacity ..................................9-19
Measurement of weights .................................9-21
Towing a trailer.....................................................9-21
Maximum load limits ........................................9-21
Towing load/specification chart .......................9-23
Towing safety ..................................................9-24
Uniform tire quality grading ..................................9-26
Emission control system warranty .......................9-27
Reporting safety defects (US only) ......................9-28
Readiness for inspection/maintenance (I/M)
test (US only) .......................................................9-28
Owner's manual/service manual order
information ............................................................9-30
In the event of a collision ................................9-31
ZX
Page 249 of 273
cGVWR (Gross Vehicle Weight Rating) þ
maximum total weight (load) limit speci-
fied for the vehicle.
cGAWR (Gross Axle Weight Rating) þ
maximum weight (load) limit specified
for the front or rear axle.
DETERMINING VEHICLE PAY-
LOAD CAPACITY
The payload capacity of this vehicle is de-
termined by weight, not by available cargo
space. For example, a roof rack, bike car-
rier, or similar equipment does not increase
payload carrying capacity of your vehicle.
To determine vehicle payload capacity:
Vehicle weight can be determined by using
a commercial-grade scale, found at places
such as a truck stop, gravel quarry, grain
elevator, or a scrap metal recycling facility.
1) Determine the curb weight of your ve-
hicle.
2) Compare the curb weight amount to the
GVWR specified for your vehicle to de-
termine how much more weight your
vehicle can carry.3) After loading (cargo and passengers),
reweigh your vehicle to determine if ei-
ther GVWR or GAWR for your vehicle is
exceeded. If GVWR is exceeded, re-
move cargo as necessary. If either the
front or rear GAWR is exceeded, shift the
load or remove cargo as necessary.
SECURING THE LOAD
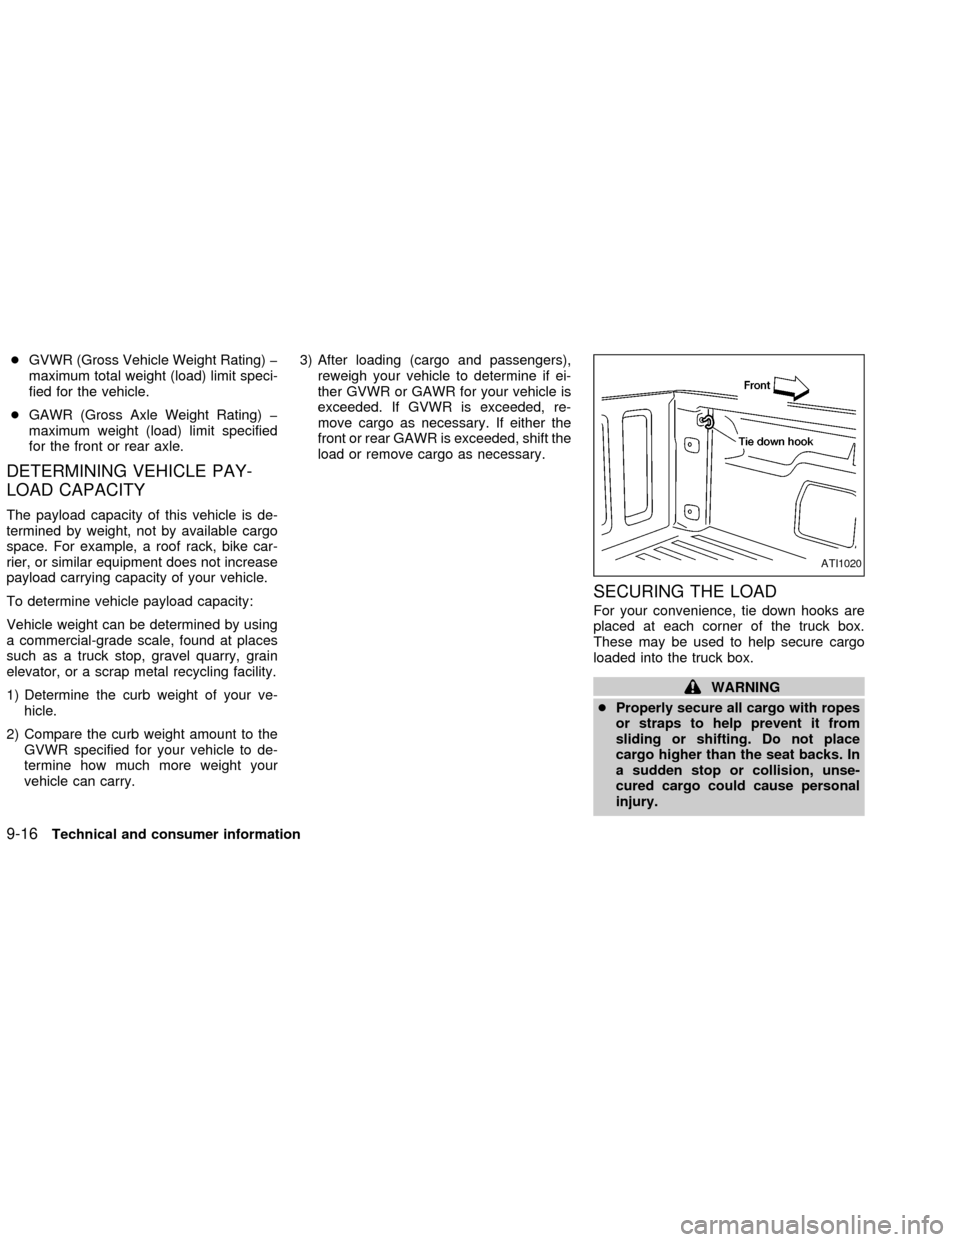
For your convenience, tie down hooks are
placed at each corner of the truck box.
These may be used to help secure cargo
loaded into the truck box.
WARNING
cProperly secure all cargo with ropes
or straps to help prevent it from
sliding or shifting. Do not place
cargo higher than the seat backs. In
a sudden stop or collision, unse-
cured cargo could cause personal
injury.
ATI1020
9-16Technical and consumer information
ZX
Page 250 of 273
cDo not load your vehicle any heavier
than the GVWR or the maximum
front and rear GAWR's. If you do,
parts on your vehicle can break, tire
damage could occur, or it can
change the way your vehicle
handles. This could result in loss of
control and cause personal injury.
CAUTION
Overloading can shorten the life of your
vehicle. Failures caused by overloading
are not covered by your warranty.
LOADING TIPS
cThe GVW must not exceed GVWR or
GAWR as specified on the FMVSS Cer-
tification Label located on the driver's
door jamb pillar.
cDo not load the front and rear axle to the
GAWR. Doing so will exceed the
GVWR.
cLoads should be spread out, and cargo
should be properly secured. Large or
heavy objects should be placed towardthe front of the truck box to help prevent
sliding or shifting.
Crew Cab models:
Crew Cab models should not be used to
carry a slide-in camper.
Regular and King Cab models:
This information is provided for you to prop-
erly install a slide-in camper and is based on
the National Highway Traffic Safety Admin-
istration regulations. It is recommended
that, before installing the camper, you care-
fully read the following information and en-
sure that the camper meets the specifica-
tions.
This information may not apply to some
Canada model vehicles.
Special body vehicles
Some vehicles are equipped with commer-
cial or camper bodies. However, this Own-
er's Manual does not cover these options.
For further information, please refer to the
body manufacturer's instruction manual.
TRUCK-CAMPER LOADING
INFORMATION
Technical and consumer information9-17
ZX