2002 NISSAN FRONTIER lights
[x] Cancel search: lightsPage 192 of 273

During the normal day-to-day operation of
the vehicle, general maintenance should be
performed regularly as prescribed in this
section. If you detect any unusual sounds,
vibrations or smells, be sure to check for the
cause or have an authorized NISSAN
dealer do it promptly. In addition, you should
notify an authorized NISSAN dealer if you
think that repairs are required.
When performing any checks or mainte-
nance work, closely observe the precau-
tions in this ``Maintenance and do-it-
yourself'' section of this manual.
EXPLANATION OF GENERAL
MAINTENANCE ITEMS
Additional information on the following
items with an ``*'' is found later in this
section.
EXTERIOR MAINTENANCE
Outside the vehicle
The maintenance items listed here should
be performed from time to time, unless
otherwise specified.
Tires*Check the pressure with a gauge at
least once a month and always prior to longdistance trips, including the spare, and ad-
just to the specified pressure if necessary.
Check carefully for damage, cuts or exces-
sive wear.
Wheel nuts*When checking the tires, make
sure no wheel nuts are missing, and check for
any loose wheel nuts. Tighten if necessary.
Tire rotation*Tires should be rotated every
7,500 miles (12,000 km).
Wheel alignment and balanceIf the ve-
hicle should pull to either side while driving
on a straight and level road, or if you detect
uneven or abnormal tire wear, there may be
a need for wheel alignment.
If the steering wheel or seat vibrates at
normal highway speeds, wheel balancing
may be needed.
For additional information regarding tires,
refer to ``Important Tire Safety Information''
in the Warranty Information Booklet (US) or
``Tire Safety Information'' in the Warranty
and Roadside Assistance Information book-
let (Canada).
WindshieldClean the windshield on a
regular basis. Check the windshield every
six months for cracks or other damage.Have a damaged windshield repaired by a
qualified repair facility.
Windshield wiper blades*Check for
cracks or wear if they do not wipe properly.
Doors, hood and tailgateCheck that the
doors, hood and tailgate operate properly.
Also ensure that all latches lock securely.
Lubricate hinges, latches, latch pins, rollers
and links as necessary. Make sure that the
secondary latch keeps the hood from open-
ing when the primary latch is released.
When driving in areas using road salt or
other corrosive materials, check lubrication
frequently.
Lights*Clean the headlights on a regular
basis. Make sure that the headlights, stop
lights, tail lights, turn signal lights, and other
lights are all operating properly and installed
securely. Also check headlight aim.
INTERIOR MAINTENANCE
The maintenance items listed here should
be checked on a regular basis, such as
when performing periodic maintenance,
cleaning the vehicle, etc.
GENERAL MAINTENANCE
Maintenance and do-it-yourself8-3
ZX
Page 193 of 273

Additional information on the following
items with an ``*'' is found later in this
section.
Warning lights and chimesMake sure all
warning lights and chimes are operating
properly.
Windshield wiper and washer*Check that
the wipers and washer operate properly and
that the wipers do not streak.
Windshield defrosterCheck that the air
comes out of the defroster outlets properly
and in sufficient quantity when operating the
heater or air conditioner.
Steering wheelCheck for changes in the
steering conditions, such as excessive free-
play, hard steering or strange noises.
SeatsCheck seat position controls such as
seat adjusters, seatback recliner, etc. to
ensure they operate smoothly and all
latches lock securely in every position.
Check that the head restraints move up and
down smoothly and the locks (if so
equipped) hold securely in all latched posi-
tions.
Seat beltsCheck that all parts of the seat
belt system (e.g., buckles, anchors, adjust-ers and retractors) operate properly and
smoothly, and are installed securely. Check
the belt webbing for cuts, fraying, wear or
damage.
Accelerator pedalCheck the pedal for
smooth operation and make sure the pedal
does not catch or require uneven effort.
Keep the floor mat away from the pedal.
Clutch pedal*Make sure the pedal oper-
ates smoothly and check that it has the
proper free travel.
BrakesCheck that the brakes do not pull
the vehicle to one side when applied.
Brake pedal and booster*Check the pedal
for smooth operation and make sure it has
the proper distance under it when de-
pressed fully. Check the brake booster func-
tion. Be certain to keep the floor mat away
from the pedal.
Parking brake*Check that the lever has
the proper travel and confirm that your
vehicle is held securely on a fairly steep hill
with only the parking brake applied.
Automatic transmission P (Park) posi-
tion mechanismCheck that the lock re-
lease button on the selector lever operatesproperly and smoothly. On a fairly steep hill
check that your vehicle is held securely with
the selector lever in the P position without
applying any brakes.
Under the hood and vehicle
The maintenance items listed here should
be checked periodically (e.g., each time you
check the engine oil or refuel).
Additional information on the following
items with an ``*'' is found later in this
section.
Windshield washer fluid*Check that there
is adequate fluid in the reservoir.
Engine oil level*Check the level after
parking the vehicle on a level surface with
the engine off. Wait a few minutes for the oil
to drain back into the oil pan.
Brake and clutch fluid levels*Make sure
that the brake and clutch fluid level is be-
tween the MIN and MAX lines on the reser-
voir.
Power steering fluid level* and lines
Check the level when the fluid is cold, with
the engine off. Check the lines for proper
attachment, leaks, cracks, etc.
8-4Maintenance and do-it-yourself
ZX
Page 220 of 273
FCC Notice:
Changes or modification not expressly
approved by the manufacturer for com-
pliance could void the user's authority to
operate the equipment.
This device complies with part 15 of the
FCC Rules and RSS-210 of Industry
Canada.
Operation is subject to the following two
conditions: (1) This device may not
cause harmful interference, and (2) this
device must accept any interference re-
ceived including interference that may
cause undesired operation of the device.HEADLIGHTS
The headlight is a semi-sealed beam type
which uses a replaceable headlight (halo-
gen) bulb. A bulb can be replaced from
inside the engine compartment without re-
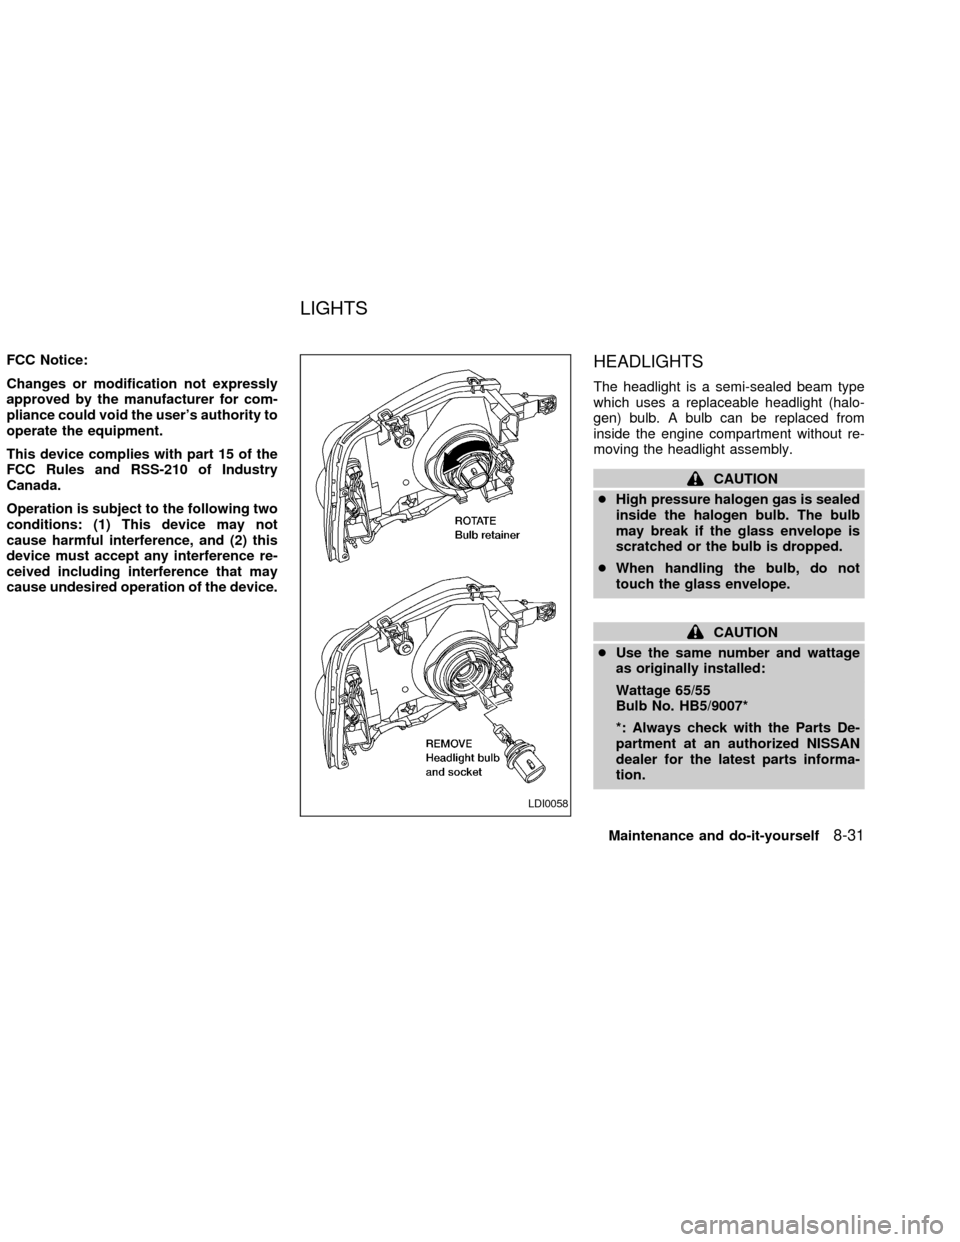
moving the headlight assembly.
CAUTION
cHigh pressure halogen gas is sealed
inside the halogen bulb. The bulb
may break if the glass envelope is
scratched or the bulb is dropped.
cWhen handling the bulb, do not
touch the glass envelope.
CAUTION
cUse the same number and wattage
as originally installed:
Wattage 65/55
Bulb No. HB5/9007*
*: Always check with the Parts De-
partment at an authorized NISSAN
dealer for the latest parts informa-
tion.
LDI0058
LIGHTS
Maintenance and do-it-yourself8-31
ZX
Page 221 of 273
cAiming is not necessary after replac-
ing the bulb. When aiming adjust-
ment is necessary, contact an autho-
rized NISSAN dealer.
cDo not leave the bulb out of the
headlight reflector for a long period
of time as dust, moisture, and smoke
may enter the headlight body and
affect the performance of the head-
light.
Replacing the headlight bulb
1. Open the hood.
2. Disconnect the negative (2) battery
cable.
3 Disconnect the electrical connector from
the rear end of the bulb.
4. Turn the bulb retaining ring counterclock-
wise until it is free from the headlamp
reflector and then remove it.
5. Carefully remove the headlight bulb. Do
not shake or rotate the bulb when remov-
ing it.
DO NOT TOUCH THE BULB.6. Install the new bulb in the reverse order
of removal.
cBe sure the lip of the bulb socket
contacts the headlight body.
Adjusting the headlight aim
Before performing aiming adjustment, make
sure of the following:
a. Use an aiming wall screen.
b. Keep all of the tires inflated to the correct
pressure.
c. Place the vehicle and screen on level
ground.
d. See that the vehicle is unloaded (except
for full levels of coolant, engine oil and
fuel, and that the spare tire, jack, and
tools are stored). Have the driver or an
equivalent weight placed in the driver's
seat.
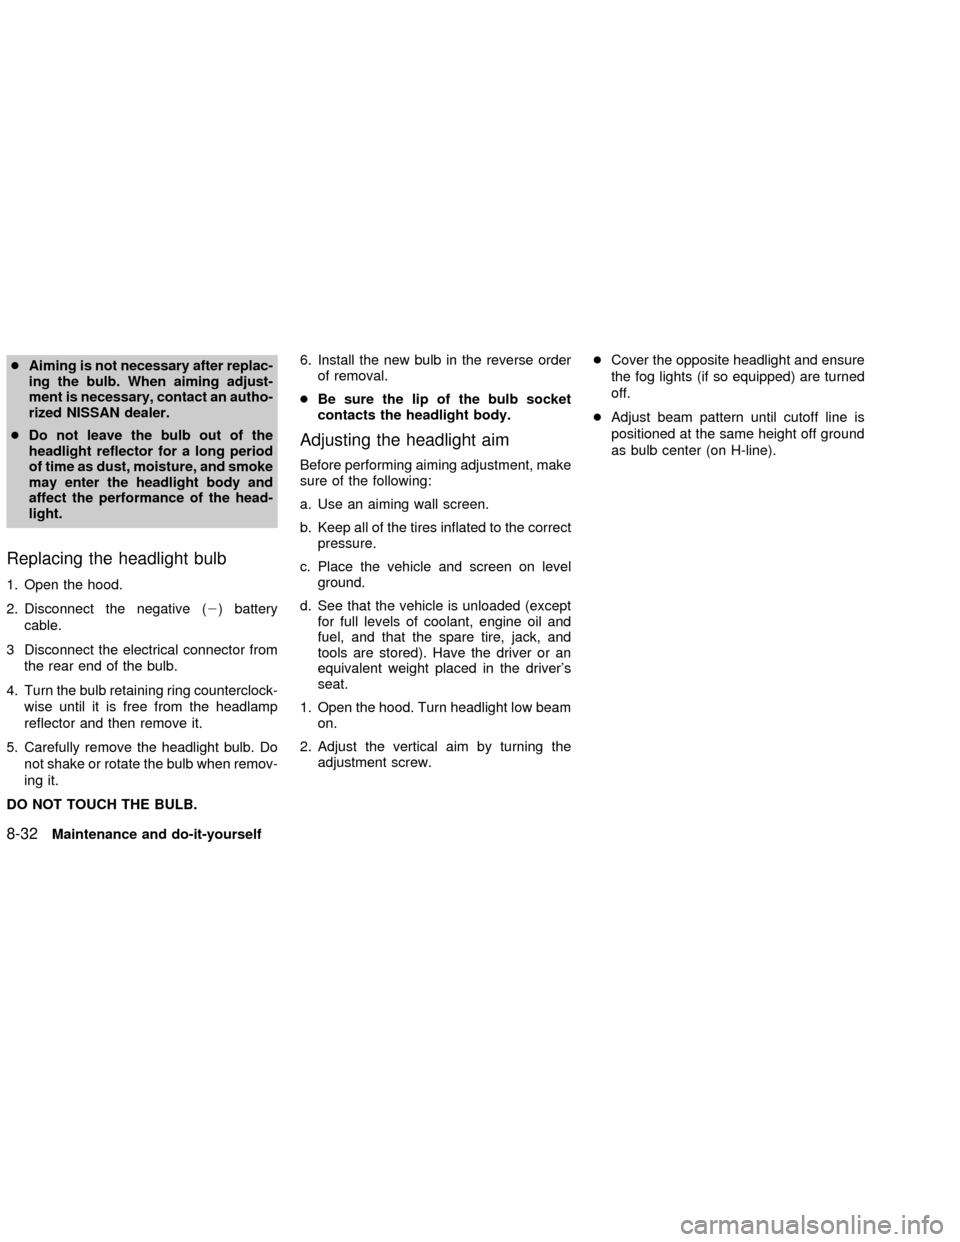
1. Open the hood. Turn headlight low beam
on.
2. Adjust the vertical aim by turning the
adjustment screw.cCover the opposite headlight and ensure
the fog lights (if so equipped) are turned
off.
cAdjust beam pattern until cutoff line is
positioned at the same height off ground
as bulb center (on H-line).
8-32Maintenance and do-it-yourself
ZX
Page 223 of 273
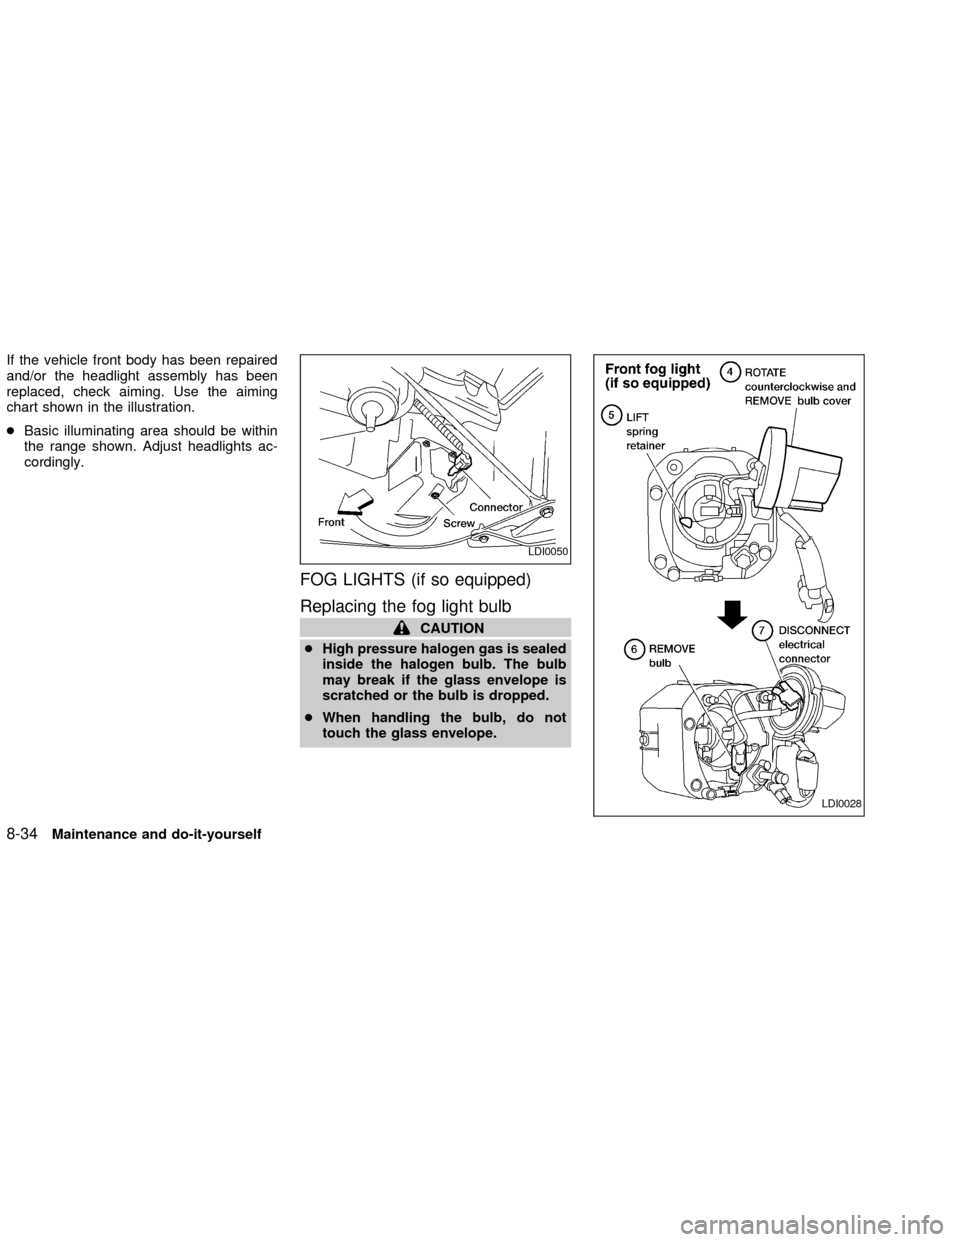
If the vehicle front body has been repaired
and/or the headlight assembly has been
replaced, check aiming. Use the aiming
chart shown in the illustration.
cBasic illuminating area should be within
the range shown. Adjust headlights ac-
cordingly.
FOG LIGHTS (if so equipped)
Replacing the fog light bulb
CAUTION
cHigh pressure halogen gas is sealed
inside the halogen bulb. The bulb
may break if the glass envelope is
scratched or the bulb is dropped.
cWhen handling the bulb, do not
touch the glass envelope.
LDI0050
LDI0028
8-34Maintenance and do-it-yourself
ZX
Page 224 of 273
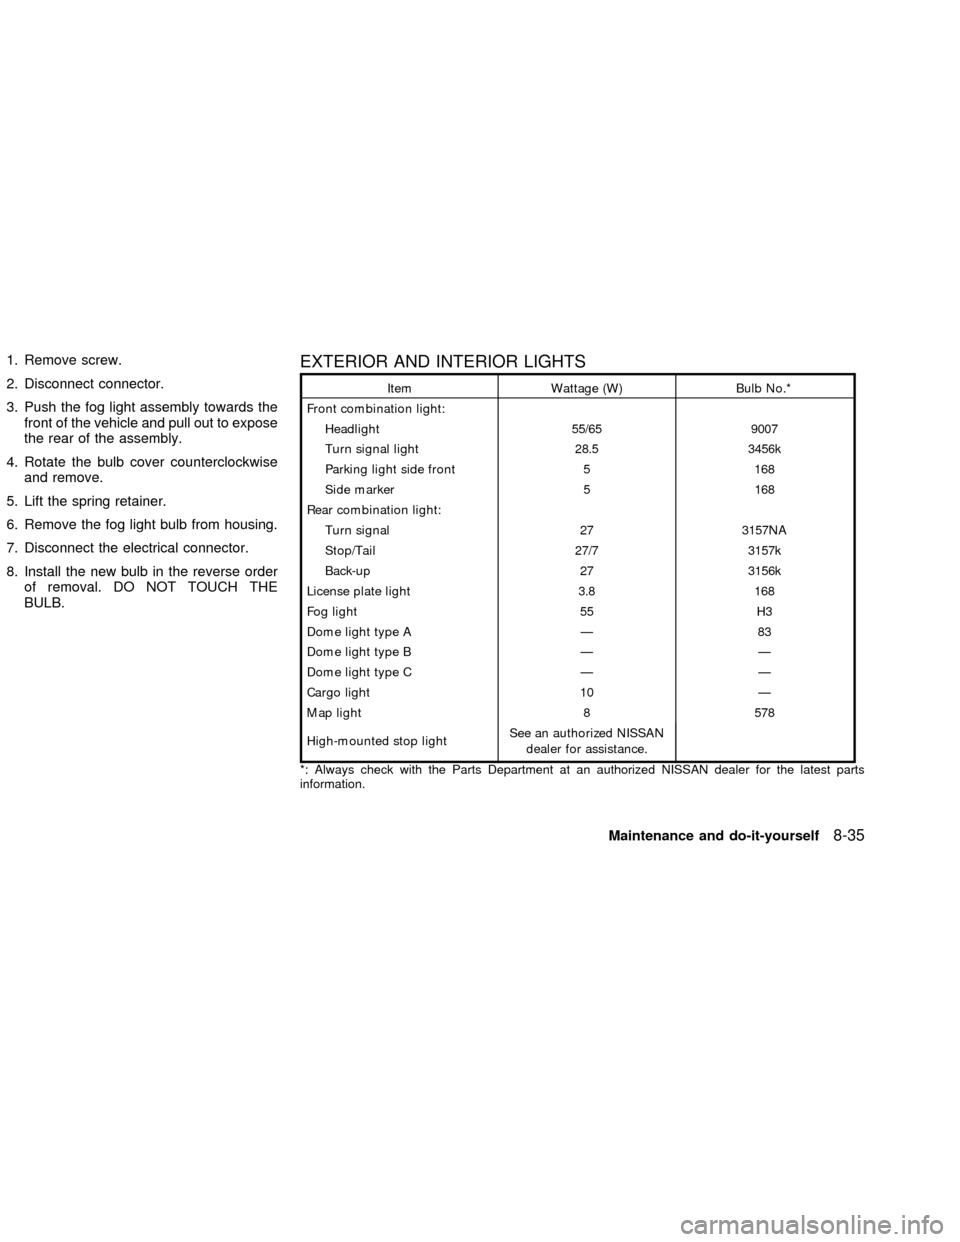
1. Remove screw.
2. Disconnect connector.
3. Push the fog light assembly towards the
front of the vehicle and pull out to expose
the rear of the assembly.
4. Rotate the bulb cover counterclockwise
and remove.
5. Lift the spring retainer.
6. Remove the fog light bulb from housing.
7. Disconnect the electrical connector.
8. Install the new bulb in the reverse order
of removal. DO NOT TOUCH THE
BULB.EXTERIOR AND INTERIOR LIGHTS
Item Wattage (W) Bulb No.*
Front combination light:
Headlight 55/65 9007
Turn signal light 28.5 3456k
Parking light side front 5 168
Side marker 5 168
Rear combination light:
Turn signal 27 3157NA
Stop/Tail 27/7 3157k
Back-up 27 3156k
License plate light 3.8 168
Fog light 55 H3
Dome light type A Ð 83
Dome light type B Ð Ð
Dome light type C Ð Ð
Cargo light 10 Ð
Map light 8 578
High-mounted stop lightSee an authorized NISSAN
dealer for assistance.
*: Always check with the Parts Department at an authorized NISSAN dealer for the latest parts
information.
Maintenance and do-it-yourself8-35
ZX
Page 225 of 273

Replacement procedures
All other lights are either type A, B, C or D.
When replacing a bulb, first remove the lens
and/or cover.
ADI1123
8-36Maintenance and do-it-yourself
ZX
Page 257 of 273
TOWING SAFETY
Trailer hitch
Check the towing capacity of your bumper
hitch or receiver-type frame mounted hitch.
Choose a proper hitch for your vehicle and
trailer. A genuine Nissan trailer hitch is
available from your NISSAN dealer. Make
sure the trailer hitch is securely attached to
the vehicle to help avoid personal injury or
property damage due to sway caused by
crosswinds, rough road surfaces or passing
trucks.
CAUTION
cSpecial hitches which include frame
reinforcements are required for tow-
ing above 2,000 lb (907 kg). Suitable
genuine NISSAN hitches for pickup
trucks and sport utility vehicles are
available at an authorized NISSAN
dealer.
cThe hitch should not be attached to
or affect the operation of the impact-
absorbing bumper.
cDo not use axle-mounted hitches.cDo not modify the vehicle exhaust
system, brake system, etc. to install
a trailer hitch.
cTo reduce the possibility of addi-
tional damage if your vehicle is
struck from the rear, where practical,
remove the hitch and/or receiver
when not in use. Remove receiver
when not in use. After the hitch is
removed, seal the bolt holes to pre-
vent exhaust fumes, water or dust
from entering the passenger com-
partment.
cRegularly check that all trailer hitch
mounting bolts are securely
mounted.
Tire pressures
cWhen towing a trailer, inflate the vehicle
tires to the recommended cold tire pres-
sure indicated on the tire placard (af-
fixed to the inside of the glove box lid).
cTrailer tire condition, size, load rating
and proper inflation pressure should be
in accordance with the trailer and tire
manufacturers' specifications.
Safety chain
Always use suitable safety chains between
your vehicle and the trailer. Safety chains
should be crossed and should be attached
to the hitch, not to the vehicle bumper or
axle. Be sure to leave enough slack in the
chain to permit turning corners.
Trailer lights
Trailer lights should comply with Federal
and/or local regulations. For assistance in
hooking up trailer lights, contact an autho-
rized NISSAN dealer.
Trailer brakes
If your trailer is equipped with a braking
system, make sure it conforms to Federal
and/or local regulations and that it is prop-
erly installed.
WARNING
Never connect a trailer brake system
directly to the vehicle brake system.
Pre-towing tips
cBe certain your vehicle maintains a level
position when a loaded and/or unloaded
9-24Technical and consumer information
ZX