2002 NISSAN FRONTIER warning
[x] Cancel search: warningPage 229 of 273
Tire chains must be installed only on the
rear wheels and not on the front wheels.
Do not use tire chains on dry roads. Driving
with chains in such conditions can cause
damage to the various mechanisms of the
vehicle due to some overstress. When driv-
ing on clear paved roads, be sure to change
to 2WD.
CHANGING WHEELS AND TIRES
Tire rotation
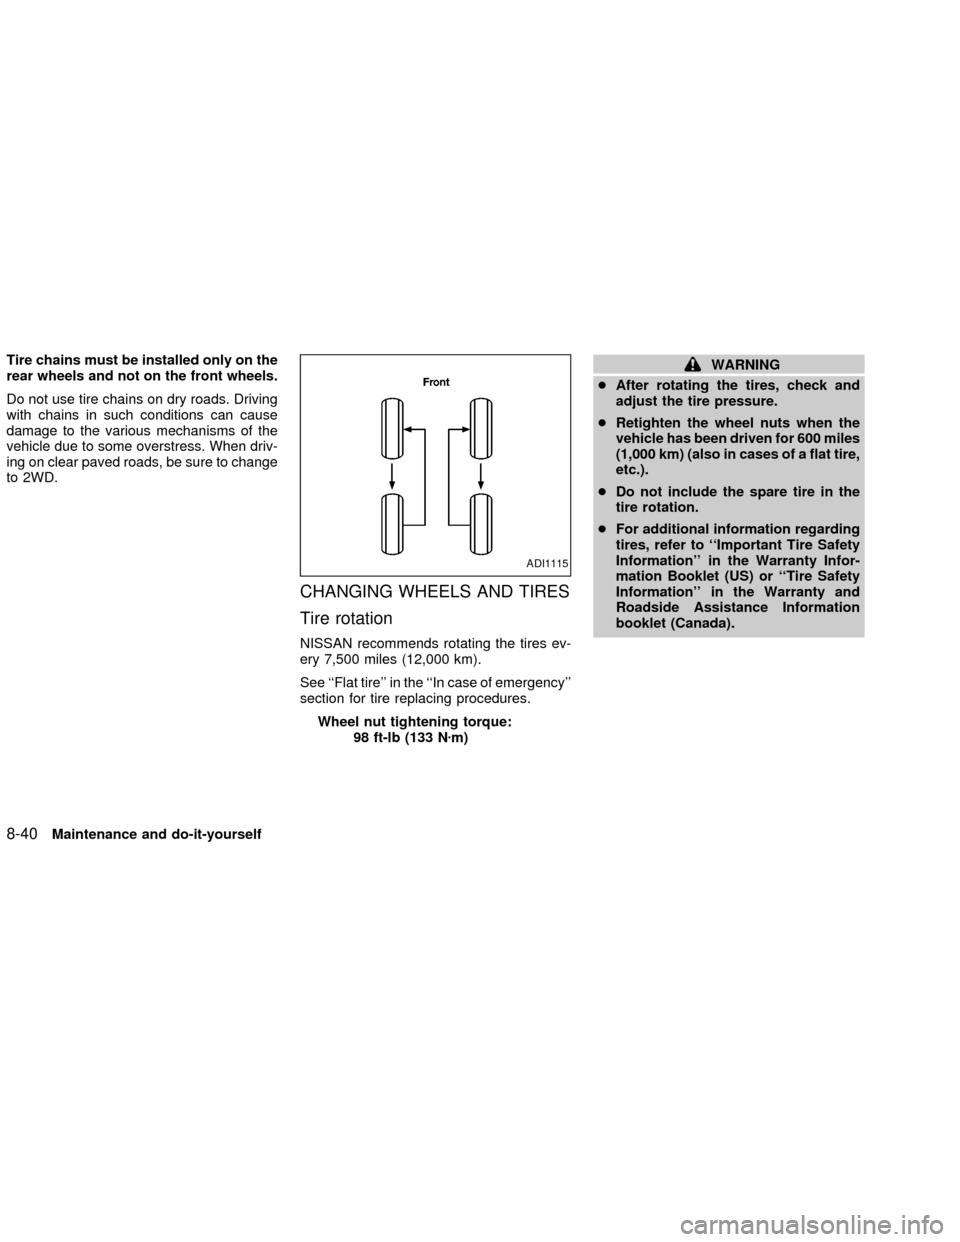
NISSAN recommends rotating the tires ev-
ery 7,500 miles (12,000 km).
See ``Flat tire'' in the ``In case of emergency''
section for tire replacing procedures.
Wheel nut tightening torque:
98 ft-lb (133 Nzm)
WARNING
cAfter rotating the tires, check and
adjust the tire pressure.
cRetighten the wheel nuts when the
vehicle has been driven for 600 miles
(1,000 km) (also in cases of a flat tire,
etc.).
cDo not include the spare tire in the
tire rotation.
cFor additional information regarding
tires, refer to ``Important Tire Safety
Information'' in the Warranty Infor-
mation Booklet (US) or ``Tire Safety
Information'' in the Warranty and
Roadside Assistance Information
booklet (Canada).
ADI1115
8-40Maintenance and do-it-yourself
ZX
Page 230 of 273
Tire wear and damage
WARNING
cTires should be periodically in-
spected for wear, cracking, bulging
or objects caught in the tread. If
excessive wear, cracks, bulging or
deep cuts are found, the tire(s)
should be replaced.
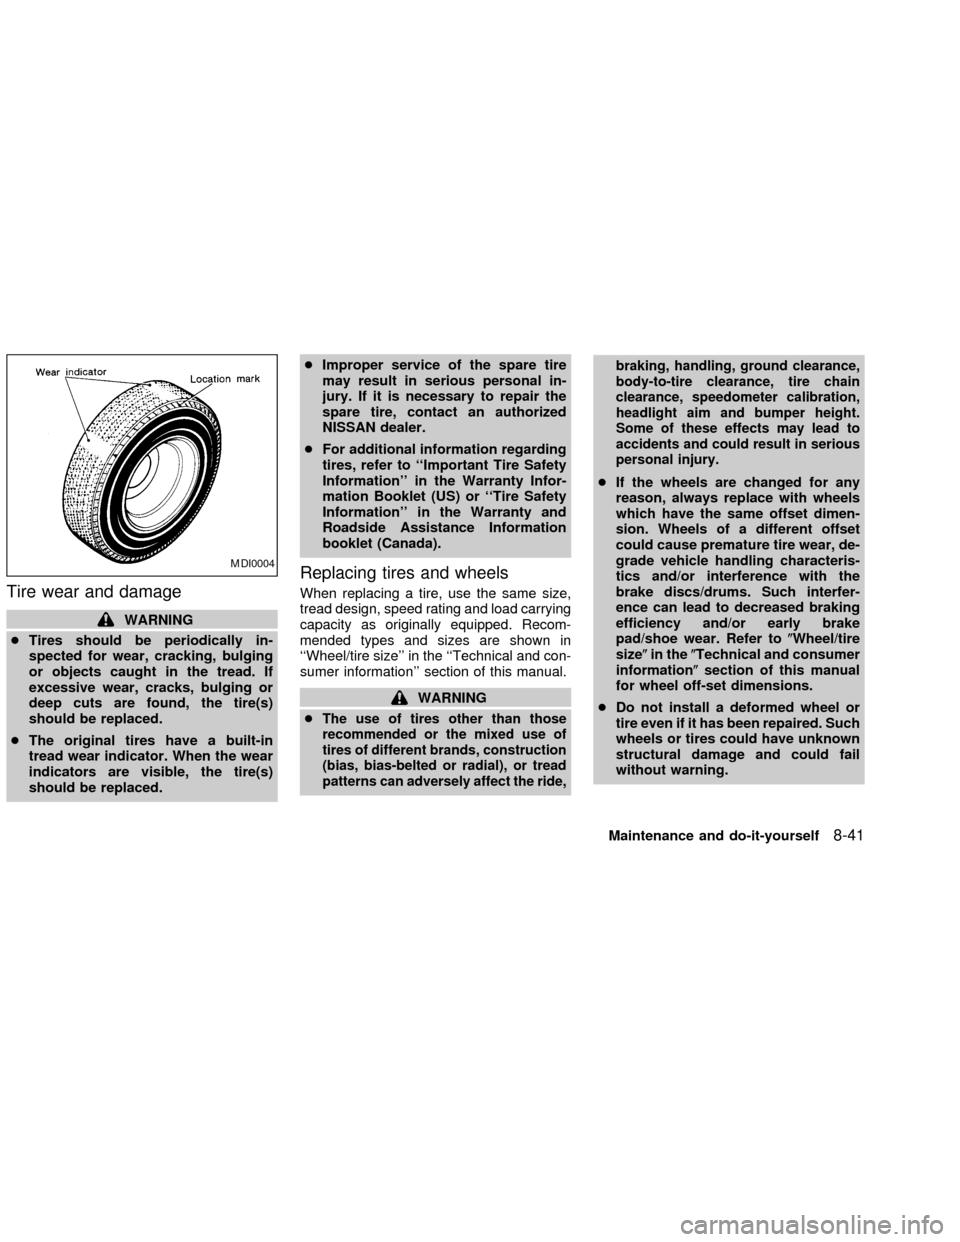
cThe original tires have a built-in
tread wear indicator. When the wear
indicators are visible, the tire(s)
should be replaced.cImproper service of the spare tire
may result in serious personal in-
jury. If it is necessary to repair the
spare tire, contact an authorized
NISSAN dealer.
cFor additional information regarding
tires, refer to ``Important Tire Safety
Information'' in the Warranty Infor-
mation Booklet (US) or ``Tire Safety
Information'' in the Warranty and
Roadside Assistance Information
booklet (Canada).
Replacing tires and wheels
When replacing a tire, use the same size,
tread design, speed rating and load carrying
capacity as originally equipped. Recom-
mended types and sizes are shown in
``Wheel/tire size'' in the ``Technical and con-
sumer information'' section of this manual.
WARNING
c
The use of tires other than those
recommended or the mixed use of
tires of different brands, construction
(bias, bias-belted or radial), or tread
patterns can adversely affect the ride,braking, handling, ground clearance,
body-to-tire clearance, tire chain
clearance, speedometer calibration,
headlight aim and bumper height.
Some of these effects may lead to
accidents and could result in serious
personal injury.
cIf the wheels are changed for any
reason, always replace with wheels
which have the same offset dimen-
sion. Wheels of a different offset
could cause premature tire wear, de-
grade vehicle handling characteris-
tics and/or interference with the
brake discs/drums. Such interfer-
ence can lead to decreased braking
efficiency and/or early brake
pad/shoe wear. Refer to(Wheel/tire
size(in the(Technical and consumer
information(section of this manual
for wheel off-set dimensions.
cDo not install a deformed wheel or
tire even if it has been repaired. Such
wheels or tires could have unknown
structural damage and could fail
without warning.
MDI0004
Maintenance and do-it-yourself8-41
ZX
Page 231 of 273
cThe use of retread tires is not recom-
mended.
cFor additional information regarding
tires, refer to ``Important Tire Safety
Information'' in the Warranty Infor-
mation Booklet (US) or ``Tire Safety
Information'' in the Warranty and
Roadside Assistance Information
booklet (Canada).
Four-wheel drive models
CAUTION
Always use tires of the same size,
brand, construction (bias, bias-belted
or radial), and tread pattern on all four
wheels. Failure to do so may result in a
circumference difference between tires
on the front and rear axles which will
cause excessive tire wear and may
damage the transmission, transfer
case and differential gears.
If excessive tire wear is found, it is recom-
mended that all four tires be replaced with
tires of the same size, brand, construction
and tread pattern. The tire pressure andwheel alignment should also be checked
and corrected as necessary. Contact an
authorized NISSAN dealer.
Wheel balance
Unbalanced wheels may affect vehicle han-
dling and tire life. Even with regular use,
wheels can get out of balance. Therefore,
they should be balanced as required.
Wheel balance service should be performed
with the wheels off the vehicle. Spin balanc-
ing the front wheels on the vehicle could
lead to transmission damage.
cFor additional information regarding tires,
refer to ``Important Tire Safety Informa-
tion'' in the Warranty Information Booklet
(US) or ``Tire Safety Information'' in the
Warranty and Roadside Assistance Infor-
mation booklet (Canada).
Care of wheels
cWash the wheels when washing the ve-
hicle to maintain their appearance.
cClean the inner side of the wheels when
the wheel is changed or the underside of
the vehicle is washed.cDo not use abrasive cleaners when
washing the wheels.
cInspect wheel rims regularly for dents or
corrosion. This may cause loss of pres-
sure or damage the tire bead.
cNISSAN recommends waxing the road
wheels to protect against road salt in
areas where it is used during winter.
Spare tire (TEMPORARY USE
ONLY)
Your vehicle may be equipped with a TEM-
PORARY USE ONLY spare tire.
To avoid property damage or personal injury
when using the TEMPORARY USE ONLY
spare tire, observe the following cautions:
WARNING
cThe spare tire should be used for
emergency use only. It should be
replaced with the standard tire at the
first opportunity to avoid possible
tire or differential damage.
cDrive carefully while the TEMPO-
RARY USE ONLY spare tire is in-
stalled. Avoid sharp turns and
abrupt braking while driving.
8-42Maintenance and do-it-yourself
ZX
Page 248 of 273
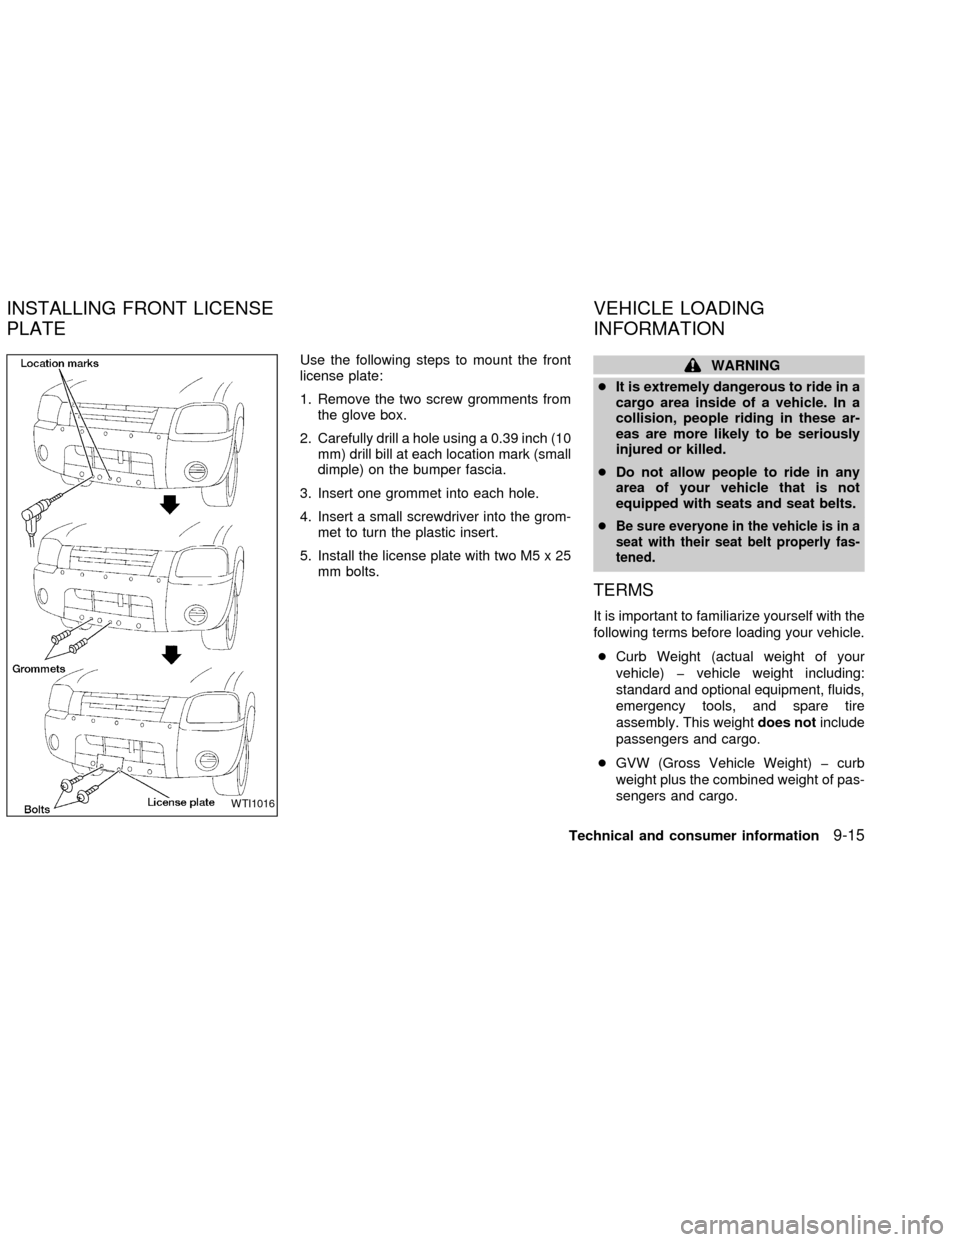
Use the following steps to mount the front
license plate:
1. Remove the two screw gromments from
the glove box.
2. Carefully drill a hole using a 0.39 inch (10
mm) drill bill at each location mark (small
dimple) on the bumper fascia.
3. Insert one grommet into each hole.
4. Insert a small screwdriver into the grom-
met to turn the plastic insert.
5. Install the license plate with two M5 x 25
mm bolts.WARNING
cIt is extremely dangerous to ride in a
cargo area inside of a vehicle. In a
collision, people riding in these ar-
eas are more likely to be seriously
injured or killed.
cDo not allow people to ride in any
area of your vehicle that is not
equipped with seats and seat belts.
c
Be sure everyone in the vehicle is in a
seat with their seat belt properly fas-
tened.
TERMS
It is important to familiarize yourself with the
following terms before loading your vehicle.
cCurb Weight (actual weight of your
vehicle) þ vehicle weight including:
standard and optional equipment, fluids,
emergency tools, and spare tire
assembly. This weightdoes notinclude
passengers and cargo.
cGVW (Gross Vehicle Weight) þ curb
weight plus the combined weight of pas-
sengers and cargo.
WTI1016
INSTALLING FRONT LICENSE
PLATEVEHICLE LOADING
INFORMATION
Technical and consumer information9-15
ZX
Page 249 of 273
cGVWR (Gross Vehicle Weight Rating) þ
maximum total weight (load) limit speci-
fied for the vehicle.
cGAWR (Gross Axle Weight Rating) þ
maximum weight (load) limit specified
for the front or rear axle.
DETERMINING VEHICLE PAY-
LOAD CAPACITY
The payload capacity of this vehicle is de-
termined by weight, not by available cargo
space. For example, a roof rack, bike car-
rier, or similar equipment does not increase
payload carrying capacity of your vehicle.
To determine vehicle payload capacity:
Vehicle weight can be determined by using
a commercial-grade scale, found at places
such as a truck stop, gravel quarry, grain
elevator, or a scrap metal recycling facility.
1) Determine the curb weight of your ve-
hicle.
2) Compare the curb weight amount to the
GVWR specified for your vehicle to de-
termine how much more weight your
vehicle can carry.3) After loading (cargo and passengers),
reweigh your vehicle to determine if ei-
ther GVWR or GAWR for your vehicle is
exceeded. If GVWR is exceeded, re-
move cargo as necessary. If either the
front or rear GAWR is exceeded, shift the
load or remove cargo as necessary.
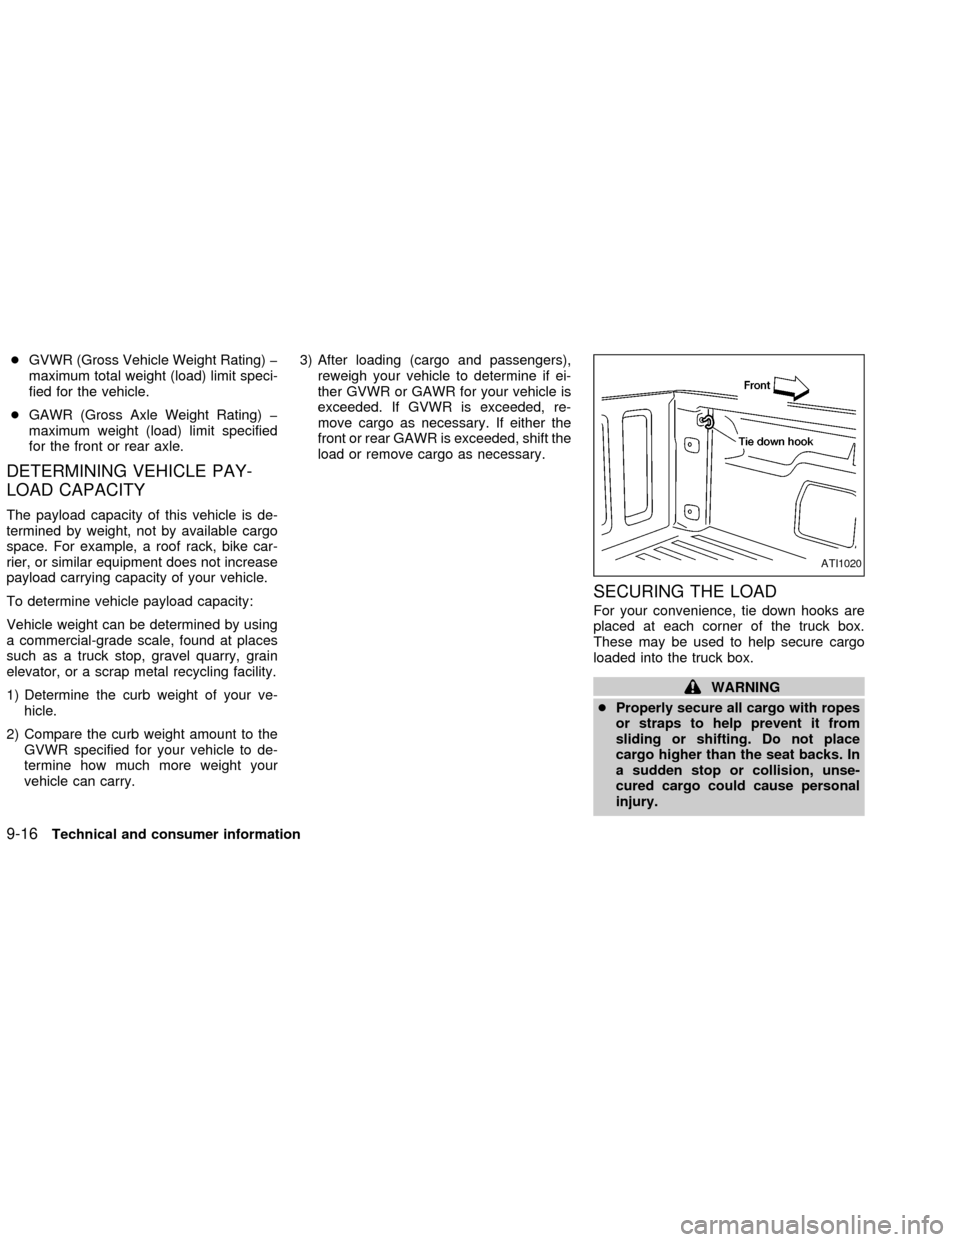
SECURING THE LOAD
For your convenience, tie down hooks are
placed at each corner of the truck box.
These may be used to help secure cargo
loaded into the truck box.
WARNING
cProperly secure all cargo with ropes
or straps to help prevent it from
sliding or shifting. Do not place
cargo higher than the seat backs. In
a sudden stop or collision, unse-
cured cargo could cause personal
injury.
ATI1020
9-16Technical and consumer information
ZX
Page 251 of 273
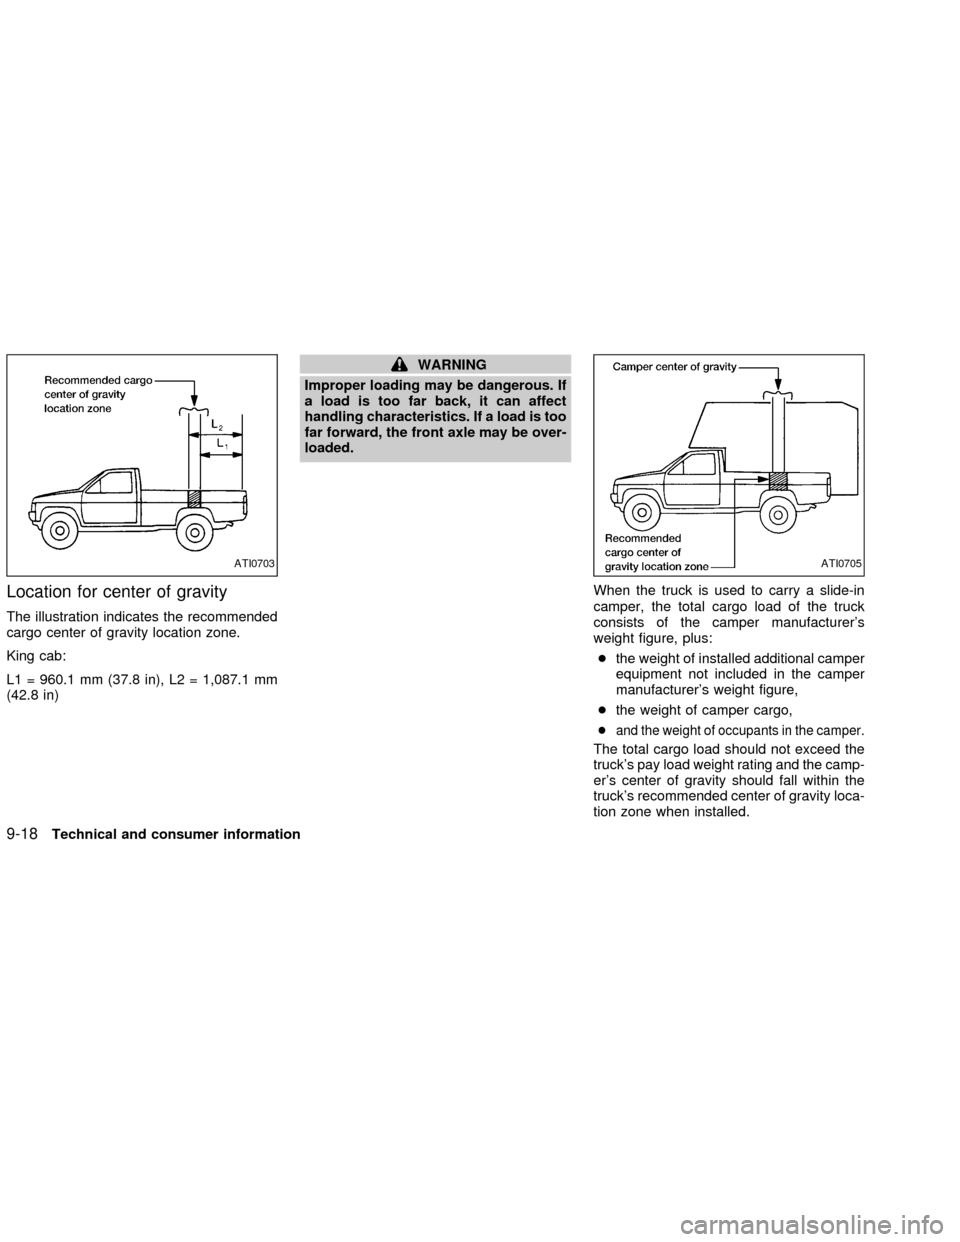
Location for center of gravity
The illustration indicates the recommended
cargo center of gravity location zone.
King cab:
L1 = 960.1 mm (37.8 in), L2 = 1,087.1 mm
(42.8 in)
WARNING
Improper loading may be dangerous. If
a load is too far back, it can affect
handling characteristics. If a load is too
far forward, the front axle may be over-
loaded.
When the truck is used to carry a slide-in
camper, the total cargo load of the truck
consists of the camper manufacturer's
weight figure, plus:
cthe weight of installed additional camper
equipment not included in the camper
manufacturer's weight figure,
cthe weight of camper cargo,
cand the weight of occupants in the camper.
The total cargo load should not exceed the
truck's pay load weight rating and the camp-
er's center of gravity should fall within the
truck's recommended center of gravity loca-
tion zone when installed.
ATI0703ATI0705
9-18Technical and consumer information
ZX
Page 252 of 273
WARNING
Overloading or improper loading can
adversely affect vehicle handling, brak-
ing and performance and may lead to
accidents.
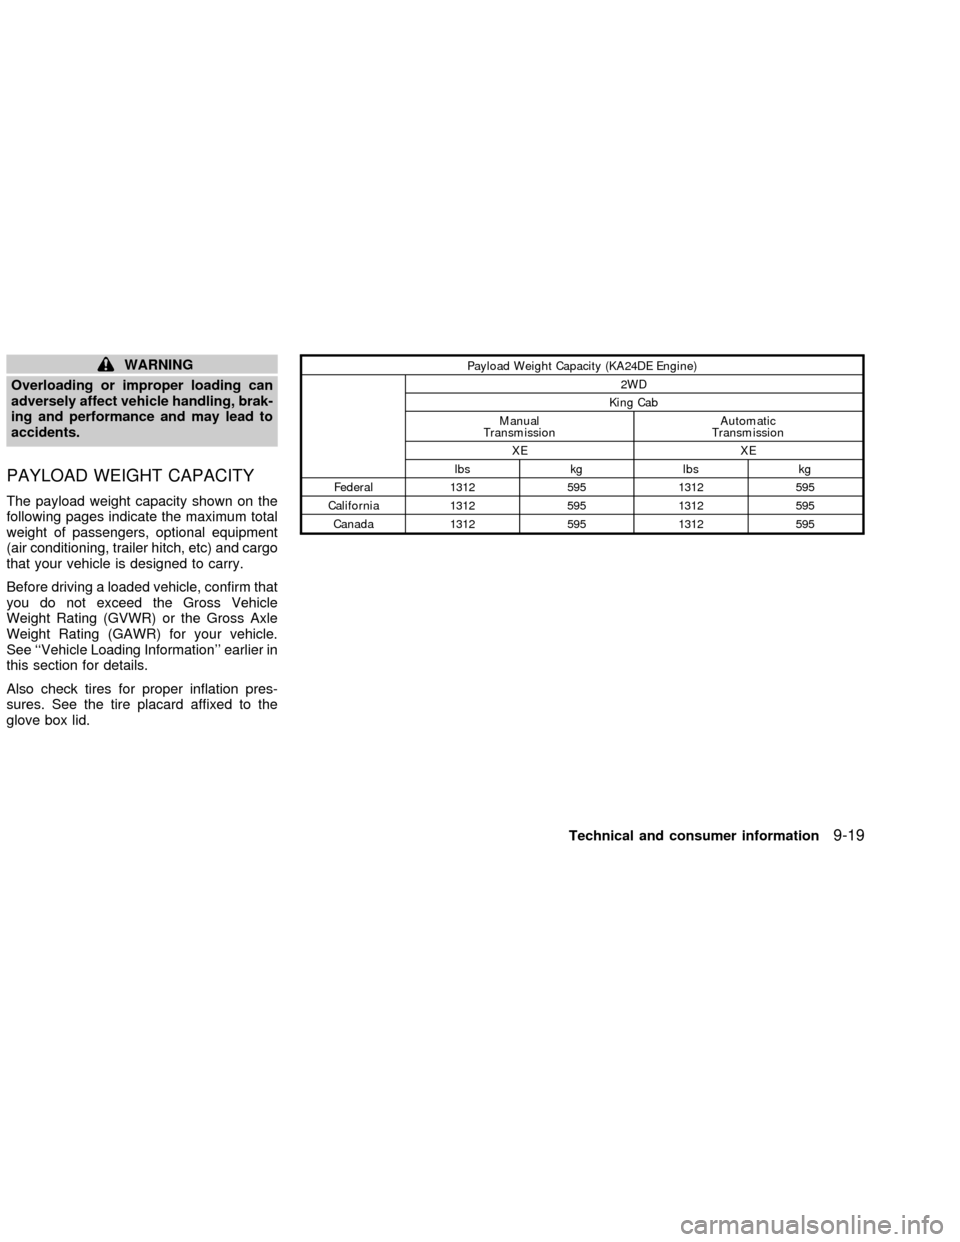
PAYLOAD WEIGHT CAPACITY
The payload weight capacity shown on the
following pages indicate the maximum total
weight of passengers, optional equipment
(air conditioning, trailer hitch, etc) and cargo
that your vehicle is designed to carry.
Before driving a loaded vehicle, confirm that
you do not exceed the Gross Vehicle
Weight Rating (GVWR) or the Gross Axle
Weight Rating (GAWR) for your vehicle.
See ``Vehicle Loading Information'' earlier in
this section for details.
Also check tires for proper inflation pres-
sures. See the tire placard affixed to the
glove box lid.
Payload Weight Capacity (KA24DE Engine)
2WD
King Cab
Manual
TransmissionAutomatic
Transmission
XE XE
lbs kg lbs kg
Federal 1312 595 1312 595
California 1312 595 1312 595
Canada 1312 595 1312 595
Technical and consumer information9-19
ZX
Page 255 of 273
steep grades or in low traction situations (for
example, on slippery boat ramps).
WARNING
Vehicle damage and/or personal injury
resulting from improper towing proce-
dures are not covered by NISSAN war-
ranties. A NISSAN Trailer Towing Guide
(U.S. only) containing information on
trailer towing ability and the special
equipment required may be obtained
from an authorized NISSAN dealer.
Tongue load
Keep the tongue load between 9 to 11
percent of the total trailer load within the
maximum tongue load limits shown in the
following Towing Load/Specification Chart.
If the tongue load becomes excessive, re-
arrange cargo to allow for proper tongue
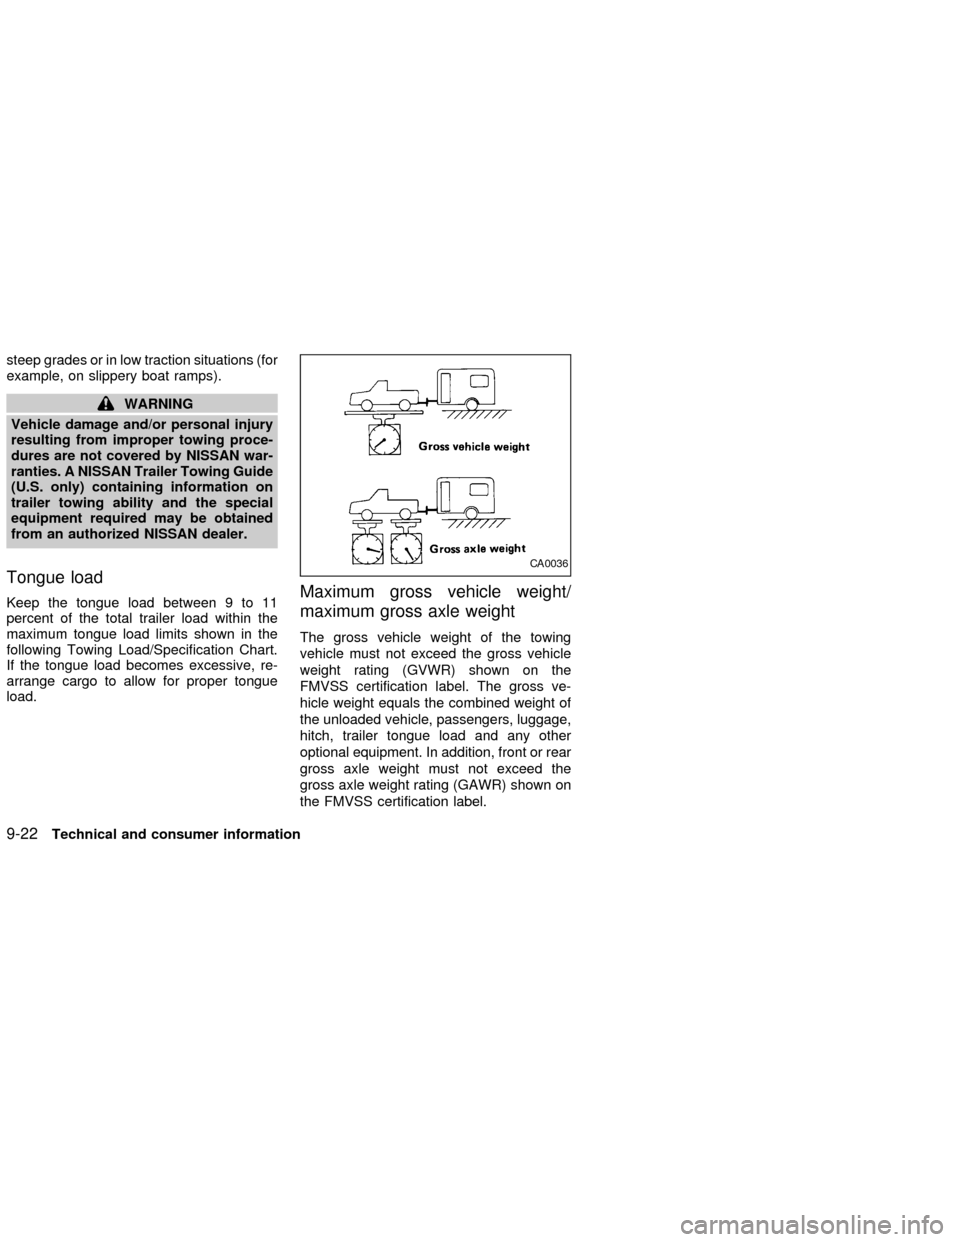
load.Maximum gross vehicle weight/
maximum gross axle weight
The gross vehicle weight of the towing
vehicle must not exceed the gross vehicle
weight rating (GVWR) shown on the
FMVSS certification label. The gross ve-
hicle weight equals the combined weight of
the unloaded vehicle, passengers, luggage,
hitch, trailer tongue load and any other
optional equipment. In addition, front or rear
gross axle weight must not exceed the
gross axle weight rating (GAWR) shown on
the FMVSS certification label.
CA0036
9-22Technical and consumer information
ZX