2002 NISSAN ALTIMA warning lights
[x] Cancel search: warning lightsPage 102 of 249
INSIDE MIRROR
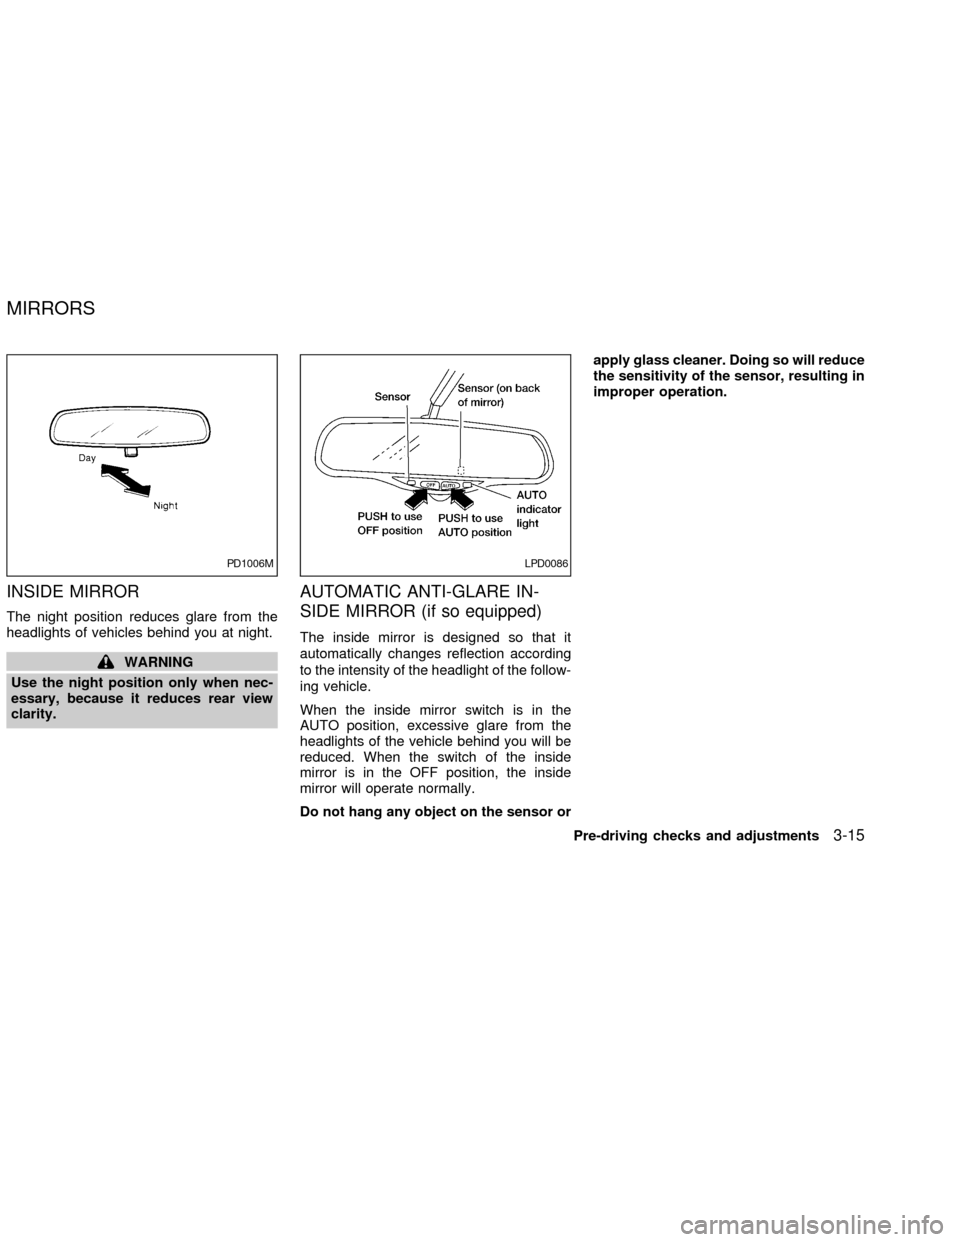
The night position reduces glare from the
headlights of vehicles behind you at night.
WARNING
Use the night position only when nec-
essary, because it reduces rear view
clarity.
AUTOMATIC ANTI-GLARE IN-
SIDE MIRROR (if so equipped)
The inside mirror is designed so that it
automatically changes reflection according
to the intensity of the headlight of the follow-
ing vehicle.
When the inside mirror switch is in the
AUTO position, excessive glare from the
headlights of the vehicle behind you will be
reduced. When the switch of the inside
mirror is in the OFF position, the inside
mirror will operate normally.
Do not hang any object on the sensor orapply glass cleaner. Doing so will reduce
the sensitivity of the sensor, resulting in
improper operation.
PD1006MLPD0086
MIRRORS
Pre-driving checks and adjustments3-15
ZX
Page 139 of 249

START (4)
This position activates the starter motor,
which starts the engine.
NISSAN VEHICLE IMMOBILIZER
SYSTEM (NVIS)
The Nissan Vehicle Immobilizer System
(NVIS) will not allow the engine to run
without the use of the registered NVIS key.
If the engine fails to run using the registered
NVIS key, it may be due to interference
caused by another NVIS key, an automated
toll road device or automated payment de-
vice on the key ring. Restart the engine
using the following procedures:
1. Leave the ignition switch in the ON posi-
tion for approximately 5 seconds.
2. Turn the ignition switch to the OFF or
LOCK position and wait approximately 5
seconds.
3. Repeat step 1 and 2 again.
4. Restart the engine while holding the de-
vice (which may have caused the inter-
ference) separate from the registered
NVIS key.If this procedure allows the engine to run,
NISSAN recommends placing the regis-
tered NVIS key on a separate key ring to
avoid interference from other devices.cMake sure the area around the vehicle is
clear.
cMaintenance items listed here should be
checked periodically, for example, each
time you check engine oil.
cCheck that all windows and lights are
clean.
cVisually inspect tires for their appearance
and condition. Also check tires for proper
inflation.
cLock all doors.
cPosition seat and adjust head restraints.
cAdjust inside and outside mirrors.
cFasten seat belts and ask all passengers
to do likewise.
cCheck the operation of warning lights
when key is turned to the ON (3) position.
See ``Warning/Indicator lights and au-
dible reminders'' in the ``Instruments and
controls'' section.
BEFORE STARTING THE
ENGINE
5-6Starting and driving
ZX
Page 141 of 249
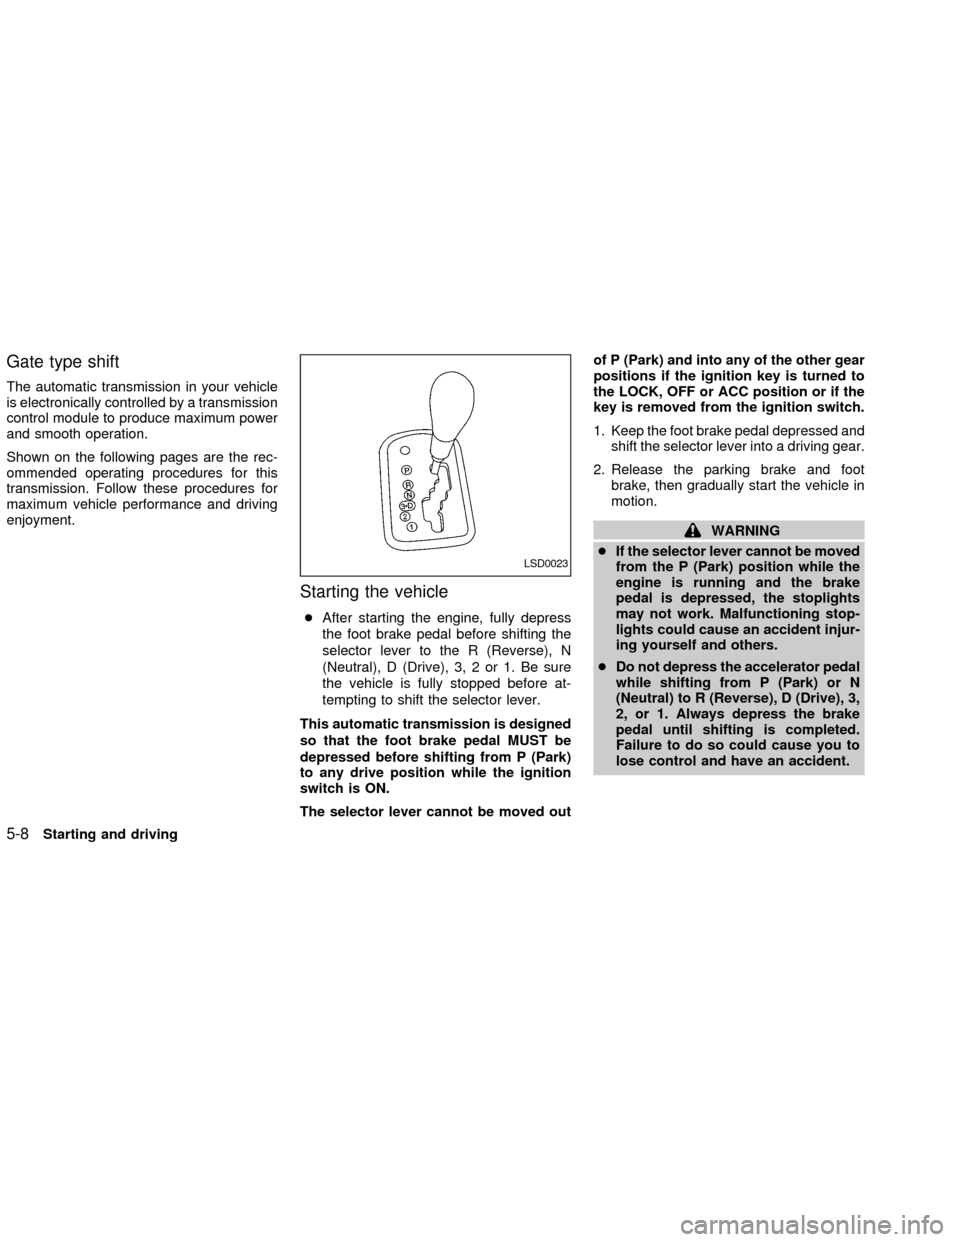
Gate type shift
The automatic transmission in your vehicle
is electronically controlled by a transmission
control module to produce maximum power
and smooth operation.
Shown on the following pages are the rec-
ommended operating procedures for this
transmission. Follow these procedures for
maximum vehicle performance and driving
enjoyment.
Starting the vehicle
cAfter starting the engine, fully depress
the foot brake pedal before shifting the
selector lever to the R (Reverse), N
(Neutral), D (Drive), 3, 2 or 1. Be sure
the vehicle is fully stopped before at-
tempting to shift the selector lever.
This automatic transmission is designed
so that the foot brake pedal MUST be
depressed before shifting from P (Park)
to any drive position while the ignition
switch is ON.
The selector lever cannot be moved outof P (Park) and into any of the other gear
positions if the ignition key is turned to
the LOCK, OFF or ACC position or if the
key is removed from the ignition switch.
1. Keep the foot brake pedal depressed and
shift the selector lever into a driving gear.
2. Release the parking brake and foot
brake, then gradually start the vehicle in
motion.
WARNING
cIf the selector lever cannot be moved
from the P (Park) position while the
engine is running and the brake
pedal is depressed, the stoplights
may not work. Malfunctioning stop-
lights could cause an accident injur-
ing yourself and others.
cDo not depress the accelerator pedal
while shifting from P (Park) or N
(Neutral) to R (Reverse), D (Drive), 3,
2, or 1. Always depress the brake
pedal until shifting is completed.
Failure to do so could cause you to
lose control and have an accident.
LSD0023
5-8Starting and driving
ZX
Page 144 of 249
form the following procedure.
1. Turn the ignition key to the LOCK posi-
tion and remove the key.
2. Apply the parking brake.
3. Remove the shift lock release cover as
shown.
4. Insert a small screwdriver in the shift lock
release slot and push down.
5. Move the shift selector lever to the N
(neutral) position while holding down the
shift lock release.
6. Turn the key to the ON position to unlock
the steering wheel.
Now the vehicle may be moved to the
desired location.
If the lever cannot be moved out of P (Park),
have your authorized NISSAN dealer check
the automatic transmission system as soon
as possible.WARNING
If the selector lever cannot be moved
from the P (Park) position while the
engine is running and the brake pedal
is depressed, the stop lights may not
work. Malfunctioning stop lights could
cause an accident injuring yourself and
others.
Accelerator downshift Ð In D posi-
tion Ð
For passing or hill climbing, fully depress
the accelerator pedal to the floor. This shifts
the transmission down into second gear or
first gear, depending on the vehicle speed.
Fail-safe
When the fail-safe operation occurs, the
next time the key is turned to the ON
position, the light in the instrument cluster of
the selected shift position will blink for ap-
proximately 8 seconds after the ignition is
turned ON. While the vehicle can be driven
under these circumstances, please note
that the gears in the automatic transmission
will be locked in third gear.
If the vehicle is driven under extremeconditions, such as excessive wheel
spinning and subsequent hard braking,
the fail-safe system may be activated.
This will occur even if all electrical cir-
cuits are functioning properly. In this
case, turn the ignition key OFF and wait
for 3 seconds. Then turn the key back to
the ON position. The vehicle should re-
turn to its normal operating condition. If
it does not return to its normal operating
condition, have your NISSAN retailer
check the transmission and repair if nec-
essary.
MANUAL TRANSMISSION
WARNING
cDo not downshift abruptly on slip-
pery roads. This may cause a loss of
control.
cDo not over-rev the engine when
shifting to a lower gear. This may
cause a loss of control or engine
damage.
Starting and driving
5-11
ZX
Page 153 of 249
tion of any malfunction. If the computer
senses any malfunction, it switches the anti-
lock brake system OFF and turns on the
ABS brake warning light in the dashboard.
The brake system then operates normally,
but without anti-lock assistance.
If the light comes on during the self-test or
while driving, take the vehicle to an autho-
rized NISSAN dealer for repair.
WARNING
The anti-lock brake system is a sophis-
ticated device, but it cannot prevent
accidents resulting from careless or
dangerous driving techniques. It can
help maintain vehicle control during
braking on slippery surfaces, but re-
member that the stopping distance on
slippery surfaces will be longer than on
normal surfaces, even with the anti-
lock brake system. Stopping distances
may also be longer on rough, gravel or
snow covered roads, or if you are using
tire chains. Always maintain a safe dis-
tance from the vehicle in front of you.
Ultimately, the responsibility for safety
of self and others rests in the hands of
the driver.cTire type and condition of tires may
also affect braking effectiveness.
When replacing tires, install the
specified size of tire on all four
wheels.
cWhen installing a spare tire, make
sure it is the proper size and type as
specified on the tire placard. For tire
placard location information, refer to
ªTire placardº in the ``Technical and
consumer information'' section of
this manual.
Refer to ``Wheels and tires'' in the
``Maintenance and do-it-yourself'' sec-
tion of this manual.When driving on slippery surfaces or sud-
denly avoiding obstacles on roads, the ve-
hicle might swerve or slip. With the vehicle
traction control system, sensors detect
these movements and control the braking
and engine output to help improve vehicle
stability while driving.
cWhen the traction control system is op-
erating, the slip indicator in the instru-
ment panel blinks.
cIf the slip indicator blinks, the vehicle is
under slippery conditions. Be sure to
drive carefully. See ªSlip indicator lightº,
and ªtraction control off indicator lightº in
the ªInstruments and controlsº section.
cIf a malfunction occurs in the system,
the
andindicator lights come
on in the meter panel.
As long as these warning lights are on,
the traction control function is canceled.
The vehicle will behave like a vehicle
without the system.
TRACTION CONTROL
SYSTEM (TCS)
5-20Starting and driving
ZX
Page 180 of 249

During the normal day-to-day operation of
the vehicle, general maintenance should be
performed regularly as prescribed in this
section. If you detect any unusual sounds,
vibrations or smells, be sure to check for the
cause or have an authorized NISSAN
dealer do it promptly. In addition, you should
notify an authorized NISSAN dealer if you
think that repairs are required.
When performing any checks or mainte-
nance work, closely observe the precau-
tions in this section.
EXPLANATION OF GENERAL
MAINTENANCE ITEMS
Additional information on the following
items with ``*'' is found later in this sec-
tion.
Outside the vehicle
The maintenance items listed here should
be performed from time to time, unless
otherwise specified.
Tires*Check the pressure with a gauge at
least once a month and always prior to long
distance trips, including the spare, and ad-
just to the specified pressure if necessary.Check carefully for damage, cuts or exces-
sive wear.
Wheel nuts*When checking the tires, make
sure no wheel nuts are missing, and check for
any loose wheel nuts. Tighten if necessary.
Tire rotation*Tires should be rotated every
7,500 miles (12,000 km).
Wheel alignment and balanceIf the ve-
hicle should pull to either side while driving
on a straight and level road, or if you detect
uneven or abnormal tire wear, there may be
a need for wheel alignment.
If the steering wheel or seat vibrates at
normal highway speeds, wheel balancing
may be needed.
WindshieldClean the windshield on a
regular basis. Check the windshield at least
every six months for cracks or other dam-
age. Have a damaged windshield repaired
by a qualified repair facility.
Windshield wiper blades*Check for
cracks or wear if they do not wipe properly.
Doors and hoodCheck that the doors and
the hood operate properly. Also ensure that
all latches lock securely. Lubricate hinges,
latches, latch pins, rollers and links as nec-essary. Make sure that the secondary latch
keeps the hood from opening when the
primary latch is released.
When driving in areas using road salt or
other corrosive materials, check lubrication
frequently.
Lights*Clean the headlights on a regular
basis. Make sure that the headlights, stop
lights, tail lights, turn signal lights, and other
lights are all operating properly and installed
securely. Also check headlight aim.
Inside the vehicle
The maintenance items listed here should
be checked on a regular basis, such as
when performing periodic maintenance,
cleaning the vehicle, etc.
Warning lights and chimesMake sure all
warning lights and chimes are operating
properly.
Windshield wiper and washer*Check that
the wipers and washer operate properly and
that the wipers do not streak.
Windshield defrosterCheck that the air
comes out of the defroster outlets properly
and in sufficient quantity when operating the
heater or air conditioner.
GENERAL MAINTENANCE
Maintenance and do-it-yourself8-3
ZX
Page 207 of 249
HEADLIGHTS
Replacing the xenon headlight bulb
WARNING
HIGH VOLTAGE
When xenon headlights are on, they
produce a high voltage. To prevent an
electric shock, never attempt to modify
or disassemble. Always have your xe-
non headlights replaced at an autho-
rized NISSAN dealer. For additional in-
formation, see ``Headlight and turn
signal switch'' in the ``Instruments and
controls'' section.
Replacing the halogen headlight
bulb
The headlight is a semi-sealed beam type
which uses a replaceable halogen bulb.
Because the headlight assembly must be
removed from the vehicle for bulb replace-
ment, see your NISSAN Dealer.
CAUTION
cDo not leave the headlight assembly
open without a bulb installed for a
long period of time. Dust, moisture,
smoke, etc. entering the headlight
body may affect bulb performance.
Remove the bulb from the headlight
assembly just before a replacement
bulb is installed.
cOnly touch the plastic base when
handling the bulb. Never touch the
glass envelope. Touching the glass
could significantly affect bulb life
and/or headlight performance.
cHigh pressure halogen gas is sealed
inside the halogen bulb. The bulb
may break if the glass envelope is
scratched or the bulb is dropped.
cUse the same number and wattage
as originally installed:
Low Beam High Beam
Wattage 55 60
Bulb no. H1 HB (9005)cAiming is not necessary after replac-
ing the bulb. When aiming adjust-
ment is necessary, contact an autho-
rized NISSAN dealer.
LIGHTS
8-30Maintenance and do-it-yourself
ZX
Page 244 of 249

Headlight and turn signal switch ............... 2-18
Heated seats.............................................. 2-24
Heater
Heater and air conditioner controls ........ 4-3
Heater operation ..................................... 4-4
Homelink Transceiver
Integrated HomeLinkTUniversal
Transceiver (If so equipped) ................ 2-35
Hood release ............................................... 3-9
Horn ........................................................... 2-23
I
Ignition switch .............................................. 5-4
Immobilizer system ..................... 2-14, 3-2, 5-6
Important vehicle information label............ 9-11
Increasing fuel economy............................ 5-16
Indicator lights and audible reminders
(See warning/indicator lights and audible
reminders) .................................................... 2-8
Inside mirror ............................................... 3-15
Instrument brightness control .................... 2-20
Integrated HomeLinkTUniversal Transceiver
(If so equipped).......................................... 2-35
Interior light ................................................ 2-34
Interior trunk lid release ............................. 3-11
J
Jump starting ...................................... 6-6, 8-18K
Key ............................................................... 3-2
Keyless entry system (See remote keyless
entry system) ............................................... 3-5
L
Labels
Air conditioner specification label ......... 9-12
Emission control information label........ 9-12
Engine serial number ........................... 9-11
F.M.V.S.S. certification label ................ 9-11
Vehicle identification number (VIN)
plate ...................................................... 9-10
Warning labels (for SRS) ..................... 1-19
License plate
Installing the license plate .................... 9-13
Light
Air bag warning light ............ 1-14, 1-19, 2-9
Bulb check/instrument panel .................. 2-8
Bulb replacement.................................. 8-32
Charge warning light .............................. 2-9
Front fog light switch ............................ 2-21
Headlight and turn signal switch .......... 2-18
Interior light ........................................... 2-34
Low washer fluid warning light ............. 2-10
Spotlights (See map light) .................... 2-34
Trunk light ............................................. 2-35
Warning/indicator lights and audible
reminders ................................................ 2-8Lock
Child safety rear door lock ..................... 3-4
Door locks............................................... 3-2
Fuel filler lid lock opener lever ............. 3-12
Glove box lock ...................................... 2-28
Power door locks .................................... 3-3
Trunk lid lock opener lever ................... 3-10
M
Maintenance
General maintenance ............................. 8-3
Maintenance precautions ................ 8-2, 8-5
Outside the vehicle ................................. 8-3
Seat belt maintenance.......................... 1-28
Under the hood and vehicle ................... 8-4
Malfunction indicator lamp (MIL) ............... 2-11
Map lights .................................................. 2-34
Meters and gauges .............................. 2-2, 2-3
Mirror
Inside mirror.......................................... 3-15
Outside mirror control ........................... 3-16
Vanity mirror ......................................... 3-14
Multi-remote control system (See remote
keyless entry system) .................................. 3-5
Multi-remote controller battery
replacement ............................................... 8-29
N
Nissan vehicle immobilizer system
(NVIS) ......................................... 2-13, 3-2, 5-6
10-3
ZX