2002 MINI Hardtop 2 Door warning
[x] Cancel search: warningPage 25 of 140

23
OVERVIEW REPAIRS OPERATIONCONTROLS DATA INDEX
CENTRAL LOCKING SYSTEM OPENING AND CLOSING Ð FROM OUTSIDE
The concept
The central locking system is ready for
operation whenever the driver's door is
closed. The doors, the tailgate and the fuel
filler door are unlocked or locked.
The central locking system can be oper-
ated:
>
From outside via the remote control as
well as via the door lock
>
From inside by pressing a button.
If operated from outside, the anti-theft
system is activated at the same time. This
prevents the doors from being unlocked via
safety lock buttons or door handles.
In the event of an accident, the central
locking system unlocks automatically. The
hazard warning system and interior lamps
are also switched on.
Via remote control
The remote control gives you an exception-
ally convenient method for unlocking and
locking your vehicle. It also offers another
function:
To open the tailgate, refer to page 24.
The tailgate will open slightly, regardless of
whether it was locked or unlocked.
Whenever you unlock (lock) the vehicle,
you simultaneously deactivate (activate)
the anti-theft system, and switch the inte-
rior lamps on (off).
If the vehicle has been properly locked
using the remote control, the hazard
warning system lights up once.
When the vehicle is unlocked, the hazard
warning system does not react.
Children might be able to lock the
doors from the inside. Always take
the vehicle keys with you so that the
vehicle can be opened again from the
outside at any time.
<
For US owners only
The transmitter and receiver units comply
with part 15 of the FCC (Federal Communi-
cation Commission) regulations. Operation
is governed by the following:
FCC ID: LX8765S
LX8765E
LX8CAS
Compliance statement:
This device complies with part 15 of the
FCC Rules. Operation is subject to the
following two conditions:
>
This device may not cause harmful inter-
ference, and
>
this device must accept any interference
received, including interference that may
cause undesired operation.
Any unauthorized modifications or
changes to these devices could void
the user's authority to operate this equip-
ment.
<
Page 26 of 140

24
OPENING AND CLOSING Ð FROM OUTSIDE
1 Unlocking and opening the tailgate
2 Locking and securing
If the remote control does not react,
the battery is discharged.
In the event of a system malfunction,
please contact your MINI center. You can
also obtain replacement keys and batteries
from your MINI center.
Battery changing, see page 22.
<
To unlock
1. Press button 1 once to unlock the
driver's door only
2. Press button 1 a second time to unlock
the other door as well as the tailgate and
the fuel filler door.
When the vehicle is unlocked, the hazard
warning system does not react.
To open the tailgate
Hold button 1 pressed for approx. five
seconds.
The tailgate will open slightly, regardless
of whether it was previously locked or
unlocked.
Before and after a trip, be sure that
the tailgate was not opened uninten-
tionally.
<
To lock and securePress button 2.
The hazard warning system flashes once.
Do not lock the vehicle if there are
passengers still inside, because they
cannot unlock the doors.
control.
In this case, use the master key to unlock
the door lock.
Page 27 of 140

25
OVERVIEW REPAIRS OPERATIONCONTROLS DATA INDEX
OPENING AND CLOSING Ð FROM OUTSIDEVia the door lock1. One turn of the key in the driver's
door lock unlocks the driverÕs door only
2. Turning the key a second time unlocks
the other door, the tailgate and the fuel
filler door.
If the vehicle has been properly locked, the
hazard warning system flashes once.
When the vehicle is unlocked, the hazard
warning system does not react.
Do not lock the vehicle if there are
passengers still inside, because they
cannot unlock the doors.<
Manual operation (in the event of electrical malfunction)
Turn the key to the extreme left or right to
unlock/lock the door.
Convenience feature via door lockYou can also operate the power windows
and the sliding/tilt sunroof via the door
lock.
>To open: with the door closed, turn the
key to the "Unlock" position and hold it
>To close: with the door closed, turn the
key to the "Lock" position and hold it.
Watch during the closing process to
be sure that no one is injured.
Releasing the key stops the operation.<
Page 46 of 140

44
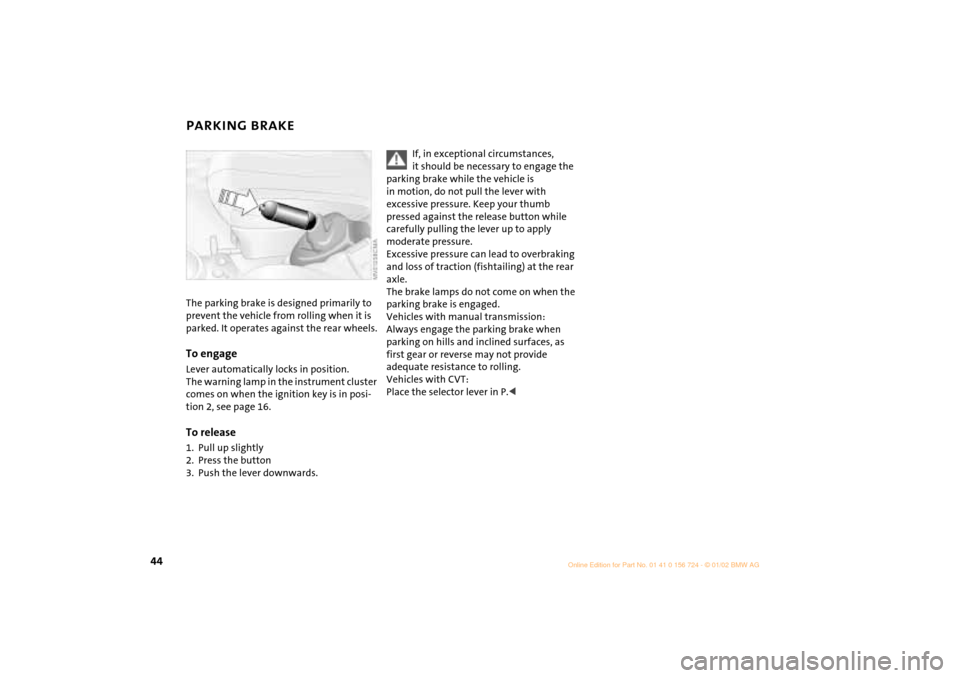
PARKING BRAKE The parking brake is designed primarily to
prevent the vehicle from rolling when it is
parked. It operates against the rear wheels.To engageLever automatically locks in position.
The warning lamp in the instrument cluster
comes on when the ignition key is in posi-
tion 2, see page 16.To release1. Pull up slightly
2. Press the button
3. Push the lever downwards.
If, in exceptional circumstances,
it should be necessary to engage the
parking brake while the vehicle is
in motion, do not pull the lever with
excessive pressure. Keep your thumb
pressed against the release button while
carefully pulling the lever up to apply
moderate pressure.
Excessive pressure can lead to overbraking
and loss of traction (fishtailing) at the rear
axle.
The brake lamps do not come on when the
parking brake is engaged.
Vehicles with manual transmission:
Always engage the parking brake when
parking on hills and inclined surfaces, as
first gear or reverse may not provide
adequate resistance to rolling.
Vehicles with CVT:
Place the selector lever in P.<
Page 51 of 140

49
OVERVIEW REPAIRS OPERATIONCONTROLS DATA INDEX
PARKING LAMPS/LOW BEAMS SIGNAL/HEADLAMP FLASHER Switching on the parking lampsTurn to the first position.
The front, rear and side vehicle lighting is
switched on.
One-sided standing lamps, see next
column.Switching on the low beamsTurn to the second position.
With the low beams on and with the igni-
tion switched off, only the parking lamps
will remain on."Follow me home" lampsIf you switch off the engine with the low
beams on, and then switch off the low
beams, they remain lit for approx. one
minute.
You can also have this function acti-
vated.<
Switching on the standing lampsFor parking, you can activate lights on one
side of the vehicle (observe local laws).
In ignition key position 0:
Move the lever into the relevant turn signal
indicator position."Lights on" warningIf the lights have not been switched off and
the ignition key is in position 0, an acoustic
signal sounds for a few seconds when you
open the driver's door to remind you that
the lights have not been switched off.Daytime driving lamps*If you desire, the light switch can be left in
the second position:
When the ignition is switched off, the
external lighting is also switched off.
You can have this function set by
your MINI center.<
1 Turn signal indicator (green indicator
accompanied by periodic clicking sound
from the relay)
2 High beams/Headlamp flasher (blue
indicator lamp)To signal brieflyPress the lever up to but not beyond the
detent.
If the indicator lamp of the indicators
and the clicking from the relay are
both faster than normal: one of the turn
signal indicators has failed.<
Page 58 of 140

56
FUEL GAUGE TEMPERATURE GAUGE In the navigation system
Please also comply with the instruc-
tions in the previous column.<
Once indicator lamp 1 switches from
orange to red, there are still approx.
2.1 gallons (8 liters) of fuel in the fuel tank.
Low temperatureThe needle is located at the bottom or on
the right.
The engine is still cold. Drive at moderate
engine and vehicle speeds.Center positionNormal operating temperature of the
engine.High temperatureAs soon as there is a deviation from the
center position upwards or to the left:
Drive moderately and at low engine speed,
if necessary, switch off the engine and
allow to cool down.
Checking coolant level, see page 91.
1 Red indicator lamp When you switch on the ignition, warning
lamp 1 comes on briefly to confirm that the
system is operational.
If the lamp comes on while operating the
vehicle, the engine has overheated. Switch
off the engine immediately and allow it to
cool down.Navigation system option
Coolant temperature warning
lamp in the tachometer.
If the lamp comes on while oper-
ating the vehicle, the engine has over-
heated. Switch off the engine immediately
and allow it to cool down.
Page 65 of 140

63
OVERVIEW REPAIRS OPERATIONCONTROLS DATA INDEX
FLAT TIRE MONITOR PARK DISTANCE CONTROL (PDC)*
Do not initialize the system when
snow chains are fitted. When driving
with snow chains, false alarms can occur or
pressure losses might not be detected.<
In the following situations false
alarms can also occur under certain
circumstances or the detection of inflation
pressure loss can be delayed:
>When driving on roads covered with
snow or on other slippery road surfaces
>A sporty driving style (slip at the driven
wheels, high lateral accelerations).<
The conceptThe PDC assists you when you back into a
parking space. A signal warns you of the
distance to an obstacle. To do this, four
ultrasonic sensors in the rear bumper
measure the distance to the nearest object.
The range for the sensors located at both
rear corners ends approx. 2 ft (60 cm)
behind the bumpers. The range for the two
middle sensors is slightly less than 5 ft
(1.5 meters).
The system starts to operate automatically
about one second after you select reverse
with the ignition key in position 2. PDC is
deactivated when you shift back out of
reverse. Acoustical signalsThe distance to the nearest object is indi-
cated by a tone sounding at various inter-
vals. As the distance between vehicle and
object decreases, the intervals between the
tones become shorter. A continuous tone
indicates the presence of an object less
than 9 in (20 cm) away.
The warning signal is canceled after
approx. three seconds if the distance to the
obstacle remains constant during this time
(if you are moving parallel to a wall, for
instance).System malfunctions will be indicated by
a continuous high-pitched tone when the
system is activated the first time. Please
have your MINI center resolve the problem.
Even with PDC, final responsibility for
estimating the distance between the
vehicle and any obstructions always
remains with the driver. Even when sensors
are involved, there is a blind spot in which
objects cannot be detected. Moreover, the
detection of obstructions can approach the
physical limits of ultrasonic measurement,
as occurs e. g. in the case of thin and
wedge-shaped objects.
Certain sources of sound, such as a loud
radio, could drown out the PDC signal
tone.<
Keep the sensors clean and free of ice
or snow in order to ensure that they
will continue to operate effectively.
Do not apply high pressure spray to the
sensors for a prolonged period of time.
Always maintain a distance of more than
4 in (10 cm).<
Page 73 of 140

71
OVERVIEW REPAIRS OPERATIONCONTROLS DATA INDEX
LUGGAGE COMPARTMENT COVER FOLDABLE REAR BACKRESTWhen the tailgate is opened, the luggage
compartment cover is also raised.
Never place heavy or hard objects on
the luggage compartment cover, as
otherwise occupants could be injured
during braking maneuvers.<
The warning triangle
* is located
beneath the luggage compartment
cover, see page 113.
Comply with legal requirements requiring
you to carry a hazard warning triangle in
the vehicle.<
RemovalTo load bulky luggage, the compartment
cover can be removed.
1. Remove the retaining straps on the
tailgate
2. Pull the luggage compartment cover out
towards the rear.
Unlock and fold1. Pull lever
2. Fold the rear backrest forwards.
When folding the backrest back into
its original position always ensure
that the detent engages securely. A loose
backrest might fail to prevent cargo from
entering the passenger compartment
during sudden braking or evasive maneu-
vers, posing a potential hazard to occu-
pants.<