Page 70 of 290

67 Rear view mirrors
Te ch n i c a l
data Instruments
and controlsOperationDrivingInstrument
cluster displayPractical hints Car care Index Exterior rear view mirrors
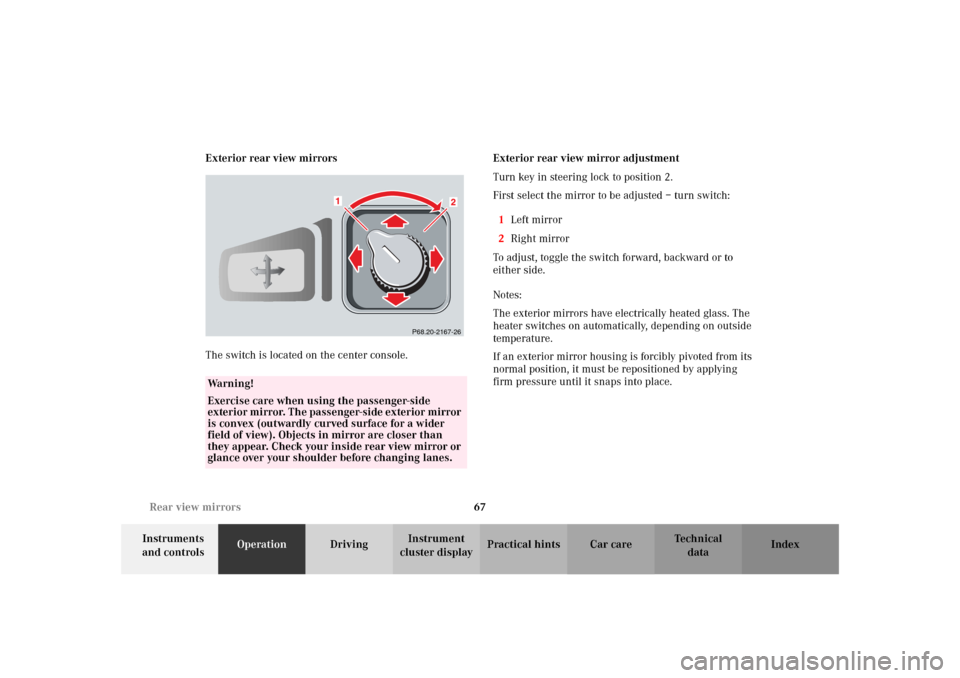
The switch is located on the center console.Exterior rear view mirror adjustment
Turn key in steering lock to position 2.
First select the mirror to be adjusted – turn switch:
1Left mirror
2Right mirror
To adjust, toggle the switch forward, backward or to
either side.
Notes:
The exterior mirrors have electrically heated glass. The
heater switches on automatically, depending on outside
temperature.
If an exterior mirror housing is forcibly pivoted from its
normal position, it must be repositioned by applying
firm pressure until it snaps into place.
Wa r n i n g !
Exercise care when using the passenger-side
exterior mirror. The passenger-side exterior mirror
is convex (outwardly curved surface for a wider
field of view). Objects in mirror are closer than
they appear. Check your inside rear view mirror or
glance over your shoulder before changing lanes.
P68.20-2167-26
Page 74 of 290

71 Instrument cluster
Te ch n i c a l
data Instruments
and controlsOperationDrivingInstrument
cluster displayPractical hints Car care Index 1Coolant temperature gauge, see page 75
2Fuel gauge with reserve and fuel cap placement
warning lamp, see page 185
3Outside temperature indicator, see page 75
4Push button for activating the instrument cluster,
intensity of instrument lamps, for trip odometer, and
for Flexible service system (FSS) indicator, see
pages 74, 76 and 77
5Left turn signal indicator lamp, see combination
switch on page 83
6Electronic stability program (ESP) warning lamp,
system is adjusting to road conditions, see page 1857Right turn signal indicator lamp, see combination
switch on page 83
8Speedometer
9Trip odometer, see page 76
10Main odometer, Flexible service system (FSS)
indicator, see page 77
11Push button for setting clock, see page 76
12Tachometer, see page 76
13Clock, see page 76
14Gear range indicator display, see selector lever
position, page 150
Notes:
Indicator lamps in the instrument cluster,
see page 72
Page 78 of 290

75 Instrument cluster
Te ch n i c a l
data Instruments
and controlsOperationDrivingInstrument
cluster displayPractical hints Car care Index Coolant temperature gauge
During severe operating conditions and stop-and-go city
traffic, the coolant temperature may rise close to the red
marking.
The engine should not be operated with the coolant
temperature in the red zone. Doing so may cause
serious engine damage which is not covered by the
Mercedes-Benz Limited Warranty.Outside temperature indicator
The temperature sensor is located in the front bumper
area. Due to its location, the sensor can be affected by
road or engine heat during idling or slow driving. This
means that the accuracy of the displayed temperature
can only be verified by comparison to a thermometer
placed next to the sensor, not by comparison to external
displays (e.g. bank signs etc.).
Adaptation to ambient temperature takes place in steps
and depends on the prevailing driving conditions (stop-
and-go or moderate, constant driving) and amount of
temperature change.
Wa r n i n g !
• Driving when your engine is badly overheated
can cause some fluids which may have leaked
into the engine compartment to catch fire. You
could be seriously burned.• Steam from an overheated engine can cause
serious burns and can occur just by opening
the engine hood. Stay away from the engine if
you see or hear steam coming from it.Turn off the engine, get out of the vehicle and do
not stand near the vehicle until it cools down.
Wa r n i n g !
The outside temperature indicator is not designed
to serve as an Ice-Warning Device and is therefore
unsuitable for that purpose. Indicated
temperatures just above the freezing point do not
guarantee that the road surface is free of ice.
Page 81 of 290

78 Flexible service system
Te ch n i c a l
data Instruments
and controlsOperationDrivingInstrument
cluster displayPractical hints Car care Index
The counter can also be set by any individual. To do so:
1. Turn key in steering lock to position 2.
2. Within 1 second press button (1) twice.
3. The present status for days or distance is displayed.
Within 10 seconds turn key in steering lock to
position 0.
4. Press and hold button (1), while turning key in
steering lock to position 2 again. The present status
for days or distance is displayed once more.
Continue to hold button (1).
After approximately 10 seconds a signal sounds, and
the display shows 10 000 miles
(Canada: 15 000 km) for approximately 10 seconds.
5. Release button (1).
If the FSS counter was inadvertently reset, have a
Mercedes-Benz Center correct it.Note:
When disconnecting vehicle battery for one or more
days at a time, such days will not be counted. Any such
days not counted by FSS can be added by your
Mercedes-Benz Center.
The interval between services is determined by the kind
of vehicle operation. Driving at extreme speeds, and
cold starts combined with short distance driving in
which the engine does not reach normal operating
temperature, reduce the interval between services.
However you choose to set your reference numbers, the
scheduled services as posted in the Service Booklet
must be followed to properly care for your vehicle.
Page 82 of 290

79 Checking engine oil level
Te ch n i c a l
data Instruments
and controlsOperationDrivingInstrument
cluster displayPractical hints Car care Index Checking engine oil level
(SLK 320 and SLK 32 AMG only)
To check the engine oil level, park vehicle on level
ground, with engine at normal operational temperature.
Check oil level approximately 5 minutes after turning
off the engine, allowing for the oil to return to the oil
pan.
Turn electronic key in steering lock to position 2 and
wait until the symbols : and I appear in the
odometer display field.Within 1 second press left button on the instrument
cluster twice.
The following messages are available:
“OK”
“-1.0 Q” (Canada: -1.0 L)
“-1.5 Q” (Canada: -1.5 L)
“-2.0 Q” (Canada: -2.0 L)
If the message “-2.0 Q” (Canada: -2.0 L) blinks and a
signal sounds, add oil according to amount displayed.
See page 197 for instructions on adding engine oil.
“HI”
The message “HI” blinks and a signal sounds.
Do not overfill the engine.
Excessive oil must be drained or siphoned. It could
cause damage to engine and catalytic converter not
covered by the Mercedes-Benz Limited Warranty.
The symbol I flashes in the odometer display field if
a proper oil level check cannot be performed.
The oil level check can be repeated after a short time.
P54.30-4497-29
Page 90 of 290

87 Climate control
Te ch n i c a l
data Instruments
and controlsOperationDrivingInstrument
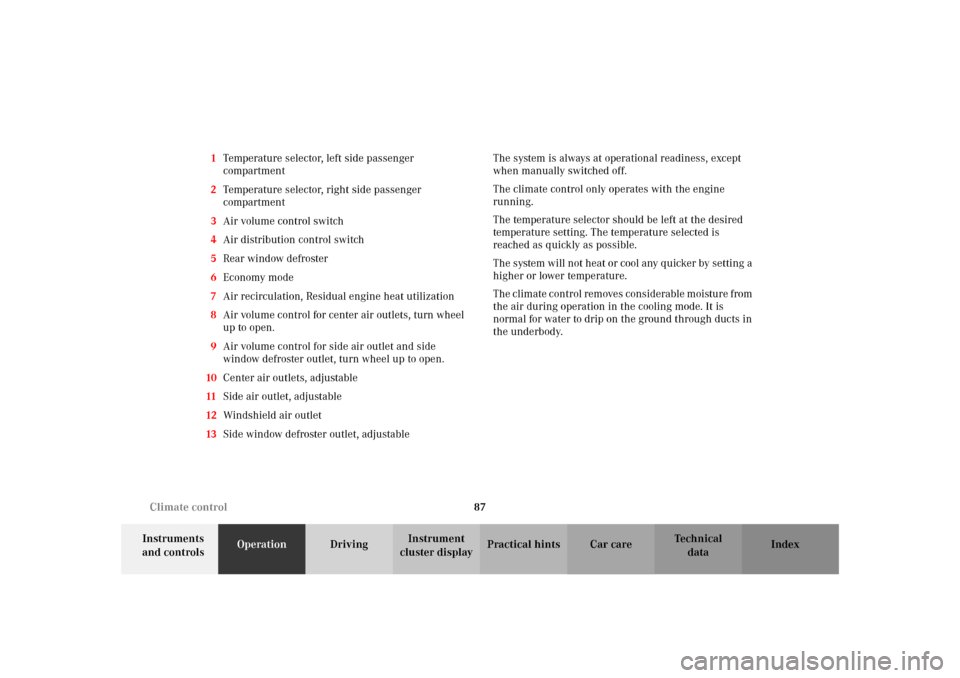
cluster displayPractical hints Car care Index 1Temperature selector, left side passenger
compartment
2Temperature selector, right side passenger
compartment
3Air volume control switch
4Air distribution control switch
5Rear window defroster
6Economy mode
7Air recirculation, Residual engine heat utilization
8Air volume control for center air outlets, turn wheel
up to open.
9Air volume control for side air outlet and side
window defroster outlet, turn wheel up to open.
10Center air outlets, adjustable
11Side air outlet, adjustable
12Windshield air outlet
13Side window defroster outlet, adjustableThe system is always at operational readiness, except
when manually switched off.
The climate control only operates with the engine
running.
The temperature selector should be left at the desired
temperature setting. The temperature selected is
reached as quickly as possible.
The system will not heat or cool any quicker by setting a
higher or lower temperature.
The climate control removes considerable moisture from
the air during operation in the cooling mode. It is
normal for water to drip on the ground through ducts in
the underbody.
Page 91 of 290
88 Climate control
Te ch n i c a l
data Instruments
and controlsOperationDrivingInstrument
cluster displayPractical hints Car care Index
Basic setting – heater
Select temperature for each side of the passenger
compartment.
Select air volume with control Q switch, set at least
to position 2 to prevent windows from fogging up.
Set air distribution control switch to position shown
above.
Turn defroster outlets for side windows to the detent
position.
Open center air outlets as desired.Basic setting – air conditioner
Select temperature for each side of the passenger
compartment.
Select air volume with control Q switch, at least to
position 1 to start the air conditioner.
Set air distribution control switch to position a.
Open center air outlets i.
Open left and right side air outlets i.
Page 92 of 290
89 Climate control
Te ch n i c a l
data Instruments
and controlsOperationDrivingInstrument
cluster displayPractical hints Car care Index Special settings (use only for short duration)
Defrosting
Set temperature selectors and switches for air volume
and air distribution to position P.
Close center air outlets.
Close left and right side air outlets.
Turn defroster outlets for side windows to the detent
position.Defogging windows
Windows fogged up on inside.
Switch off economy mode S. Indicator lamp goes out.
Switch off air recirculation O. Indicator lamp goes
out.
Set air distribution control switch to position c.
Increase air volume with control switch.
Close center and right side air outlets i.
Turn defroster outlets for side windows to the detent
position.