2002 MERCEDES-BENZ SL600 instrument panel
[x] Cancel search: instrument panelPage 243 of 302
239 Jump starting
Te ch n ica l
data Instruments
and controlsOperation DrivingInstrument
cluster displayPractical hintsCar care Index Jump startingImportant!
A discharged battery can freeze at approx. +14°F
(–10°C). In that case, it must be thawed out before
jumper cables are used. Attempting to jump start a
frozen battery can result in it exploding, causing
personal injury.
Jumper cable specifications:
• Minimum cable cross-section of 25 mm
2 or approx.
2AWG
• Maximum length of 11.5 ft. (3.5 m).
If the battery is discharged, the engine should be started
with jumper cables and the (12 V) battery of another
vehicle.
Only use 12 V battery to jump start your vehicle. Jump
starting with more powerful battery could damage the
vehicle’s electrical systems, which will not be covered
by the Mercedes-Benz Limited Warranty.
The battery is located in the trunk behind the right side
cover panel.
Wa r n i n g !
Failure to follow these directions will cause
damage to the electronic components, and can lead
to a battery explosion and severe injury or death.Never lean over batteries while connecting or jump
starting, you might get injured.Battery fluid contains sulfuric acid. Do not allow
this fluid to come in contact with eyes, skin or
clothing. In case it does, immediately flush affected
area with water, and seek medical help if
necessary.A battery will also produce hydrogen gas, which is
flammable and very explosive. Keep flames or
sparks away from battery, avoid improper
connection of jumper cables, smoking etc.Read all instructions before proceeding.
Page 245 of 302
241 Towing the vehicle
Te ch n ica l
data Instruments
and controlsOperation DrivingInstrument
cluster displayPractical hintsCar care Index Tow in g t h e ve hic l e
All except Sport Package
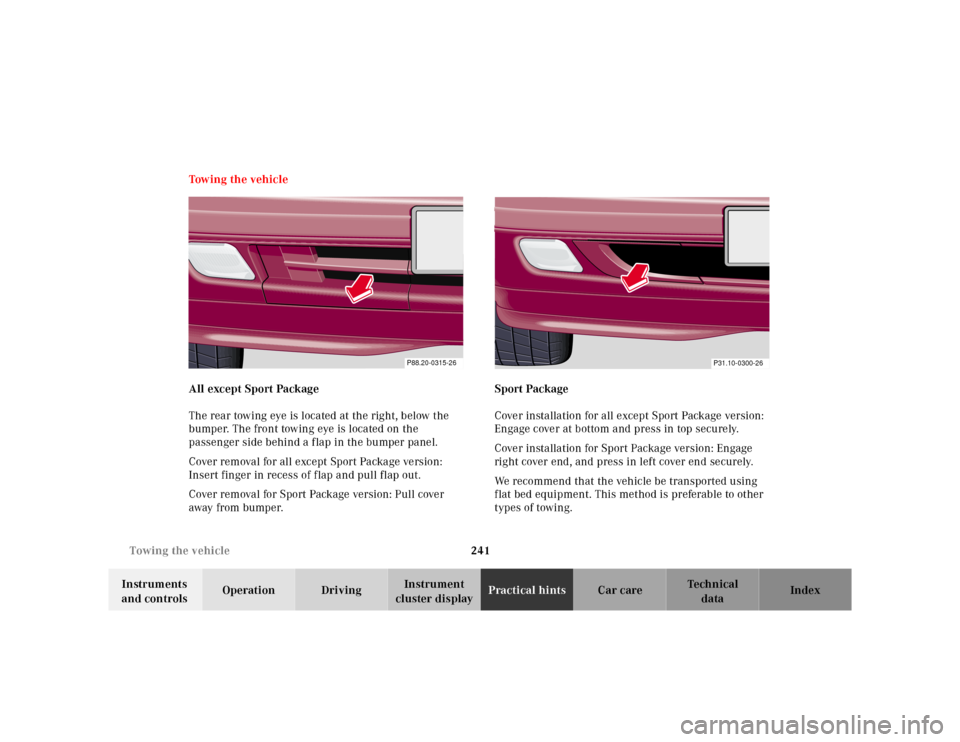
The rear towing eye is located at the right, below the
bumper. The front towing eye is located on the
passenger side behind a flap in the bumper panel.
Cover removal for all except Sport Package version:
Insert finger in recess of flap and pull flap out.
Cover removal for Sport Package version: Pull cover
away from bumper.Sport Package
Cover installation for all except Sport Package version:
Engage cover at bottom and press in top securely.
Cover installation for Sport Package version: Engage
right cover end, and press in left cover end securely.
We recommend that the vehicle be transported using
flat bed equipment. This method is preferable to other
types of towing.
P88.20-0315-26
P31.10-0300-26
Page 264 of 302
260 Manual release of fuel filler flap
Te ch n ica l
data Instruments
and controlsOperation DrivingInstrument
cluster displayPractical hintsCar care Index
Manual release of fuel filler flap
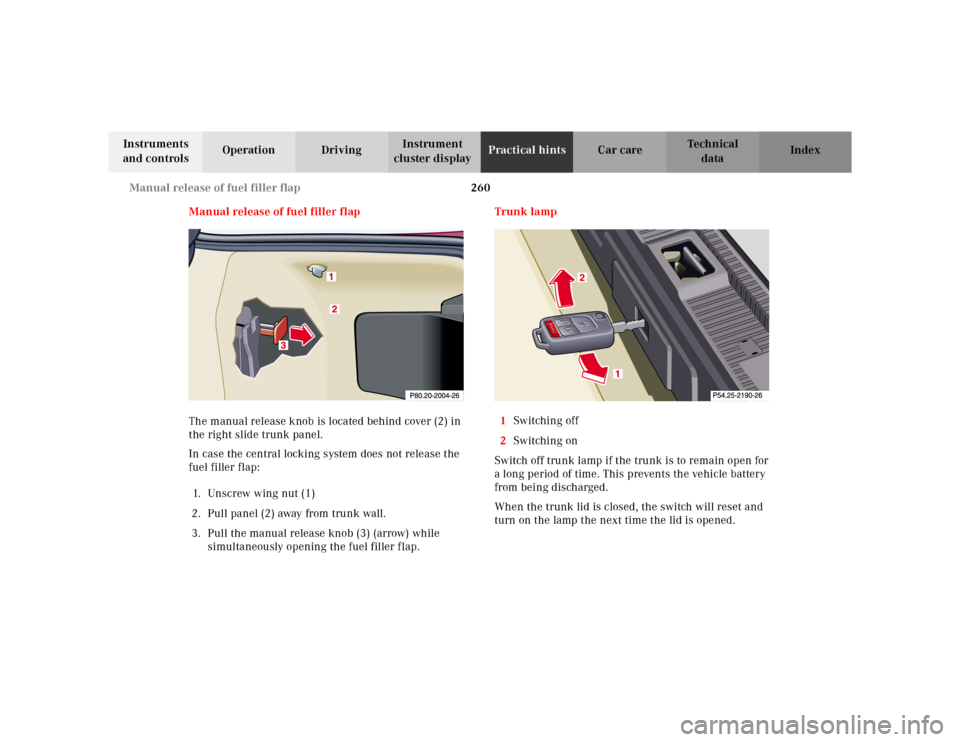
The manual release knob is located behind cover (2) in
the right slide trunk panel.
In case the central locking system does not release the
fuel filler flap:
1. Unscrew wing nut (1)
2. Pull panel (2) away from trunk wall.
3. Pull the manual release knob (3) (arrow) while
simultaneously opening the fuel filler flap.Trunk lamp
1Switching off
2Switching on
Switch off trunk lamp if the trunk is to remain open for
a long period of time. This prevents the vehicle battery
from being discharged.
When the trunk lid is closed, the switch will reset and
turn on the lamp the next time the lid is opened.
Page 265 of 302
261 Contents - Vehicle care
Te ch n ica l
data Instruments
and controlsOperation DrivingInstrument
cluster displayPractical hintsCar careIndex
Vehicle care Cleaning and care
of the vehicle .............................262
Power washer ..............................263
Tar stains .....................................263
Paintwork, Painted Body
Components ................................263
Engine cleaning ..........................264
Vehicle washing .........................264Ornamental moldings ............... 264
Headlamps, taillamps,
turn signal lenses ...................... 264
Window cleaning ....................... 265
Light alloy wheels ..................... 265
Instrument cluster ..................... 265
Steering wheel and
gear selector lever ..................... 265
Cup holder .................................. 265
Seat belts ..................................... 266
Headliner, shelf behind
roll bars, and other hard
plastic trim items ....................... 266Soft top .........................................266
Headliner .....................................267
Wind screen ................................267
Automatic antenna .....................267
Wiper blade .................................267
Headlamp cleaning
system ..........................................267
Leather upholstery .....................268
Plastic and rubber parts ............268
Illuminated door sill panels .....268
Page 272 of 302
268 Cleaning and care of the vehicle
Te ch n ica l
data Instruments
and controlsOperation DrivingInstrument
cluster displayPractical hintsCar careIndex
Leather upholstery
Using aftermarket seat covers or wearing clothing that
have the tendency to give off coloring (e.g. when wet
etc.) may cause the upholstery to become permanently
discolored. By lining the seats with a proper
intermediate cover, contact-discoloration will be
prevented.
Wipe leather upholstery with a damp cloth and dry
thoroughly or clean with Mercedes-Benz approved
Leather Care. Exercise particular care when cleaning
perforated leather as its underside should not become
wet.Plastic and rubber parts
Do not use oil or wax on these parts.
Illuminated door sill panels
Use a gentle dish-washing detergent or mild detergent
for delicate fabrics as a washing solution. Wipe with a
cloth moistened in lukewarm solution. Do not use
scouring agents.
Page 291 of 302
287 Index
Te ch n ica l
data Instruments
and controlsOperation DrivingInstrument
cluster displayPractical hints Car careIndex
DDisplay illumination ........................................................ 77
Door control panel ........................................................... 20
Door pockets ................................................................... 129
Doors .................................................................................. 34
Drinking and Driving .....................................................176
Drive sensibly - Save Fuel .............................................176
Driving instructions .......................................................176
Block heater ............................................................... 183
Brakes ......................................................................... 177
Deep water ................................................................. 182
Pedals ...........................................................................176
Traveling abroad ....................................................... 183
Winter driving ........................................................... 182
Driving off ....................................................................... 178EEconomy ............................................................................ 93
Electronic stability program (ESP) .............................. 192
Emergency call
See Tele Aid ............................................................... 156
Emergency tensioning retractor (ETR) ......................... 59
Emergency trunk lid release button ............................. 40Emergency unlocking in
case of accident ........................................................... 37
Emission control ............................................................ 164
Engine compartment .................................................... 220
Engine oil
Additives .................................................................... 279
Capacities .................................................................. 277
Checking level .......................................................... 222
Consumption ................................................................83
Engine oils ................................................................. 279
Low level warning lamp ........................................... 210
Engine oil level indicator ................................................82
Engine oil temperature gauge ........................................ 83
Entrance lamps in footwells,
exit lamps in doors ...................................................120
ESP (Electronic Stability Program) ............................. 192
Control Switch ........................................................... 194
Malfunction indicator lamp .................................... 207
Synchronizing ........................................................... 193
Warning lamp ........................................................... 207
ETR (Emergency tensioning retractor) .........................59
SRS indicator lamp .................................................. 206
Exterior lamp switch .......................................................84
Exterior lamps ............................................................... 243
Adjusting headlamp aim ......................................... 248
Bulb for high and low beam ................................... 245