2002 MERCEDES-BENZ SL500 Battery
[x] Cancel search: BatteryPage 8 of 302

5 Contents
Practical hints First aid kit ..................................... 216
Stowing things in the vehicle ...... 216
Vehicle tools .................................... 217
Vehicle jack ..................................... 218
Fuses ................................................ 219
Hood .................................................220
Automatic transmission
fluid level ...................................222
Checking engine oil level .............222
Coolant level ...................................224
Adding coolant ...............................225
Windshield and
headlamp washer
fluid mixing ratio ......................226
Wheels .............................................227
Tire replacement ............................227
Rotating wheels ..............................228
Spare wheel ....................................229
Changing wheels ........................... 231
Tire inflation pressure ..................235
Battery .............................................237
Battery Recycling .......................238Jump starting ................................. 239
Towing the vehicle ........................ 241
Exterior lamps ............................... 243
Headlamp assembly
(Halogen) .................................... 244
Taillamp assemblies .................. 250
Changing batteries in the
remote control ........................... 252
Synchronizing ............................ 253
Raising soft top manually ............ 254
Replacing wiper blade ................. 258
Manual release of
fuel filler flap ............................ 260
Trunk lamp ..................................... 260
Vehicle care Cleaning and care
of the vehicle ............................. 262
Power washer ............................. 263
Tar stains .................................... 263
Paintwork, Painted Body
Components ................................ 263
Engine cleaning ......................... 264
Vehicle washing ......................... 264Ornamental moldings ................264
Headlamps, taillamps,
turn signal lenses ......................264
Window cleaning .......................265
Light alloy wheels ......................265
Instrument cluster .....................265
Steering wheel and
gear selector lever ......................265
Cup holder ...................................265
Seat belts .....................................266
Headliner, shelf behind
roll bars, and other hard
plastic trim items .......................266
Soft top .........................................266
Headliner .....................................267
Wind screen ................................267
Automatic antenna .....................267
Wiper blade .................................267
Headlamp cleaning
system ..........................................267
Leather upholstery .....................268
Plastic and rubber parts ............268
Illuminated door sill panels .....268
Page 33 of 302
29 Central locking system
Te ch n ica l
data Instruments
and controlsOperationDrivingInstrument
cluster displayPractical hints Car care Index Note:
Do not give the master key to an unauthorized person.
Obtaining replacement keys
Your vehicle is equipped with a theft deterrent locking
system requiring a special key manufacturing process.
For security reasons, replacement keys can only be
obtained from your authorized Mercedes-Benz Center.
Central locking system
Remote control
Due to the extended operational range of the remote
control, it could be possible to unintentionally lock or
unlock the vehicle by pressing the transmit button.
The vehicle doors, trunk, storage compartment in
armrest, and fuel filler flap can be centrally locked and
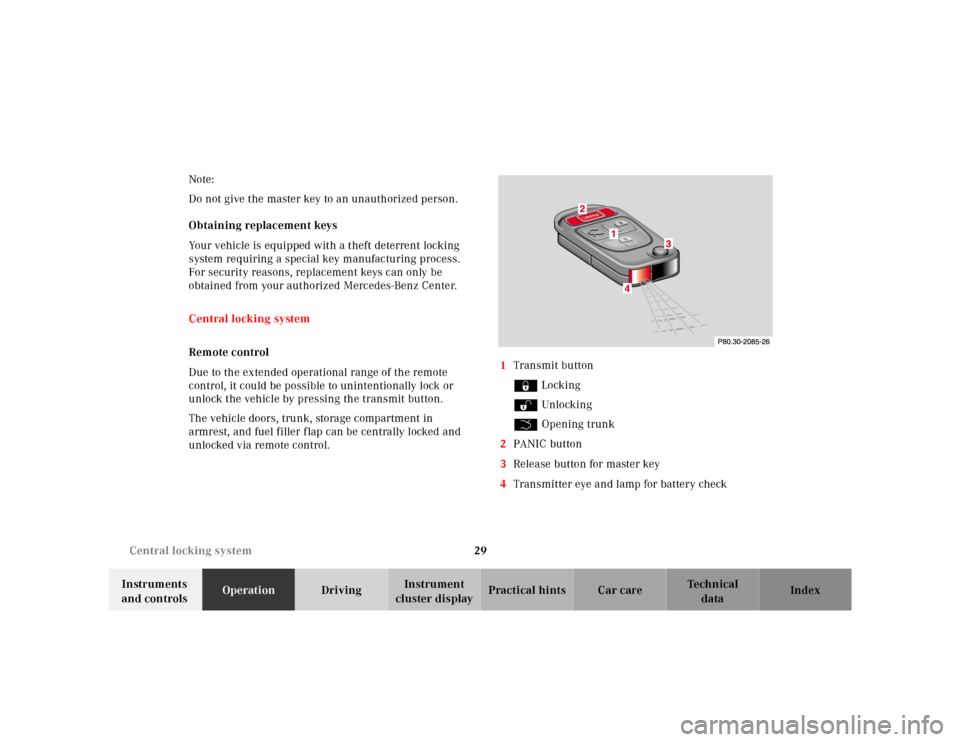
unlocked via remote control.1Transmit button
‹ Locking
ΠUnlocking
ŠOpening trunk
2PANIC button
3Release button for master key
4Transmitter eye and lamp for battery check
Page 34 of 302

30 Central locking system
Te ch n ica l
data Instruments
and controlsOperationDrivingInstrument
cluster displayPractical hints Car care Index
Locking and unlocking with remote control
Unlocking:
Press transmit button Œ. All turn signal lamps blink
once to indicate that the vehicle is unlocked.
The remote control can be programmed for two kinds of
unlocking modes (see below):
Selective unlocking mode –
Press transmit button Œonce to unlock driver’s door,
storage compartment in armrest, and fuel filler flap.
Press transmit button Πtwice to unlock both doors,
storage compartment in armrest, fuel filler flap, and
trunk.
Global unlocking mode –
Press transmit button Πonce to unlock both doors,
storage compartment in armrest, fuel filler flap, and
trunk.
Notes:
If the trunk was previously locked separately, it will
remain locked, see page 38.
The presently active unlocking mode (selective or
global) can only be determined by unlocking the vehicle
with the remote control (see below for changing mode).If within 40 seconds of unlocking with the remote
control, neither door is opened, the key is not inserted
in the steering lock, or the central locking switch is not
activated, the vehicle will automatically lock.
Locking:
Press transmit button ‹ once. All turn signal lamps
blink three times to indicate that the vehicle is locked.
Note:
If the vehicle cannot be locked or unlocked by pressing
the transmit button, then it may be necessary to change
the batteries in the remote control (if ok, battery check
lamp in transmitter will light briefly when transmitting)
or to synchronize the remote control, see page 252 and
page 253.
Page 35 of 302
31 Central locking system
Te ch n ica l
data Instruments
and controlsOperationDrivingInstrument
cluster displayPractical hints Car care Index Choosing global or selective mode on remote control
Press and hold transmit buttons ‹ and Œ
simultaneously for five seconds to reprogram the
remote control. Battery check lamp will blink two times
indicating the completed mode change.Opening the trunk
Press the transmit button Šuntil the trunk lid is
open.
Important!
Do not place remote control in trunk since trunk is
locked when the lid is closed if the vehicle is centrally
locked.
Note:
If the trunk was previously locked separately, it will
remain locked. See page 38.
Page 37 of 302
33 Central locking system
Te ch n ica l
data Instruments
and controlsOperationDrivingInstrument
cluster displayPractical hints Car care Index Start lock-out
Important!
Removing the key from the steering lock activates the
start lock-out. The engine cannot be started.
Turning the key in the steering lock to position 2
deactivates the start lock-out.
Note:
In case the engine cannot be started (vehicle’s battery is
in order), and Á and î are shown in the
odometer display field, the system is not operational.
Contact an authorized Mercedes-Benz Center or call
1-800-FOR-MERCedes (in the USA), or 1-800-387-0100
(in Canada).General notes on the central locking system
If the key in the steering lock is in position 2, the
vehicle cannot be locked or unlocked with the remote
control.
If the vehicle cannot be locked or unlocked:
• Aim transmitter eye at a receiver of either door
handle and press button‹ orŒ.
• Check the batteries of the remote control,
see page 252.
• Synchronize the remote control,
see page 253.
Page 44 of 302
40 Central locking system
Te ch n ica l
data Instruments
and controlsOperationDrivingInstrument
cluster displayPractical hints Car care Index
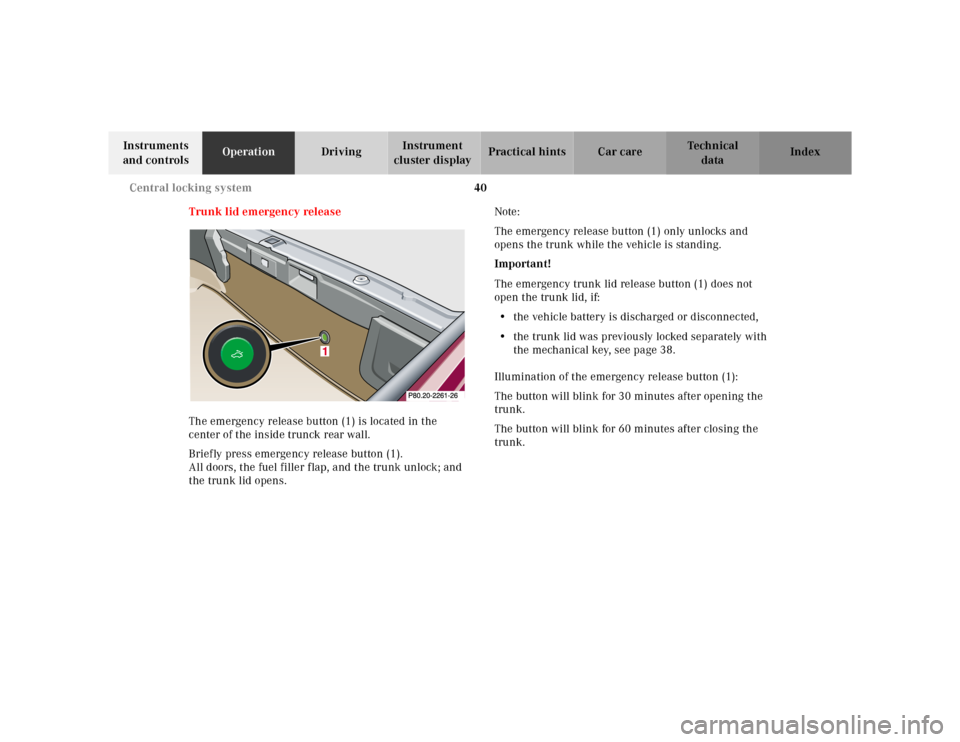
Trunk lid emergency release
The emergency release button (1) is located in the
center of the inside trunck rear wall.
Briefly press emergency release button (1).
All doors, the fuel filler flap, and the trunk unlock; and
the trunk lid opens.Note:
The emergency release button (1) only unlocks and
opens the trunk while the vehicle is standing.
Important!
The emergency trunk lid release button (1) does not
open the trunk lid, if:
• the vehicle battery is discharged or disconnected,
• the trunk lid was previously locked separately with
the mechanical key, see page 38.
Illumination of the emergency release button (1):
The button will blink for 30 minutes after opening the
trunk.
The button will blink for 60 minutes after closing the
trunk.
1
Page 55 of 302
51 Seats
Te ch n ica l
data Instruments
and controlsOperationDrivingInstrument
cluster displayPractical hints Car care Index Note:
When in operation, the seat heater consumes a large
amount of electrical power. It is not advisable to use the
seat heater longer than necessary.
The seat heaters may automatically switch off if too
many power consumers are switched on at the same
time, or if the battery charge is low. When this occurs,
the indicator lamp in the switch will blink (both
indicator lamps blink during rapid seat heating mode).
The seat heaters will switch on again automatically as
soon as sufficient voltage is available.
If the blinking of the indicator lamps is distracting to
you, the seat heaters can be switched off.
Page 80 of 302
76 Instrument cluster
Te ch n ica l
data Instruments
and controlsOperationDrivingInstrument
cluster displayPractical hints Car care Index
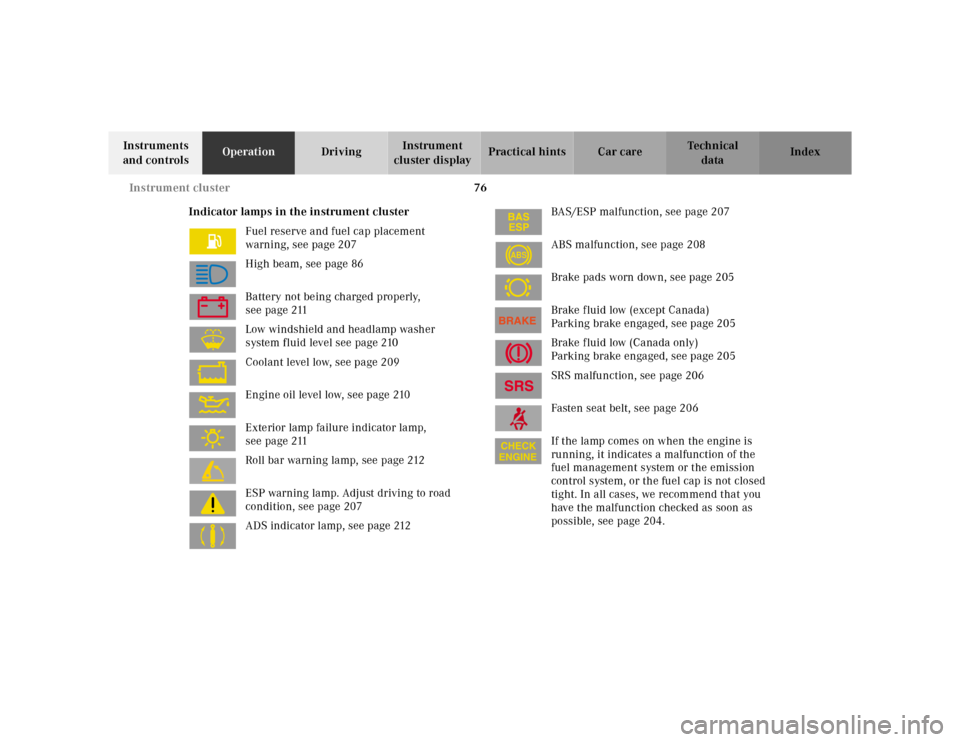
Indicator lamps in the instrument cluster
Fuel reserve and fuel cap placement
warning, see page 207
High beam, see page 86
Battery not being charged properly,
see page 211
Low windshield and headlamp washer
system fluid level see page 210
Coolant level low, see page 209
Engine oil level low, see page 210
Exterior lamp failure indicator lamp,
see page 211
Roll bar warning lamp, see page 212
ESP warning lamp. Adjust driving to road
condition, see page 207
ADS indicator lamp, see page 212BAS/ESP malfunction, see page 207
ABS malfunction, see page 208
Brake pads worn down, see page 205
Brake fluid low (except Canada)
Parking brake engaged, see page 205
Brake fluid low (Canada only)
Parking brake engaged, see page 205
SRS malfunction, see page 206
Fasten seat belt, see page 206
If the lamp comes on when the engine is
running, it indicates a malfunction of the
fuel management system or the emission
control system, or the fuel cap is not closed
tight. In all cases, we recommend that you
have the malfunction checked as soon as
possible, see page 204.
ABS