Page 309 of 430

306 Malfunction and indicator lamps
Te ch n i c a l
data Instruments
and controlsOperation DrivingInstrument
cluster displayPractical hints Car care Index
ABS malfunction indicator lamp
The ABS malfunction indicator lamp in the
instrument cluster comes on with the
electronic key in starter switch position 2
and should go out with the engine running.
When the ABS malfunction indicator lamp in the
instrument cluster remains illuminated while the
engine is running, it indicates that the ABS has detected
a malfunction and has switched off. In this case, the
brake system functions in the usual manner, but
without antilock assistance.
A malfunctioning ABS control unit can possibly affect
the operation of other systems (e.g. Parktronic,
Navigation, Automatic transmission). Be guided
accordingly with respect to the use of those systems and
have the system checked at your authorized
Mercedes-Benz Center as soon as possible.With the ABS malfunctioning, the BAS and ESP are also
switched off. The malfunction indicator lamp and
malfunction messages in the multifunction display
come on with the engine running.
If the charging voltage falls below 10 volts, the
malfunction indicator lamp comes on and the ABS is
switched off. When the voltage is above this value again,
the malfunction indicator lamp should go out and the
ABS is operational.
Have the system checked at your authorized
Mercedes-Benz Center as soon as possible.
See page 278 for notes on antilock brake system (ABS).
ABS
Page 315 of 430
312 Malfunction and warning messages
Te ch n i c a l
data Instruments
and controlsOperation DrivingInstrument
cluster displayPractical hints Car care Index
ENTRY POSITION
* C = Category, see page 309Wait until the seat and steering wheel have moved to
their driving positions. The display will clear when they
have done so.
See also page 63 for easy-entry / exit feature.BRAKE ASSIST
* C = Category, see page 309A malfunction has been detected in the system. The
brake system functions in the usual manner, but
without brake assist system (BAS).
See page 277 for notes on the brake assist system (BAS).
Line 1 Line 2 C*
ENTRY POSITION DO NOT DRIVE! 1
Line 1 Line 2 C*
BRAKE ASSIST VISIT WORKSHOP! 2
Page 316 of 430
313 Malfunction and warning messages
Te ch n i c a l
data Instruments
and controlsOperation DrivingInstrument
cluster displayPractical hints Car care Index BRAKE PAD WEAR
* C = Category, see page 309When this message appears during braking, it indicates
that the brake pads are worn down.
Have the brake system checked at your authorized
Mercedes-Benz Center as soon as possible.BRAKE FLUID
* C = Category, see page 309 Line 1 Line 2 C*
BRAKE PAD WEAR VISIT WORKSHOP! 2Line 1 Line 2 C*
BRAKE FLUID VISIT WORKSHOP! 2Wa r n i n g !
Driving with this message displayed can result in
an accident. Have your brake system checked
immediately. Don’t add brake fluid before checking
the brake system. Overfilling the brake fluid
reservoir can result in spilling brake fluid on hot
engine parts and the brake fluid catching fire. You
can be seriously burned.
Page 317 of 430
314 Malfunction and warning messages
Te ch n i c a l
data Instruments
and controlsOperation DrivingInstrument
cluster displayPractical hints Car care Index
PA R K I N G B R A K E
* C = Category, see page 309
TRUNK OPEN* C = Category, see page 309 Line 1 Line 2 C*
PARKING BRAKE RELEASE PARKING BRAKE! 1Line 1 Line 2 C*
TRUNK OPEN! 2
Page 321 of 430
318 Malfunction and warning messages
Te ch n i c a l
data Instruments
and controlsOperation DrivingInstrument
cluster displayPractical hints Car care Index
LIGHTING SYSTEM
Line 1 Line 2 C*
LOW BEAM, L CHECK LAMPS! 2
LOW BEAM, R CHECK LAMPS! 2
DISPLAY DEFECTIVE VISIT WORKSHOP!
1
2
TURN SIGNAL LR CHECK LAMPS! 2
TURN SIGNAL RR CHECK LAMPS! 2
TURN SIGNAL IN MIRROR, L CHECK LAMPS! 2
TURN SIGNAL IN MIRROR, R CHECK LAMPS! 2
TURN SIGNAL LF CHECK LAMPS! 2
TURN SIGNAL RF CHECK LAMPS! 2
BRAKE LAMP
2
VISIT WORKSHOP! 2
BRAKE LAMP, L
3
CHECK LAMPS! 2
BRAKE LAMP, R
3
CHECK LAMPS! 2
3RD BRAKE LAMP
3
CHECK LAMPS! 2
HIGH BEAM, L CHECK LAMPS! 2
HIGH BEAM, R CHECK LAMPS! 2
LICENSE PLATE LAMP, L CHECK LAMPS! 2
LICENSE PLATE LAMP, R CHECK LAMPS! 2
TURN OFF LAMPS! 1
FRONT FOGLAMP, L CHECK LAMPS! 2
FRONT FOGLAMP, R CHECK LAMPS! 2
REAR FOGLAMP CHECK LAMPS! 2
REVERSE LAMP, L CHECK LAMPS! 2 Line 1 Line 2 C*
Page 322 of 430

319 Malfunction and warning messages
Te ch n i c a l
data Instruments
and controlsOperation DrivingInstrument
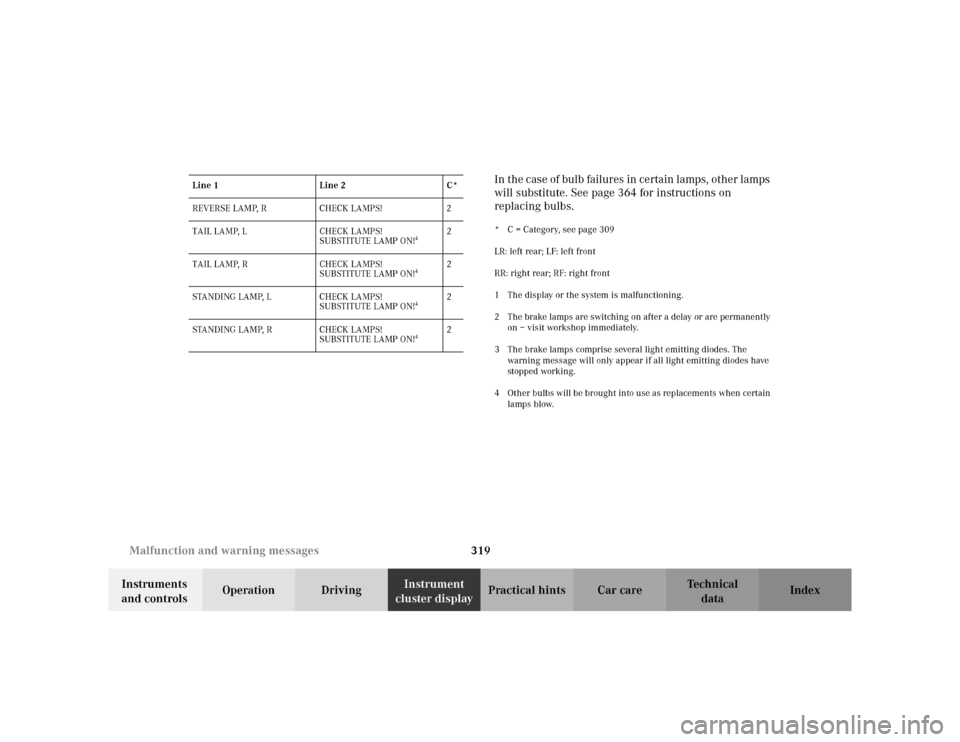
cluster displayPractical hints Car care IndexIn the case of bulb failures in certain lamps, other lamps
will substitute. See page 364 for instructions on
replacing bulbs.
* C = Category, see page 309
LR: left rear; LF: left front
RR: right rear; RF: right front
1 The display or the system is malfunctioning.
2 The brake lamps are switching on after a delay or are permanently
on – visit workshop immediately.
3 The brake lamps comprise several light emitting diodes. The
warning message will only appear if all light emitting diodes have
stopped working.
4 Other bulbs will be brought into use as replacements when certain
lamps blow. REVERSE LAMP, R CHECK LAMPS! 2
TAIL LAMP, L CHECK LAMPS!
SUBSTITUTE LAMP ON!
4
2
TAIL LAMP, R CHECK LAMPS!
SUBSTITUTE LAMP ON!
4
2
STANDING LAMP, L CHECK LAMPS!
SUBSTITUTE LAMP ON!
4
2
STANDING LAMP, R CHECK LAMPS!
SUBSTITUTE LAMP ON!
4
2 Line 1 Line 2 C*
Page 326 of 430

323 Malfunction and warning messages
Te ch n i c a l
data Instruments
and controlsOperation DrivingInstrument
cluster displayPractical hints Car care Index
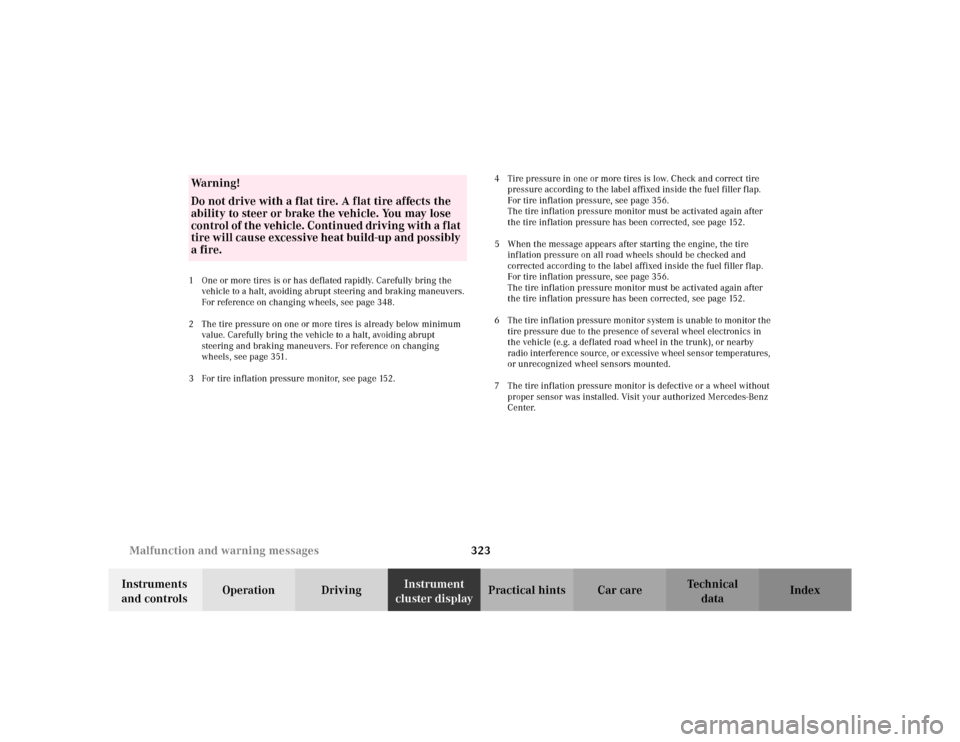
1 One or more tires is or has deflated rapidly. Carefully bring the
vehicle to a halt, avoiding abrupt steering and braking maneuvers.
For reference on changing wheels, see page 348.
2 The tire pressure on one or more tires is already below minimum
value. Carefully bring the vehicle to a halt, avoiding abrupt
steering and braking maneuvers. For reference on changing
wheels, see page 351.
3 For tire inflation pressure monitor, see page 152.4 Tire pressure in one or more tires is low. Check and correct tire
pressure according to the label affixed inside the fuel filler flap.
For tire inflation pressure, see page 356.
The tire inf lation pressure monitor must be activated again after
the tire inflation pressure has been corrected, see page 152.
5 When the message appears after starting the engine, the tire
inflation pressure on all road wheels should be checked and
corrected according to the label affixed inside the fuel filler flap.
For tire inflation pressure, see page 356.
The tire inf lation pressure monitor must be activated again after
the tire inflation pressure has been corrected, see page 152.
6 The tire inflation pressure monitor system is unable to monitor the
tire pressure due to the presence of several wheel electronics in
the vehicle (e.g. a deflated road wheel in the trunk), or nearby
radio interference source, or excessive wheel sensor temperatures,
or unrecognized wheel sensors mounted.
7 The tire inflation pressure monitor is defective or a wheel without
proper sensor was installed. Visit your authorized Mercedes-Benz
Center.Wa r n i n g !
Do not drive with a flat tire. A flat tire affects the
ability to steer or brake the vehicle. You may lose
control of the vehicle. Continued driving with a flat
tire will cause excessive heat build-up and possibly
a fire.
Page 340 of 430

337 Fuses
Te ch n i c a l
data Instruments
and controlsOperation DrivingInstrument
cluster displayPractical hintsCar care Index Fuses
Most of your vehicle’s electrical components are fused
with safety fuses. With the exception of the brake lights,
all individual lighting system components are
electronically fused. Before replacing a blown safety
fuse, determine the cause of the short circuit. Always
observe amperage and color of fuse.
The circuit for components is protected by a cycled
circuit breaker interrupted if too much current is being
drawn. The circuit closes automatically after a short
time; the circuit is broken again if the malfunction
reoccurs.
Always use a new fuse for replacement. Never attempt to
repair or bridge a blown fuse.
A fuse chart, spare fuses and a fuse extractor are located
in the vehicle tool kit in the luggage bowl under the
trunk floor. See page 346 for notes on the vehicle tool
kit.Fuse boxes in the engine compartment
1Fuse box in engine compartment, left-hand side
3Ta b s
3
3
1
P54.15-2007-26