2002 MERCEDES-BENZ S500 Control arm
[x] Cancel search: Control armPage 236 of 430
233 Starter switch — KEYLESS-GO
Te ch n i c a l
data Instruments
and controlsOperationDrivingInstrument
cluster displayPractical hints Car care Index “On” position
(starter switch position 1, see page 230).
Most electrical consumers can be operated. For detailed
information see respective subjects.
Operation / driving position
(starter switch position 2, see page 230).
All electrical consumers can be operated. Gear selector
is unlocked.
“Off” position
(electronic key removable from starter switch).
Most electrical consumers cannot be operated.
The selector lever is locked in position “P”.
Notes:
For improved recognition of the KEYLESS-GO-card the
doors should be closed when pressing the start- / stop
button.
The gear selector lever can only be moved with the
vehicle battery charged and connected, and the starter
switch in the Operation position. With the gear selector
lever in position “P”, the brake pedal must also be
depressed.Important!
For the KEYLESS-GO-system to function properly, the
operator should observe the following:
•If the KEYLESS-GO-card is positioned farther away
from the vehicle (e.g. inside clothing or a briefcase),
the vehicle cannot be locked (see page 38) or started
with the start-/stop button (see page 235).
•If the KEYLESS-GO-card is removed from the vehicle
while the engine is running, or by placing the card
in front of the center armrest (see page 198), the
message “CHIP-CARD – NOT RECOGNIZED!” will
appear repeatedly for approx. 2 seconds in the
multifunction display, see page 328.
If the message “CHIP - CARD – NOT RECOGNIZED”
is ignored for an extended of time (approx.
15 minutes), the engine could stop by itself during a
vehicle stop (e.g. traffic light). The vehicle can then
no longer be centrally locked or the engine
restarted. You must first find the card. Start the
engine again.
Page 245 of 430
242 Automatic transmission
Te ch n i c a l
data Instruments
and controlsOperationDrivingInstrument
cluster displayPractical hints Car care Index
Briefly press selector lever in the “D +” direction:
The transmission will shift from the current gear range
to the next higher gear range. If the transmission is
already in gear range “D”, an additional upshift of one
gear is possible.
Press and hold selector lever in the “D +” direction:
The transmission will shift from the current gear
directly to gear range “D”.
Important!
With transmission in gear range “D”, “4” or “3”,
upshifting from 1st to 2nd to 3rd gear is delayed
depending on vehicle speed and engine temperature.
This allows the catalytic converter to heat up more
quickly to operating temperatures.
During the brief warm-up period this delayed upshift
and increased engine noise might be perceived as a malfunction. However, neither the engine nor
transmission are negatively affected by this mode of
operation.
The delayed upshift is effective with vehicle speeds
below 31 mph (50 km/h) at partial throttle and engine
temperatures below 95
°F (35
°C).
To avoid overrevving the engine when the selector lever
is m ove d to a lower gear range , t he tran smi ss ion will n ot
shift to a lower gear, if the engine’s revolutions per
minute limit would be exceeded. In this case there will
be no downshift, even when the vehicle speed reaches
the engine’s rpm limit of that gear, e.g. by applying the
service brakes.
To prevent the engine from laboring at low RPM when
driving uphill gradients or with your vehicle heavily
loaded, the automatic transmission will downshift when
necessary to maintain engine RPM within the best
torque range.
Wa r n i n g !
On slippery road surfaces, never downshift in order
to obtain braking action. This could result in drive
wheel slip and reduced vehicle control. Your
vehicle’s ABS will not prevent this type of loss of
control.
Page 250 of 430

247 Driving instructions
Te ch n i c a l
data Instruments
and controlsOperationDrivingInstrument
cluster displayPractical hints Car care Index Driving instructions
Drive sensibly – Save Fuel
Fuel consumption, to a great extent, depends on driving
habits and operating conditions.
To save fuel you should:
•keep tires at the recommended inflation pressures,
•remove unnecessary loads,
•remove roof rack when not in use,
•allow engine to warm up under low load use,
•avoid frequent acceleration and deceleration,
•have all maintenance work performed at regular
intervals by an authorized Mercedes-Benz Center.
Fuel consumption is also increased by driving in cold
weather, in stop-and-go traffic, on short trips and in hilly
country.Drinking and driving
Ped al s
Wa r n i n g !
Drinking or taking drugs and driving can be a very
dangerous combination. Even a small amount of
alcohol or drugs can affect your reflexes,
perceptions and judgement.The possibility of a serious or even fatal accident is
sharply increased when you drink or take drugs
and drive.Please don’t drink or take drugs and drive or allow
anyone to drive after drinking or taking drugs.Wa r n i n g !
Keep driver’s foot area clear at all times. Objects
stored in this area may impair pedal movement.
Page 251 of 430

248 Driving instructions
Te ch n i c a l
data Instruments
and controlsOperationDrivingInstrument
cluster displayPractical hints Car care Index
Power assistance
BrakesExcessive use of salt and other snow melting chemicals
spread on roads during the winter months may cause a
build up of moisture or residue to form on the braking
components. This build up or residue could cause light
corrosion of the braking components if the vehicle is
parked with the brakes cold. Apply steady and even
braking pressure when stopping the vehicle to warm up
and dry the brake components.
Important!
Please pay attention to the function of the brake assist
system (BAS), see page 277.
The condition of the parking brake system is checked
each time the vehicle is in the shop for the required
maintenance service at an authorized Mercedes-Benz
Center.
Wa r n i n g !
When the engine is not running, the brake and
steering systems are without power assistance.
Under these circumstances, a much greater effort is
necessary to stop or steer the vehicle.Wa r n i n g !
After driving in heavy rain for some time without
applying the brakes or through water deep enough
to wet brake components or salty road conditions,
the first braking action may be somewhat reduced
and increased pedal pressure may be necessary to
obtain expected braking effect. Be sure to maintain
a safe distance from vehicles in front.Resting your foot on the brake pedal will cause
excessive and premature wear of the brake pads.It can also result in the brakes overheating thereby
significantly reducing their effectiveness. It may
not be possible to stop the vehicle in sufficient time
to avoid an accident.
Page 252 of 430
249 Driving instructions
Te ch n i c a l
data Instruments
and controlsOperationDrivingInstrument
cluster displayPractical hints Car care Index If the parking brake is released and the brake warning
lamp in the instrument cluster stays on, the brake fluid
level in the reservoir is too low.
Brake pad wear or a leak in the system may be the
reason for low brake fluid in the reservoir.
Have the brake system inspected at an authorized
Mercedes-Benz Center immediately.
All checks and service work on the brake system should
be carried out by an authorized Mercedes-Benz Center.
Install only brake pads and brake fluid recommended by
Mercedes-Benz.Caution!
When driving down long and steep grades, relieve the
load on the brakes by shifting into a lower gear to use
the engine’s braking power. This helps prevent
overheating of the brakes and reduces brake pad wear.
After hard braking, it is advisable to drive on for some
time, rather than immediately parking, so the air stream
will cool down the brakes faster.
Driving off
Apply the service brakes to test them briefly after
driving off. Perform this procedure only when the road
is clear of other traffic.
Warm up the engine smoothly. Do not place full load on
the engine until the operating temperature has been
reached.
When starting off on a slippery surface, do not allow one
drive wheel to spin for an extended period with the ESP
switched off. Doing so may cause serious damage to the
drive train which is not covered by the Mercedes-Benz
Limited Warranty.
Wa r n i n g !
If other than recommended brake pads are
installed, or other than recommended brake fluid
is used, the braking properties of the vehicle can be
degraded to an extent that safe braking is
substantially impaired. This could result in an
accident.
Page 265 of 430
262 Driving systems
Te ch n i c a l
data Instruments
and controlsOperationDrivingInstrument
cluster displayPractical hints Car care Index
Note:
For operation in the USA only: This device complies
with Part 15 of the FCC Rules. Operation is subject to
the following two conditions:
(1) This device may not cause harmful interference, and
(2) this device must accept any interference received,
including interference that may cause undesired
operation.
Any unauthorized modification to this device could void
the user’s authority to operate the equipment.
Wa r n i n g !
Only use Distronic if the traffic and weather
conditions make it advisable to travel at a steady
speed.Use of Distronic can be dangerous on winding
roads or in heavy traffic because conditions do not
allow safe driving at a steady speed.
Use of Distronic can be dangerous on slippery
roads. Rapid changes in tire adhesion can result in
wheel spin and loss of control.
Distronic does not act upon adverse sight distance
conditions. Do not use Distronic during conditions
of fog and heavy rain, snow or sleet.The “Resume” function should only be operated if
the driver is fully aware of the previously set speed
and wishes to resume this particular preset speed.Distronic does not recognize accordingly and will
not react to stationary objects. It is designed and
intended only to maintain a set speed and keep a
set distance from moving objects in front of it.
Page 350 of 430
347 Vehicle jack
Te ch n i c a l
data Instruments
and controlsOperation DrivingInstrument
cluster displayPractical hintsCar care Index Ve h i c l e j a c k
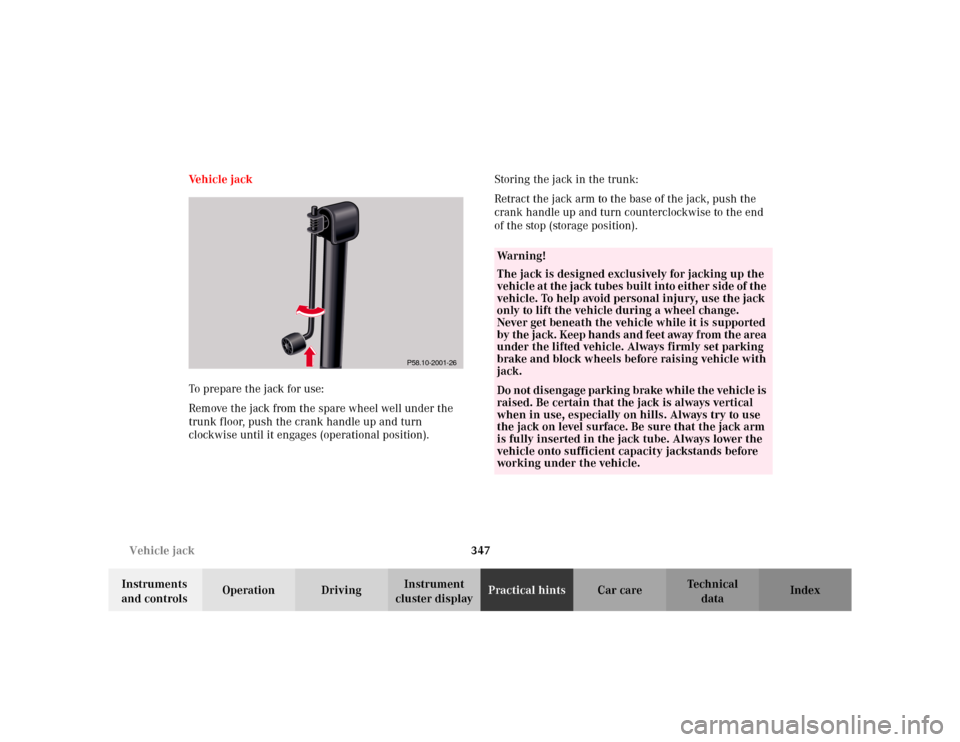
To prepare the jack for use:
Remove the jack from the spare wheel well under the
trunk floor, push the crank handle up and turn
clockwise until it engages (operational position).Storing the jack in the trunk:
Retract the jack arm to the base of the jack, push the
crank handle up and turn counterclockwise to the end
of the stop (storage position).
P58.10-2001-26
Wa r n i n g !
The jack is designed exclusively for jacking up the
vehicle at the jack tubes built into either side of the
vehicle. To help avoid personal injury, use the jack
only to lift the vehicle during a wheel change.
Never get beneath the vehicle while it is supported
by the jack. Keep hands and feet away from the area
under the lifted vehicle. Always firmly set parking
brake and block wheels before raising vehicle with
jack.Do not disengage parking brake while the vehicle is
raised. Be certain that the jack is always vertical
when in use, especially on hills. Always try to use
the jack on level surface. Be sure that the jack arm
is fully inserted in the jack tube. Always lower the
vehicle onto sufficient capacity jackstands before
working under the vehicle.
Page 354 of 430
351 Tires, Wheels
Te ch n i c a l
data Instruments
and controlsOperation DrivingInstrument
cluster displayPractical hintsCar care Index Changing wheelsMove vehicle to a level area which is a safe distance
from the roadway.
1. Set parking brake and turn on hazard warning
flasher.
2. Move selector lever to position “P” and turn off
engine.
3. Prevent vehicle from rolling away by blocking
wheels with wheel chocks (not supplied with
vehicle) or sizable wood block or stone. When
changing a wheel on a hill, place chocks on the
downhill side blocking both wheels of the other
axle. On an level road, place one chock in front of
and one behind the wheel that is diagonally
opposite to the wheel being changed.
Wa r n i n g !
The jack is designed exclusively for jacking up the
vehicle at the jack tubes built into either side of the
vehicle. To help avoid personal injury, use the jack
only to lift the vehicle during a wheel change.
Never get beneath the vehicle while it is supported
by the jack. Keep hands and feet away from the area
under the lifted vehicle. Always firmly set parking
brake and block wheels before raising vehicle with
jack.Do not disengage parking brake while the vehicle is
raised. Be certain that the jack is always vertical
when in use, especially on hills. Always try to use
the jack on level surface. Be sure that the jack arm
is fully inserted in the jack tube. Always lower the
vehicle onto sufficient capacity jackstands before
working under the vehicle.