2002 MERCEDES-BENZ S500 Page 33
[x] Cancel search: Page 33Page 72 of 430
69 Seats
Te ch n i c a l
data Instruments
and controlsOperationDrivingInstrument
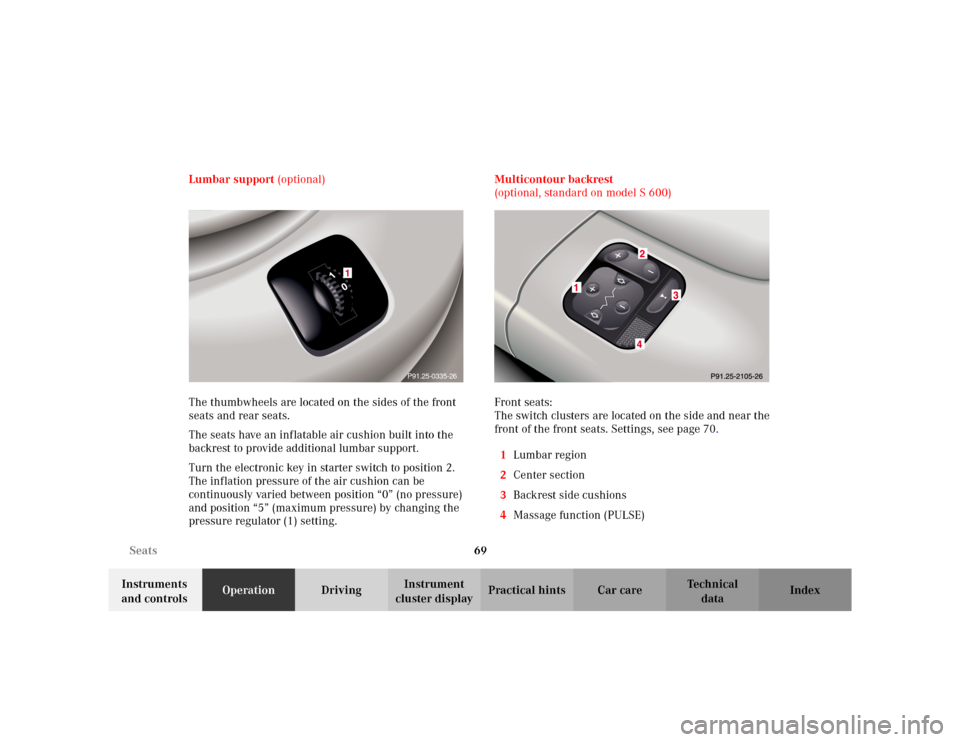
cluster displayPractical hints Car care Index Lumbar support (optional)
The thumbwheels are located on the sides of the front
seats and rear seats.
The seats have an inflatable air cushion built into the
backrest to provide additional lumbar support.
Turn the electronic key in starter switch to position 2.
The inflation pressure of the air cushion can be
continuously varied between position “0” (no pressure)
and position “5” (maximum pressure) by changing the
pressure regulator (1) setting.Multicontour backrest
(optional, standard on model S 600)
Front seats:
The switch clusters are located on the side and near the
front of the front seats. Settings, see page 70.
1Lumbar region
2Center section
3Backrest side cushions
4Massage function (PULSE)
P91.25-0335-26
1
Page 77 of 430

74 Seats
Te ch n i c a l
data Instruments
and controlsOperationDrivingInstrument
cluster displayPractical hints Car care Index
Seat ventilation system
(optional, standard on model S 600)
The buttons are located on each door.
Seat ventilation can be activated manually with the
electronic key in starter switch positions 1 or 2, or by
the summer opening function (driver’s seat only), see
page 43.
Notes:
When in operation, the seat ventilation system
consumes a large amount of electrical power. It is not
advisable to use the seat ventilator longer than
necessary.The seat ventilators may automatically switch off if too
many power consumers are switched on at the same
time or if the battery charge is low. In this case, one or
more indicator lamps will blink.
The seat ventilation switch back on again automatically
as soon as sufficient voltage is available.
If the blinking of the indicator lamps is distracting to
you, the seat ventilators can be switched off.
The maximum ventilation level (level 3) is automatically
selected if the driver’s seat ventilation is activated by
the summer opening function, see page 43.
Page 83 of 430
80 Seats
Te ch n i c a l
data Instruments
and controlsOperationDrivingInstrument
cluster displayPractical hints Car care Index
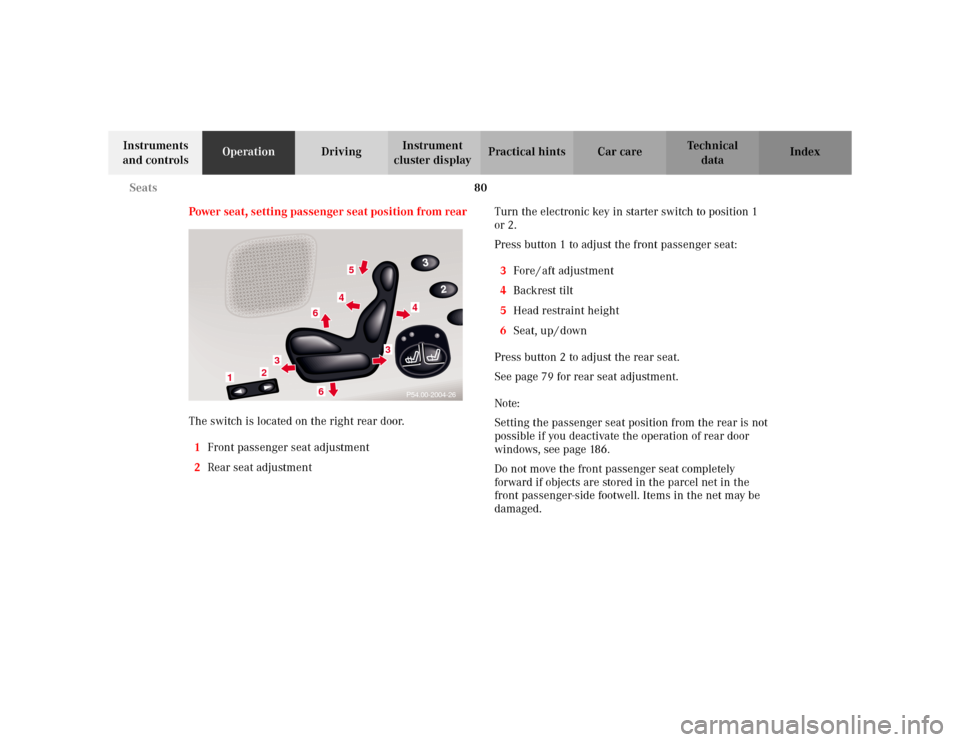
Power seat, setting passenger seat position from rear
The switch is located on the right rear door.
1Front passenger seat adjustment
2Rear seat adjustmentTurn the electronic key in starter switch to position 1
or 2.
Press button 1 to adjust the front passenger seat:
3Fore / aft adjustment
4Backrest tilt
5Head restraint height
6Seat, up / down
Press button 2 to adjust the rear seat.
See page 79 for rear seat adjustment.
Note:
Setting the passenger seat position from the rear is not
possible if you deactivate the operation of rear door
windows, see page 186.
Do not move the front passenger seat completely
forward if objects are stored in the parcel net in the
front passenger-side footwell. Items in the net may be
damaged.
5
3
4
4
66
3
1
2
P54.00-2004-26
Page 85 of 430
82 Restraint systems
Te ch n i c a l
data Instruments
and controlsOperationDrivingInstrument
cluster displayPractical hints Car care Index
Seat belt nonusage warning system
With the electronic key in starter switch position 2, a
warning sounds for a short time if the driver’s seat belt
is not fastened.
Automatic comfort-fit seat belt:
An automatic comfort-fit feature for all seat belt is
activated when the electronic key in the starter switch is
turned to position 1 or 2.
The retraction force of the inertia reel is reduced,
increasing the level of seat belt comfort.
Note:
For cleaning and care of the seat belts see page 389.
Wa r n i n g !
Never ride in a moving vehicle with the backrest
reclined. Sitting in an excessively reclined position
can be dangerous. You could slide under the seat
belt in a collision. If you slide under it, the belt
would apply force at the abdomen or neck. That
could cause serious or even fatal injuries. The
backrest and seat belt provide the best restraint
when the wearer is in an upright position and the
belt is properly positioned on the body.
Page 91 of 430
88 Restraint systems
Te ch n i c a l
data Instruments
and controlsOperationDrivingInstrument
cluster displayPractical hints Car care Index
BabySmart
TM airbag deactivation system
Special BabySmart
TM compatible child seats, designed
for use with the Mercedes-Benz system and available at
any authorized Mercedes-Benz Center are required for
use with the BabySmart
TM airbag deactivation system.
With the special child seat properly installed, the
passenger front airbag will not deploy.
The 7 indicator lamp located on the center console
will be illuminated, except with electronic key removed
or in starter switch position 0. The system does not
deactivate the door mounted side impact airbag.
Self-test BabySmart
TM without special child seat
installed
After turning electronic key in starter switch to
position 1 or 2, the 7 indicator lamp located on the
center console comes on for approximately 6 seconds
and then extinguishes.
If the indicator lamp should not come on or is
continuously lit, the system is not functioning. You must
see an authorized Mercedes-Benz Center before seating
any child on the front passenger seat. See page 308 for
notes on the 7 indicator lamp.
BabySmart
TM is a trademark of Siemens Automotive Corp.
Wa r n i n g !
The BabySmart
TM airbag deactivation system will
ONLY work with a special child seat designed to
operate with it. It will not work with child seats
which are not BabySmart
TM compatible.
Never place anything between seat cushion and
child seat (e.g. pillow), since it reduces the
effectiveness of the deactivation system. The
bottom of the child seat must make full contact
with the passenger seat cushion. An incorrectly
mounted child seat could cause injuries to the
child in case of an accident instead of protecting
the child.Follow the manufacturer’s instructions for
installation of special child seats.The passenger front airbag will not deploy only if
the 7 indicator lamp remains illuminated.Please be sure to check the indicator every time
you use the special system child seat. Should the
light go out while the restraint is installed, please
check installation. If the light remains out, do not
use the BabySmart
TM restraint to transport children
on the front passenger seat until the system has
been repaired.
Page 95 of 430

92 Restraint systems
Te ch n i c a l
data Instruments
and controlsOperationDrivingInstrument
cluster displayPractical hints Car care Index
come on at all or if it fails to extinguish after
approximately 4 seconds or if it comes on thereafter, a
malfunction in the system has been detected.
The following system components are monitored or
undergo a self-check: crash-sensor(s), airbag ignition
circuits, front seat belt buckles, emergency tensioning
retractors, seat sensor.
Initially, when the electronic key is turned from starter
switch position 0 to position 1 or 2, malfunctions in the
crash sensor are detected and indicated (the “SRS”
indicator lamp stays on longer than 4 seconds or does
not come on).
Have the system checked at your authorized
Mercedes-Benz Center immediately.
In the operational mode, after the indicator lamp has
gone out following the initial check, interruptions or
short circuits in the airbag ignition circuit and in the
driver and front passenger seat belt buckle harnesses,
and low voltage in the entire system are detected and
indicated.Note:
See page 305 for information on the Supplemental
Restraint System (SRS) indicator lamp.
The driver and passenger front airbags are designed to
activate only in certain frontal impacts exceeding a
preset threshold. The front passenger airbag deploys
only if the front passenger seat is occupied and the
7 indicator lamp on the center console is not
illuminated.
Note:
Heavy objects on the front passenger seat can appear to
the “SRS” to indicate the presence of an occupant in
that seat which causes the passenger front airbag to
deploy in a crash exceeding the appropriate threshold.
Wa r n i n g !
In the event a malfunction of the “SRS” is indicated
as outlined above, the “SRS” may not be
operational. For your safety, we strongly
recommend that you visit an authorized
Mercedes-Benz Center immediately to have the
system checked; otherwise the “SRS” may not be
activated when needed in an accident, which could
result in serious or fatal injury, or it might deploy
unexpectedly and unnecessarily which could also
result in injury.
Page 102 of 430
99 Restraint systems
Te ch n i c a l
data Instruments
and controlsOperationDrivingInstrument
cluster displayPractical hints Car care Index Infant and child restraint systems
We recommend all infants and children be properly
restrained at all times while the vehicle is in motion. All
lap-shoulder belts except the driver’s seat belt have
special seat belt retractors for secure fastening of child
restraints.
To activate, pull shoulder belt out completely and let it
retract. During the seat belt retraction a ratcheting
sound can be heard to indicate that the special seat belt
retractor is activated. The belt is now locked.
To deactivate, release seat belt buckle and let seat belt
retract completely. The seat belt can again be used in
the usual manner
Note:
For child seats with mounting fittings for tether
anchorages refer to page 101 (installation of infant and
child restraint systems).Important!
The use of infant or child restraints is required by law in
all 50 states and all Canadian provinces.
Infants and small children should be seated in an
appropriate infant or child restraint system properly
secured by a lap-shoulder belt, and that complies with
U.S. Federal Motor Vehicle Safety Standard 213 and
Canadian Motor Vehicle Safety Standard 213.
A statement by the child restraint manufacturer of
compliance with this standard can be found on the
instruction label on the restraint and in the instruction
manual provided with the restraint.
When using any infant or child restraint system, be sure
to carefully read and follow all manufacturer’s
instructions for installation and use.
Please read and observe warning labels affixed to inside
of vehicle and to infant or child restraints.
Wa r n i n g !
Never release the seat belt buckle while vehicle is
in motion, since the special seat belt retractor will
be deactivated.
Page 105 of 430
102 Steering wheel adjustment
Te ch n i c a l
data Instruments
and controlsOperationDrivingInstrument
cluster displayPractical hints Car care Index
Steering wheel adjustment
To adjust the steering wheel position, turn the electronic
key in starter switch to position 1 or 2. With the driver’s
door open, the steering wheel can also be operated with
the electronic key removed or in starter switch
position 0. However any adjustment will be cancelled
and the steering wheel will return to it’s position stored
in memory if the driver’s door is closed or the electronic
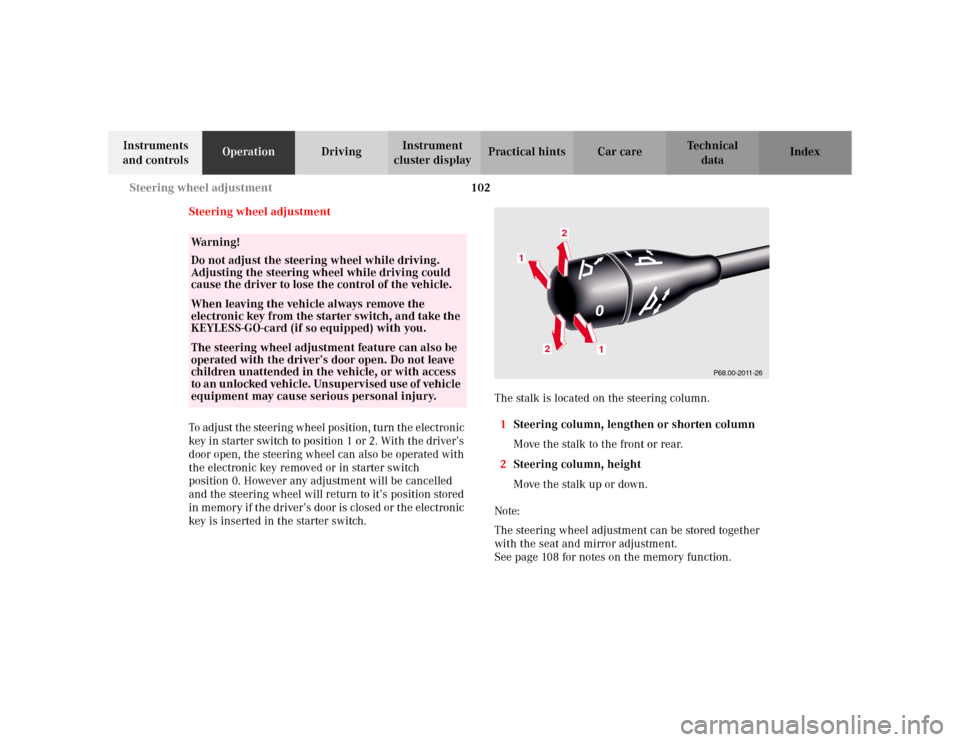
key is inserted in the starter switch.The stalk is located on the steering column.
1Steering column, lengthen or shorten column
Move the stalk to the front or rear.
2Steering column, height
Move the stalk up or down.
Note:
The steering wheel adjustment can be stored together
with the seat and mirror adjustment.
See page 108 for notes on the memory function.
Wa r n i n g !
Do not adjust the steering wheel while driving.
Adjusting the steering wheel while driving could
cause the driver to lose the control of the vehicle.When leaving the vehicle always remove the
electronic key from the starter switch, and take the
KEYLESS-GO-card (if so equipped) with you. The steering wheel adjustment feature can also be
operated with the driver’s door open. Do not leave
children unattended in the vehicle, or with access
to an unlocked vehicle. Unsupervised use of vehicle
equipment may cause serious personal injury.
P68.00-2011-26
1
1
2
2