2002 MERCEDES-BENZ S500 hand
[x] Cancel search: handPage 67 of 430
64 Seats
Te ch n i c a l
data Instruments
and controlsOperationDrivingInstrument
cluster displayPractical hints Car care Index
Front seat adjustment
To operate the front power seat adjustment switches,
turn the electronic key in starter switch to position 1
or 2 (with a front door open, the respective power seats
can also be operated with the electronic key removed or
in starter switch position 0).
Wa r n i n g !
Do not adjust the driver’s seat while driving.
Adjusting the seat while driving could cause the
driver to lose control of the vehicle.Never ride in a moving vehicle with the seat back
reclined. Sitting in an excessively reclined position
can be dangerous. You could slide under the seat
belt in a collision. If you slide under it, the belt
would apply force at the abdomen or neck. That
could cause serious or fatal injuries. The seat back
and seat belts provide the best restraint when the
wearer is in an upright position and belts are
properly positioned on the body.Never place hands under seat or near any moving
parts while a seat is being adjusted.
When leaving the vehicle always remove the
electronic key from the starter switch, take the
KEYLESS-GO-card (if so equipped) with you, and
lock your vehicle. The power seats can also be operated with the
driver’s or front passenger door open. Do not leave
children unattended in the vehicle, or with access
to an unlocked vehicle. Unsupervised use of vehicle
equipment may cause serious personal injury.
Page 69 of 430
66 Seats
Te ch n i c a l
data Instruments
and controlsOperationDrivingInstrument
cluster displayPractical hints Car care Index
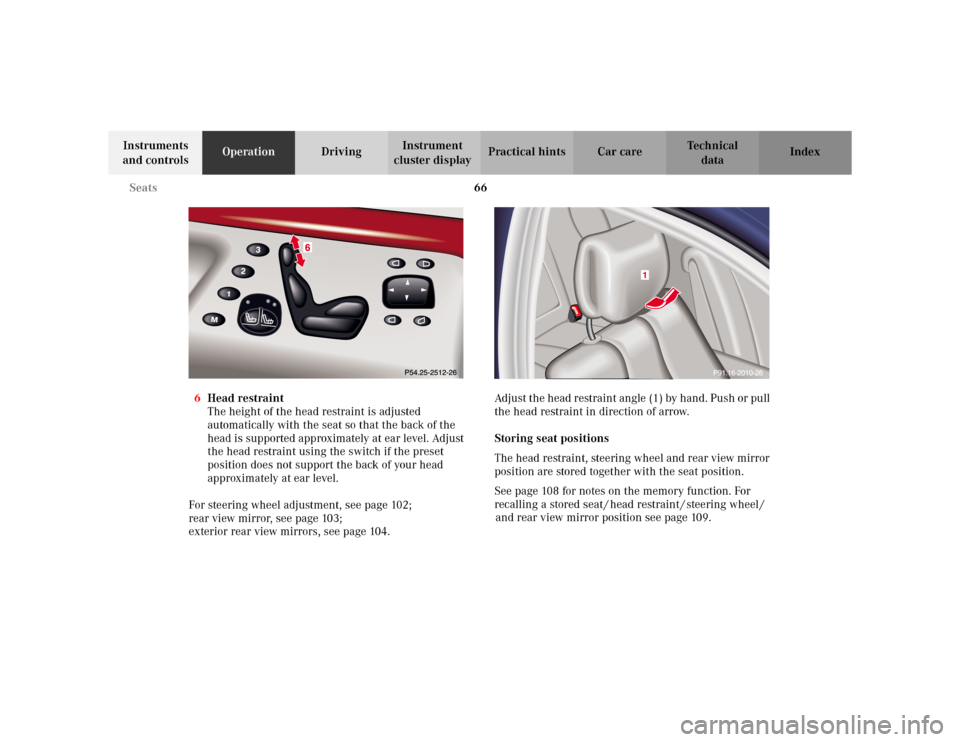
6Head restraint
The height of the head restraint is adjusted
automatically with the seat so that the back of the
head is supported approximately at ear level. Adjust
the head restraint using the switch if the preset
position does not support the back of your head
approximately at ear level.
For steering wheel adjustment, see page 102;
rear view mirror, see page 103;
exterior rear view mirrors, see page 104.Adjust the head restraint angle (1) by hand. Push or pull
the head restraint in direction of arrow.
Storing seat positions
The head restraint, steering wheel and rear view mirror
position are stored together with the seat position.
See page 108 for notes on the memory function. For
recalling a stored seat / head restraint / steering wheel /
and rear view mirror position see page 109.
1
Page 80 of 430
77 Seats
Te ch n i c a l
data Instruments
and controlsOperationDrivingInstrument
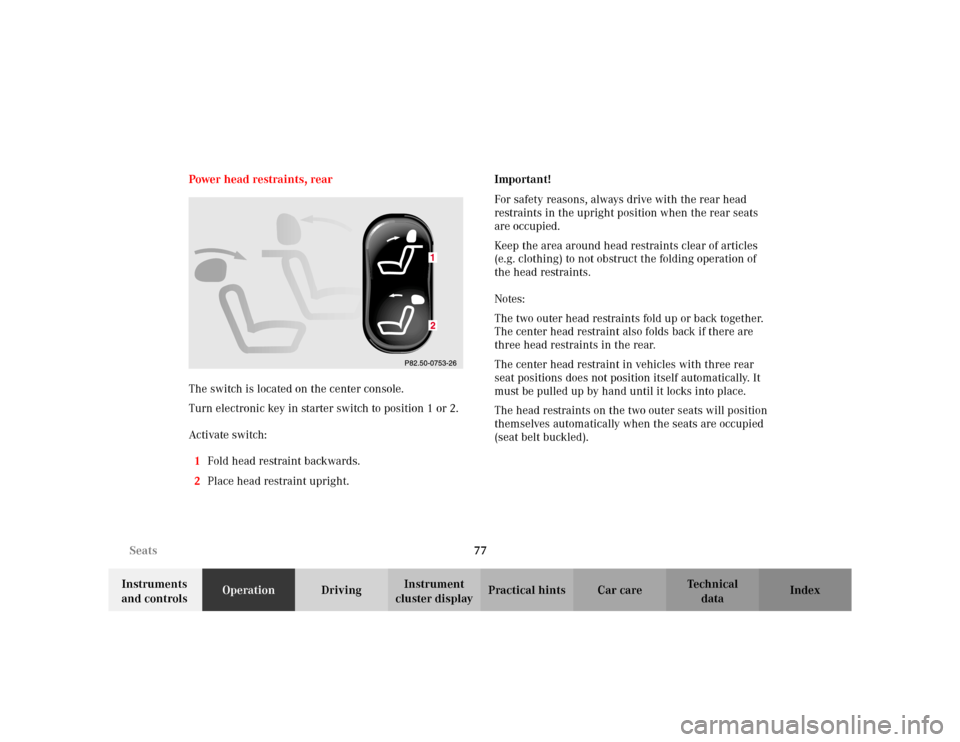
cluster displayPractical hints Car care Index Power head restraints, rear
The switch is located on the center console.
Turn electronic key in starter switch to position 1 or 2.
Activate switch:
1Fold head restraint backwards.
2Place head restraint upright.Important!
For safety reasons, always drive with the rear head
restraints in the upright position when the rear seats
are occupied.
Keep the area around head restraints clear of articles
(e.g. clothing) to not obstruct the folding operation of
the head restraints.
Notes:
The two outer head restraints fold up or back together.
The center head restraint also folds back if there are
three head restraints in the rear.
The center head restraint in vehicles with three rear
seat positions does not position itself automatically. It
must be pulled up by hand until it locks into place.
The head restraints on the two outer seats will position
themselves automatically when the seats are occupied
(seat belt buckled).
Page 98 of 430
95 Restraint systems
Te ch n i c a l
data Instruments
and controlsOperationDrivingInstrument
cluster displayPractical hints Car care Index Your vehicle was originally equipped with airbags
which are designed to activate in certain impacts
exceeding a preset threshold to reduce the potential
and severity of injury. It is important to your safety
and that of your passenger that you replace deployed
airbags and repair any malfunctioning airbags to
ensure the vehicle will continue to provide crash
protection for occupants.
Wa r n i n g !
To reduce the risk of injury when the front airbags
inflate, it is very important for the driver and front
passenger to always be in a properly seated
position and to wear their seat belts.For maximum protection in the event of a collision
always be in normal seated position with your back
against the backrest. Fasten your seat belt and
ensure that it is properly positioned on your body.Since the airbag inflates with considerable speed
and force, a proper seating and hands on steering
wheel position will help to keep you at a safe
distance from the airbag. Occupants who are
unbelted, out of position or too close to the airbag
can be seriously injured by an airbag as it inflates
with great force in the blink of an eye:
• Sit properly belted in an upright position with
your back against the backrest.• Adjust the driver’s seat as far as possible
rearward, still permitting proper operation of
vehicle controls. The distance from the center
of the driver’s breastbone to the center of the
airbag cover on the steering wheel must be at
least ten inches (25 cm) or more. You should be
able to accomplish this by a combination of
adjustments to the seat and steering wheel. If
you have any problems, please see your
authorized Mercedes-Benz Center.• Do not lean with your head or chest close to the
steering wheel or dashboard.• Keep hands on the outside of steering wheel
rim. Placing hands and arms inside the rim
can increase the risk and potential severity of
hand / arm injury when driver front airbag
inflates.• Adjust the front passenger seat as far as
possible rearward from the dashboard when
the seat is occupied.
Page 100 of 430
97 Restraint systems
Te ch n i c a l
data Instruments
and controlsOperationDrivingInstrument
cluster displayPractical hints Car care Index Safety guidelines for the seat belt, emergency
tensioning retractor and airbag
If you believe that, even with the use of these
guidelines, it would be safer for your rear seat
occupants to have both rear door mounted side
airbags deactivated, then deactivation can be
accomplished upon your written election to do so at
your authorized Mercedes-Benz Center at an
additional cost. Please contact your local
authorized Mercedes-Benz Center or call our
Customer Assistance Center at 1-800-FOR-
MERCedes (1-800-367-6372) for details.Wa r n i n g !
• Damaged seat belts or belts that were highly
stressed in an accident must be replaced and
their anchoring points must also be checked.
Use only belts installed or supplied by an
authorized Mercedes-Benz Center.• Airbags and “ETR’s” are designed to function
on a one-time-only basis. An airbag or
emergency tensioning retractor (ETR) that was
activated must be replaced.• Do not pass belts over sharp edges.
• Do not make any modification that could
change the effectiveness of the belts.• No modifications of any kind may be made to
any components or wiring of the “SRS”. This
includes changing or removing any component
or part of the “SRS”, the installation of
additional trim material, badges etc. over the
steering wheel hub, front passenger airbag
cover, door trim panels, or door frame trims,
and installation of additional electrical /
electronic equipment on or near “SRS”
components and wiring. Keep area between
airbags and occupants free from objects (e.g.
packages, purses, umbrellas, etc.).• Do not hang items such as coat hangers from
the coat hooks or handles over the door. These
items may turn into projectiles and cause head
and other injuries when curtain airbag is
deployed.• An airbag system component within the
steering wheel gets hot after the airbag has
inflated. Do not touch.
Page 109 of 430
106 Rear view mirrors
Te ch n i c a l
data Instruments
and controlsOperationDrivingInstrument
cluster displayPractical hints Car care Index
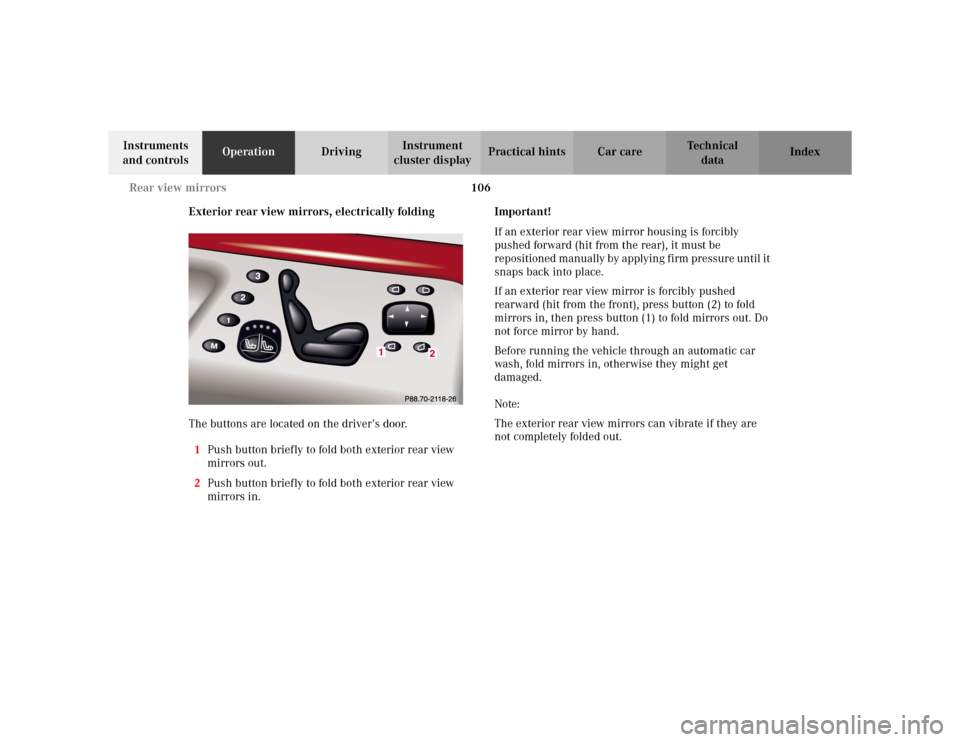
Exterior rear view mirrors, electrically folding
The buttons are located on the driver’s door.
1Push button briefly to fold both exterior rear view
mirrors out.
2Push button briefly to fold both exterior rear view
mirrors in.Important!
If an exterior rear view mirror housing is forcibly
pushed forward (hit from the rear), it must be
rep osition ed man ually by apply in g f irm pr ess ur e until it
snaps back into place.
If an exterior rear view mirror is forcibly pushed
rearward (hit from the front), press button (2) to fold
mirrors in, then press button (1) to fold mirrors out. Do
not force mirror by hand.
Before running the vehicle through an automatic car
wash, fold mirrors in, otherwise they might get
damaged.
Note:
The exterior rear view mirrors can vibrate if they are
not completely folded out.
Page 112 of 430
109 Memory function
Te ch n i c a l
data Instruments
and controlsOperationDrivingInstrument
cluster displayPractical hints Car care Index Storing positions into memory
Driver’s seat: with the electronic key in starter switch
position 1 or 2 or with the driver’s door open.
Front passenger seat and rear seats: with electronic key
in starter switch position 1 or 2 or the relevant doors
open.
Adjust the seat and multicontour backrest to the desired
position. You can also adjust the steering wheel, the
exterior rear view mirrors electrically and the inside
rear view mirror by hand for the driver’s seat. See
page 104 for exterior rear view mirror adjustment and
page 102 for steering wheel adjustment.
Push memory button “M”, release and push a stored
position button “1”, “2” or “3” within 3 seconds.Recalling positions from memory
To recall a seat / steering wheel and rear view mirror
position, push and hold button “1”, “2” or “3” until seat /
steering wheel and rear view mirror movement has
stopped.
The seat / steering wheel and rear view mirror
movement stops when the button is released.
Caution!
Do not operate the power seats using the memory
button if the seat backrest is in an excessively reclined
position. Doing so could cause damage to front or rear
seats.
First move backrest to an upright position.
Page 162 of 430
159 Exterior lamp switch
Te ch n i c a l
data Instruments
and controlsOperationDrivingInstrument
cluster displayPractical hints Car care Index Headlamp mode
Manual headlamp mode
The low beam headlamps and parking lamps can be
switched on and off with the exterior lamp switch. For
exterior lamp switch, see page 158.
Note:
With the daytime running lamp mode activated and the
engine running, the low beam headlamps cannot be
switched off manually. See page 160 for notes on the
daytime running lamp mode.Automatic headlamp mode
Turn exterior lamp switch to positionU.
•Electronic key in starter switch position 1:
The parking lamps switch on and off automatically
depending on the brightness of the ambient light.
•Electronic key in starter switch position 2 and the
engine running:
The low beam headlamps and parking lamps are
switched on and off automatically depending on the
brightness of the ambient light.
The low beam headlamps and parking lamps can
still be switched on and off manually using the
exterior lamp switch.
Note:
With the daytime running lamp mode activated, the low
beam headlamps cannot be switched off automatically.
The headlamps will not be automatically switched on
under foggy conditions.
Front fog lamps and rear fog lamp cannot be switched
on manually with exterior lamp switch in positionU.
To activate the fog lamps turn exterior lamp switch to
positionB.
Wa r n i n g !
The driver is responsible for the operation of the
vehicle’s lights at all times. The automatic
headlamp feature is only an aid to the driver.
Switch on the vehicle lights by hand when driving
or traffic conditions require you to do so.