Page 284 of 342

281 Towing
Te ch n i c a l
data Instruments
and controlsOperation DrivingInstrument
cluster displayPractical hintsCar care Index Transmission selector lever, manually unlocking
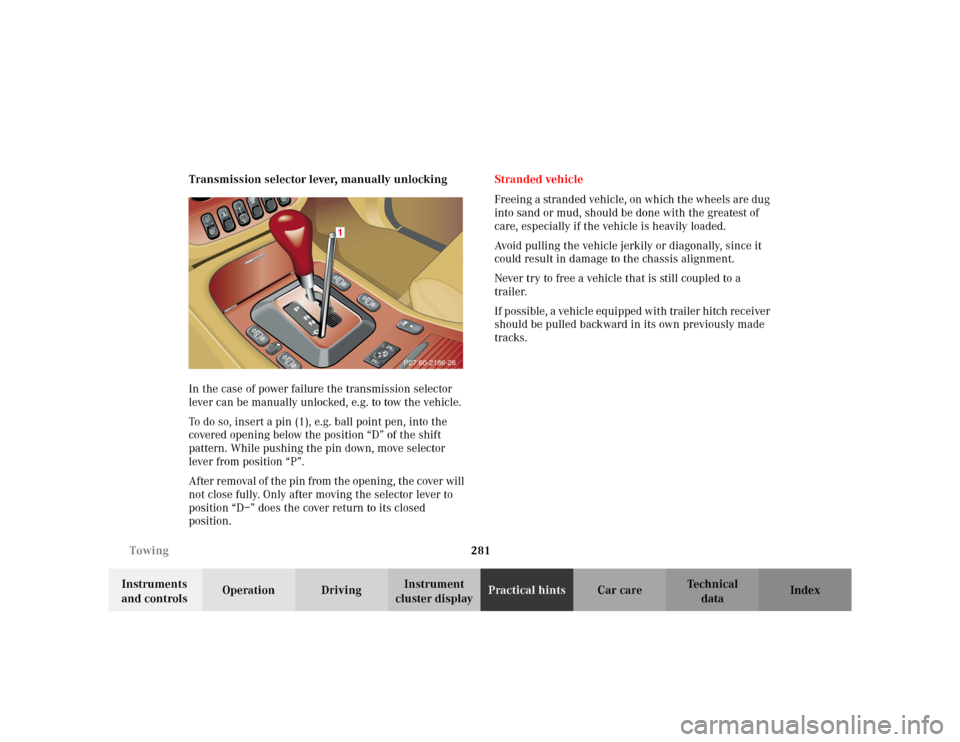
In the case of power failure the transmission selector
lever can be manually unlocked, e.g. to tow the vehicle.
To do so, insert a pin (1), e.g. ball point pen, into the
covered opening below the position “D” of the shift
pattern. While pushing the pin down, move selector
lever from position “P”.
After removal of the pin from the opening, the cover will
not close fully. Only after moving the selector lever to
position “D–” does the cover return to its closed
position.Stranded vehicle
Freeing a stranded vehicle, on which the wheels are dug
into sand or mud, should be done with the greatest of
care, especially if the vehicle is heavily loaded.
Avoid pulling the vehicle jerkily or diagonally, since it
could result in damage to the chassis alignment.
Never try to free a vehicle that is still coupled to a
trailer.
If possible, a vehicle equipped with trailer hitch receiver
should be pulled backward in its own previously made
tracks.
P27.60-2186-26
1
Page 285 of 342

282 Exterior lamps
Te ch n i c a l
data Instruments
and controlsOperation DrivingInstrument
cluster displayPractical hintsCar care Index
Exterior lamps
Headlamp adjustment
Correct headlamp adjustment is extremely important.
Check and readjust headlamps at regular intervals and
when a bulb has been replaced.
For adjusting headlamp aim see page 290.Replacing bulbs
To prevent a possible electrical short circuit, switch off
lamp prior to replacing a bulb.
When replacing bulbs, install only 12 volt bulbs with
the specified watt rating.
When replacing halogen bulbs do not touch glass
portion of bulb with bare hands. Use plain paper or a
clean cloth.
Wa r n i n g !
Bulbs and bulb holders can be very hot. Allow the
lamp to cool down before changing a bulb.
Halogen lamps contain pressurized gas. A bulb can
explode if you:
• touch or move it when hot,
•drop the bulb,
• scratch the bulb.Wear eye and hand protection.
Wa r n i n g !
Because of high voltage in BiXenon lamps, it is
dangerous to replace the bulb of repair the lamp
and its components. We recommend that you have
such work done by a qualified technician.
Page 286 of 342
283 Exterior lamps
Te ch n i c a l
data Instruments
and controlsOperation DrivingInstrument
cluster displayPractical hintsCar care Index Headlamp assembly (Halogen)
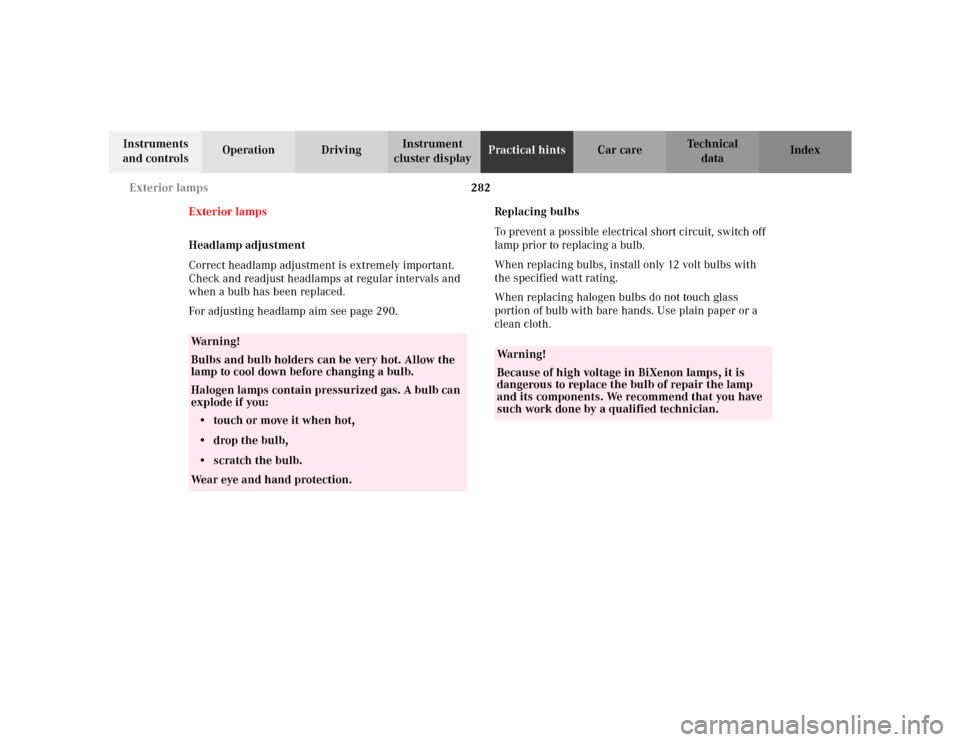
1Headlamp vertical / horizontal adjustment screw
2Headlamp vertical / horizontal adjustment screw
3Headlamp cover with locking tab
4High beam headlamp cover with locking tab
5Bulb socket for turn signal, parking, standing, and
side marker lamp6Electrical connector for low beam headlamp bulb
7Electrical connector for high beam headlamp bulb
P82.10-2756-26
6
P82.15-2082-26
Page 287 of 342
284 Exterior lamps
Te ch n i c a l
data Instruments
and controlsOperation DrivingInstrument
cluster displayPractical hintsCar care Index
Headlamp assembly (BiXenon)
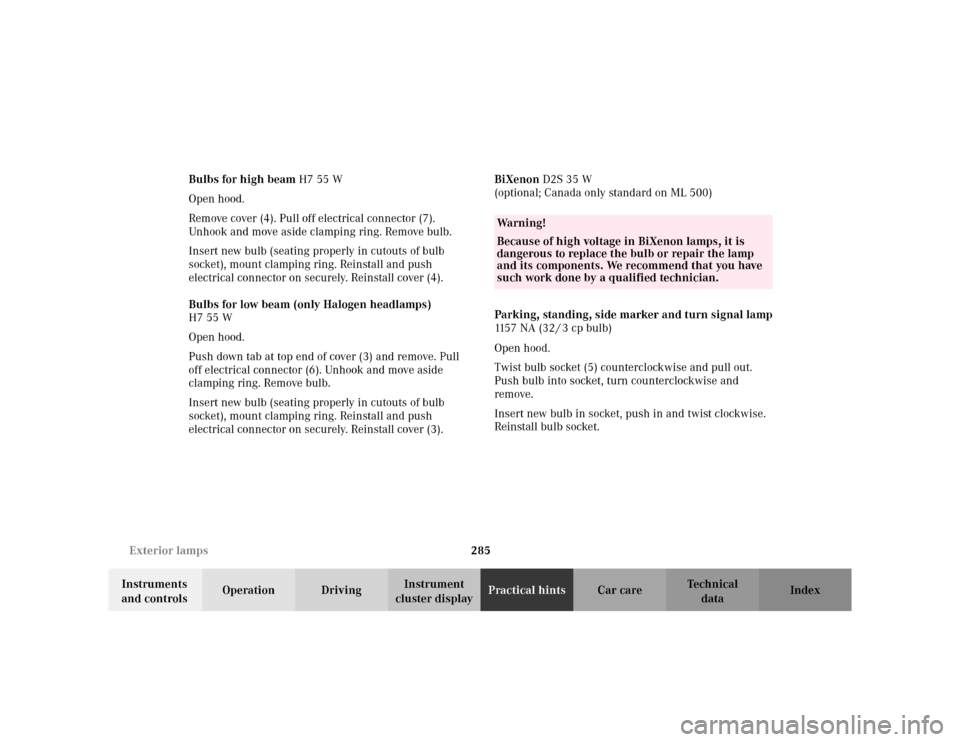
1Headlamp vertical / horizontal adjustment screw
2Headlamp vertical / horizontal adjustment screw
3Headlamp cover with locking tab
4High beam headlamp cover with locking tab
5Bulb socket for turn signal, parking, standing, and
side marker lamp6Electrical connector for BiXenon headlamp bulb
7Electrical connector for high beam headlamp bulb
P82.10-2756-26
P82.10-2805-26
6
Page 288 of 342

285 Exterior lamps
Te ch n i c a l
data Instruments
and controlsOperation DrivingInstrument
cluster displayPractical hintsCar care Index Bulbs for high beam H7 55 W
Open hood.
Remove cover (4). Pull off electrical connector (7).
Unhook and move aside clamping ring. Remove bulb.
Insert new bulb (seating properly in cutouts of bulb
socket), mount clamping ring. Reinstall and push
electrical connector on securely. Reinstall cover (4).
Bulbs for low beam (only Halogen headlamps)
H7 55 W
Open hood.
Push down tab at top end of cover (3) and remove. Pull
off electrical connector (6). Unhook and move aside
clamping ring. Remove bulb.
Insert new bulb (seating properly in cutouts of bulb
socket), mount clamping ring. Reinstall and push
electrical connector on securely. Reinstall cover (3).BiXenon D2S 35 W
(optional; Canada only standard on ML 500)
Parking, standing, side marker and turn signal lamp
115 7 N A ( 3 2 / 3 c p b u l b )
Open hood.
Twist bulb socket (5) counterclockwise and pull out.
Push bulb into socket, turn counterclockwise and
remove.
Insert new bulb in socket, push in and twist clockwise.
Reinstall bulb socket.
Wa r n i n g !
Because of high voltage in BiXenon lamps, it is
dangerous to replace the bulb or repair the lamp
and its components. We recommend that you have
such work done by a qualified technician.
Page 289 of 342
286 Exterior lamps
Te ch n i c a l
data Instruments
and controlsOperation DrivingInstrument
cluster displayPractical hintsCar care Index
Fog lamp assembly
The foglamps are located in the front bumper.
Check and readjust foglamps at regular intervals and
when a bulb has been replaced.
Removing fog lamp assembly:
Remove foglamp holder from bumper by pressing
locking tab of fog lamp holder using a suitable tool
(e.g. screw driver). Swing fog lamp holder out of bumper
and remove fog lamp from holder.1Bulbs for fog lamps
H8 35 W
2Ta b s
Remove connector from lamp (1), turn lamp socket
towards left and pull out. Remove bulb.
Insert new bulb into lamp socket and insert into
housing. Turn socket towards right.
During fog lamp installation, make sure that fog lamp
tabs (2) firmly seat into the slots of the holder.
P82.10-2764-26
Page 290 of 342
287 Exterior lamps
Te ch n i c a l
data Instruments
and controlsOperation DrivingInstrument
cluster displayPractical hintsCar care Index Taillamp assemblies
1Stop lamp (1073 [32 cp bulb])
2Backup lamp (1073 [32 cp bulb])
3Turn signal lamp (P Y 21 W bulb)
4Tail, parking, standing lamp, driver’s side rear fog
lamp (P 21 / 4 W bulb)
5Side marker lamp W 5 WOpen liftgate.
Remove screws (1).
Remove taillamp.
Note.
Spacers are used under the taillamp mounting tabs.
During reinstallation make sure that the spacers are
properly installed onto the screws.
P82.10-2755-26
Page 291 of 342
288 Exterior lamps
Te ch n i c a l
data Instruments
and controlsOperation DrivingInstrument
cluster displayPractical hintsCar care Index
Pull off electrical connector (2).
Squeeze tabs (3) together and remove bulb holder.
Push bulb into socket, turn counterclockwise and
remove.
Insert new bulb in socket, push in and twist clockwise.
Reinstall bulb holder.
Reinstall electrical connector (2).
Reinstall taillamp.Additional turn signals on the exterior mirror
The Additional turn signals on the exterior mirror are
equipped with LEDs.
Have the system checked at an authorized
Mercedes-Benz Center if a malfunction occurs.
P82.10-2753-26