2002 MERCEDES-BENZ ML55AMG mirror controls
[x] Cancel search: mirror controlsPage 112 of 342
109 Automatic climate control
Te ch n i c a l
data Instruments
and controlsOperationDrivingInstrument
cluster displayPractical hints Car care Index 1Display and controls
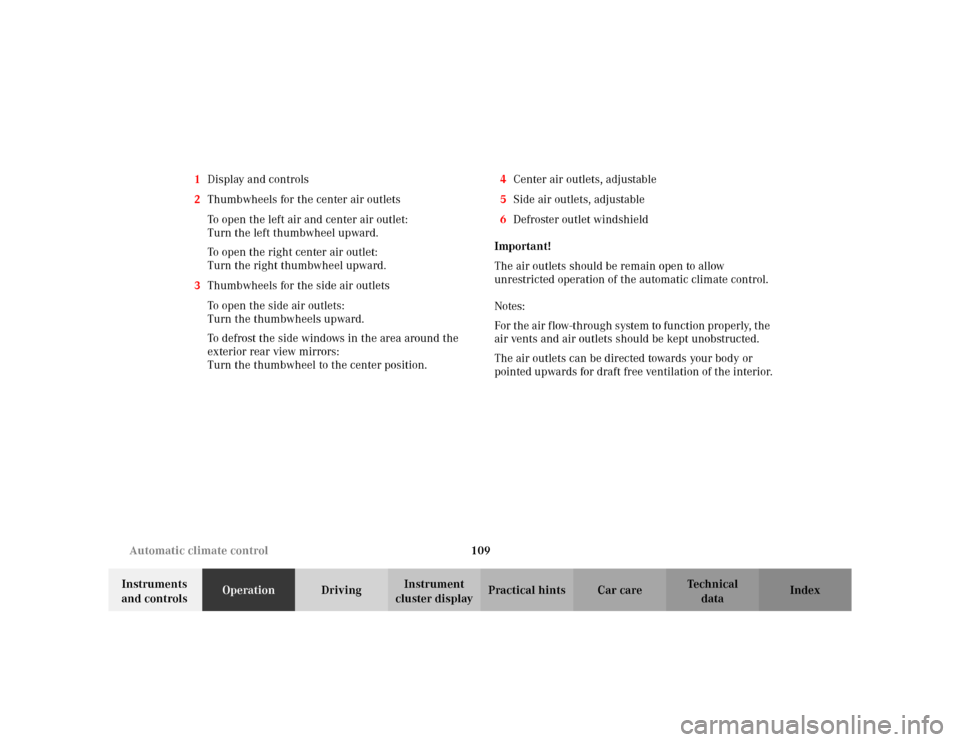
2Thumbwheels for the center air outlets
To open the left air and center air outlet:
Turn the left thumbwheel upward.
To open the right center air outlet:
Turn the right thumbwheel upward.
3Thumbwheels for the side air outlets
To open the side air outlets:
Turn the thumbwheels upward.
To defrost the side windows in the area around the
exterior rear view mirrors:
Turn the thumbwheel to the center position.4Center air outlets, adjustable
5Side air outlets, adjustable
6Defroster outlet windshield
Important!
The air outlets should be remain open to allow
unrestricted operation of the automatic climate control.
Notes:
For the air flow-through system to function properly, the
air vents and air outlets should be kept unobstructed.
The air outlets can be directed towards your body or
pointed upwards for draft free ventilation of the interior.
Page 131 of 342
128 Interior equipment
Te ch n i c a l
data Instruments
and controlsOperationDrivingInstrument
cluster displayPractical hints Car care Index
Interior lighting
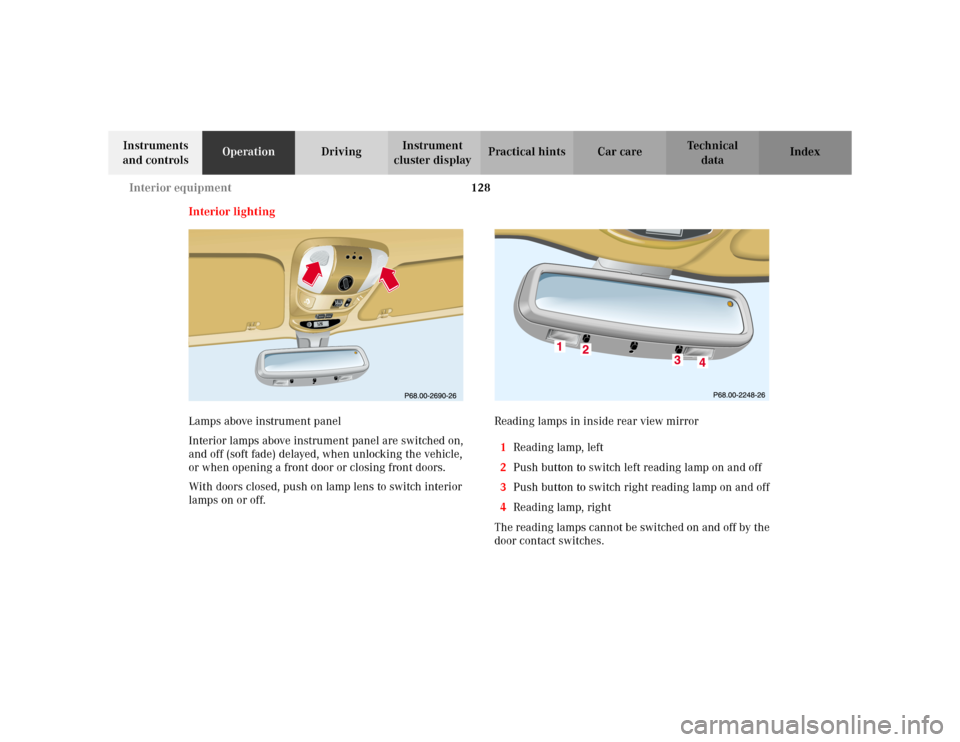
Lamps above instrument panel
Interior lamps above instrument panel are switched on,
and off (soft fade) delayed, when unlocking the vehicle,
or when opening a front door or closing front doors.
With doors closed, push on lamp lens to switch interior
lamps on or off.Reading lamps in inside rear view mirror
1Reading lamp, left
2Push button to switch left reading lamp on and off
3Push button to switch right reading lamp on and off
4Reading lamp, right
The reading lamps cannot be switched on and off by the
door contact switches.
RESETMOD
E
Page 134 of 342
131 Interior equipment
Te ch n i c a l
data Instruments
and controlsOperationDrivingInstrument
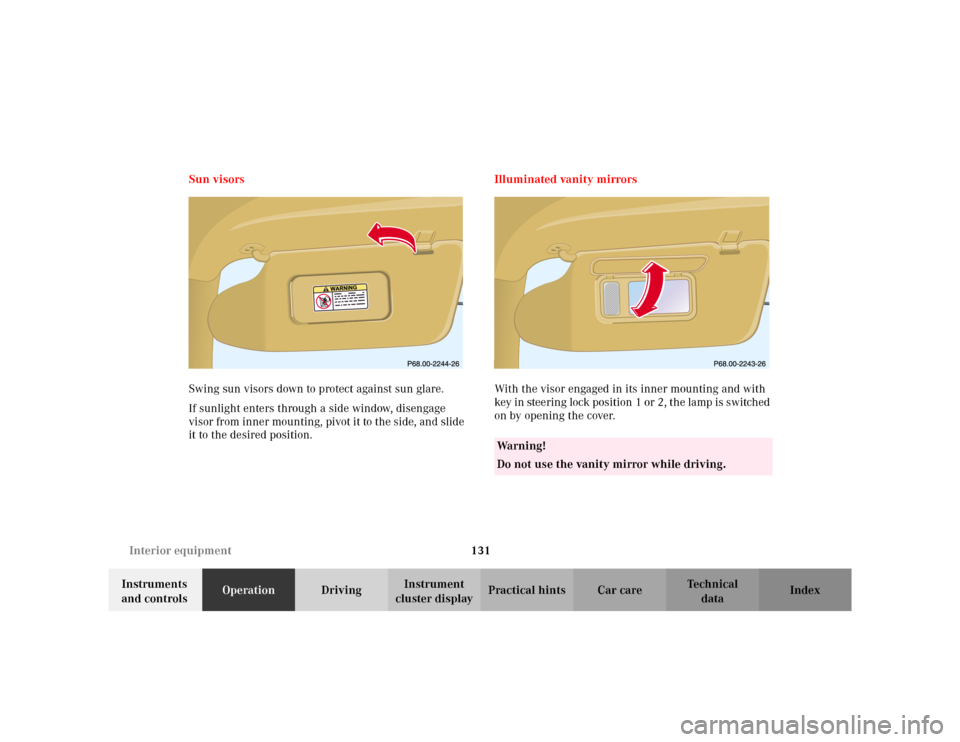
cluster displayPractical hints Car care Index Sun visors
Swing sun visors down to protect against sun glare.
If sunlight enters through a side window, disengage
visor from inner mounting, pivot it to the side, and slide
it to the desired position.Illuminated vanity mirrors
With the visor engaged in its inner mounting and with
key in steering lock position 1 or 2, the lamp is switched
on by opening the cover.
Wa r n i n g !
Do not use the vanity mirror while driving.
Page 170 of 342
167 Tele Aid
Te ch n i c a l
data Instruments
and controlsOperationDrivingInstrument
cluster displayPractical hints Car care Index Important!
Always make sure that the indicator lamps in the
“SOS” button, the Roadside Assistance button• and
the Information button¡do not remain illuminated
constantly in red and the message “TELE AID – VISIT
WORKSHOP” is not displayed in the MCS display after
the system self check.
If a malfunction is indicated as outlined above, have the
system checked at the nearest Mercedes-Benz Light
Truck Center as soon as possible.
Emergency calls
An emergency call is initiated automatically:
•following an accident in which the Emergency
Tensioning Retractors (ETR’s) or airbags deploy,
•if the antitheft alarm or the tow away alarm stays on
for more than 20 seconds, see pages 36 and 37.
An emergency call can also be initiated manually by
opening the cover next to the inside rear view mirror
labeled “SOS”, then briefly pressing the button located
under the cover. See below for instructions on initiating
an emergency call manually.Once the emergency call is in progress, the indicator
lamp in the “SOS” button will begin to flash. The
message “EMERGENCY CALL – CONNECTING CALL”
appears in the MCS display. When the connection is
established, the message “EMERGENCY CALL – CALL
CONNECTED” appears in the MCS display. All
information relevant to the emergency, such as the
location of the vehicle (determined by the GPS satellite
location system), vehicle model, identification number
and color are generated.
A voice connection between the Response Center and
the occupants of the vehicle will be established
automatically soon after the emergency call has been
initiated. When a voice connection is established the
audio system mutes and the message “TELE AID –
EMERGENCY CALL ACTIVE” appears in the MCS
display. The Response Center will attempt to determine
more precisely the nature of the accident provided they
can speak to an occupant of the vehicle.
Page 215 of 342

212 Driving instructions
Te ch n i c a l
data Instruments
and controlsOperationDrivingInstrument
cluster displayPractical hints Car care Index
Towing a trailer
There are many different laws, including speed limit
restrictions, having to do with trailer towing. Make sure
that your rig will be legal, not only for where you reside,
but also for where you will be driving. A good source for
this information can be the police or local authorities.
Before you start driving with the trailer, check the
trailer hitch, break-away switch, safety chains, electrical
connections, lighting and tires. Also adjust the mirrors
to permit unobstructed view beyond rear of trailer.
If the trailer has electric brakes, start your vehicle and
trailer moving slowly, and then apply only the trailer
brake controller by hand to be sure the brakes are
working properly.
When towing a trailer, check occasionally to be sure that
the load is secure, and that lighting and trailer brakes
(if so equipped) are functioning properly.
Always secure items in the trailer to prevent load shifts
while driving.
Take into consideration that when towing a trailer, the
handling characteristics are different and less stable
from those when operating the vehicle without a trailer.
It is important to avoid sudden maneuvers.The vehicle and trailer combination is heavier, and
therefore is limited in acceleration and climbing ability,
and requires longer stopping distances. It is more prone
to reacting to side wind gusts, and requires more
sensitive steering input.
In order to gain skill and an understanding of the
vehicle’s behavior, you should practice turning,
stopping and backing up in an area which is free from
traffic.
If possible, do not brake abruptly, but rather engage the
brake slightly at first to permit the trailer to activate its
brake. Then increase the braking force.
Caution!
If the trailer should begin to sway, reduce the vehicle’s
speed and use the brake controller by hand to straighten
out the vehicle and trailer. In no case should you
attempt to straighten out the tow vehicle and trailer by
increasing the speed or oversteering and stepping on
the brakes.
If the transmission hunts between gears on inclines,
manually shift to a lower gear (select “4”, “3”, “2”
or “1”). A lower gear and reduction of speed reduces the
chance of engine overloading and / or overheating.
Page 291 of 342
288 Exterior lamps
Te ch n i c a l
data Instruments
and controlsOperation DrivingInstrument
cluster displayPractical hintsCar care Index
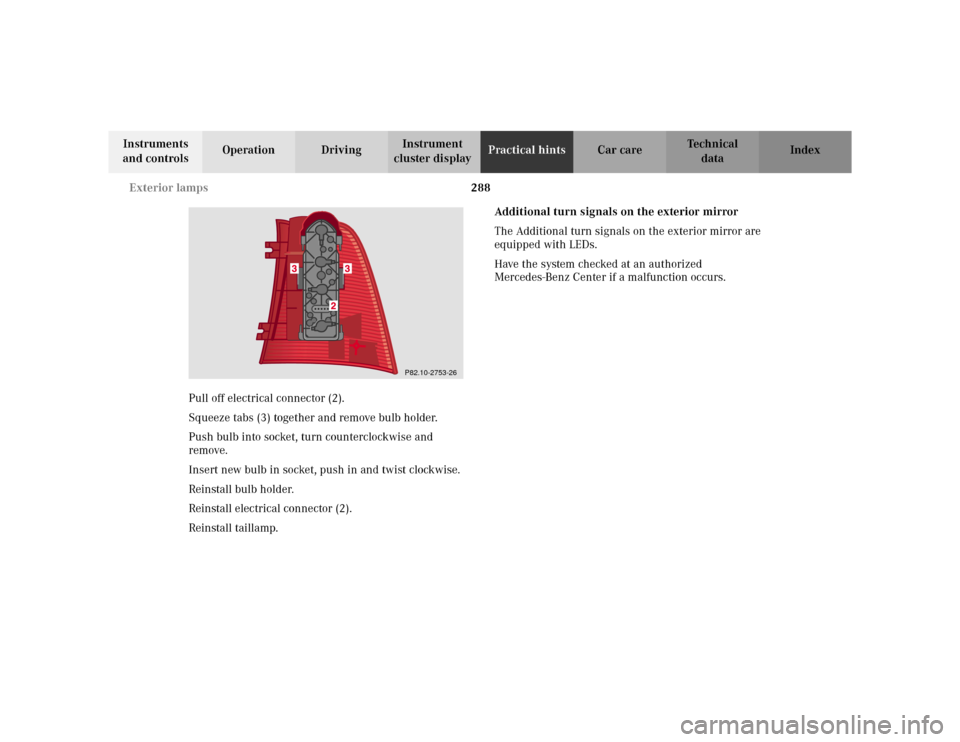
Pull off electrical connector (2).
Squeeze tabs (3) together and remove bulb holder.
Push bulb into socket, turn counterclockwise and
remove.
Insert new bulb in socket, push in and twist clockwise.
Reinstall bulb holder.
Reinstall electrical connector (2).
Reinstall taillamp.Additional turn signals on the exterior mirror
The Additional turn signals on the exterior mirror are
equipped with LEDs.
Have the system checked at an authorized
Mercedes-Benz Center if a malfunction occurs.
P82.10-2753-26
Page 303 of 342
300 Cleaning and care of the vehicle
Te ch n i c a l
data Instruments
and controlsOperation DrivingInstrument
cluster displayPractical hintsCar careIndex
Engine cleaning
Prior to cleaning the engine compartment make sure to
protect electrical components and connectors from the
intrusion of water and cleaning agents.
Corrosion protection, such as MB Anticorrosion Wax
should be applied to the engine compartment after
every engine cleaning. Before applying, all control
linkage bushings and joints should be lubricated. The
poly-V-belt and all pulleys should be protected from any
wax.
Vehicle washing
Do not use hot water or wash your vehicle in direct
sunlight. Use only a mild car wash detergent, such as
Mercedes-Benz approved Car Shampoo.
Thoroughly spray the vehicle with a diffused jet of
water. Direct only a very weak spray towards the
ventilation intake. Use plenty of water and rinse the
sponge and chamois frequently.
Rinse with clear water and thoroughly wipe dry with a
chamois. Do not allow cleaning agents to dry on the
finish.Due to the width of the vehicle, prior to running the
vehicle through an automatic car wash, fold back the
outside mirrors to prevent them from getting damaged.
In the winter, thoroughly remove all traces of road salt
as soon as possible.
When washing the underbody, do not forget to clean the
inner sides of the wheels.
Ornamental moldings
For regular cleaning and care of very dirty chrome-
plated parts, use a chrome cleaner.
Headlamps, taillamps, turn signal lenses
Use a mild car wash detergent, such as Mercedes-Benz
approved Car Shampoo, with plenty of water.
To prevent scratches, never apply strong force and use
only a soft, non-scratchy cloth when cleaning the lenses.
Do not attempt to wipe dirty lenses with a dry cloth or
sponge.
Page 329 of 342
326 Index
Te ch n i c a l
data Instruments
and controlsOperation DrivingInstrument
cluster displayPractical hints Car careIndex
ETS (4-ETS+) ................................................................... 221
LOW RANGE – 4-ETS+ ............................................. 222
Express opening and
closing of power windows ....................................... 122
Exterior lamp switch ....................................................... 97
Daytime running lamp mode .................................. 100
Exterior lamps ................................................................ 282
Additional turn signals on
the exterior mirror ...............................................288
Adjusting headlamp aim .......................................... 290
Fog lamp assembly ................................................... 286
Fog lamps ................................................................... 103
Headlamp assembly ........................................ 283, 284
Headlamps ................................97, 283, 284, 290, 300
High mounted stop lamp .........................................289
License plate lamps .................................................. 289
Low and high beam ............................................97, 285
Parking lamp .......................................................97, 285
Replacing bulbs ......................................................... 282
Side marker lamp ......................................................285
Standing lamp .....................................................97, 285
Taillamp assemblies ................................................. 287
Turn signal lamp .................................................97, 285
Exterior mirror, front passenger side,
parking position .......................................................... 78Exterior rear view mirrors .............................................. 77
Electrically folding ...................................................... 79
Parking position ..........................................................78
FFirst aid kit ..................................................................... 250
Flat tire
See Changing wheels .............................................. 267
Flexible service system (FSS) ........................................ 94
FSS indicator lamp ............................................. 85, 247
Floor plates
Removable .................................................................. 147
Fog lamp switch ............................................................. 103
Four ETS
LOW RANGE – 4-ETS+ ............................................ 222
Malfunction indicator lamp .................................... 243
Four wheel electronic traction system (4-ETS+) .......221
Malfunction indicator lamp .................................... 243
Fuel
Gasoline additives ..................................................... 318
Premium unleaded gasoline ................... 236, 315, 317
Fuel filler flap
Manual release ......................................................... 295
Fuel requirements ......................................................... 317