Page 131 of 342
128 Interior equipment
Te ch n i c a l
data Instruments
and controlsOperationDrivingInstrument
cluster displayPractical hints Car care Index
Interior lighting
Lamps above instrument panel
Interior lamps above instrument panel are switched on,
and off (soft fade) delayed, when unlocking the vehicle,
or when opening a front door or closing front doors.
With doors closed, push on lamp lens to switch interior
lamps on or off.Reading lamps in inside rear view mirror
1Reading lamp, left
2Push button to switch left reading lamp on and off
3Push button to switch right reading lamp on and off
4Reading lamp, right
The reading lamps cannot be switched on and off by the
door contact switches.
RESETMOD
E
Page 137 of 342
134 Interior equipment
Te ch n i c a l
data Instruments
and controlsOperationDrivingInstrument
cluster displayPractical hints Car care Index
Storage compartment under front passenger seat
(standard; optional on ML 320)
The storage compartment under the front passenger
seat is lockable with its separate key (1).
Note:
Slide seat rearward to gain easier access to the storage
compartment.Cup holder in instrument panel
Touch top of cover. The cup holder (1) opens
automatically.
Caution!
Keep cup holder closed while traveling. Place only
containers that fit into the cup holder to prevent spills.
Do not fill containers to a height where the contents
could spill during vehicle maneuvers, especially hot
liquids.
Page 154 of 342
151 Interior equipment
Te ch n i c a l
data Instruments
and controlsOperationDrivingInstrument
cluster displayPractical hints Car care Index Hooks
Four hooks, located on the rear compartment trim
panels can be used to secure light weight items
(maximum permissible weight per hook: 9 lbs. [4 kg]).Partition net (MB Accessory)
Use of the partition net is a particularly important safety
factor when the vehicle is loaded higher than the top of
the seat backrests with smaller objects.
The partition net can be installed behind the backrests
of the front or rear seats.
Note:
Passenger use of seats behind installed partition net is
restricted because of the footwell being taken up by the
net.
Page 173 of 342

170 Tele Aid
Te ch n i c a l
data Instruments
and controlsOperationDrivingInstrument
cluster displayPractical hints Car care Index
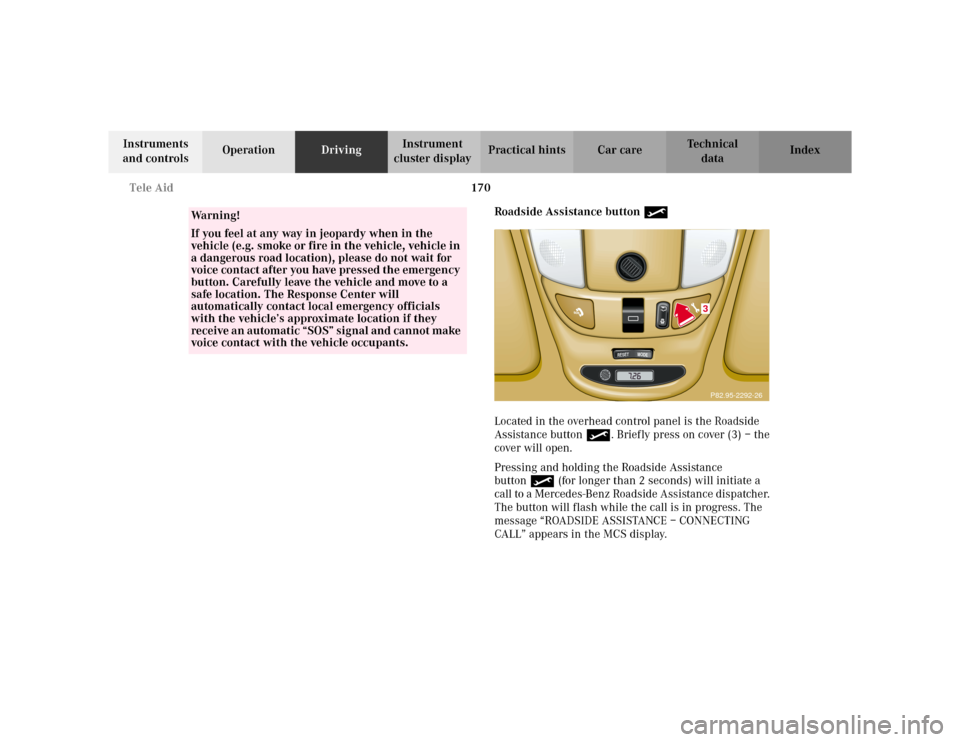
Roadside Assistance button •
Located in the overhead control panel is the Roadside
Assistance button•. Briefly press on cover (3) – the
cover will open.
Pressing and holding the Roadside Assistance
button• (for longer than 2 seconds) will initiate a
call to a Mercedes-Benz Roadside Assistance dispatcher.
The button will flash while the call is in progress. The
message “ROADSIDE ASSISTANCE – CONNECTING
CALL” appears in the MCS display.
Wa r n i n g !
If you feel at any way in jeopardy when in the
vehicle (e.g. smoke or fire in the vehicle, vehicle in
a dangerous road location), please do not wait for
voice contact after you have pressed the emergency
button. Carefully leave the vehicle and move to a
safe location. The Response Center will
automatically contact local emergency officials
with the vehicle’s approximate location if they
receive an automatic “SOS” signal and cannot make
voice contact with the vehicle occupants.
RESET
MODE
3P82.95-2292-26
Page 175 of 342

172 Tele Aid
Te ch n i c a l
data Instruments
and controlsOperationDrivingInstrument
cluster displayPractical hints Car care Index
If the indicator lamp in the Roadside Assistance
button• is illuminated continuously and there was
no voice connection to the Response Center established,
then the Tele Aid system could not initiate an Roadside
Assistance call (e.g. the relevant cellular phone network
is not available). The message “ROADSIDE
ASSISTANCE – CALL FAILED” appears in the MCS
display.
Should this occur, assistance must be summoned by
other means.
Roadside Assistance calls can be terminated using the
END button on the MCS unit.Information button ¡
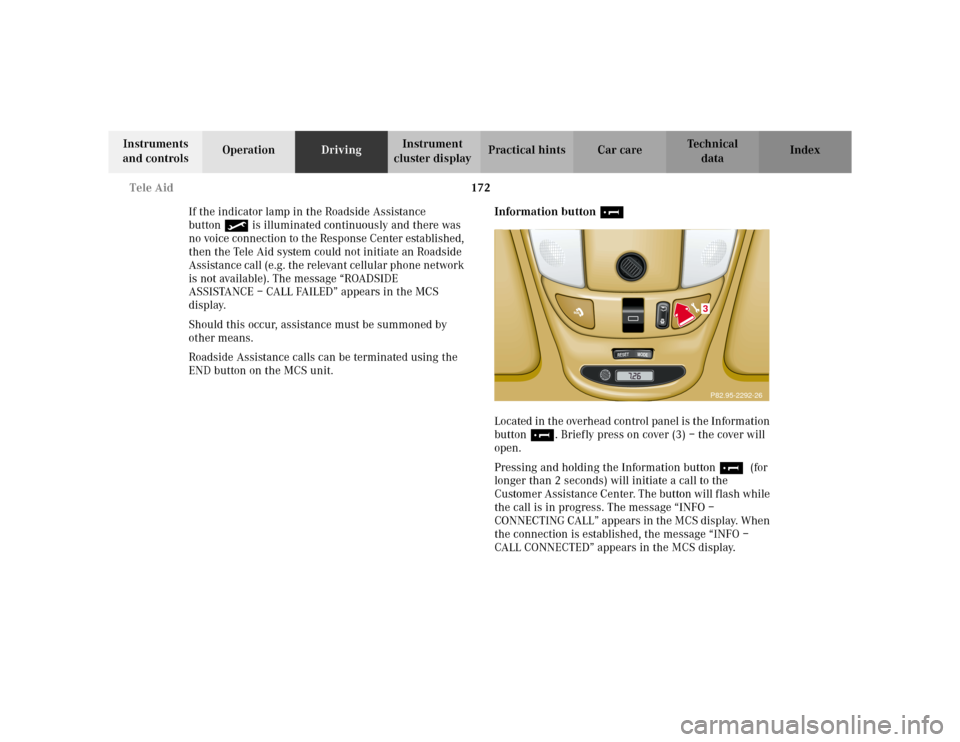
Located in the overhead control panel is the Information
button¡. Briefly press on cover (3) – the cover will
open.
Pressing and holding the Information button¡ (for
longer than 2 seconds) will initiate a call to the
Customer Assistance Center. The button will flash while
the call is in progress. The message “INFO –
CONNECTING CALL” appears in the MCS display. When
the connection is established, the message “INFO –
CALL CONNECTED” appears in the MCS display.
RESET
MODE
3P82.95-2292-26
Page 194 of 342
191 Parking brake
Te ch n i c a l
data Instruments
and controlsOperationDrivingInstrument
cluster displayPractical hints Car care Index Parking brake
To engage, firmly depress parking brake pedal (1).
When the key is in steering lock position 2, the brake
warning lampÉ in the instrument cluster should
come on brightly.To release the parking brake, pull handle (2) on
instrument panel. The brake warning lampÉ in the
instrument cluster should go out.
A warning sounds, if you start to drive without having
released the parking brake.
Also see brake warning lamp on page 241.
Wa r n i n g !
When leaving the vehicle always remove the key
from the steering lock, and lock the vehicle. Do not
leave children unattended in the vehicle, or with
access to an unlocked vehicle. Children could
release the parking brake, which could result in an
accident or serious injury.
Page 230 of 342
227 Driving systems
Te ch n i c a l
data Instruments
and controlsOperationDrivingInstrument
cluster displayPractical hints Car care Index Transmission control – LOW RANGE mode
The switch is located in the instrument panel.
Important!
When switching to or from the LOW RANGE mode,
observe the following:
•The vehicle must be at a complete standstill.
•The engine speed must not exceed 1500 rpm.Failure to do so may result in transmission / engine
damage not covered by the Mercedes-Benz Limited
Warranty
The LOW RANGE mode should be switched on:
•during off-road driving,
•when crossing waters,
•when towing up or down on steep gradients,
or additional practical hints refer to off-road driving
on page 202.
Important!
Operating the vehicle on a single axle dynamometer
should only be done for briefly testing the brakes. To do
so, turn key in steering lock to position 1.
Page 256 of 342
253 Engine compartment
Te ch n i c a l
data Instruments
and controlsOperation DrivingInstrument
cluster displayPractical hintsCar care Index Hood
To o pen :
To unlock the hood, pull release lever (1) under the
driver’s side of the instrument panel. At the same time a
handle (2) will extend out of the radiator grill (it may be
necessary to lift the hood up slightly).
Caution!
To avoid damage to the windshield wipers or hood, open
the hood only with wipers in the parked position.Pull handle (2) to its stop out of radiator grill and open
hood (do not pull up on handle).
To c l o s e :
Lower hood and let it drop into lock from a height of
approximately 1 ft. (30 cm).
To avoid hood damage, please make sure that hood is
fully closed. If not, repeat closing procedure. Do not
push down on hood to attempt to fully close it.