Page 8 of 342

5 Contents
Practical hintsFirst aid kit .....................................250
Fuses ................................................250
Electrical outlet ..............................252
Stowing items in the vehicle ........252
Hood .................................................253
Checking engine oil level .............255
Automatic transmission
fluid level ...................................256
Engine oil consumption ................256
Coolant level ...................................256
Adding coolant ...........................257
Windshield washer/headlamp
cleaning system .........................258
Windshield and headlamp
washer fluid mixing ratio .........259Ve h i c l e j a c k ,
wheel bolt wrench and
screwdriver ............................... 259
Air pump ......................................... 261
Wheels ............................................ 262
Tire replacement ....................... 262
Rotating wheels ......................... 263
Spare wheel .................................... 264
Changing wheels ........................... 267
Tire inflation pressure ................. 272
Battery ............................................. 273
Jump starting ................................. 275
Towing the vehicle ........................ 277
Transmission selector lever,
manually unlocking .................. 281
Stranded vehicle ............................ 281Exterior lamps ................................282
Headlamp assembly ...................283
Taillamp assemblies ..................287
Adjusting headlamp aim ...............290
Remote control battery
replacement ...............................292
Synchronizing
remote control ............................293
Emergency operation of
sliding/pop-up roof ...................294
Manual release for
fuel filler flap .............................295
Replacing wiper blades .................295
Roof rack .........................................296
Page 22 of 342

19 Instruments and controls
Te ch n i c a l
data Instruments
and controlsOperation DrivingInstrument
cluster displayPractical hints Car care Index 1Cup holder, see page 132
2Parking brake release, see page 191
3Parking brake pedal, see page 191
4Steering wheel adjustment lever, see page 74
5Headlamp washer switch, see page 104
6Exterior lamp switch, see page 97
7Cruise control switch, see page 214
8Instrument cluster, see page 82
9Hazard warning flasher switch, see page 104
10Horn (with key in steering lock position 1 or 2),
Driver airbag, see page 58
11Steering lock with ignition / starter switch, see
page 180
12Windshield wiper / washer switch, see page 105
13Voice recognition system switch (optional only for
Canada), see separate operating instructions
14Parking assist warning indicators, see page 230
15Transmission control switch– LOW RANGE mode,
see page 22716Indicator lamp for antitheft alarm system
17Front fog lamp / rear fog lamp switch, see page 103
18MCS (Optional Modular Control System), see
separate operator’s manual
19Front passenger airbag, see page 58
20Glove box (illuminated with key in steering lock
position 1 or 2)
21Cup holder, see page 132
22Storage compartment
23Electrical outlet, see page 252
24Automatic climate control switch, see page 108
Rear window defroster switch, see page 121
25Left front seat heater switch, see page 46
26Switch for rear quarter window, left, see page 125
27Switch for rear window washer /wiper, see page 106
28ESP control switch, see page 225
29Switch for rear quarter window, right, see page 125
30Right front seat heater switch, see page 46
Page 23 of 342
20 Instruments and controls
Te ch n i c a l
data Instruments
and controlsOperation DrivingInstrument
cluster displayPractical hints Car care Index
Center console1Ashtray with lighter, see page 137
2Selector lever, see page 183
3Power window switch, left front door, see page 122
4Power window safety switch, rear doors,
see page 122
5Power window switch, left rear door, see page 122
6Central locking switch, see page 32
7Storage compartment, see page 133
8Exterior mirror adjustment switch, see page 77
Exterior mirrors, electrically folding, see page 79
9Parking assist (parktronic) deactivation switch
(optional), see page 230
10Power window switch, right rear door, see page 122
11Power window switch, right front door, see page 122
P68.20-2472-27
Page 43 of 342
40 Seats
Te ch n i c a l
data Instruments
and controlsOperationDrivingInstrument
cluster displayPractical hints Car care Index
Manual seats (ML 320)
We recommend to adjust the manual seat in the
following order:
1Seat, fore / aft
Lift handle (1), slide seat to desired position and
allow handle to reengage. Check for proper
engagement before driving. The position should be
as far rearward as possible, consistent with ability to
properly operate controls.2Seat cushion tilt
Raise lever (2), move seat cushion to desired
position. Release lever.
3Backrest tilt
Turn handwheel (3) until your arms are slightly
angled when holding the steering wheel.
4Head restraint height
Raising:
Pull up on head restraint.
Lowering:
Push button (4), located at top of seat back, and
push down on head restraint.
Adj ust he ad r estrain t to supp ort the back of t he head
approximately at ear level. The head restraint angle
can also be adjusted manually.
See page 45 for removing head restraints.
Page 77 of 342

74 Adjustable steering wheel
Te ch n i c a l
data Instruments
and controlsOperationDrivingInstrument
cluster displayPractical hints Car care Index
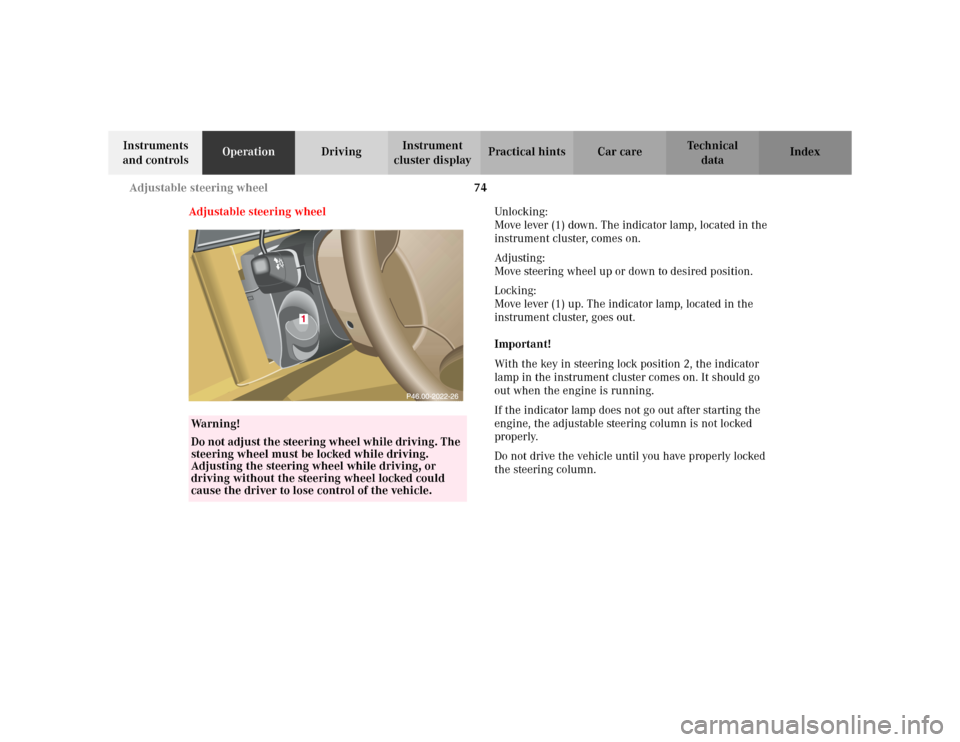
Adjustable steering wheelUnlocking:
Move lever (1) down. The indicator lamp, located in the
instrument cluster, comes on.
Adjusting:
Move steering wheel up or down to desired position.
Locking:
Move lever (1) up. The indicator lamp, located in the
instrument cluster, goes out.
Important!
With the key in steering lock position 2, the indicator
lamp in the instrument cluster comes on. It should go
out when the engine is running.
If the indicator lamp does not go out after starting the
engine, the adjustable steering column is not locked
properly.
Do not drive the vehicle until you have properly locked
the steering column.
Wa r n i n g !
Do not adjust the steering wheel while driving. The
steering wheel must be locked while driving.
Adjusting the steering wheel while driving, or
driving without the steering wheel locked could
cause the driver to lose control of the vehicle.
Page 78 of 342
75 Rear view mirrors
Te ch n i c a l
data Instruments
and controlsOperationDrivingInstrument
cluster displayPractical hints Car care Index Inside rear view mirrorUse your inside rear view mirror to determine the size
and distance of objects seen in the passenger side rear
view convex mirror.
Antiglare night position
Manual (only ML 320):
Tilt the inside rear view mirror to the antiglare night
position using the lever (1) at its lower edge.
Page 79 of 342

76 Rear view mirrors
Te ch n i c a l
data Instruments
and controlsOperationDrivingInstrument
cluster displayPractical hints Car care Index
Automatic (optional on ML 320):
With the key in steering lock position 2 and the
automatic antiglare function activated, the mirror
reflection brightness responds to changes in light
sensitivity.
To a c ti va te :
Press button (1). The green indicator lamp in the inside
rear view mirror lights up.To d e a c t i va t e :
Press button (1) again. The indicator lamp in the inside
rear view mirror goes out. The mirror brightness does
not respond to changes in light sensitivity.
Notes:
With gear selector lever in position “R”, or with the
interior lamps (except cargo compartment lamp)
switched on, the mirror brightness does not respond to
changes in light sensitivity.
The automatic antiglare function does not react, if
incoming light is not aimed directly at sensors in the
inside rear view mirror.
The antiglare function will not react for example, if the
cargo area is fully loaded.
Wa r n i n g !
In the case of an accident liquid electrolyte may
escape the mirror housing when the mirror glass
breaks.Electrolyte has an irritating effect. Do not allow the
liquid come into contact with eyes, skin, clothing,
or respiratory system. In cases it does, immediately
flush affected area with water, and seek medical
help if necessary.
Page 81 of 342

78 Rear view mirrors
Te ch n i c a l
data Instruments
and controlsOperationDrivingInstrument
cluster displayPractical hints Car care Index
Storing exterior rear view mirror positions
(only vehicle with memory function)
The exterior rear view mirror positions are stored in
memory with the seat positions and can be recalled
when necessary. See page 43 for notes on the memory
function.
Parking position (only vehicle with memory function)
The passenger side exterior mirror can be adjusted and
programmed to assist the driver during parking
maneuvers (e.g. to observe the curb or other objects
close to the vehicle).
With the key in steering lock position 2, and the exterior
rear view mirror switch in the passenger side position,
the passenger side mirror will be turned downward
when placing the gear selector lever in “R” reverse.
The passenger side mirror will return to its previous
position:
•immediately at speeds above approx. 6 mph
(10 km/h) – independent of the engaged gear,
•after 10 seconds when shifting gear selector lever
from “R” Reverse,
•by pressing the driver’s side mirror button%.To store passenger side mirror parking position:
1. The vehicle must be stationary.
Turn key to steering lock position 1 or 2.
2. Select passenger side mirror& and adjust the
mirror to view the curb.
3. Push the memory button “M”, see page 43.
4. Within 3 seconds push bottom of adjustment
button (3), see page 77.
The mirror should not move.
Repeat the memory procedure if the mirror moves.
Note:
The selected position will be stored relative to the
memory button (1, 2, 3) pushed.