2002 MERCEDES-BENZ ML320 Steering light
[x] Cancel search: Steering lightPage 9 of 342

6 Contents
Vehicle careCleaning and care of the vehicle .298
Power washer ..............................299
Tar stains .....................................299
Paintwork, painted body
components .................................299
Engine cleaning ..........................300
Vehicle washing .........................300
Ornamental moldings ................300
Headlamps, taillamps, turn signal
lenses ...........................................300
Cleaning the parktronic system
sensors ......................................... 301
Window cleaning ........................ 301
Wiper blades ............................... 301
Light alloy wheels ......................302
Instrument cluster .....................302
Steering wheel and gear selector
lever ..............................................302
Cup holder ...................................302
Seat belts .....................................302
Headliner .....................................302
Upholstery ...................................303Hard plastic trim items ............. 303
Plastic and rubber parts ........... 303
Technical dataSpare parts service ....................... 306
Warranty coverage ........................ 306
Identification labels ...................... 307
Layout of poly-V-belt drive ........... 308
Technical data ................................ 309
Fuels, coolants, lubricants etc. –
capacities .................................... 314
Engine oils ....................................... 316
Engine oil additives ....................... 316
Air conditioner refrigerant ........... 316
Brake fluid ....................................... 316
Premium unleaded gasoline ......... 317
Fuel requirements ......................... 317
Gasoline additives .......................... 318
Coolants ........................................... 318
Consumer information ................. 320
IndexIndex ................................................322
Page 25 of 342

22 Contents - Operation
Te ch n i c a l
data Instruments
and controlsOperationDrivingInstrument
cluster displayPractical hints Car care Index
OperationVehicle keys ...................................... 24
Start lock-out .................................... 25
General notes on the
central locking system ............... 25
Central locking system ................... 26
Radio frequency
remote control .............................. 26
Unlocking the liftgate .................. 27
Panic button .................................. 28
Mechanical keys ........................... 29
Doors .................................................. 30
Central locking switch .................... 32
Automatic central locking .............. 33
Emergency unlocking
in case of accident ...................... 33
Liftgate ............................................... 34
Antitheft alarm system ................... 36
Tow-away alarm and
glass breakage sensor ................ 37
Seats, front ........................................ 38
Manual seats ................................. 40
Power seats ................................... 41Head restraint .............................. 42
Memory function ......................... 43
Heated seats ..................................... 46
Seat belts and
integrated restraint system ....... 48
Seat belts .......................................... 48
Seat belt nonusage
warning system ............................ 49
BabySmart
TM airbag
deactivation system ................... 55
Self-test BabySmart
TM without
special child seat installed ......... 55
Supplemental restraint
system (SRS) ............................... 56
Emergency tensioning
retractor (ETR) ............................ 57
Airbags .............................................. 58
Safety guidelines for
the seat belt, emergency
tensioning retractor
and airbag ..................................... 66
Infant and
child restraint systems ............... 68
Adjustable steering wheel ............... 74
Inside rear view mirror .................. 75Antiglare night position .............. 75
Exterior rear view mirrors ............. 77
Exterior rear view mirror,
electrically folding ....................... 79
Instrument cluster ........................... 82
Indicator lamps in
the instrument cluster ............... 84
Trip computer ................................... 89
Flexible service system
(FSS) .............................................. 94
Engine oil level indicator ................ 96
Exterior lamp switch ....................... 97
Headlamp mode ............................... 99
Night security illumination ......... 101
Locator lighting .......................... 102
Fog lamp switch ............................ 103
Hazard warning flasher
switch .......................................... 104
Headlamp cleaning system .......... 104
Windshield wiper/washer
switch .......................................... 105
Rear window wiper/washer ......... 106
Automatic climate control ............ 108
Dust filter ..................................... 111
Page 28 of 342

25 Central locking system
Te ch n i c a l
data Instruments
and controlsOperationDrivingInstrument
cluster displayPractical hints Car care Index Obtaining replacement keys
Your vehicle is equipped with a theft deterrent locking
system requiring a special key manufacturing process.
For security reasons, replacement keys can only be
obtained from your authorized Mercedes-Benz Light
Truck Center.
Start lock-out
Important!
Removing the key from the steering lock activates the
start lock-out. The engine cannot be started.
Turning the key in the steering lock to position 2
deactivates the start lock-out.
Note:
In case the engine cannot be started and the
messagesÁ and î are shown in the odometer
display field, the system is not operational. Contact an
authorized Mercedes-Benz Light Truck Center or call
1-800-FOR-MERCedes (in the USA), or 1-800-387-0100
(in Canada).General notes on the central locking system
If the key in the steering lock is in position 1 or 2, the
vehicle cannot be locked or unlocked with the remote
control.
If the vehicle cannot be locked or unlocked:
•Check the batteries of the remote control, see
page 292.
•Synchronize the remote control, see page 293.
Page 31 of 342

28 Central locking system
Te ch n i c a l
data Instruments
and controlsOperationDrivingInstrument
cluster displayPractical hints Car care Index
Panic button
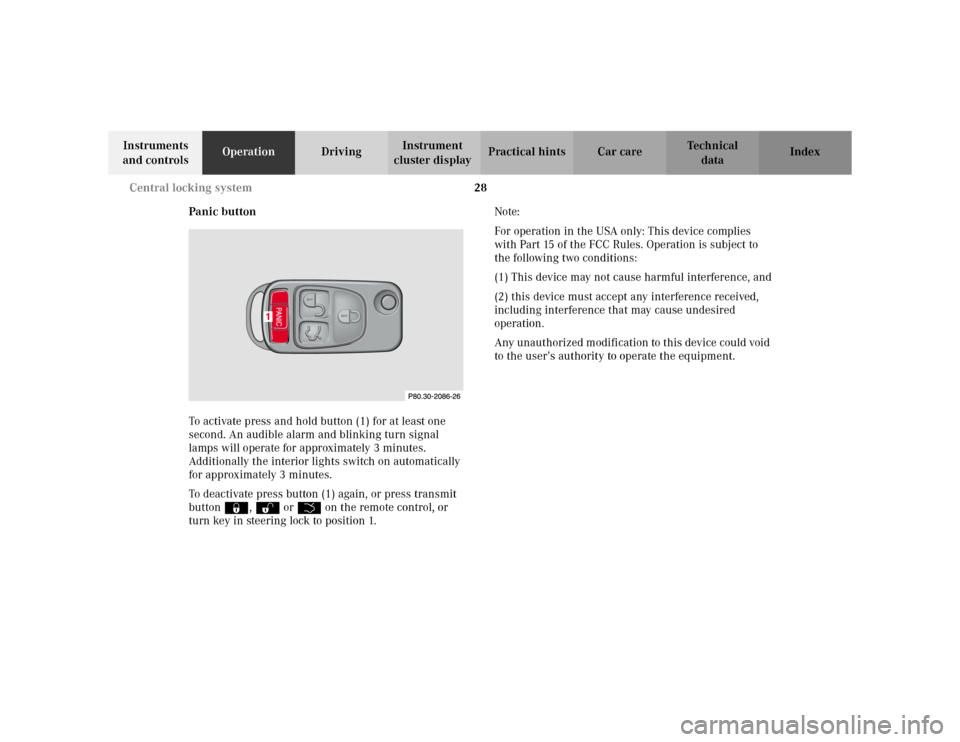
To activate press and hold button (1) for at least one
second. An audible alarm and blinking turn signal
lamps will operate for approximately 3 minutes.
Additionally the interior lights switch on automatically
for approximately 3 minutes.
To deactivate press button (1) again, or press transmit
button‹, ŒorŠ on the remote control, or
turn key in steering lock to position 1.Note:
For operation in the USA only: This device complies
with Part 15 of the FCC Rules. Operation is subject to
the following two conditions:
(1) This device may not cause harmful interference, and
(2) this device must accept any interference received,
including interference that may cause undesired
operation.
Any unauthorized modification to this device could void
to the user’s authority to operate the equipment.
Page 36 of 342

33 Central locking system
Te ch n i c a l
data Instruments
and controlsOperationDrivingInstrument
cluster displayPractical hints Car care Index Automatic central locking
The central locking switch also operates the automatic
central locking.
With the automatic central locking system activated and
the engine running, the doors and trunk are locked at
vehicle speeds of approximately 9 mph (15 km / h) or
more.
To a c ti va te :
With key in steering lock position 2 hold upper portion
of switch (1) for a minimum of 5 seconds.
To deactivate:
With key in steering lock position 2 hold lower portion
of switch (2) for a minimum of 5 seconds.
Notes:
If doors are unlocked with the central locking switch
after activating the automatic central locking, and
neither door is opened, then the doors remain unlocked
even at vehicle speeds of approximately 9 mph
(15 km / h) or more.If a door is opened from the inside at speeds of
approximately 9 mph (15 km / h) or less with the
automatic central locking activated, the door will again
be automatically locked at speeds of approximately
9 mph (15 km / h) or more.
Important!
When towing the vehicle, or with the vehicle on a
dynamometer test stand, please, note the following:
With the engine running, the vehicle doors will lock if
the left front wheel spins at vehicle speeds of
approximately 9 mph (15 km / h) or more.
To prevent vehicle door locks from locking, deactivate
the automatic central locking.
Emergency unlocking in case of accident
The doors unlock automatically a short time after an
accident in which an airbag or emergency tensioning
retractor deploys (this is intended to aid rescue and
exit). However, the key must still be in the steering lock
position 1 or 2.
Additionally the hazard warning flashers turn on
automatically and the interior lights switch on for
approximately 30 minutes.
Page 39 of 342

36 Antitheft alarm system
Te ch n i c a l
data Instruments
and controlsOperationDrivingInstrument
cluster displayPractical hints Car care Index
Antitheft alarm system
The indicator lamp is located in the center console.
The antitheft alarm is automatically armed or disarmed
with the remote control by locking or unlocking the
vehicle.
The antitheft alarm is armed within approximately
15 seconds after locking the vehicle with the remote
control.
A blinking lamp in the center console indicates that the
alarm is armed.
Notes:
Use of the mechanical key in the front door locks does
not arm or disarm the antitheft alarm system.
The alarm sounds when unlocking the driver’s door
with the mechanical key. Cancel alarm by turning key in
steering lock to position 1, or with the remote control by
pressing buttonŒ or‹.
If the vehicle battery voltage falls below 10 volts, the
alarm is automatically canceled and the antitheft alarm
system is disarmed. When the voltage is above this
value again, the antitheft alarm system is armed again.Operation:
Once the alarm system has been armed, the turn signal
lamps will flash rapidly (approximately 3 minutes) and
the horn will sound intermittently (approximately
30 seconds) when someone:
•opens a door,
•opens the liftgate,
•opens the hood,
•breaks a window,
•attempts to raise the vehicle.
The alarm will stay on even if the activating element
(a door, for example) is immediately closed.
If the alarm stays on for more than 20 seconds, an
emergency call is initiated automatically. See Tele Aid
on page 166.
Note:
The alarm system will cycle three times when triggered.
The interior lights are automatically switched on when
the alarm comes on and go out when the alarm is
cancelled.
Page 43 of 342

40 Seats
Te ch n i c a l
data Instruments
and controlsOperationDrivingInstrument
cluster displayPractical hints Car care Index
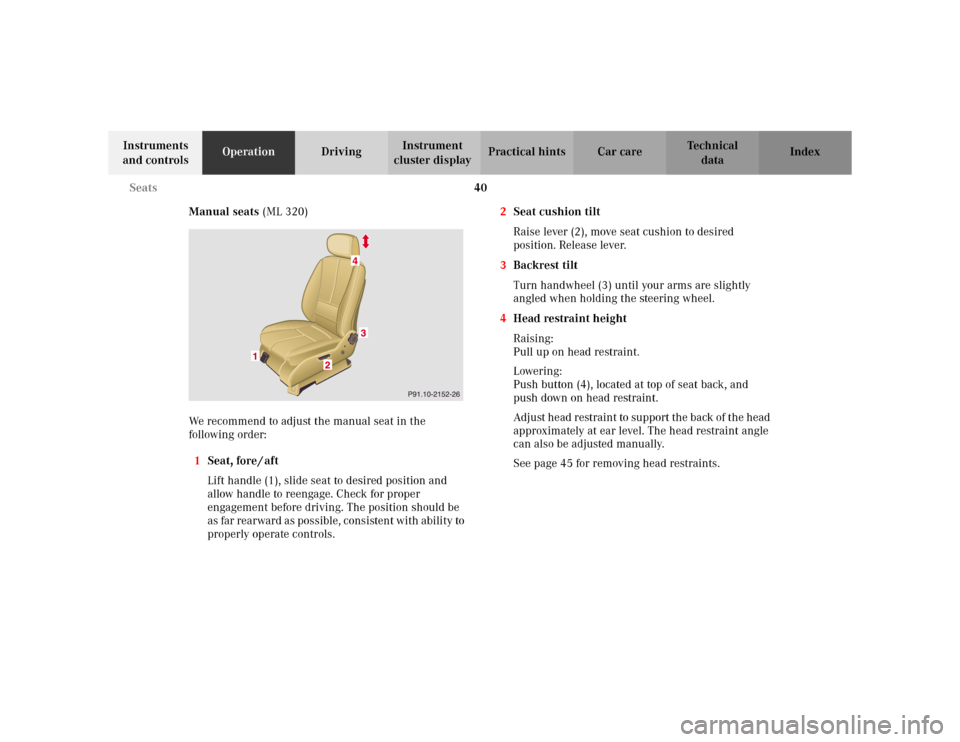
Manual seats (ML 320)
We recommend to adjust the manual seat in the
following order:
1Seat, fore / aft
Lift handle (1), slide seat to desired position and
allow handle to reengage. Check for proper
engagement before driving. The position should be
as far rearward as possible, consistent with ability to
properly operate controls.2Seat cushion tilt
Raise lever (2), move seat cushion to desired
position. Release lever.
3Backrest tilt
Turn handwheel (3) until your arms are slightly
angled when holding the steering wheel.
4Head restraint height
Raising:
Pull up on head restraint.
Lowering:
Push button (4), located at top of seat back, and
push down on head restraint.
Adj ust he ad r estrain t to supp ort the back of t he head
approximately at ear level. The head restraint angle
can also be adjusted manually.
See page 45 for removing head restraints.
Page 44 of 342

41 Seats
Te ch n i c a l
data Instruments
and controlsOperationDrivingInstrument
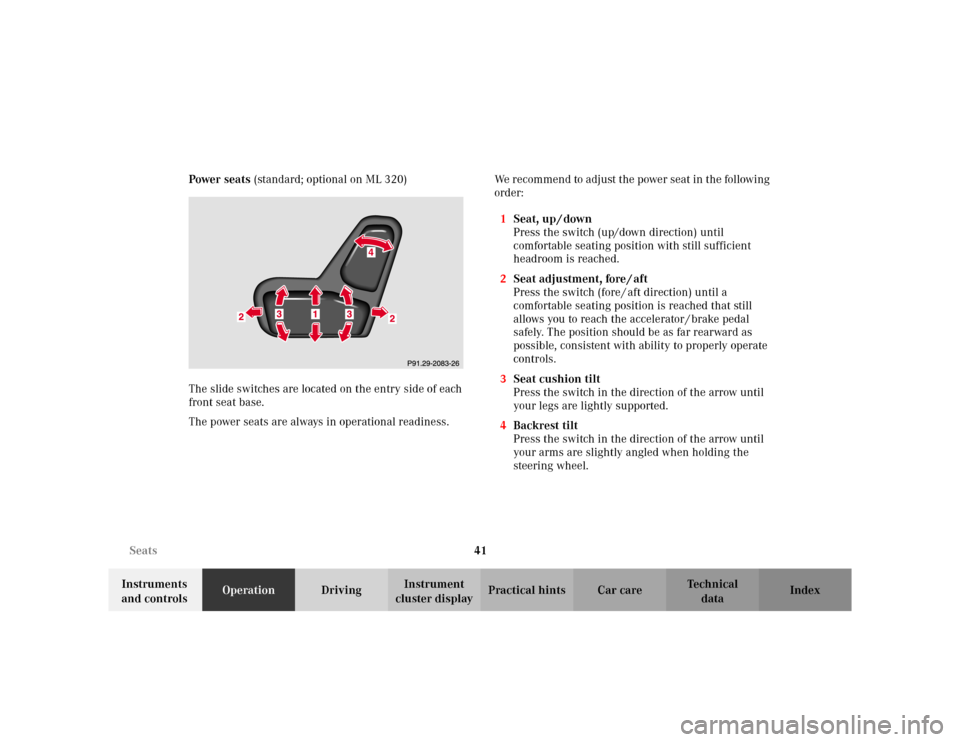
cluster displayPractical hints Car care Index Power seats (standard; optional on ML 320)
The slide switches are located on the entry side of each
front seat base.
The power seats are always in operational readiness.We recommend to adjust the power seat in the following
order:
1Seat, up / down
Press the switch (up/down direction) until
comfortable seating position with still sufficient
headroom is reached.
2Seat adjustment, fore / aft
Press the switch (fore / aft direction) until a
comfortable seating position is reached that still
allows you to reach the accelerator / brake pedal
safely. The position should be as far rearward as
possible, consistent with ability to properly operate
controls.
3Seat cushion tilt
Press the switch in the direction of the arrow until
your legs are lightly supported.
4Backrest tilt
Press the switch in the direction of the arrow until
your arms are slightly angled when holding the
steering wheel.