2002 MERCEDES-BENZ ML320 page 94
[x] Cancel search: page 94Page 190 of 342
187 Automatic transmission
Te ch n i c a l
data Instruments
and controlsOperationDrivingInstrument
cluster displayPractical hints Car care Index Neutral
No power is transmitted from the engine to the
drive axle. When the brakes are released, the
vehicle can be moved freely (pushed or towed). Do
not engage “N” while driving except to coast
when the vehicle is in danger of skidding (e.g. on
icy roads, see winter driving instructions on
page 199).
Important!
Coasting the vehicle, or driving for any other
reason with selector lever in “N” can result in
transmission damage that is not covered by the
Mercedes-Benz Limited Warranty.
The transmission automatically upshifts through
5th gear. Position “D” provides optimum driving
characteristics under all normal operating
conditions.Gear selection for special circumstances
The transmission gear ranges for special circumstances
can be selected by pressing the selector lever to the
right or the left with the selector lever in position “D”.
The gear range currently selected is indicated in the
instrument cluster display.
Briefly press selector lever in the “D –” direction:
The transmission will shift from the current gear range
to the next lower gear range.
Press and hold selector lever in the “D –” direction:
The selector lever position display will switch to the
gear range currently selected by the automatic
transmission.
Shifting into another gear range that allows for quicker
acceleration or to slow the vehicle down is possible.
Downshifts can also be performed.
Note:
To avoid overrevving the engine when the selector lever
is moved in “D –” direction, the transmission will not
shift to a lower gear range if the engine’s revolutions
per minute limit would be exceeded.
Page 194 of 342
191 Parking brake
Te ch n i c a l
data Instruments
and controlsOperationDrivingInstrument
cluster displayPractical hints Car care Index Parking brake
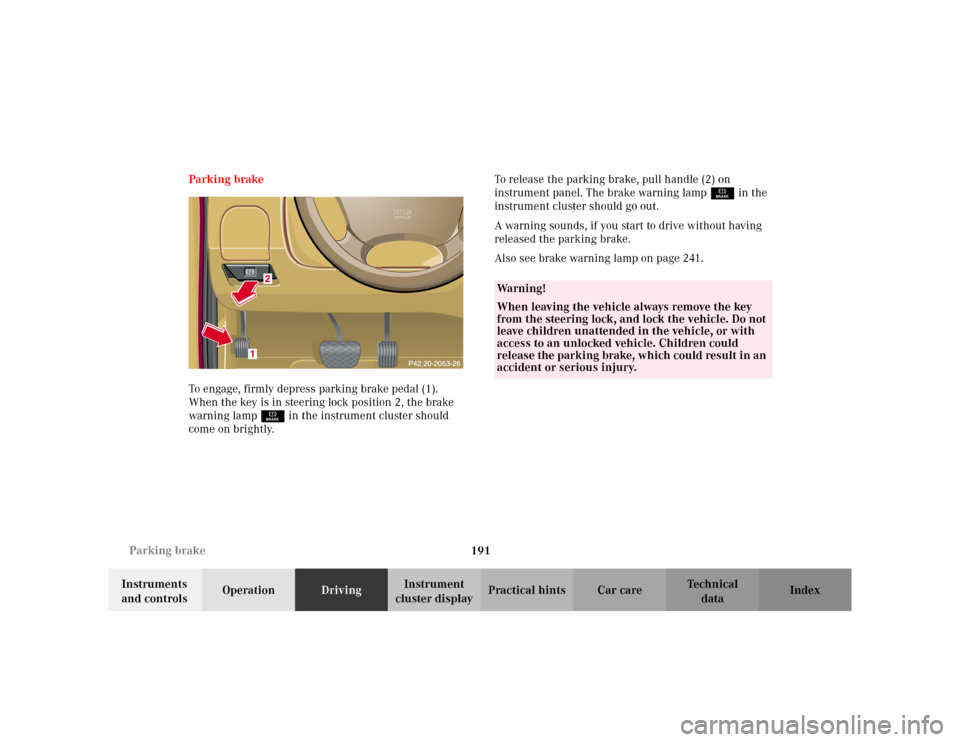
To engage, firmly depress parking brake pedal (1).
When the key is in steering lock position 2, the brake
warning lampÉ in the instrument cluster should
come on brightly.To release the parking brake, pull handle (2) on
instrument panel. The brake warning lampÉ in the
instrument cluster should go out.
A warning sounds, if you start to drive without having
released the parking brake.
Also see brake warning lamp on page 241.
Wa r n i n g !
When leaving the vehicle always remove the key
from the steering lock, and lock the vehicle. Do not
leave children unattended in the vehicle, or with
access to an unlocked vehicle. Children could
release the parking brake, which could result in an
accident or serious injury.
Page 196 of 342
193 Driving instructions
Te ch n i c a l
data Instruments
and controlsOperationDrivingInstrument
cluster displayPractical hints Car care Index Power assistance
BrakesExcessive use of road salt and other snow melting
chemicals spread on roads during the winter months
may cause a build up of moisture or residue to form on
the braking components. This build up or residue could
cause light corrosion of the braking components if the
vehicle is parked with the brakes cold. Apply steady and
even braking pressure when stopping the vehicle to
warm up and dry the brake components.
Important!
Please pay attention to the function of the brake assist
system (BAS), see page 217.
The condition of the parking brake system is checked
each time the vehicle is in the shop for the required
maintenance service.
If the parking brake is released and the brake warning
lamp in the instrument cluster stays on and there is no
audible warning (EBP), the brake fluid level in the
reservoir is too low.
Brake pad wear or a leak in the system may be the
reason for low brake fluid in the reservoir.
Have the brake system inspected at an authorized
Mercedes-Benz Light Truck Center immediately.
Wa r n i n g !
When the engine is not running, the brake and
steering systems are without power assistance.
Under these circumstances, a much greater effort is
necessary to stop or steer the vehicle.Wa r n i n g !
After driving in heavy rain for some time without
applying the brakes or through water deep enough
to wet brake components or salty road conditions,
the first braking action may be somewhat reduced
and increased pedal pressure may be necessary to
obtain expected braking effect. Be sure to maintain
a safe distance from vehicles in front.Resting your foot on the brake pedal will cause
excessive and premature wear of the brake pads.It can also result in the brakes overheating thereby
significantly reducing their effectiveness. It may
not be possible to stop the vehicle in sufficient time
to avoid an accident.
Page 202 of 342

199 Driving instructions
Te ch n i c a l
data Instruments
and controlsOperationDrivingInstrument
cluster displayPractical hints Car care Index Snow chains
Use only snow chains that are tested and recommended
by Mercedes-Benz. Your authorized Mercedes-Benz
Light Truck Center will be glad to advise you on this
subject.
Snow chains should be used on all four wheels. With
only two chains available, they should be mounted on
the rear wheels. Follow the manufacturer’s mounting
instructions.
Snow chains should only be driven on snow covered
roads at speeds not to exceed 30 mph (50 km / h).
Remove chains as soon as possible when driving on
roads without snow.
When driving with snow chains, press the ESP control
switch to OFF, refer to page 225.
Model ML 55 AMG
Use of snow chains is not permissible with tire size
285 / 50 R 18.Winter driving instructions
The most important rule for slippery or icy roads is to
drive sensibly and to avoid abrupt acceleration, braking
and steering maneuvers. Do not use the cruise control
system under such conditions.
When the vehicle is in danger of skidding, move
selector lever to position “N”. Try to keep the vehicle
under control by corrective steering action.
Caution!
Do not use LOW RANGE mode when driving on ice or
packed snow. At speeds below 18 mph (30 km / h)
vehicle steering is adversely affected by the LOW
RANGE ABS, see page 220.
Road salts and chemicals can adversely affect braking
efficiency. Increased pedal force may become necessary
to produce the normal brake effect. We therefore
recommend depressing the brake pedal periodically
when traveling at length on salt-strewn roads. This can
bring road salt impaired braking efficiency back to
normal. A prerequisite is, however, that this be done
without endangering other drivers on the road.
Page 203 of 342
200 Driving instructions
Te ch n i c a l
data Instruments
and controlsOperationDrivingInstrument
cluster displayPractical hints Car care Index
If the vehicle is parked after being driven on salt treated
roads, the braking efficiency should be tested as soon as
possible after driving is resumed while observing the
safety rules in the previous paragraph.
Winter driving
Have your vehicle winterized at your authorized
Mercedes-Benz Light Truck Center before the onset of
winter.
•Change the engine oil if the engine contains an oil
which is not approved for winter operation. For
viscosity (SAE / CCMC class) and filling quantity,
see page 314.•Check engine coolant anticorrosion / antifreeze
concentration.
•Additive for the windshield washer and headlamp
cleaning system: Add MB Concentrate “S” to a
premixed windshield washer solvent / antifreeze
which is formulated for below freezing temperatures
see page 259.
•Test battery: Battery capacity drops with decreasing
ambient temperature. A well charged battery helps
to ensure that the engine can be started, even at low
ambient temperatures.
•Tires: We recommend M+S rated radial-ply tires on
all four wheels for the winter season. Observe
permissible maximum speed for M+S rated
radial-ply tires and the legal speed limit.
In winter operation, the maximum effectiveness of the
antilock brake system (ABS), the four wheel electronic
traction system (4-ETS+), the electronic stability
program (ESP), and electronic brake proportioning
(EBP) can only be achieved with M+S rated radial-ply
tires and / or snow chains recommended by
Mercedes-Benz. Snow chains maximize performance.
For driving instructions using snow chains see
page 199.
Wa r n i n g !
If the vehicle becomes stuck in snow, make sure
that snow is kept clear of the exhaust pipe and
from around the vehicle with engine running.
Otherwise, deadly carbon monoxide (CO) gases may
enter vehicle interior resulting in unconsciousness
and death.To assure sufficient fresh air ventilation, open a
window slightly on the side of the vehicle not
facing the wind.
Page 205 of 342

202 Driving instructions
Te ch n i c a l
data Instruments
and controlsOperationDrivingInstrument
cluster displayPractical hints Car care Index
Off-Road driving
Familiarize yourself with the vehicle characteristics and
gear changing before you attempt any difficult terrain
off-road driving. We recommend that you start out with
easy off-road travel.
Please read this chapter carefully before you begin
off-road travel.
Special driving features are available for specific kinds
of operation:
•LOW RANGE mode, see page 227
•LOW RANGE - ABS, see page 220
•LOW RANGE - 4-ETS+, see page 222
•LOW RANGE - ESP, see page 226
Engage the LOW RANGE mode before driving under
off-road conditions. For switching LOW RANGE mode on
and off see page 227.
Fasten items being carried as securely as possible, see
page 154.
We recommend to keep doors, liftgate, windows, and
roof closed whenever driving in off-road mode.Important!
Adjust vehicle speed to condition of terrain. The more
uneven, rutty and steeper the terrain, the lower the
speed should be.
Watch out for obstacles, such as rocks, holes,
tree-stumps, ruts.
Be especially careful when driving in unknown
territory. Eventually get out of the vehicle and scout the
path you intend to take.
Continuous and speedy driving in sandy soil overcomes
the vehicle rolling resistance, and helps to prevent the
vehicle from sinking into the ground.
Do not initiate jumps with the vehicle. It interrupts the
forward momentum of the vehicle.
Sand, dirt, mud and other material having friction
property, can cause exceptional wear and tear as well as
failure of the brakes.
In this case the brakes may be less effective or even fail
when you most need them. Always clean and check the
brakes following each off-road trip.
Page 206 of 342
203 Driving instructions
Te ch n i c a l
data Instruments
and controlsOperationDrivingInstrument
cluster displayPractical hints Car care Index Checklist before off-road driving
• Tires: Check the tread depth and maintain specified
tire pressure (see tire pressure label inside the fuel
filler flap). Check tires for possible damage and
remove foreign objects. The valve caps must be
mounted.
•Rims: Dented or bent rims can cause tire pressure
loss and damage the tire beads. For this reason,
check and, if neccesary, change rims before driving
off-road.
• Vehicle tool kit: Check if the vehicle jack is
functional. In all cases take the vehicle tool kit, a
strong tow rope, a shovel and a small plank (to put
under the vehicle jack on sandy soil) with you.Driving in steep terrain
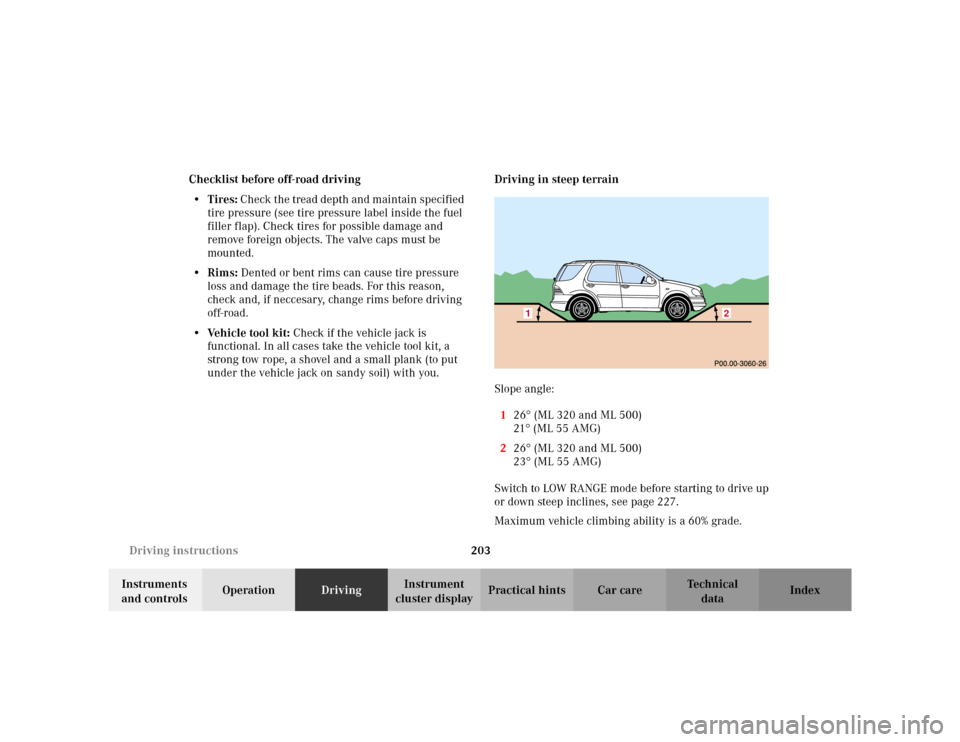
Slope angle:
126
° (ML 320 and ML 500)
21° (ML 55 AMG)
226° (ML 320 and ML 500)
23° (ML 55 AMG)
Switch to LOW RANGE mode before starting to drive up
or down steep inclines, see page 227.
Maximum vehicle climbing ability is a 60% grade.1
2
Page 207 of 342
204 Driving instructions
Te ch n i c a l
data Instruments
and controlsOperationDrivingInstrument
cluster displayPractical hints Car care Index
Driving on embankments, slopes and other steep
inclines should only be done straight up or downhill, i.e.
in the line of gravity.
Do not drive along the side of a slope (danger of vehicle
rollover). If in doing so, the vehicle begins to show a
tendency to roll, immediately steer into a line of gravity
(straight up or downhill).
To help avoid the vehicle rolling over, never turn it
around on steep inclines. If the vehicle cannot complete
the attempted climb, back it down in reverse gear.
Utilize the engine’s braking power when descending a
slope, observe the engine speed (do not overrev the
engine). Apply the service brake as needed.
Check the brakes after a lengthy downgrade drive.
Notes:
Avoid excessive engine speeds – drive with moderate
engine speeds (max. 3000 RPM).
Select gear range “2” or “1” on the automatic
transmission, see page 183.Traction in steep terrain:
Be easy on the accelerator and watch for continuous
wheel traction when driving in steep terrain.
The 4-ETS+ helps greatly when starting out on a steep
incline when the front wheels have then the tendency to
slip due to the weight shifting away the front axle.
The 4-ETS+ recognizes the situation and limits the
torque for the front wheels by braking them.
Simultaneously the torque for the rear wheels is
increased.
See page 221 for four wheel electronic traction system
(4-ETS+).
Driving across a hilltop:
To prevent the vehicle from speeding up too much after
climbing a hill, decelerate just ahead of a hilltop (do not
select gear range “N”). Use the momentum of the
vehicle to drive across the hilltop. Driving in this
manner prevents the vehicle from jumping across the
hilltop and thus loosing its forward momentum.