Page 73 of 342
70 Restraint systems
Te ch n i c a l
data Instruments
and controlsOperationDrivingInstrument
cluster displayPractical hints Car care Index
Installation of infant and child restraint systems
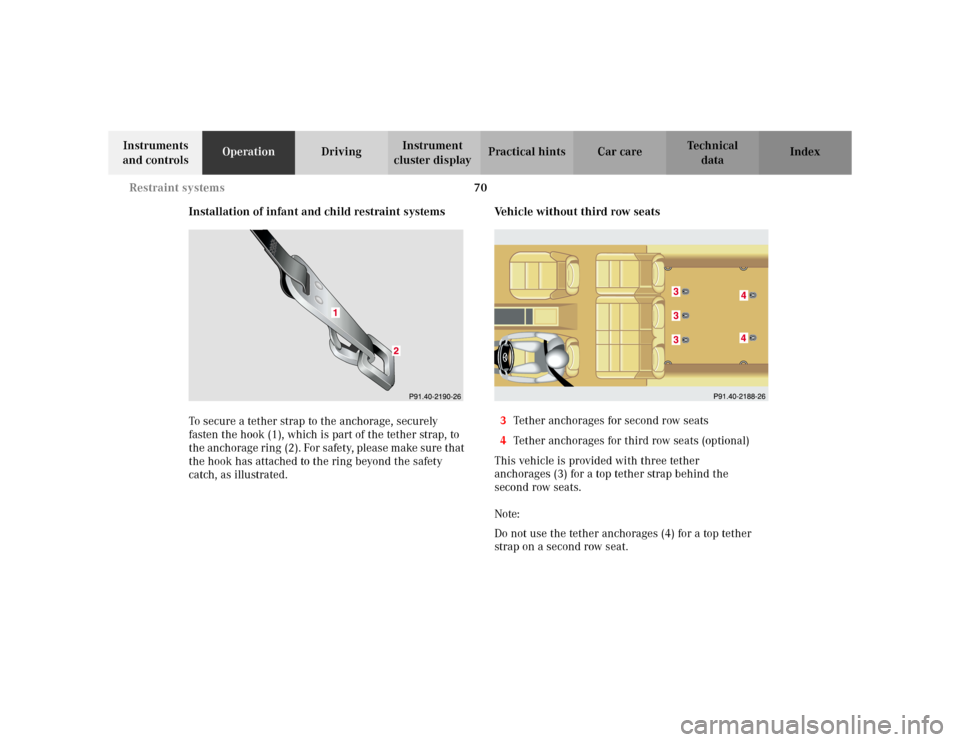
To secure a tether strap to the anchorage, securely
fasten the hook (1), which is part of the tether strap, to
the anchorage ring (2). For safety, please make sure that
the hook has attached to the ring beyond the safety
catch, as illustrated.Vehicle without third row seats
3Tether anchorages for second row seats
4Tether anchorages for third row seats (optional)
This vehicle is provided with three tether
anchorages (3) for a top tether strap behind the
second row seats.
Note:
Do not use the tether anchorages (4) for a top tether
strap on a second row seat.
Page 76 of 342
73 Restraint systems
Te ch n i c a l
data Instruments
and controlsOperationDrivingInstrument
cluster displayPractical hints Car care Index Install a “LATCH” type child seat according to the
manufacturer’s instructions.
The child seat must be firmly attached in the right and
left side mounting fittings (1).
Non-“LATCH” type child seats may also be used and are
capable of being installed using the vehicle’s seat belt
system. Install child seat according to the
manufacturer’s instructions.
Note:
With a child seat installed in the left rear seat, the seat
belt for the center seat occupied by a passenger must
operate freely. Guide seat belt between its seat cushion
mount and backrest mount along outside of right side
child seat mount.
Wa r n i n g !
The “LATCH” mounting fittings are intended for
children up to 22 kg (50 lbs) in weight.Children too big for child restraint systems must
ride in back seats using regular seat belts. Position
shoulder belt across chest and shoulder, not face or
neck. A booster seat may be necessary to achieve
proper belt positioning for children from 41 lbs. to
the point where a lap / shoulder belt fits properly
without one.Install child seat according to manufacturer’s
instructions.The child seat must be firmly attached in the right
and left side mounting fittings (1).An incorrectly mounted child seat may come loose
during an accident.Damaged or impact damaged child seats or child
seat mounting fittings must be replaced.Do not leave children unattended in the vehicle,
even if the children are secured in a child restraint
system.
Page 104 of 342
101 Exterior lamp switch
Te ch n i c a l
data Instruments
and controlsOperationDrivingInstrument
cluster displayPractical hints Car care Index Night security illumination
This function will be only active with exterior lamp
switch in positionU.
When turning off the engine, the exterior lamps
(parking lamps and fog lamps) switch on for added
illumination. After the last door has been closed the
lamp-on time period commences.
The lamp-on time period for night security illumination
can be set at several different timed levels from 0 (off) to
60 seconds, see “Setting illumination time” on
page 102.Notes:
Within 10 minutes after closing the last door or the
tailgate the night security illumination can be
reactivated by opening a door or the tailgate.
If after switching the engine off, no doors are opened or
if after opening the doors or trunk they are not closed,
the night security illumination will switch off
automatically after 60 seconds.
Deactivating night security illumination temporarily:
Turn the electronic key in steering lock to position 0
then to position 2 and back to position 0 again before
getting out of the vehicle. The night security
illumination will not be activated when the door is
opened.
Page 135 of 342
132 Interior equipment
Te ch n i c a l
data Instruments
and controlsOperationDrivingInstrument
cluster displayPractical hints Car care Index
Interior Storage compartments, armrest and cup holder
Wa r n i n g !
To help avoid personal injury during a collision or
sudden maneuver, exercise care when stowing
things. Put luggage or cargo in the rear cargo area
and secure. Do not pile luggage or cargo higher
than the seat backs. Luggage nets cannot secure hard or heavy objects.
Wa r n i n g !
Keep compartment lids closed. This will help to
prevent stored objects from being thrown about
and injuring vehicle occupants during an accident
and sudden maneuvers.
Page 144 of 342
141 Interior equipment
Te ch n i c a l
data Instruments
and controlsOperationDrivingInstrument
cluster displayPractical hints Car care Index To return seat bench section to sitting position:
1. Pull lever (1) and raise seat bench section until it
locks in place.
2. Pull lock button (2) up, and unfold seat back to
upright position. Check for secure locking by
pushing and pulling on the backrest. The red
backrest lock indicators at the lock buttons (2) are
not visible in locked position.
3. Pull lever (1) in direction of arrow, and slide seat
bench section rearward to desired position.4. Install and adjust head restraint.
For installation of head restraints see page 143.
Wa r n i n g !
Failure to assure that seats are locked into place
could result in an increased chance of injury in an
accident.Never place hands under seat or near any moving
parts while a seat is being adjusted.
Page 145 of 342
142 Interior equipment
Te ch n i c a l
data Instruments
and controlsOperationDrivingInstrument
cluster displayPractical hints Car care Index
Easy entry/exit feature
(only in vehicles with third row seats)
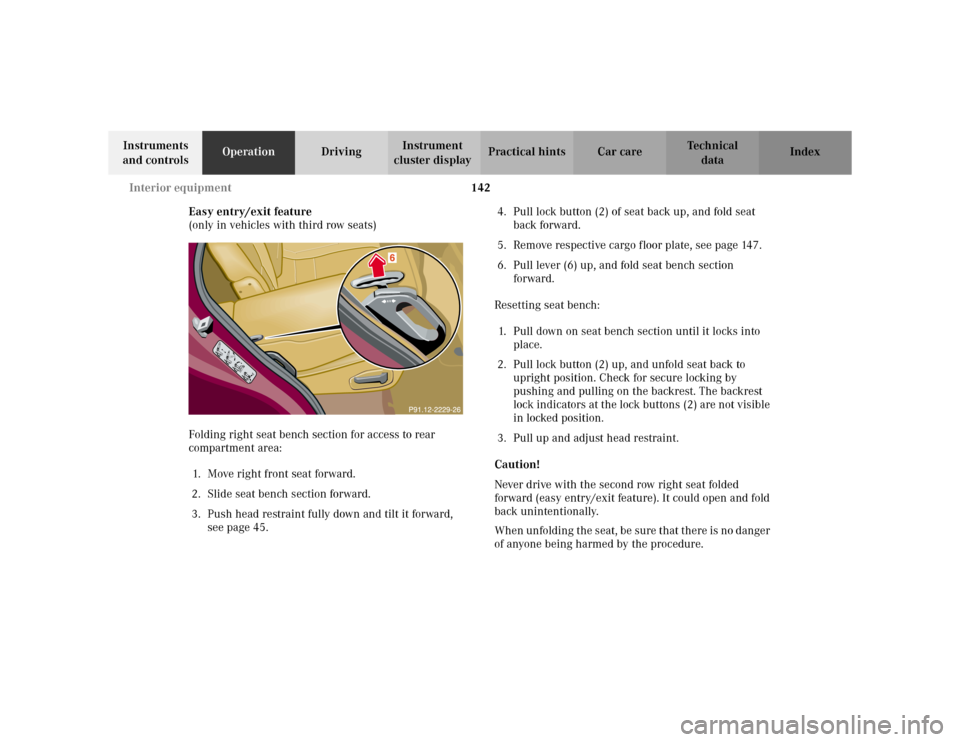
Folding right seat bench section for access to rear
compartment area:
1. Move right front seat forward.
2. Slide seat bench section forward.
3. Push head restraint fully down and tilt it forward,
see page 45.4. Pull lock button (2) of seat back up, and fold seat
back forward.
5. Remove respective cargo floor plate, see page 147.
6. Pull lever (6) up, and fold seat bench section
forward.
Resetting seat bench:
1. Pull down on seat bench section until it locks into
place.
2. Pull lock button (2) up, and unfold seat back to
upright position. Check for secure locking by
pushing and pulling on the backrest. The backrest
lock indicators at the lock buttons (2) are not visible
in locked position.
3. Pull up and adjust head restraint.
Caution!
Never drive with the second row right seat folded
forward (easy entry/exit feature). It could open and fold
back unintentionally.
When unfolding the seat, be sure that there is no danger
of anyone being harmed by the procedure.
Page 147 of 342
144 Interior equipment
Te ch n i c a l
data Instruments
and controlsOperationDrivingInstrument
cluster displayPractical hints Car care Index
Third row seats (optional on ML 320 and ML 500)
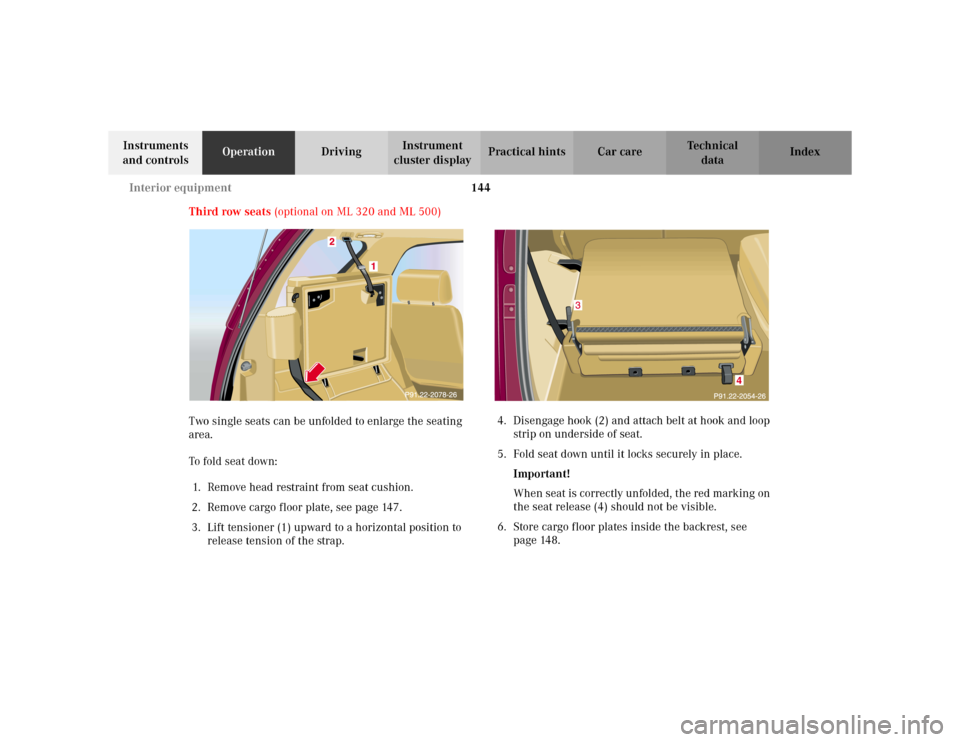
Two single seats can be unfolded to enlarge the seating
area.
To fol d s ea t d own:
1. Remove head restraint from seat cushion.
2. Remove cargo floor plate, see page 147.
3. Lift tensioner (1) upward to a horizontal position to
release tension of the strap.4. Disengage hook (2) and attach belt at hook and loop
strip on underside of seat.
5. Fold seat down until it locks securely in place.
Important!
When seat is correctly unfolded, the red marking on
the seat release (4) should not be visible.
6. Store cargo floor plates inside the backrest, see
page 148.
4
Page 148 of 342
145 Interior equipment
Te ch n i c a l
data Instruments
and controlsOperationDrivingInstrument
cluster displayPractical hints Car care Index 7. Pull release lever (3) and unfold seat back until it
locks securely in place.
8. Install head restraint in seat back.
Note:
For removal and installation of head restraint refer to
rear seat head restraints on page 143.
To stor e sea t :
1. Remove head restraint from seat back.
2. Pull release lever (3) and fold seat back forward
until it audibly locks securely in place.
3. Remove cargo floor plates from the backrest.
4. Pull seat release (4) and fold seat up. Engage
hook (2) in ceiling mount. Pull on free end of strap
until tight.
Important!
After folding the seats up, by hand place the lap belt
portion of the seat belt behind the seat (arrow).
Otherwise, the lap belt may be subject to damage and
could rip.5. Install head restraint in openings provided in seat
cushion.
6. Install cargo floor plates, see page 147.
Wa r n i n g !
Failure to assure that seats are locked into place
could result in an increased chance of injury in an
accident.Never place hands under seat or near any moving
parts while a seat is being adjusted.For your protection, drive only with properly
positioned head restraints.Adjust head restraint to support the back of the
head approximately at ear level.