Page 313 of 385

310 Tires, Wheels
Te ch n i c a l
data Instruments
and controlsOperation DrivingInstrument
cluster displayPractical hintsCar care Index
Wheels
Replace rims or tires with the same designation,
manufacturer and type as shown on the original part.
See your authorized Mercedes-Benz Light Truck Center
for further information.
See your authorized Mercedes-Benz Light Truck Center
for information on tested and recommended rims and
tires for summer and winter operation. They can also
offer advice concerning tire service and purchase.Tire replacement
Front and rear tires should be replaced in sets. Rims
and tires must be of the correct size and type. For
dimensions, see technical data on page 359.
We recommend that you break in new tires for
approximately 60 miles (100 km) at moderate speed.
It is imperative that the wheel mounting bolts be
fastened to a tightening torque of 97 ft.lb. (130 Nm)
whenever wheels are mounted.
For rim and tire specif ications, refer to technical data on
page 359.
Wa r n i n g !
Do not mix different tire construction types (i.e.
radial, bias, bias-belted) on your vehicle because
handling may be adversely affected and may result
in loss of control.
Wa r n i n g !
Worn, old tires can cause accidents. If the tire tread
is badly worn, or if the tires have sustained
damage, replace them.When replacing rims, use only genuine
Mercedes-Benz wheel bolts specified for the
particular rim type. Failure to do so can result in
the bolts loosening and possibly an accident.
J_G463.book Seite 310 Mittwoch, 19. September 2001 8:06 08
Page 318 of 385

315 Tires, Wheels
Te ch n i c a l
data Instruments
and controlsOperation DrivingInstrument
cluster displayPractical hintsCar care Index Move vehicle to a level area which is a safe distance
from the roadway.
Important!
The vehic le door s lock if t he lef t f ron t wheel r otate s with
the engine running. Do not leave the engine running
while changing a wheel.
1. Set parking brake and turn on hazard warning
flasher.
2. Move selector lever to position “P” and turn off
engine, and remove key from the starter switch.
Lock steering wheel with wheels in straight ahead
position.
3. Prevent vehicle from rolling away by blocking
wheels with wheel chocks (not supplied with
vehicle) or sizable wood block or stone. When
changing a wheel on a hill, place chocks on the
downhill side blocking both wheels of the other
axle. On a level road, place one chock in front of and
one behind the wheel that is diagonally opposite to
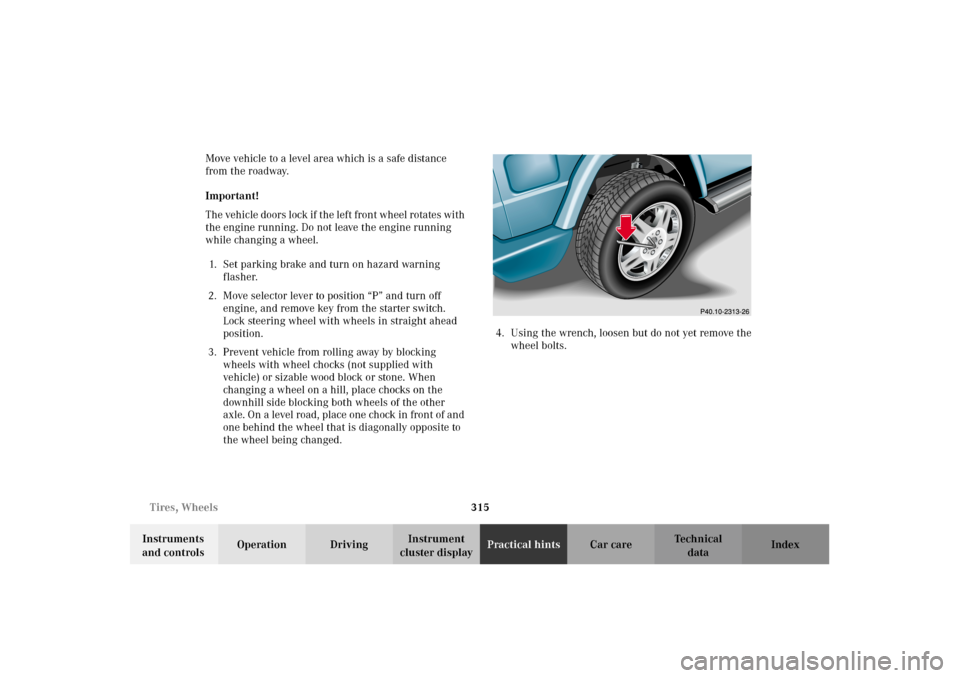
the wheel being changed.4. Using the wrench, loosen but do not yet remove the
wheel bolts.
J_G463.book Seite 315 Mittwoch, 19. September 2001 8:06 08
Page 319 of 385
316 Tires, Wheels
Te ch n i c a l
data Instruments
and controlsOperation DrivingInstrument
cluster displayPractical hintsCar care Index
5. The jack must always be in a vertical position, even
on slopes. Place jack under axle housing. Be certain
the jack arm is positioned correctly under the axle
housing.
6. Jack up the vehicle until the wheel is clear of the
ground. Never start engine while vehicle is raised.7. Now finish to unscrew and remove all wheel bolts.
Keep bolt threads protected from dirt and sand.
8. Remove wheel. Grip wheel from the sides. Keep
hands from beneath the wheels.
Clean contact surfaces of wheel and wheel hub.
Install spare wheel on wheel hub. Insert wheel bolts
and tighten them slightly.
9. Lower vehicle to ground. Remove jack.
Before storing the jack, it should be fully collapsed.
For proper storage of jack see page 296.
J_G463.book Seite 316 Mittwoch, 19. September 2001 8:06 08
Page 320 of 385
317 Tires, Wheels
Te ch n i c a l
data Instruments
and controlsOperation DrivingInstrument
cluster displayPractical hintsCar care Index With the vehicle lowered to ground, tighten the five
bolts evenly using the wrench. When tigthening follow
the sequence illustrated, until all bolts are tight.
Observe a tightening torque of 97 ft.lb. (130 Nm).
Ensure proper tire pressure, see page 318.
Wa r n i n g !
Always replace wheel bolts that are damaged or
rusted.Never apply oil or grease to wheel bolts.Damaged wheel hub threads should be repaired
immediately.Incorrect mounting bolts or improperly tightened
mounting bolts can cause the wheel to come off.
This could cause an accident. Be sure to use the
correct mounting bolts.
J_G463.book Seite 317 Mittwoch, 19. September 2001 8:06 08
Page 329 of 385

326 Towing
Te ch n i c a l
data Instruments
and controlsOperation DrivingInstrument
cluster displayPractical hintsCar care Index
Engine damage /Transmission damage,
Electrical malfunction
To be certain to avoid additional damage to the vehicle
powertrain, however you should do the following:
Shift automatic transmission to position “N”.
Important!
Vehicle may be towed for distances up to 30 miles
(50 km) and at a speed not to exceed 30 mph
(50 km/h).
For towing vehicle for distances exceeding 30 miles
(50 km) or if the vehicle has a damaged transfer
case, remove drive shafts to the drive axles.
When towing vehicle with one axle raised, the
electronic key in starter switch must be in
position 1.
With damage to front axle, raise front axle. Remove
drive shaft between rear axle and transfer case.
With damage to rear axle, raise rear axle and tow
vehicle with wheel lift or dolly placed under front
wheels.Notes:
When removing drive shaft, place M10 nuts on bolts as
distance sleeves and tighten using M8 nuts.
Always install new self-locking nuts when reinstalling
the drive shaft.
Caution!
If the vehicle is towed with the front axle raised, the
engine must be shut off (electronic key in starter switch
position 1). Otherwise, the 4-ETS may become engaged
which may cause loss of towing control. Switch off the
tow-away alarm (see page 43) as well as the ESP (see
page 245).
Note:
To signal turns while being towed with hazard warning
flasher in use, turn electronic key in starter switch to
position 1 and activate combination switch for left or
right turn signal in usual manner. Now deactivate the
hazard warning flasher, only the selected turn signal
will operate. Upon canceling the turn signal, the hazard
warning flasher must be activated again.
J_G463.book Seite 326 Mittwoch, 19. September 2001 8:06 08