2002 MERCEDES-BENZ G500 key battery
[x] Cancel search: key batteryPage 323 of 385

320 Battery
Te ch n i c a l
data Instruments
and controlsOperation DrivingInstrument
cluster displayPractical hintsCar care Index
The service life of the battery is dependent on its
condition of charge. The battery should always be kept
sufficiently charged, in order to last an optimum length
of time.
Therefore, we strongly recommend that you have the
battery charge checked frequently, and corrected if
necessary, especially if you use the vehicle less than
approximately 200 miles (300 km) per month,
mostly for short distance trips, or if it is not used for
long periods of time.
Only charge a battery with a battery charger after the
battery has been disconnected from the vehicle’s
electrical circuit.
Always disconnect the battery negative lead first and
connect last.
When removing and connecting the battery, always
make sure that all electrical consumers are off and the
key is in starter switch position 0. The battery must
always be securely installed when the vehicle is in
operation. During removal and installation always
protect the disconnected battery positive (+) terminal
with the cover attached to the battery.While t he en gin e is run ning t he batter y te rm in al clamp s
must not be loosened or detached, otherwise the
generator and other electronic components would be
damaged.
Note:
The gear selector lever will remain locked in
position “P” and the electronic key can not be turned in
the starter switch, if the vehicle battery is disconnected
or discharged.
After reconnecting the battery also set the clock (see
COMAND operator’s manual), synchronize the
electronic stability program (ESP) (see page 244) and
the front seat head restraints (see page 47).
Battery recycling
Batteries contain material that can harm the
environment with improper disposal.
Large 12 Volt storage batteries contain lead.
Recycling of batteries is the preferred method of
disposal.
Many states require sellers of batteries to accept old
batteries for recycling.
J_G463.book Seite 320 Mittwoch, 19. September 2001 8:06 08
Page 327 of 385
324 Towing
Te ch n i c a l
data Instruments
and controlsOperation DrivingInstrument
cluster displayPractical hintsCar care Index
Towing the vehicle
Notes:
The selector lever will remain locked in position “P” and
the electronic key cannot be turned in the starter switch
if the battery is disconnected or discharged. See battery
on page 319 or jump starting on page 321.
In order to move the vehicle, shift automatic
transmission to position “N”.
Transmission selector lever, manually unlocking, see
page 327.Important!
When towing the vehicle, please, note the following:
Towing of the vehicle should only be done using the
properly installed towing eye bolt. Never attach tow
cable, tow rope or tow rod to vehicle chassis, frame
or suspension parts.
The vehicle may be towed with all wheels on the
ground and the selector lever in position “N” for
distances up to 30 miles (50 km) and at a speed not
to exceed 30 mph (50 km / h). The key must be in
starter switch position 2.
With the automatic central locking activated and the
engine running, the vehicle doors lock if the left front
wheel is turning at vehicle speeds of approximately
9 mph (15 km / h) or more.
To prevent the vehicle door locks from locking,
deactivate the automatic central locking. See the
individual setting menu “VEHICLE” – “AUTOMATIC
DOOR LOCK” on page 118.
We recommend that the vehicle be transported using
flat bed equipment. This method is preferable to other
types of towing.
To prevent damage during transport, do not tie down
vehicle by its chassis or suspension parts.
Prior to towing the vehicle with all wheels on the
ground, make certain that the electronic key is in
starter switch position 2.If the electronic key is left in the starter switch
position 0 for an extended period of time, it can no
longer be turned in the switch. In this case, the
steering is locked. To unlock, remove electronic key
from starter switch and reinsert.
With the engine not running, there is no power
assistance for the braking and steering systems. In
this case, it is important to keep in mind that a
considerably higher degree of effort is necessary to
brake and steer the vehicle.
J_G463.book Seite 324 Mittwoch, 19. September 2001 8:06 08
Page 346 of 385
343 Electronic main key
Te ch n i c a l
data Instruments
and controlsOperation DrivingInstrument
cluster displayPractical hintsCar care Index Changing batteries in the electronic key
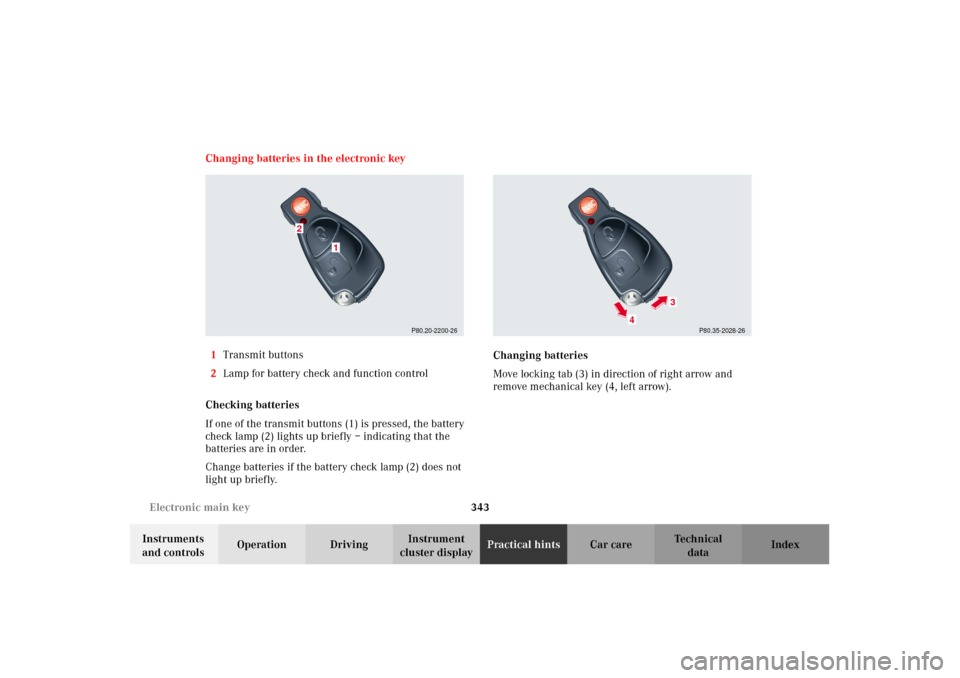
1Transmit buttons
2Lamp for battery check and function control
Checking batteries
If one of the transmit buttons (1) is pressed, the battery
check lamp (2) lights up briefly – indicating that the
batteries are in order.
Change batteries if the battery check lamp (2) does not
light up briefly.Changing batteries
Move locking tab (3) in direction of right arrow and
remove mechanical key (4, left arrow).
P80.20-2200-26
1
2
P80.35-2028-26
4
3
J_G463.book Seite 343 Mittwoch, 19. September 2001 8:06 08
Page 347 of 385
344 Electronic main key
Te ch n i c a l
data Instruments
and controlsOperation DrivingInstrument
cluster displayPractical hintsCar care Index
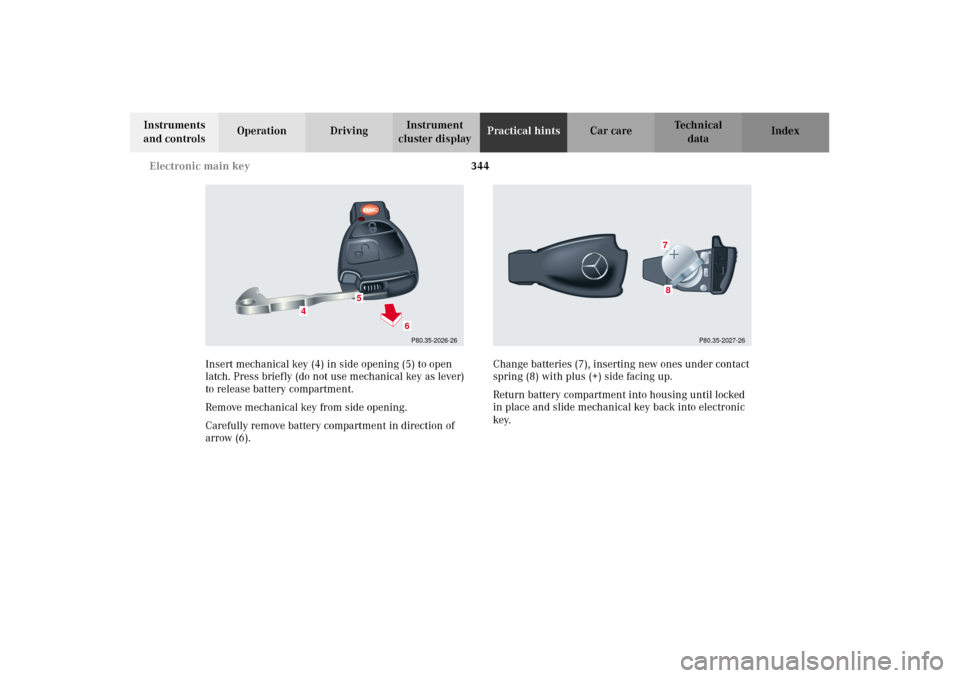
Insert mechanical key (4) in side opening (5) to open
latch. Press briefly (do not use mechanical key as lever)
to release battery compartment.
Remove mechanical key from side opening.
Carefully remove battery compartment in direction of
arrow (6).Change batteries (7), inserting new ones under contact
spring (8) with plus (+) side facing up.
Return battery compartment into housing until locked
in place and slide mechanical key back into electronic
key.
P80.35-2026-26
5
4
6
P80.35-2027-26
78
J_G463.book Seite 344 Mittwoch, 19. September 2001 8:06 08
Page 348 of 385
345 Electronic main key
Te ch n i c a l
data Instruments
and controlsOperation DrivingInstrument
cluster displayPractical hintsCar care Index Important!
Batteries contain materials that can harm the
environment if disposed of improperly. Recycling of
batteries is the preferred method of disposal. For
disposal, please follow manufacturer’s recommendation
on battery package.
Replacement Battery:
Lithium, type CR 2025 or equivalent.Synchronizing remote control
The remote control may have to be resynchronized, if
the vehicle cannot be locked or unlocked.
To synchronize insert electronic key in starter switch.
The remote control should once again be operational.
J_G463.book Seite 345 Mittwoch, 19. September 2001 8:06 08
Page 377 of 385

374 Index
Te ch n i c a l
data Instruments
and controlsOperation DrivingInstrument
cluster displayPractical hints Car careIndex
Individual settings ......................................................... 108
"CONVENIENCE" ...................................................... 120
"INSTRUMENT CLUSTER" .......................................110
"LIGHTING" ................................................................114
"VEHICLE"
(audio and central locking system) ....................118
Infant and child restraint system
Installation ................................................................... 75
Infant and child restraint systems ................................ 73
Child seat mounts - LATCH type .............................. 76
Information call
See Tele Aid ............................................................... 192
Instrument cluster ........................................................... 84
Indicator lamps ........................................................... 86
Malfunction and indicator lamps ...........................264
Instruments and controls ............................................... 18
Interior
General notes ............................................................. 162
Interior lighting ............................................................. 156
JJack ................................................................................... 296
Jump starting .................................................................. 321
KKeys, changing battery ................................................. 343
Keys, vehicle .....................................................................26LLamps, exterior .............................................................. 328
Bulbs for low and high beam .................................. 331
Bulbs for parking and standing lamp .................... 331
Fog lamp, front ......................................................... 332
Front and rear side marker lamps ........................ 337
Headlamp assembly ................................................. 329
Headlamps .........................................................329, 352
High mounted stop lamp ......................................... 342
License plate lamps ................................................. 340
Rear fog lamp/Backup lamp .................................... 341
Replacing bulbs ........................................................ 328
Taillamp assemblies ................................................ 339
Turn signal lamp, front ........................................... 334
Turn signal lamp, side ............................................. 335
Layout of poly-V-belt ..................................................... 358
Lighter ............................................................................. 170
Limp home mode
(Automatic transmission) ........................................ 214
Loading instructions ...................................................... 178
J_G463.book Seite 374 Mittwoch, 19. September 2001 8:06 08