Page 132 of 385
129 Exterior lamp switch
Te ch n i c a l
data Instruments
and controlsOperationDrivingInstrument
cluster displayPractical hints Car care Index Exterior lamp switch
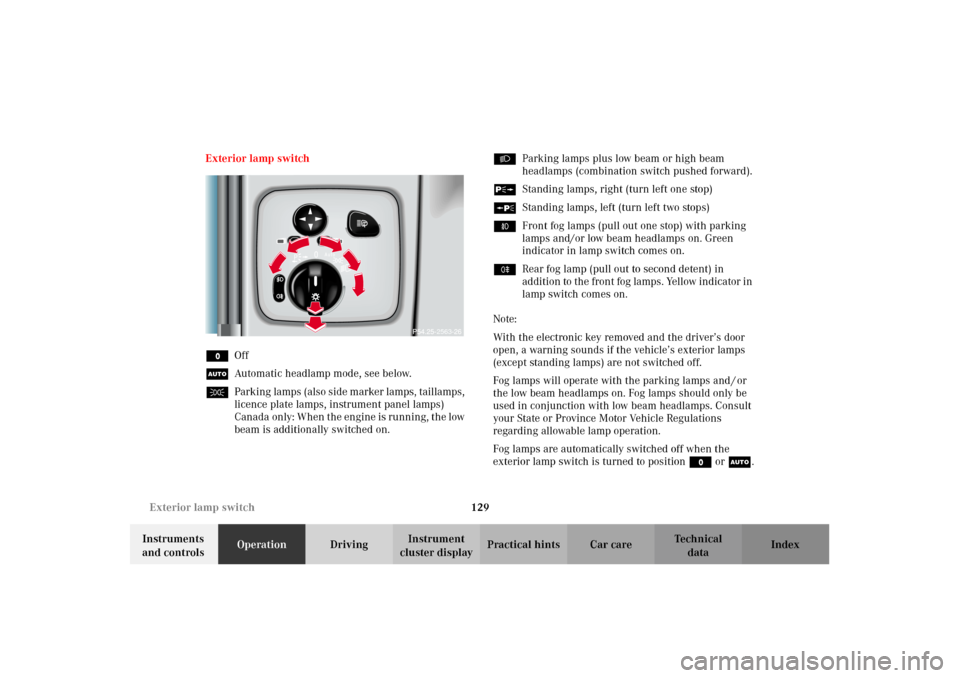
MOff
UAutomatic headlamp mode, see below.
CPar k ing lamps (als o s id e m ar ker lamps , taillamps ,
licence plate lamps, instrument panel lamps)
Canada only: When the engine is running, the low
beam is additionally switched on.BParking lamps plus low beam or high beam
headlamps (combination switch pushed forward).
ˆStanding lamps, right (turn left one stop)
‚Standing lamps, left (turn left two stops)
‡Front fog lamps (pull out one stop) with parking
lamps and/or low beam headlamps on. Green
indicator in lamp switch comes on.
†Rear fog lamp (pull out to second detent) in
addition to the front fog lamps. Yellow indicator in
lamp switch comes on.
Note:
With the electronic key removed and the driver’s door
open, a warning sounds if the vehicle’s exterior lamps
(except standing lamps) are not switched off.
Fog lamps will operate with the parking lamps and / or
the low beam headlamps on. Fog lamps should only be
used in conjunction with low beam headlamps. Consult
your State or Province Motor Vehicle Regulations
regarding allowable lamp operation.
Fog lamps are automatically switched off when the
exterior lamp switch is turned to position M or U.
2563
J_G463.book Seite 129 Mittwoch, 19. September 2001 8:06 08
Page 133 of 385
130 Exterior lamp switch
Te ch n i c a l
data Instruments
and controlsOperationDrivingInstrument
cluster displayPractical hints Car care Index
Headlamp mode
Manual headlamp mode
The low beam headlamps and parking lamps can be
switched on and off with the exterior lamp switch. For
exterior lamp switch, see above.
Note:
With the daytime running lamp mode activated and the
engine running, the low beam headlamps cannot be
switched off manually.Automat ic headlamp mode
Turn exterior lamp switch to positionU.
•Electronic key in starter switch position 1:
The parking lamps switch on and off automatically
depending on the brightness of the ambient light.
•Electronic key in starter switch position 2 and the
engine running:
The low beam headlamps and parking lamps are
switched on and off automatically depending on the
brightness of the ambient light.
The low beam headlamps and parking lamps can
still be switched on and off manually using the
exterior lamp switch.
Note:
With the daytime running lamp mode activated, the low
beam headlamps cannot be switched off manually.
The headlamps will not be automatically switched on
under foggy conditions.
Front fog lamps and rear fog lamp cannot be switched
on manually with exterior lamp switch in positionU.
To activate the fog lamps turn exterior switch to
positionB.
Wa r n i n g !
The driver is responsible for the operation of the
vehicle’s lights at all times. The automatic
headlamp feature is only an aid to the driver.
Switch on the vehicle lights by hand when driving
or traffic conditions require you to do so.
J_G463.book Seite 130 Mittwoch, 19. September 2001 8:06 08
Page 134 of 385
131 Exterior lamp switch
Te ch n i c a l
data Instruments
and controlsOperationDrivingInstrument
cluster displayPractical hints Car care Index Daytime running lamp mode
Turn exterior lamp switch to positionM orU.
When the engine is running, the low beam headlamps
are automatically switched on. In low ambient light
conditions the parking lamps will also switch on.
•Canada only:
When shifting from a driving position to
position “N” or “P”, the low beam switches off
(3 minutes delay).
For nighttime driving the exterior lamp switch
should be turned to position B to permit
activation of the high beam headlamps.•USA only:
The high beam headlamps can also be activated
when driving with the daytime running lamp mode
activated and exterior lamp switch in positionM.
To activate the daytime running lamp mode, see the
individual setting menu “LIGHTING” – “LIGHT
CIRCUIT HEADLAMP MODE” on page 114.
Note:
See page 129 for notes on the exterior lamp switch.
J_G463.book Seite 131 Mittwoch, 19. September 2001 8:06 08
Page 135 of 385
132 Exterior lamp switch
Te ch n i c a l
data Instruments
and controlsOperationDrivingInstrument
cluster displayPractical hints Car care Index
Night security illumination
Turn exterior lamp switch to positionU.
At low ambient light conditions and with the engine
having been switched off, the exterior lamps (fog lamps
and parking lamps) switch on for added illumination,
(except in daytime running mode). After the last door
has been closed the lamp-on time period commences.
See the individual setting menu “LIGHTING” –
“HEADLAMPS DELAYED SWITCH–OFF” on page 114,
for instructions on how to activate the function.
The lamp-on time period for night security illumination
can be set at several different timed levels from 0 (off) to
60 seconds, see the individual setting menu
“LIGHTING” – “HEADLAMPS DELAYED SWITCH–OFF”
on page 114.Notes:
Within 10 minutes after closing the last door the night
security illumination can be reactivated by opening a
door.
If after switching the engine off, no doors are opened or
if after opening the doors or tailgate they are not closed,
the night security illumination will switch off
automatically after 60 seconds.
Deactivating night security illumination temporarily:
Turn the electronic key in starter switch to position 0
then to position 2 and back to position 0 again before
getting out of the vehicle. The night security
illumination will not be activated when the door is
opened.
J_G463.book Seite 132 Mittwoch, 19. September 2001 8:06 08
Page 136 of 385
133 Exterior lamp switch
Te ch n i c a l
data Instruments
and controlsOperationDrivingInstrument
cluster displayPractical hints Car care Index Locator lighting
Turn exterior lamp switch to positionU.
After unlocking the vehicle with the electronic key
during darkness the fog lamps and parking lamps
switch on for approximately 40 seconds.
The exterior lamps will be switched off when opening
the driver’s door.
See the individual setting menu “LIGHTING” –
“LOCATOR LIGHTING” on page 114, for instructions on
how to activate the function. Headlamp cleaning system
Turn the electronic key in starter switch to position 1.
The headlamps will be cleaned with a high-pressure
water jet when you press the headlamp washer
button (1).
See page 307 for instructions on filling up the
windshield/headlamp washer reservoir.
2564
J_G463.book Seite 133 Mittwoch, 19. September 2001 8:06 08
Page 140 of 385
137 Combination switch
Te ch n i c a l
data Instruments
and controlsOperationDrivingInstrument
cluster displayPractical hints Car care Index Windshield wipers smear
If the windshield wipers smear the windshield, even
during rain, activate the washer system as often as
necessary. The fluid in the washer reservoir should be
mixed in the correct ratio.
See page 307 for instructions on filling up the
windshield washer reservoir and page 348 for notes on
replacing the wiper blade inserts. Windshield and headlamp washer fluid mixing ratio
For temperatures above freezing:
MB Windshield Washer Concentrate “S” and water.
1 part “S” to 100 parts water
(40 ml “S” to 1 gallon water).
For temperature below freezing:
MB Windshield Washer Concentrate “S” and
commercially available premixed windshield washer
solvent / antifreeze
1 part “S” to 100 parts solvent
(40 ml “S” to 1 gallon solvent).
J_G463.book Seite 137 Mittwoch, 19. September 2001 8:06 08
Page 226 of 385
223 Driving instructions
Te ch n i c a l
data Instruments
and controlsOperationDrivingInstrument
cluster displayPractical hints Car care Index Road salts and chemicals can adversely affect braking
efficiency. Increased pedal force may become necessary
to produce the normal brake effect. We therefore
recommend depressing the brake pedal periodically
when traveling at length on salt-strewn roads. This can
bring road salt impaired braking efficiency back to
normal. A prerequisite is, however, that this be done
without endangering other drivers on the road.
If the vehicle is parked after being driven on salt treated
roads, the braking ef ficiency should be tested as soon as
possible after driving is resumed while observing the
safety rules in the previous paragraph.Winter driving
Have your vehicle winterized at your authorized
Mercedes-Benz Light Truck Center before the onset of
winter.
•Check the engine oil. Change the engine oil if the
engine contains an oil which is not approved for
winter operation. For viscosity (SAE / CCMC class)
and filling quantity, see page 361.
•Check engine coolant anticorrosion / antifreeze
concentration.
•Additive for the windshield washer and headlamp
cleaning system: Add MB Concentrate “S” to a
premixed windshield washer solvent / antifreeze
which is form ulated for b elow f r eezin g temperatures
see page 307.
•Test battery: Battery capacity drops with decreasing
ambient temperature. A well charged battery helps
to ensure that the engine can be started, even at low
ambient temperatures.
•Tires: We recommend M+S rated radial-ply tires on
all four wheels for the winter season. Observe
permissible maximum speed for M+S rated
radial-ply tires and the legal speed limit.
Wa r n i n g !
If the vehicle becomes stuck in snow, make sure
that snow is kept clear of the exhaust pipe and
from around the vehicle with engine running.
Otherwise, deadly carbon monoxide (CO) gases may
enter vehicle interior resulting in unconsciousness
and death.To assure sufficient fresh air ventilation, open a
window slightly on the side of the vehicle not
facing the wind.
J_G463.book Seite 223 Mittwoch, 19. September 2001 8:06 08
Page 264 of 385
261 Check regulary and before a long trip
Te ch n i c a l
data Instruments
and controlsOperationDrivingInstrument
cluster displayPractical hints Car care Index Check regularly and before a long trip 1Engine oil level
See “Checking engine oil level” on page 304 and
“Engine oil level indicator” on page 127.
2Coolant level
See “Coolant level” on page 306.
3Brake fluid
See “Brake fluid” on page 363.
4Windshield washer system/
Headlamp cleaning system/
Rear window washer system
For refilling reservoir see page 307.
Opening hood, see page 302.
Vehicle lighting: Check function and cleanliness. For
replacement of light bulbs, see “Exterior lamps” on
page 328.
Exterior lamp switch, see page 129.
2
1
3
4
J_G463.book Seite 261 Mittwoch, 19. September 2001 8:06 08