Page 49 of 350

46 Seats
Technical
data Instruments
and controlsOperationDrivingInstrument
cluster displayPractical hints Car care Index
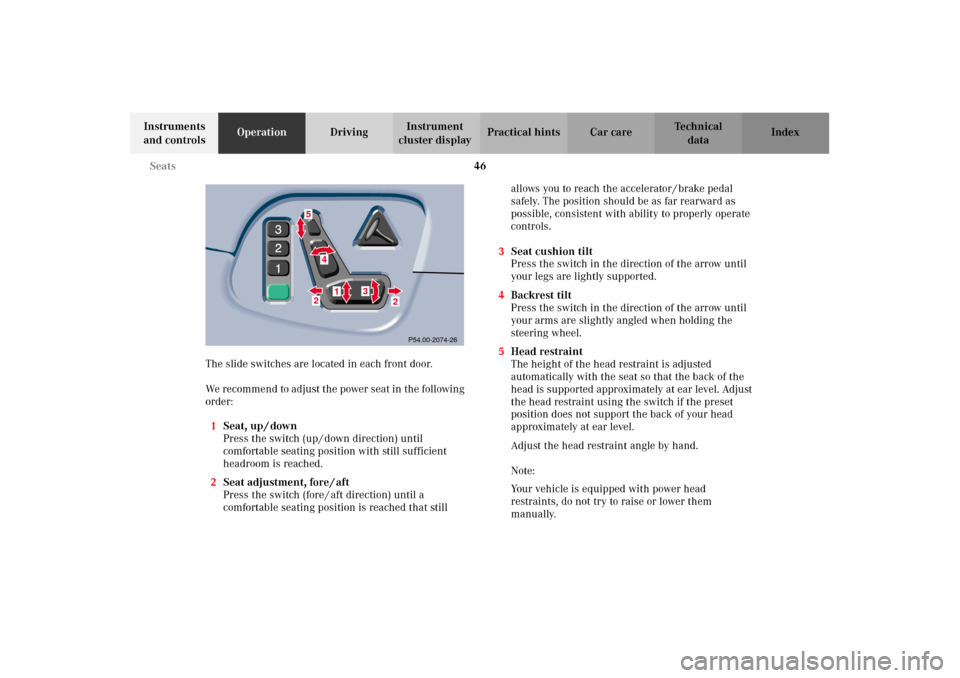
The slide switches are located in each front door.
We recommend to adjust the power seat in the following
order:
1Seat, up / down
Press the switch (up / down direction) until
comfortable seating position with still sufficient
headroom is reached.
2Seat adjustment, fore / aft
Press the switch (fore / aft direction) until a
comfortable seating position is reached that still allows you to reach the accelerator / brake pedal
safely. The position should be as far rearward as
possible, consistent with ability to properly operate
controls.
3Seat cushion tilt
Press the switch in the direction of the arrow until
your legs are lightly supported.
4Backrest tilt
Press the switch in the direction of the arrow until
your arms are slightly angled when holding the
steering wheel.
5Head restraint
The height of the head restraint is adjusted
automatically with the seat so that the back of the
head is supported approximately at ear level. Adjust
the head restraint using the switch if the preset
position does not support the back of your head
approximately at ear level.
Adjust the head restraint angle by hand.
Note:
Your vehicle is equipped with power head
restraints, do not try to raise or lower them
manually.
2
5
4
3
2
1
P54.00-2074-26
W210.book Seite 46 Mittwoch, 30. Mai 2001 11:45 11
Page 50 of 350
47 Seats
Technical
data Instruments
and controlsOperationDrivingInstrument
cluster displayPractical hints Car care Index Synchronizing Head Restraints
If the power supply was interrupted (battery
disconnected or empty), the head restraints are no
longer adjusted automatically.
To resynchronize the adjustment feature, turn
electronic key in steering lock to position 2, move the
seat completely forward and the head restraint fully
down, and hold respective buttons for approximately
two seconds.Caution!
Do not remove head restraints except when mounting
seat covers. For removal refer to Front seat head
restraints, see page 51. Whenever restraints have been
removed be sure to reinstall them before driving.
W210.book Seite 47 Mittwoch, 30. Mai 2001 11:45 11
Page 52 of 350

49 Seats
Technical
data Instruments
and controlsOperationDrivingInstrument
cluster displayPractical hints Car care Index Recalling positions from memory
To recall a seat / head restraint / steering wheel and
exterior rear view mirror position, push and hold
position button “1”, “2” or “3” until seat / head restraint /
steering wheel and exterior rear view mirror movement
has stopped. The seat / head restraint / steering wheel
and exterior rear view mirror movement stops when the
position button is released.
Caution!
Do not operate the power seats using the memory
button if the seat backrest is in an excessively reclined
position. Doing so could cause damage to front or rear
seats.
First move the backrest to an upright position.Important!
Prior to operating the vehicle, the driver should adjust
the seat height for proper vision as well as fore / aft
placement and backrest angle to ensure adequate
control, reach, operation, and comfort. The head
restraint should also be adjusted for proper height. See
also airbag section for proper seat positioning.
In addition, also adjust the steering wheel to ensure
adequate control, reach, operation, and comfort.
Both the inside and outside rear view mirrors should be
adjusted for adequate rearward vision.
Fasten seat belts. Infants and small children should be
seated in a properly secured restraint system that
complies with U.S. Federal Motor Vehicle Safety
Standard 213 and Canadian Motor Vehicle Safety
Standard 213.1.
All seat, head restraint, steering wheel, and rear view
mirror adjustments as well as fastening of seat belts
should be done before the vehicle is put into motion.
W210.book Seite 49 Mittwoch, 30. Mai 2001 11:45 11
Page 54 of 350
51 Seats
Technical
data Instruments
and controlsOperationDrivingInstrument
cluster displayPractical hints Car care Index Front seat head restraints
Removal:
Push button (1) up to bring the power adjustable head
restraint to its highest position.
Pull out head restraint completely with both hands.Installation:
Push button (1) of the power adjustable head restraint
up for approximately 5 seconds.
Insert the head restraint and push it down to the stop.
Adjust head restraint to the desired position.
For positioning of head restraints, see page 45 and 52.
1
P82.40-2009-26
Wa r n i n g !
For your protection, drive only with properly
positioned head restraints. Adjust head restraint to support the back of the
head approximately at ear level.Do not drive the vehicle without the seat head
restraints. Head restraints are intended to help
reduce injuries during an accident.
W210.book Seite 51 Mittwoch, 30. Mai 2001 11:45 11
Page 57 of 350
54 Seats
Technical
data Instruments
and controlsOperationDrivingInstrument
cluster displayPractical hints Car care Index
Seat heater
The seat heaters can be switched on with the electronic
key in steering lock positions 1 or 2.Notes:
When in operation, the seat heater consumes a large
amount of electrical power. It is not advisable to use the
seat heater longer than necessary.
The seat heaters may automatically switch off if too
many power consumers are switched on at the same
time, or if the battery charge is low. When this occurs,
the indicator lamp in the switch will blink (both
indicator lamps blink during rapid seat heating mode).
The seat heaters will switch on again automatically as
soon as sufficient voltage is available.
If the blinking of the indicator lamps is distracting to
you, the seat heaters can be switched off.
W210.book Seite 54 Mittwoch, 30. Mai 2001 11:45 11
Page 61 of 350
58 Seats
Technical
data Instruments
and controlsOperationDrivingInstrument
cluster displayPractical hints Car care Index
Notes:
When in operation, the seat ventilation consumes a
large amount of electrical power. It is not advisable to
use the seat ventilation longer than necessary.
The seat ventilation may automatically switch off if too
many power consumers are switched on at the same
time or if the battery charge is low. When this occurs,
one or more indicator lamps in the switch will blink.
The seat ventilation will switch on again automatically
as soon as sufficient voltage is available.
If the blinking indicator lamps pose a distraction, the
seat ventilation can be switched off.
W210.book Seite 58 Mittwoch, 30. Mai 2001 11:45 11
Page 133 of 350

130 Automatic climate control
Technical
data Instruments
and controlsOperationDrivingInstrument
cluster displayPractical hints Car care Index
Rear window defroster
Turn electronic key in steering lock to position 2.
To select, press F button.
To c a nc el, pr ess F button again.
Notes:
Heavy accumulation of snow and ice should be removed
before activating the defroster.
The rear window defroster uses a large amount of
power. To keep the battery drain to a minimum, turn off
the defroster as soon as the window is clear.
The defroster is automatically turned off after a
maximum of 12 minutes of operation.
If several power consumers are turned on
simultaneously, or the battery is only partially charged,
it is possible that the defroster will automatically turn
itself off. When this happens, the indicator lamp inside
the switch starts blinking.
As soon as the battery has sufficient voltage, the
defroster automatically turns itself back on.Air distribution
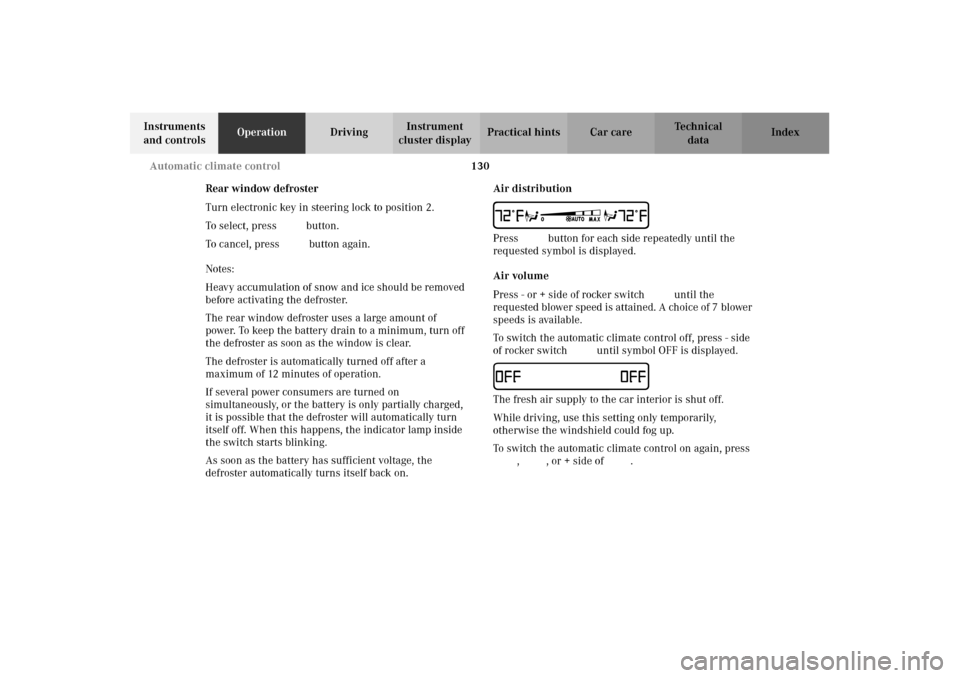
UPress b button for each side repeatedly until the
requested symbol is displayed.
Air volume
Press - or + side of rocker switch ï until the
requested blower speed is attained. A choice of 7 blower
speeds is available.
To switch the automatic climate control off, press - side
of rocker switch ï until symbol OFF is displayed.IThe fresh air supply to the car interior is shut off.
While driving, use this setting only temporarily,
otherwise the windshield could fog up.
To switch the automatic climate control on again, press
U, P, or + side of ï.
W210.book Seite 130 Mittwoch, 30. Mai 2001 11:45 11
Page 140 of 350
137 Audio system
Technical
data Instruments
and controlsOperationDrivingInstrument
cluster displayPractical hints Car care Index 10Soft keys for
radio band selection, see page 141
tone controls, see page 139
scan, see page 142
Tape eject, see page 144
Tape track select, see page 144
Dolby, see page 146
CD random / repeat, see page 150
11Tape mode selector, see page 143
Anti-theft system
If the power supply to the
radio has been
interrupted,“CODE” will
appear on the display when it
is next switched on. The radio
will only work after the five-digit code has been entered
using the buttons on the right-hand control panel.The code number is shown on the Radio code card,
supplied with the radio.
Important!
Never leave the Radio code card in the vehicle. Keep it
in a safe place.
W210.book Seite 137 Mittwoch, 30. Mai 2001 11:45 11