Page 30 of 354

27 Central locking system
Te ch n i c a l
data Instruments
and controlsOperationDrivingInstrument
cluster displayPractical hints Car care Index Central locking system
Radio frequency and infrared remote control
The electronic key has an integrated radio frequency
and infrared remote control.
Due to the extended operational range of the remote
control, it could be possible to unintentionally lock or
unlock the vehicle by pressing the transmit button. If
one of the transmit buttons is pressed, the battery check
lamp lights up briefly – indicating that the batteries are
in order. See page 304 for checking batteries.
The vehicle doors, tailgate and fuel filler flap can be
centrally locked and unlocked via remote control.
Opening and closing the windows and sliding / pop-up
roof remotely can only be done with the infrared portion
of the remote control. Aim transmitter eye at a
receiver (6 or 7), press and hold transmit button Œ
or ‹.
If the electronic key is inserted in steering lock, the
vehicle cannot be locked or unlocked with the remote
control.1Transmit button
‹ Locking
ΠUnlocking
2Lamp for battery check (see page 304 for changing
batteries if it does not light up briefly)
3PA N I C b u t t o n
4Transmitter eye
5Locking tab for mechanical key
P80.35-2033-26
2
1
4
3
5
Page 32 of 354

29 Central locking system
Te ch n i c a l
data Instruments
and controlsOperationDrivingInstrument
cluster displayPractical hints Car care Index Locking and unlocking with remote control
Unlocking:
Press transmit button Œ. All turn signal lamps blink
once to indicate that the vehicle is unlocked.
The remote control can be programmed for two kinds of
unlocking modes (see below):
Selective unlocking mode –
Press transmit button Œ o nce to un lock dr iver’s d oor
and fuel filler flap.
Press transmit button Πtwice to unlock all doors,
fuel filler flap, and tailgate.
Global unlocking mode –
Press transmit button Œonce to unlock all doors,
fuel filler flap, and tailgate.
Notes:
If the tailgate was previously locked separately, it will
remain locked, see page 36.
The presently active unlocking mode (selective or
global) can only be determined by unlocking the vehicle
with the remote control (see below for changing mode).If within 40 seconds of unlocking with the remote
control, neither door nor tailgate is opened, the
electronic key is not inserted in the steering lock, or the
central locking switch is not activated, the vehicle will
automatically lock.
Locking:
Press transmit button ‹ once. All turn signal lamps
blink three times to indicate that the vehicle is locked.
If they do not blink three times, a door or tailgate is not
properly closed.
Note:
If the vehicle cannot be locked or unlocked by pressing
the transmit button, then it may be necessary to change
the batteries in the electronic key (if ok, battery check
lamp in electronic key will light briefly when pressing
transmit button) or to synchronize the remote control,
see pages 304 and 306.
Page 33 of 354

30 Central locking system
Te ch n i c a l
data Instruments
and controlsOperationDrivingInstrument
cluster displayPractical hints Car care Index
Choosing global or selective mode on remote control
Press and hold transmit buttons ‹ and Œ
simultaneously for five seconds to reprogram the
remote control. Battery check lamp will blink two times
indicating the completed mode change.
Opening and closing windows and
sliding / pop-up roof from outside
(summer opening / convenience feature)
Aim transmitter eye of remote control at a door receiver.
Summer opening:
Continue to press transmit button Πafter unlocking
the vehicle.
The windows and sliding / pop-up roof begin to open
after approximately 1 second.
To interrupt opening procedure, release transmit
button.
Convenience feature:
Continue to press transmit button ‹ after locking
the vehicle.The windows and sliding / pop-up roof begin to close
after approximately 1 second.
To interrupt closing procedure, release transmit button.
Ensure that all side windows and the sliding/pop-up
roof are properly closed before leaving the vehicle.
Note:
If the windows and sliding / pop-up roof cannot be
operated automatically by pressing the transmit button
of t he r emo te c ontr ol then it m ay be n ece ssar y to chan ge
the batteries in the electronic key (if ok, battery check
lamp in electronic key will light briefly when
transmitting), or to synchronize the remote control, see
page 304 and 306.
Wa r n i n g !
Never operate the windows or sliding / pop-up roof
if there is the possibility of anyone being harmed
by the opening or closing procedure.In case the procedure causes potential danger, the
procedure can be immediately halted by releasing
the remote control button. To reverse direction of
movement press Œ for opening or ‹ for
closing.
Page 46 of 354

43 Seats
Te ch n i c a l
data Instruments
and controlsOperationDrivingInstrument
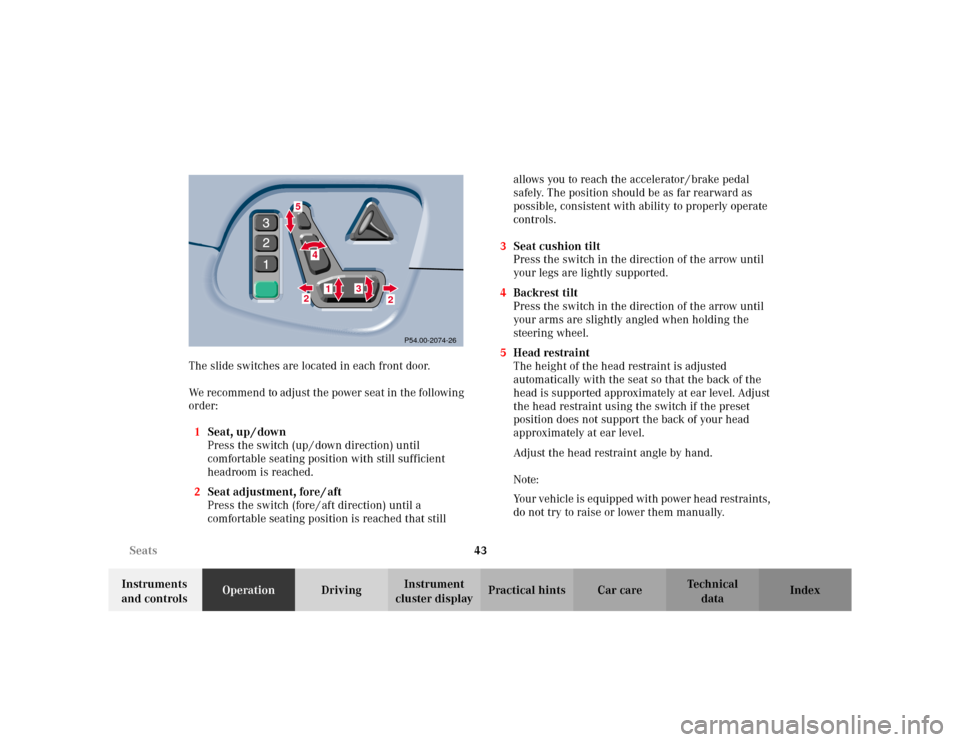
cluster displayPractical hints Car care Index The slide switches are located in each front door.
We recommend to adjust the power seat in the following
order:
1Seat, up / down
Press the switch (up / down direction) until
comfortable seating position with still sufficient
headroom is reached.
2Seat adjustment, fore / aft
Press the switch (fore / aft direction) until a
comfortable seating position is reached that still allows you to reach the accelerator / brake pedal
safely. The position should be as far rearward as
possible, consistent with ability to properly operate
controls.
3Seat cushion tilt
Press the switch in the direction of the arrow until
your legs are lightly supported.
4Backrest tilt
Press the switch in the direction of the arrow until
your arms are slightly angled when holding the
steering wheel.
5Head restraint
The height of the head restraint is adjusted
automatically with the seat so that the back of the
head is supported approximately at ear level. Adjust
the head restraint using the switch if the preset
position does not support the back of your head
approximately at ear level.
Adjust the head restraint angle by hand.
Note:
Your vehicle is equipped with power head restraints,
do not try to raise or lower them manually.
2
5
4
3
2
1
P54.00-2074-26
Page 56 of 354
53 Seats
Te ch n i c a l
data Instruments
and controlsOperationDrivingInstrument
cluster displayPractical hints Car care Index Vehicles without seat ventilation
The front seat heater switches are located in the center
console.Press switch to turn on seat heater:
1Normal seat heating mode. One indicator lamp in
the switch lights up.
2Rapid seat heating mode. Both indicator lamps in
the switch light up.
After approximately 5 minutes in the rapid seat
heating mode, the seat heater automatically
switches to normal operation and only one indicator
lamp will stay on.
Turning off seat heater:
If one indicator lamp is on, press upper half of switch.
If both indicator lamps are on, press lower half of
switch.
If left on, the seat heater automatically turns off after
approximately 30 minutes of operation.
P54.25-2036-26
12
Page 57 of 354
54 Seats
Te ch n i c a l
data Instruments
and controlsOperationDrivingInstrument
cluster displayPractical hints Car care Index
Vehicles with seat ventilation (optional)
The front seat heater switches are located in the center
console.Rapid heating mode:
Press button (3) once.
Both red indicator lamps above the button light up.
The system switches over to normal heating mode
automatically after approximately 5 minutes.
Normal heating mode:
Press button (3) twice.
One red indicator lamp above the button lights up.
The seat heater will be automatically switched off after
approximately 30 minutes.
Turning off the heater:
Press the button (3) again.
The indicator lamps go out. The seat heater is switched
off.
Page 58 of 354
55 Seats
Te ch n i c a l
data Instruments
and controlsOperationDrivingInstrument
cluster displayPractical hints Car care Index Seat ventilation (optional)
The front seat ventilation switches are located in the
center console.
Turn the electronic key in steering lock to position 1
or 2.Level 3 ventilation setting (maximum):
Press button (1).
Three blue indicator lamps beside the button light up.
Level 2 ventilation setting (middle):
Press button (1) again.
Two blue indicator lamps beside the button light up.
Level 1 ventilation setting (minimum):
Press button (1) again.
One blue indicator lamp beside the button lights up.
Turning off seat ventilation:
If one blue indicator lamp is on, press button (1) once.
If two blue indicator lamps are on, press button (1)
twice.
If three blue indicator lamps are on, press button (1)
three times.
Page 68 of 354

65 Restraint systems
Te ch n i c a l
data Instruments
and controlsOperationDrivingInstrument
cluster displayPractical hints Car care Index BabySmart
TM airbag deactivation system
Special BabySmart
TM compatible child seats, designed
for use with the Mercedes-Benz system and available at
any authorized Mercedes-Benz Center are required for
use with the BabySmart
TM airbag deactivation system.
With the special child seat properly installed, the
passenger front airbag will not deploy. The 7
indicator lamp located on the center console will be
illuminated, except with electronic key removed or in
steering lock position 0. The system does not deactivate
the door mounted side impact airbag and the window
airbag.
Self-test BabySmart
TM
without special child seat installed
After turning electronic key in steering lock to position
1 or 2, the 7 indicator lamp located on the center
console comes on for approximately 6 seconds and then
extinguishes.
If the indicator lamp should not come on or is
continuously lit, the system is not functioning. You must
see an authorized Mercedes-Benz Center before seating
any child on the front passenger seat.BabySmart
TM is a trademark of Siemens Automotive Corp.
Wa r n i n g !
The BabySmart
TM airbag deactivation system will
ONLY work with a special child seat designed to
operate with it. It will not work with child seats
which are not BabySmart
TM compatible.
Never place anything between seat cushion and
child seat (e.g. pillow), since it reduces the
effectiveness of the deactivation system.The bottom
of the child seat must make full contact with the
passenger seat cushion. An incorrectly mounted
child seat could cause injuries to the child in case
of ar accident instead of protecting the child.Follow the manufacturer’s instructions for
installation of special child seats.The passenger front airbag will not deploy only if
the 7 indicator lamp remains illuminated.Please be sure to check the indicator every time
you use the special system child seat.
Should the light go out while the restraint is
installed, please check installation. If the light
remains out, do not use the BabySmart
TM restraint
to transport children on the front passenger seat
until the system has been repaired.