2002 MERCEDES-BENZ CLK55AMG CABRIOLET brake light
[x] Cancel search: brake lightPage 8 of 346

5 ContentsWiper blade .................................305
Light alloy wheels ......................305
Instrument cluster .....................306
Steering wheel and
gear selector lever ......................306
Cup holder ...................................306
Seat belts .....................................306
Headliner .....................................306
Upholstery ...................................307
Hard plastic trim items .............307
Plastic and rubber parts ............307
Wind screen ...............................307
Rubber weatherstrip .................307
Soft top .........................................308
Technical dataSpare parts service ........................ 310
Warranty coverage ......................... 310
Identification labels ....................... 311
Layout of poly-V-belt drive ............312
Technical data ................................. 313
Fuels, coolants, lubricants etc. –
capacities .................................... 318
Engine oils ...................................... 320
Engine oil additives ...................... 320
Air conditioner
refrigerant ................................. 320
Brake fluid ...................................... 320Premium unleaded
gasoline ...................................... 321
Fuel requirements ......................... 321
Gasoline additives .........................322
Coolants ...........................................322
Consumer information ..................324
IndexIndex ................................................326
J_A208.book Seite 5 Donnerstag, 31. Mai 2001 9:35 09
Page 22 of 346

19 Instruments and controls
Technical
data Instruments
and controlsOperation DrivingInstrument
cluster displayPractical hints Car care Index For more detailed descriptions see Index on page 326.
For adjustment of air outlets, refer to automatic climate
control, see page 120.
1Side air outlet, adjustable
2Air volume control for side air outlet
3Exterior lamp switch, see page 114
4Parking brake release, see page 204
5Parking brake pedal, see page 204
6Hood lock release, see page 254
7Combination switch, see page 117
8Cruise control switch, see page 214
9Multifunction steering wheel, see page 88
Horn (with electronic key in steering lock
position 1 or 2)
10Instrument cluster, see page 82
11Voice recognition system switch, see separate
operating instructions
12Steering lock with ignition/starter
switch, see page 19213Center air outlets, adjustable
14Air volume control for center air outlets
15Left front seat heater switch, see page 56
16Headlamp washer switch, see page 116
17Roll bar switch, see page 53
Roll bar warning lamp, see page 233
18Hazard warning flasher switch, see page 119
19Central locking switch, see page 35
20Switch for tow-away alarm, see page 44
Indicator lamp for antitheft alarm system, see
page 43
21Right front seat heater switch, see page 56
22Automatic climate control, see page 120
Rear window defroster switch, see page 124
23Glove box (illuminated with electronic key in
steering lock position 1 or 2), see page 151
24Audio system, see page 127
25Storage compartment
26Ashtray with lighter, see page 154
J_A208.book Seite 19 Donnerstag, 31. Mai 2001 9:35 09
Page 49 of 346

46 Seats
Technical
data Instruments
and controlsOperationDrivingInstrument
cluster displayPractical hints Car care Index
The slide switches are located in each door.
We recommend to adjust the power seat in the following
order:
1Seat, up/down
Press the switch (up/down direction) until
comfortable seating position with still sufficient
headroom is reached.
2Seat, fore/aft
Press the switch (fore/aft direction) until a
comfortable seating position is reached that still
allows you to reach the accelerator/brake pedal safely. The position should be as far rearward as
possible, consistent with ability to properly operate
controls.
Note:
Do not move the front passenger seat completely
forward if objects are stored in the parcel net in the
front passenger side footwell. Items in the net may
be damaged.
3Seat cushion tilt
Press the switch in the direction of the arrow until
your legs are lightly supported.
4Backrest tilt
Press the switch in the direction of the arrow until
your arms are slightly angled when holding the
steering wheel.
5Head restraint
During seat adjustment, the head restraint is
automatically adjusted based on seat (fore/aft)
position to support the back of the head
approximately at ear level. Please check the position
of the head restraint to assure that it supports the
back of the head approximately at ear level. The
head restraint angle can also be adjusted manually.
87
4
52
2
1
3
J_A208.book Seite 46 Donnerstag, 31. Mai 2001 9:35 09
Page 157 of 346

154 Interior equipment
Technical
data Instruments
and controlsOperationDrivingInstrument
cluster displayPractical hints Car care Index
Ashtray
Center console, front
By touching the bottom of the cover lightly, the ashtray
opens automatically.Prior to removing the ashtray insert, move the gear
selector lever to position “N”.
To r e m ove a s h t r ay :
Push sliding knob (1) toward the right to eject the
insert.
To install ashtray:
Install insert into ashtray frame and push down to
engage.
Wa r n i n g !
Remove front ashtray only with vehicle standing
still. With the gear selector lever in position “N”,
turn off the engine and set the parking brake.
Otherwise the vehicle might move as a result of
unintended contact with the gear selector lever.
J_A208.book Seite 154 Donnerstag, 31. Mai 2001 9:35 09
Page 167 of 346

164 Soft top
Technical
data Instruments
and controlsOperationDrivingInstrument
cluster displayPractical hints Car care Index
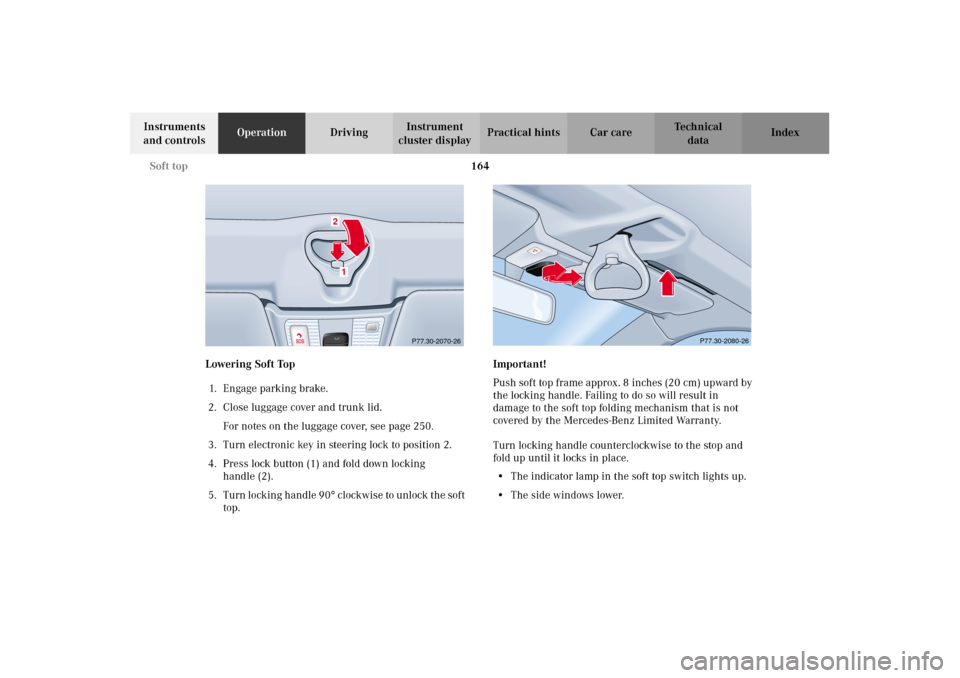
Lowering Soft Top
1. Engage parking brake.
2. Close luggage cover and trunk lid.
For notes on the luggage cover, see page 250.
3. Turn electronic key in steering lock to position 2.
4. Press lock button (1) and fold down locking
handle (2).
5 . Turn lock in g han dle 9 0
° c lockwis e to unlock t he soft
top.Important!
Push soft top frame approx. 8 inches (20 cm) upward by
the locking handle. Failing to do so will result in
damage to the soft top folding mechanism that is not
covered by the Mercedes-Benz Limited Warranty.
Turn locking handle counterclockwise to the stop and
fold up until it locks in place.
•The indicator lamp in the soft top switch lights up.
•The side windows lower.
P77.30-2070-26
12
P77.30-2080-26
J_A208.book Seite 164 Donnerstag, 31. Mai 2001 9:35 09
Page 169 of 346

166 Soft top
Technical
data Instruments
and controlsOperationDrivingInstrument
cluster displayPractical hints Car care Index
Note:
For safety reasons, the soft top cannot be lowered while
driving.
Raising Soft Top
1. Engage parking brake.
2. Close luggage cover and trunk lid.
For notes on the luggage cover, see page 250.
3. Turn electronic key in steering lock to position 2. 4. Press symbol side of soft top switch and hold:
•The indicator lamp in the soft top switch lights
up.
Notes:
If indicator lamp blinks slowly, a malfunction
has occurred in the system.
If indicator lamp blinks rapidly, the trunk lid
and/or the luggage cover may be open, and need
to be closed.
•The side windows lower.
•The roll bar lowers (when in the upper position).
•The soft top compartment cover unlocks and
opens.
•The soft top is raised from its storage
compartment to the closing position.
•The soft top storage compartment closes and the
rear window section of the soft top lowers – a
signal sounds.
Wa r n i n g !
To prevent possible accidents, drive the vehicle
only with the soft top either completely closed and
locked, or fully lowered into its storage
compartment.
J_A208.book Seite 166 Donnerstag, 31. Mai 2001 9:35 09
Page 195 of 346

192 Steering lock
Technical
data Instruments
and controlsOperationDrivingInstrument
cluster displayPractical hints Car care Index
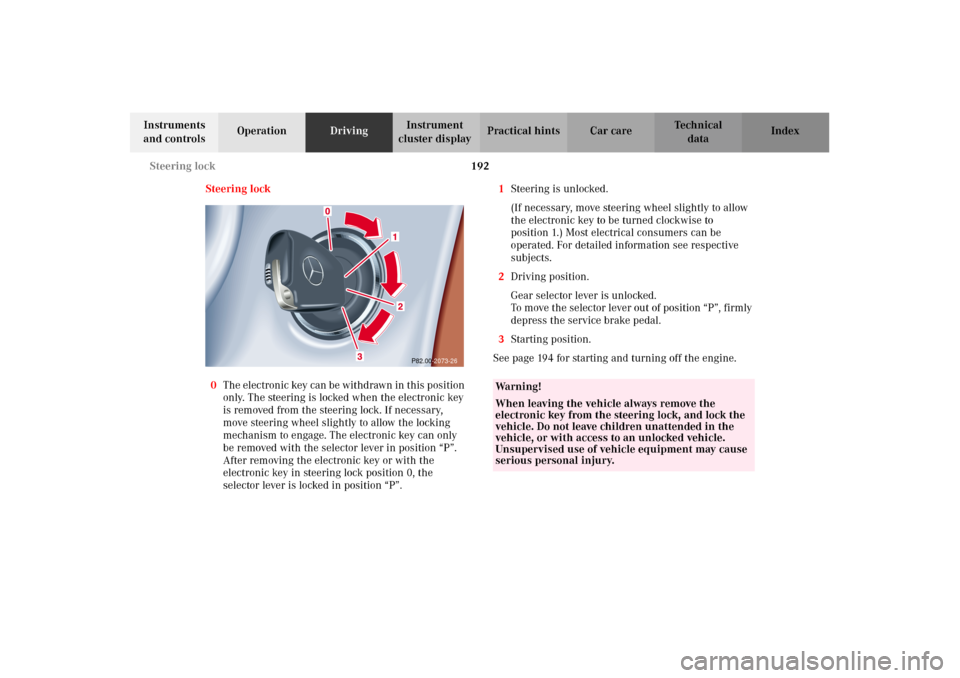
Steering lock
0The electronic key can be withdrawn in this position
only. The steering is locked when the electronic key
is removed from the steering lock. If necessary,
move steering wheel slightly to allow the locking
mechanism to engage. The electronic key can only
be removed with the selector lever in position “P”.
After removing the electronic key or with the
electronic key in steering lock position 0, the
selector lever is locked in position “P”.1Steering is unlocked.
(If necessary, move steering wheel slightly to allow
the electronic key to be turned clockwise to
position 1.) Most electrical consumers can be
operated. For detailed information see respective
subjects.
2Driving position.
Gear selector lever is unlocked.
To move the selector lever out of position “P”, firmly
depress the service brake pedal.
3Starting position.
See page 194 for starting and turning off the engine.
P82.00-2073-26
Wa r n i n g !
When leaving the vehicle always remove the
electronic key from the steering lock, and lock the
vehicle. Do not leave children unattended in the
vehicle, or with access to an unlocked vehicle.
Unsupervised use of vehicle equipment may cause
serious personal injury.
J_A208.book Seite 192 Donnerstag, 31. Mai 2001 9:35 09
Page 200 of 346

197 Automatic transmission
Technical
data Instruments
and controlsOperationDrivingInstrument
cluster displayPractical hints Car care Index Stopping
For brief stops, e.g. at traffic lights, leave the
transmission in gear and hold vehicle with the service
brake.
For longer stops with the engine idling, shift into “N”
or “P” and hold the vehicle with the service brake.
When stopping the vehicle on an uphill gradient, do not
hold it with the accelerator, use the brake. This avoids
unnecessary transmission heat build up.
Maneuvering
To maneuver in tight areas, e.g. when pulling into a
parking space, control the vehicle speed by gradually
releasing the brakes. Accelerate gently and never
abruptly step on the accelerator.
To rock a vehicle out of soft ground (mud or snow),
alternately shift from forward to reverse, while applying
slight partial throttle.Rocking a vehicle free in this manner may cause the
ABS or traction system malfunction indicator lamp to
come on. Turn off and restart the engine to clear the
malfunction indication.
Wa r n i n g !
Getting out of your vehicle with the selector lever
not fully engaged in position “P” is dangerous.
Also, when parked on an incline, position “P” alone
may not prevent your vehicle from moving,
possibly hitting people or objects.Always set the parking brake in addition to shifting
to position “P”, see page 204 for parking brake. When parked on an incline, also turn front wheel
against curb.Wa r n i n g !
When leaving the vehicle, always remove the
electronic key from the steering lock, and lock the
vehicle. Do not leave children unattended in the
vehicle, or with access to an unlocked vehicle.
Children could move the gear selector lever from
position “P”, which could result in an accident or
serious personal injury.
J_A208.book Seite 197 Donnerstag, 31. Mai 2001 9:35 09