2002 MERCEDES-BENZ CL600 brake
[x] Cancel search: brakePage 6 of 430

3 ContentsPower windows ............................... 183
Sliding/pop-up roof ....................... 186
Interior lighting ............................. 189
Rear window sunshade ................. 191
Sun visors ....................................... 192
Vanity mirrors ................................ 192
Interior ............................................ 193
Storage compartments and
armrests ..................................... 193
Glove box ..................................... 194
Coat hooks ...................................... 198
Cup holder ...................................... 199
Ashtrays ..........................................202
Lighter .............................................204
Parcel net in trunk ........................205
Cargo tie-down hooks ....................206
Parcel net in
front passenger footwell ..........206
Telephone, general ........................207
Garage door opener .......................208
Infrared reflecting windshield .... 212
DrivingControl and operation of
radio transmitters .....................214
The first 1 000 miles
(1 500 km) .................................. 215
Maintenance ...................................215
Tele Aid ............................................ 216
Catalytic converter ........................ 226
Emission control ............................ 227
Starter switch ................................. 228
Starter switch – KEYLESS-GO ..... 230
Starting and turning off
the engine .................................. 233
Automatic transmission ............... 235
Parking brake ................................ 244
Driving instructions ...................... 245
Drive sensibly – save fuel ........ 245
Drinking and driving ................ 245
Pedals .......................................... 245
Power assistance ........................ 246
Brakes .......................................... 246Driving off ...................................247
Parking ........................................248
Tires .............................................249
Snow chains ................................ 251
Winter driving instructions ......252
Deep water ..................................254
Passenger compartment ...........254
Traveling abroad ........................255
Cruise control .................................256
Distronic (DTR) ..............................259
Brake assist system (BAS) ............275
Antilock brake system
(ABS) ........................................... 276
Electronic stability program
(ESP) ...........................................278
Active body control (ABC) ............282
Level control system ......................283
Parking assist
(Parktronic) ................................286
What you should know
at the gas station ....................... 291
Check regularly and
before a long trip ......................294
J_OM_215.book Seite 3 Mittwoch, 30. Mai 2001 2:01 14
Page 7 of 430

4 Contents
Instrument cluster displayMalfunction and indicator
lamps in the
instrument cluster ....................296
On-board
diagnostic system .......................296
Check engine malfunction
indicator lamp .............................296
Brake warning lamp ..................298
Supplemental
restraint system
(SRS) indicator lamp ..................299
Fuel reserve warning .................299
ABS malfunction
indicator lamp .............................300
Electronic stabilityprogram
(ESP) — warning lamp ............... 301
Distronic (DTR) —
warning lamp .............................. 301
Seat belt nonusage
warning lamp ..............................302
Malfunction and indicator
lamp in the center console ......302
AIRBAG OFF indicator lamp .....302Malfunction and
warning messages in the
multifunction display .............. 303
DISPLAY DEFECTIVE
(engine control unit) ................. 304
DISPLAY DEFECTIVE
(several systems) ....................... 304
BATTERY /ALTERNATOR ......... 305
ENTRY POSITION ...................... 306
BRAKE ASSIST ........................... 306
BRAKE PAD WEAR .................... 307
BRAKE FLUID ............................ 307
PARKING BRAKE ....................... 308
TRUNK OPEN ............................. 308
ELEC. STABIL. PROG.
(Electronic stability program) . 309
COOLANT (coolant level) .......... 310
COOLANT
(coolant temperature) ................ 311
LIGHTING SYSTEM ....................312
LAMP SENSOR ............................ 314
SEAT BELT SYSTEM ................... 314
TELEPHONE – FUNCTION ........ 315
CRUISE CONTROL ...................... 315ACTIVE BODY CONTROL
(ABC) ............................................ 316
TIRE PRESSURE ......................... 318
ENGINE OIL LEVEL ...................320
SEAT BACKREST ........................ 321
KEY ...............................................322
DOOR ...........................................322
HOOD ...........................................323
TELE AID .....................................323
WASHER FLUID .........................326
DISTRONIC (DTR) ......................327
Practical hintsFirst aid kit .....................................330
Fuses ................................................ 331
Shelf below rear window ..............333
Hood .................................................334
Checking engine oil level .............337
Automatic transmission
fluid level ...................................338
Active body control
(ABC) fluid level ........................338
Coolant level ...................................339
Adding coolant ...........................339
J_OM_215.book Seite 4 Mittwoch, 30. Mai 2001 2:01 14
Page 9 of 430

6 Contents
Technical dataSpare parts service ........................390
Warranty coverage .........................390
Identification labels ....................... 391
Layout of poly-V-belt drive ............393
Technical data ................................394
Fuels, coolants,
lubricants etc. - capacities .......399
Engine oils ...................................... 401
Engine oil additives ....................... 401
Air conditioner refrigerant ........... 401
Brake fluid ...................................... 401
Premium unleaded gasoline ........402
Fuel requirements .........................402
Gasoline additives .........................403
Coolants ...........................................403
Consumer information ..................405
IndexIndex ............................................... 407
J_OM_215.book Seite 6 Mittwoch, 30. Mai 2001 2:01 14
Page 26 of 430

23 Instruments and controls
Te ch n i c a l
data Instruments
and controlsOperation DrivingInstrument
cluster displayPractical hints Car care Index 1Left front parktronic warning indicator,
seepage288
2Side air outlet, adjustable
3Air volume control for side air outlet
4Exterior lamp switch, see page 159
5Headlamp washer button, see page 163
6Parking brake release, see page 244
7Hood lock release, see page 334
8Parking brake pedal, see page 244
9Easy-entry/exit feature switch, see page 66
Steering wheel adjustment switch, see page 105
10Combination switch, see page 164
11Cruise control switch, see page 256, or
Distronic (DTR) switch, see page 259
12Multifunction steering wheel, see page 120
Driver airbag, see page 92,
Horn (with electronic key in starter switch
position 1 or 2)13Instrument cluster, seepage114
14Voice recognition system switch, see separate
operating instructions
15Starter switch, see page 228
16Right front parktronic warning indicator,
seepage288
17Fixed air outlets
18Center air outlets, adjustable
19Air volume control for left center air outlet
20Air temperature control for center air outlets
21Air volume control for right center air outlet
22Glove box lock, seepage194
23Glove box lid release, see page 194
J_OM_215.book Seite 23 Mittwoch, 30. Mai 2001 2:01 14
Page 71 of 430

68 Seats
Te ch n i c a l
data Instruments
and controlsOperationDrivingInstrument
cluster displayPractical hints Car care Index
The switches are located in both doors.
We recommend to adjust the power seat in the following
order:
1Seat adjustment, fore/aft
Press the switch (fore/aft direction) until a
comfortable seating position is reached that still
allows you to reach the accelerator/brake pedal
safely. The position should be as far rearward as
possible, consistent with ability to properly operate
controls.Note:
Do not move the front passenger seat completely
forward if objects are stored in the parcel net in the
front passenger side footwell. Items in the net may be
damaged.
2Seat, up/down
Press the switch (up/down direction) until
comfortable seating position with still sufficient
headroom is reached.
3Seat cushion tilt
Press the switch in the direction of the arrow until
your legs are slightly supported.
4Backrest tilt
Press the switch in the direction of the arrow until
your arms are slightly angled when holding the
steering wheel.
5Seat cushion depth
Press the switch fore or aft until your legs are
supported comfortably.
422
3
51
3
1
4
J_OM_215.book Seite 68 Mittwoch, 30. Mai 2001 2:01 14
Page 118 of 430

115 Instrument cluster
Te ch n i c a l
data Instruments
and controlsOperationDrivingInstrument
cluster displayPractical hints Car care Index 1Knob for instrument cluster illumination,
seepage116
2Engine malfunction indicator lamp, see page 296
3Brake fluid low or parking brake engaged,
seepage307
4Supplemental restraint system (SRS) malfunction
indicator lamp, see page 299
5Coolant temperature gauge, see page 117
6Outside temperature indicator, see page 117
7Fuel gauge with reserve warning lamp, see page 299
8Left turn signal indicator lamp, see combination
switch on page 164
9Speedometer, see page 118
10Electronic stability program (ESP) warning lamp,
system is adjusting to road conditions, see page 301
11Distance warning lamp – vehicles with Distronic
(DTR), distance to the vehicle ahead is insufficient,
see page 270 and page 301.
Vehicles without Distronic: It illuminates with the
electronic key in starter switch position 2. It should
go out when the engine is running.12Multifunction display, see page 120
Malfunction and warning messages in the
multifunction display, see page 303
13Trip odometer, see page 119 and 124
14Main odometer, see page 124
15Right turn signal indicator lamp, see combination
switch on page 164
16Tachometer, see page 119
17Gear range indicator display, see selector lever
positions on page 238
18Digital clock
To set the time, see COMAND operator’s manual
19Antilock brake system (ABS) malfunction indicator
lamp, see page 300
20High beam headlamp indicator,
see exterior lamp switch, page 159, and
combination switch, page 164
21Fasten seat belts, see page 302
22Reset buttonJ, s e e p a g e s 116 , 119
J_OM_215.book Seite 115 Mittwoch, 30. Mai 2001 2:01 14
Page 156 of 430

153 Tire inflation pressure monitor
Te ch n i c a l
data Instruments
and controlsOperationDrivingInstrument
cluster displayPractical hints Car care Index Tire inflation pressure monitor
(optional for Canada)
The tire inflation pressure, as selected by the driver, is
monitored in all four wheels on the ground. A warning
is issued to the driver in the case of a decrease in the
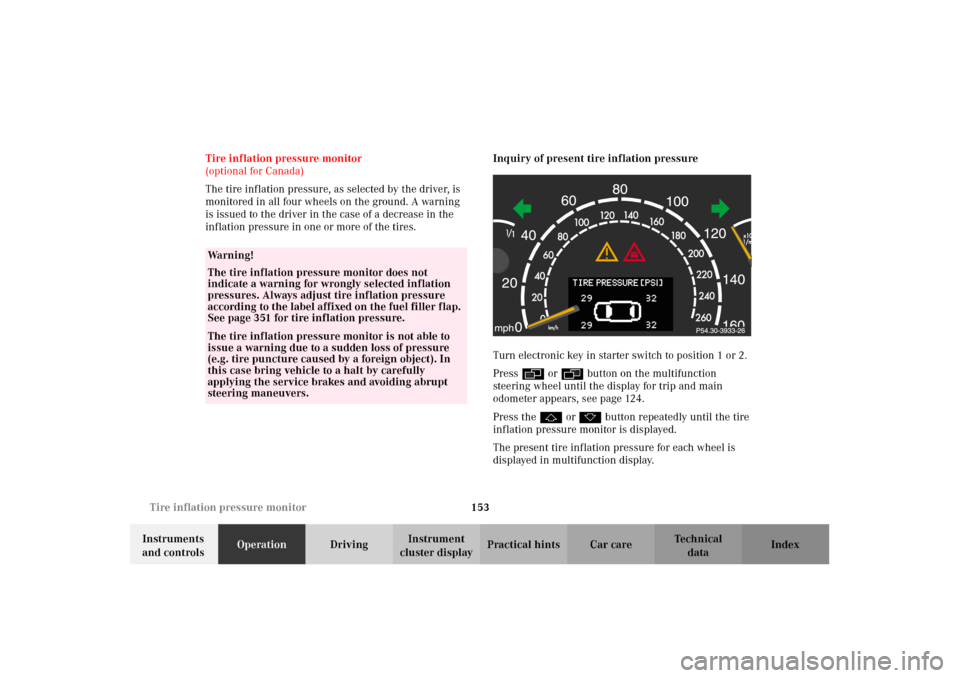
inflation pressure in one or more of the tires.Inquiry of present tire inflation pressure
Turn electronic key in starter switch to position 1 or 2.
Pressè or ÿbutton on the multifunction
steering wheel until the display for trip and main
odometer appears, see page 124.
Press thej or kbutton repeatedly until the tire
inflation pressure monitor is displayed.
The present tire inflation pressure for each wheel is
displayed in multifunction display.
Wa r n i n g !
The tire inflation pressure monitor does not
indicate a warning for wrongly selected inflation
pressures. Always adjust tire inflation pressure
according to the label affixed on the fuel filler flap.
See page 351 for tire inflation pressure.The tire inflation pressure monitor is not able to
issue a warning due to a sudden loss of pressure
(e.g. tire puncture caused by a foreign object). In
this case bring vehicle to a halt by carefully
applying the service brakes and avoiding abrupt
steering maneuvers.
J_OM_215.book Seite 153 Mittwoch, 30. Mai 2001 2:01 14
Page 205 of 430

202 Interior equipment
Te ch n i c a l
data Instruments
and controlsOperationDrivingInstrument
cluster displayPractical hints Car care Index
Ashtrays
Center console
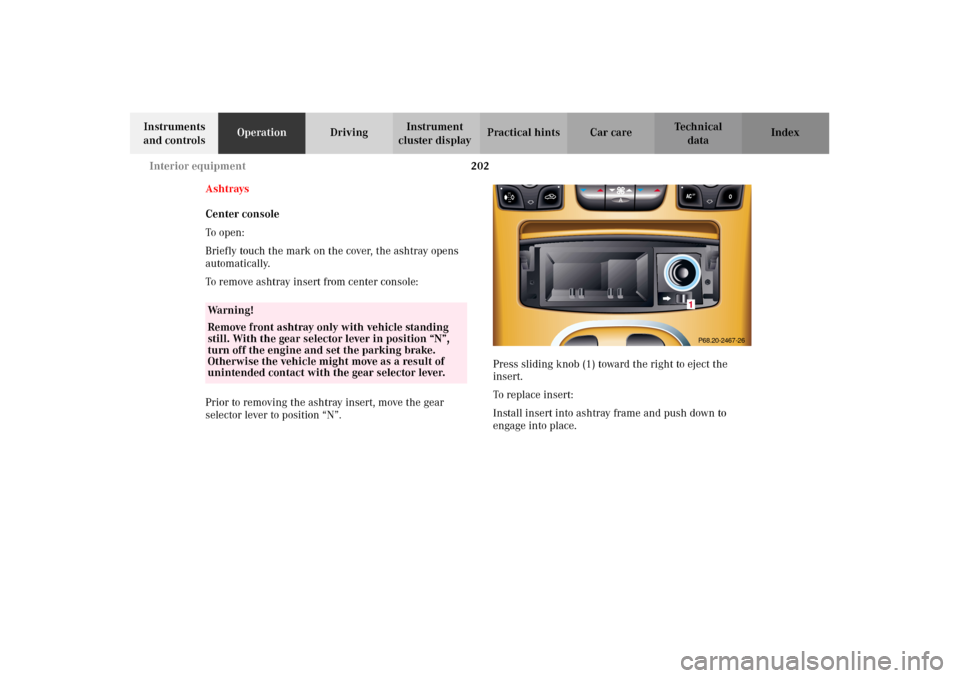
To o pen :
Briefly touch the mark on the cover, the ashtray opens
automatically.
To remove ashtray insert from center console:
Prior to removing the ashtray insert, move the gear
selector lever to position “N”.Press sliding knob (1) toward the right to eject the
insert.
To replace insert:
Install insert into ashtray frame and push down to
engage into place.
Wa r n i n g !
Remove front ashtray only with vehicle standing
still. With the gear selector lever in position “N”,
turn off the engine and set the parking brake.
Otherwise the vehicle might move as a result of
unintended contact with the gear selector lever.
P68.20-2467-261
J_OM_215.book Seite 202 Mittwoch, 30. Mai 2001 2:01 14