Page 311 of 430
308 Malfunction and warning messages
Te ch n i c a l
data Instruments
and controlsOperation DrivingInstrument
cluster displayPractical hints Car care Index
PA R K I N G B R A K E
* C = Category, see page 303
TRUNK OPEN* C = Category, see page 303 Line 1 Line 2 C*
PARKING BRAKE RELEASE PARKING BRAKE! 1Line 1 Line 2 C*
TRUNK OPEN! 2
J_OM_215.book Seite 308 Mittwoch, 30. Mai 2001 2:01 14
Page 322 of 430

319 Malfunction and warning messages
Te ch n i c a l
data Instruments
and controlsOperation DrivingInstrument
cluster displayPractical hints Car care Index
1 One or more tires is or has deflated rapidly. Carefully bring the
vehicle to a halt, avoiding abrupt steering and braking maneuvers.
For reference on changing wheels, see page 343.
2 The tire pressure on one or more tires is already below minimum
value. Carefully bring the vehicle to a halt, avoiding abrupt
steering and braking maneuvers. For reference on changing
wheels, see page 343.
3 For tire inflation pressure monitor, see page 153.4 Tire pressure in one or more tires is low. Check and correct tire
pressure according to the label affixed inside the fuel filler flap.
For tire inflation pressure, see page 351.
The tire inf lation pressure monitor must be activated again after
the tire inflation pressure has been corrected, see page 153.
5 When the message appears after starting the engine, the tire
inflation pressure on all road wheels should be checked and
corrected according to the label affixed inside the fuel filler flap.
For tire inflation pressure, see page 351.
The tire inf lation pressure monitor must be activated again after
the tire inflation pressure has been corrected, see page 153.
6 The tire inflation pressure monitor system is unable to monitor the
tire pressure due to the presence of several wheel electronics in
the vehicle (e.g. a deflated road wheel in the trunk), or nearby
radio interference source, or excessive wheel sensor temperatures,
or unrecognized wheel sensors mounted.
7 The tire inflation pressure monitor is defective or a wheel without
proper sensor was installed. Visit your authorized Mercedes-Benz
Center.Wa r n i n g !
Do not drive with a flat tire. A flat tire affects the
ability to steer or brake the vehicle. You may lose
control of the vehicle. Continued driving with a flat
tire will cause excessive heat build-up and possibly
a fire.
J_OM_215.book Seite 319 Mittwoch, 30. Mai 2001 2:01 14
Page 334 of 430

331 Fuses
Te ch n i c a l
data Instruments
and controlsOperation DrivingInstrument
cluster displayPractical hintsCar care Index Fuses
Most of your vehicle’s electrical components are fused
with safety fuses. With the exception of the brake lights,
all individual lighting system components are
electronically fused. Before replacing a blown safety
fuse, determine the cause of the short circuit. Always
observe amperage and color of fuse.
The circuit for components is protected by a cycled
circuit breaker interrupted if too much current is being
drawn. The circuit closes automatically after a short
time; the circuit is broken again if the malfunction
reoccurs.
A lways us e a new fus e for re placeme nt. Never atte mp t to
repair or bridge a blown fuse.
A fuse chart, spare fuses and a fuse extractor are located
in the vehicle tool kit in the luggage bowl under the
trunk floor. See page 341 for notes on the vehicle tool
kit.Fuse boxes in the engine compartment
1Fuse box in engine compartment, left-hand side
3Ta b s
3
3
1
P54.15-2064-26
J_OM_215.book Seite 331 Mittwoch, 30. Mai 2001 2:01 14
Page 336 of 430
333 Fuses
Te ch n i c a l
data Instruments
and controlsOperation DrivingInstrument
cluster displayPractical hintsCar care Index Auxiliary fuse box below rear seat
4Auxiliary fuse box below right rear seat.
To o pen :
Remove the cover.
To c lo se:
Press the cover on.Shelf below rear window
4
Wa r n i n g !
The shelf below the rear window should not be
used to carry objects. This will avoid such objects
from being thrown about and injuring vehicle
occupants during an accident or sudden maneuver.
The trunk is the preferred place to carry objects.
J_OM_215.book Seite 333 Mittwoch, 30. Mai 2001 2:01 14
Page 344 of 430
341 Spare wheel
Te ch n i c a l
data Instruments
and controlsOperation DrivingInstrument
cluster displayPractical hintsCar care Index Spare wheel, vehicle tools, storage compartment
1Jack
2Luggage bowl with vehicle tool kit, towing eye bolt,
fuses, fuse extractor and fuse chart
3Storage tray
4Spare wheel Lift trunk floor and engage handle in upper edge of
trunk.
Always lower trunk floor before closing trunk lid.
To remove the spare wheel:
Take out the vehicle tool kit tray.
Turn t he luggage b owl coun ter clock wise an d re move t he
spare wheel.
To store spare wheel:
Place spare wheel in wheel well and secure it with
luggage bowl. Turn luggage bowl clockwise to its stop.
Place vehicle tool kit tray in luggage bowl.
P40.10-0523-26
1
4
3
2
J_OM_215.book Seite 341 Mittwoch, 30. Mai 2001 2:01 14
Page 345 of 430

342 Jack
Te ch n i c a l
data Instruments
and controlsOperation DrivingInstrument
cluster displayPractical hintsCar care Index
Jack
To prepare the jack for use:
Remove the jack from the spare wheel well under the
trunk floor, push the crank handle up and turn
clockwise until it engages (operational position).Storing the jack in the trunk:
Retract the jack arm to the base of the jack, push the
crank handle up and turn counterclockwise to the end
of the stop (storage position).
P58.10-2001-26
Wa r n i n g !
The jack is designed exclusively for jacking up the
vehicle at the jack tubes built into either side of the
vehicle. To help avoid personal injury, use the jack
only to lift the vehicle during a wheel change.
Never get beneath the vehicle while it is supported
by the ja ck. Keep ha nd s an d feet away from the area
under the lifted vehicle. Always firmly set parking
brake and block wheels before raising vehicle with
jack.Do not d i sen ga ge park in g b ra ke whi l e the vehic l e is
raised. Be certain that the jack is always vertical
when in use, especially on hills. Always try to use
the jack on level surface. Be sure that the jack arm
is fully inserted in the jack tube. Always lower the
vehicle onto sufficient capacity jackstands before
working under the vehicle.
J_OM_215.book Seite 342 Mittwoch, 30. Mai 2001 2:01 14
Page 356 of 430

353 Battery
Te ch n i c a l
data Instruments
and controlsOperation DrivingInstrument
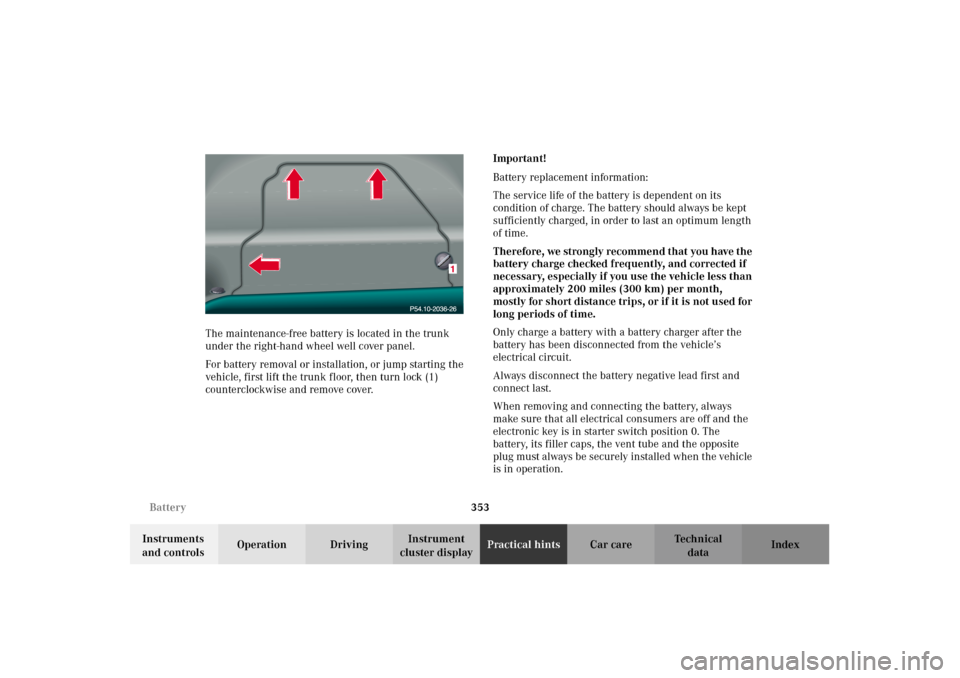
cluster displayPractical hintsCar care Index The maintenance-free battery is located in the trunk
under the right-hand wheel well cover panel.
For battery removal or installation, or jump starting the
vehicle, first lift the trunk floor, then turn lock (1)
counterclockwise and remove cover.Important!
Battery replacement information:
The service life of the battery is dependent on its
condition of charge. The battery should always be kept
sufficiently charged, in order to last an optimum length
of time.
Therefore, we strongly recommend that you have the
battery charge checked frequently, and corrected if
necessary, especially if you use the vehicle less than
approximately 200 miles (300 km) per month,
mostly for short distance trips, or if it is not used for
long periods of time.
Only charge a battery with a battery charger after the
battery has been disconnected from the vehicle’s
electrical circuit.
Always disconnect the battery negative lead first and
connect last.
When removing and connecting the battery, always
make sure that all electrical consumers are off and the
electronic key is in starter switch position 0. The
battery, its filler caps, the vent tube and the opposite
plug must always be securely installed when the vehicle
is in operation.
J_OM_215.book Seite 353 Mittwoch, 30. Mai 2001 2:01 14
Page 358 of 430

355 Jump starting
Te ch n i c a l
data Instruments
and controlsOperation DrivingInstrument
cluster displayPractical hintsCar care Index Jump startingImportant!
A discharged battery can freeze at approx. +14
°F
(–10
°C). In that case, it must be thawed out before
jumper cables are used. Attempting to jump start a
frozen battery can result in it exploding, causing
personal injury.
Jumper cable specifications:
•Minimum cable cross-section of 25 mm
2 or
approx. 2 AWG
•Maximum length of 11.5 ft. (3.5 m).
If the battery is discharged, the engine should be started
with jumper cables and the (12 V) battery of another
vehicle.
Only use 12 V battery to jump start your vehicle. Jump
starting with more powerful battery could damage the
vehicle’s electrical systems, which will not be covered
by the Mercedes-Benz Limited Warranty.
The battery is located in the trunk under the right-hand
wheel well cover panel.
Wa r n i n g !
Failure to follow these directions will cause
damage to the electronic components, and can lead
to a battery explosion and severe injury or death.Never lean over batteries while connecting or jump
starting, you might get injured.Battery fluid contains sulfuric acid. Do not allow
this fluid to come in contact with eyes, skin or
clothing. In case it does, immediately flush affected
area with water, and seek medical help if
necessary.A battery will also produce hydrogen gas, which is
flammable and very explosive. Keep flames or
sparks away from battery, avoid improper
connection of jumper cables, smoking etc..Read all instructions before proceeding.
J_OM_215.book Seite 355 Mittwoch, 30. Mai 2001 2:01 14