Page 202 of 399
199 Interior equipment
Te ch n i c a l
data Instruments
and controlsOperationDrivingInstrument
cluster displayPractical hints Car care Index Sunshade for panorama sliding/pop-up roof
1to open sunshade
2to close sunshade
3to open sunshade
4to close sunshade
Turn the electronic key in starter switch to position 1
or 2.Sunshades only operate with panorama sliding / pop-up
roof closed. See page 200 for notes on the panorama
sliding / pop-up roof.
Both sunshades open or close together.
To open or close sunshades, move the switch in the
required direction.
Release switch when the sunshades have reached the
required position.
Opening the sunshade automatically:
Move the switch past resistance point in direction (1)
and release.
Stopping the sunshade:
Move the switch in any direction.
Wa r n i n g !
When closing the sunshade, be sure that there is
no danger of anyone being harmed by the closing
procedure.
Page 203 of 399

200 Interior equipment
Te ch n i c a l
data Instruments
and controlsOperationDrivingInstrument
cluster displayPractical hints Car care Index
Panorama sliding/pop-up roof (optional)
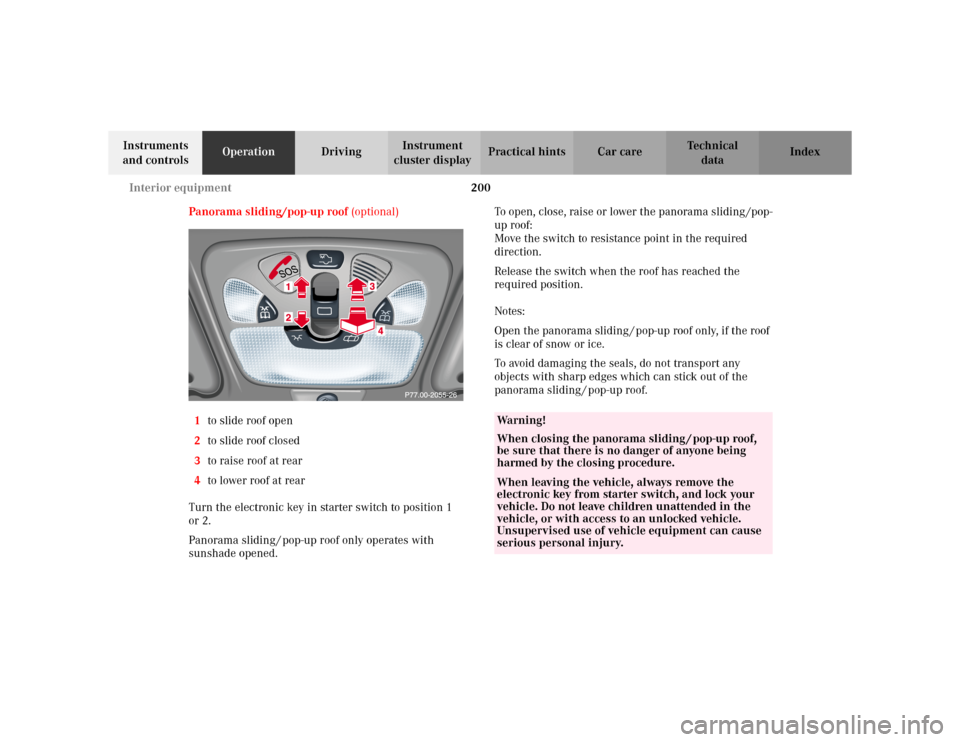
1to slide roof open
2to slide roof closed
3to raise roof at rear
4to lower roof at rear
Turn the electronic key in starter switch to position 1
or 2.
Panorama sliding / pop-up roof only operates with
sunshade opened.To open, close, raise or lower the panorama sliding /pop-
up roof:
Move the switch to resistance point in the required
direction.
Release the switch when the roof has reached the
required position.
Notes:
Open the panorama sliding / pop-up roof only, if the roof
is clear of snow or ice.
To avoid damaging the seals, do not transport any
objects with sharp edges which can stick out of the
panorama sliding / pop-up roof.
Wa r n i n g !
When closing the panorama sliding / pop-up roof,
be sure that there is no danger of anyone being
harmed by the closing procedure.When leaving the vehicle, always remove the
electronic key from starter switch, and lock your
vehicle. Do not leave children unattended in the
vehicle, or with access to an unlocked vehicle.
Unsupervised use of vehicle equipment can cause
serious personal injury.
Page 204 of 399

201 Interior equipment
Te ch n i c a l
data Instruments
and controlsOperationDrivingInstrument
cluster displayPractical hints Car care Index Opening the panorama sliding / pop-up roof
automatically
Move the switch past resistance point in direction (1)
and release. The roof will not open completely. Press
switch again to open it completely.
Stopping the sliding / pop-up roof:
Move the switch in any direction.
If the movement of the panorama sliding / pop-up roof is
blocked during the closing procedure, the roof will stop
and reopen slightly.
The panorama sliding/pop-up roof can also be opened
and closed using the summer opening / convenience
feature, see page 34.
Notes:
The panorama sliding/pop-up roof can be opened or
closed manually should an electrical malfunction occur,
see page 354.
Wa r n i n g !
When closing the panorama sliding / pop-up roof,
be sure that there is no danger of anyone being
harmed by the closing procedure.The closing procedure of the panorama sliding/
pop- up roof can be immediately reversed by either
pressing or pulling the switch, or pressing
buttonŒon the electronic key and holding it.When leaving the vehicle, always remove the
electronic key from starter switch, and lock your
vehicle. Do not leave children unattended in the
vehicle, or with access to an unlocked vehicle.
Unsupervised use of vehicle equipment can cause
serious personal injury.
Page 205 of 399

202 Interior equipment
Te ch n i c a l
data Instruments
and controlsOperationDrivingInstrument
cluster displayPractical hints Car care Index
Synchronizing the panorama sliding / pop-up roof
The panorama sliding / pop-up roof and the sunshade
must be resynchronized if the power supply has been
interrupted (battery disconnected or low), the panorama
sliding / pop-up roof has been closed manually or the
panorama sliding / pop-up roof or the sunshade does not
open smoothly or malfunctions.
•Move the switch in the “close” (2) direction, wait
until the sunshades are fully closed. Hold on the
switch for approximately 1 second.
•Move the switch in the “open” (1) direction, wait
until the sunshades are fully opened. Hold on the
switch for approximately 1 second.•Move the switch in the “open” (1) direction, wait
until the panorama sliding/ pop- up roof is
approximately 4 in (10 cm) opened.
•Move the switch in the “close” (2) direction, wait
until the panorama sliding/ pop- up roof is fully
closed and hold the switch for approximately
1second.
The panorama sliding/ pop- up roof is synchronized,
when the panorama sliding/ pop- up roof opens
automatically.
Page 260 of 399

257 Driving instructions
Te ch n i c a l
data Instruments
and controlsOperationDrivingInstrument
cluster displayPractical hints Car care Index Driving instructions
Drive sensibly – Save Fuel
Fuel consumption, to a great extent, depends on driving
habits and operating conditions.
To save fuel you should:
•keep tires at the recommended inflation pressures,
•remove unnecessary loads,
•remove roof rack when not in use,
•allow engine to warm up under low load use,
•avoid frequent acceleration and deceleration,
•have all maintenance work performed at regular
intervals by an authorized Mercedes-Benz Center.
Fuel consumption is also increased by driving in cold
weather, in stop-and-go traffic, on short trips and in hilly
country.Drinking and driving
Ped al s
Wa r n i n g !
Drinking or taking drugs and driving can be a very
dangerous combination. Even a small amount of
alcohol or drugs can affect your reflexes,
perceptions and judgement.The possibility of a serious or even fatal accident is
sharply increased when you drink or take drugs
and drive.Please don’t drink or take drugs and drive or allow
anyone to drive after drinking or taking drugs.Wa r n i n g !
Keep driver’s foot area clear at all times. Objects
stored in this area may impair pedal movement.
Page 312 of 399

309 Contents - Practical hints
Te ch n i c a l
data Instruments
and controlsOperation DrivingInstrument
cluster displayPractical hintsCar care Index
Practical hintsFirst aid kit...................................... 310
Stowing things in the vehicle ...... 311
Fuses ................................................ 311
Hood ................................................. 315
Automatic transmission
fluid level ................................... 317
Adding engine oil........................... 318
Coolant level ................................... 319
Adding coolant............................ 319
Windshield and headlamp
washer system ........................... 320
Spare wheel, storage
compartment.............................. 321Vehicle tools and air pump .......... 322
Vehicle jack .................................... 323
Wheels ............................................ 324
Tire replacement........................ 324
Rotating wheels ......................... 325
Spare wheel .................................... 326
Changing wheels ........................... 327
Inflating the collapsible
spare tire ..................................... 333
Storing spare wheel in
wheel well ................................... 334
Tire inflation pressure ................. 335
Battery............................................. 336
Jump starting.................................. 338Towing the vehicle......................... 341
Transmission selector lever,
manually unlocking ................... 344
Exterior lamps ................................ 345
Replacing bulbs .......................... 345
Changing batteries in the
electronic main key .................. 351
Synchronizing remote
control .......................................... 353
Emergency engine shut-down ..... 353
Fuel filler flap, manual release ... 354
Replacing wiper blade insert ....... 356
Roof rack ......................................... 357
Page 340 of 399

337 Battery
Te ch n i c a l
data Instruments
and controlsOperation DrivingInstrument
cluster displayPractical hintsCar care Index Removal of filter box:
Release three clamps (1) and remove filter box.
Installation of filter box:
Install filter box properly and secure with
three clamps (1).Notes:
The gear selector lever will remain locked in
position “P” and the electronic key can not be turned in
the starter switch, if the vehicle battery is disconnected
or discharged.
After reconnecting the battery also set the clock
(vehicles with COMAND: see COMAND operator’s
manual) resynchronize the front seat head restraints,
the express feature of the power windows, the
panorama sliding / pop-up roof, and the electronic
stability program (see individual settings on page 121,
head restraints on page 54, power windows on page 197,
synchronizing the sliding / pop-up roof on page 202 and
electronic stability program on page 274).
Battery recycling
Batteries contain materials that can harm the
environment with improper disposal.
Large 12 Volt storage batteries contain lead.
Recycling of batteries is the preferred method of
disposal.
Many states require sellers of batteries to accept old
batteries for recycling.
Page 357 of 399
354 Fuel filler flap, manual release
Te ch n i c a l
data Instruments
and controlsOperation DrivingInstrument
cluster displayPractical hintsCar care Index
Fuel filler flap, manual release
Open the trunk lid and fold right-side taillamp trim
aside. Reach inside and turn the release knob (arrow)
clockwise. Open the fuel filler flap.Emergency operation of sliding / pop-up roof
The panorama sliding / pop-up roof can be opened or
closed manually should an electrical malfunction occur.
The panorama sliding / pop-up roof drive is located
behind the lens (1) of the interior overhead light.
Pry off the lens (1) using a screwdriver.
P47.25-2031-26