Page 309 of 399
306 Malfunction and warning messages
Te ch n i c a l
data Instruments
and controlsOperation DrivingInstrument
cluster displayPractical hints Car care Index
RESTRAINT SYSTEM
* C = Category, see page 290.See page 62 for notes on the seat belts, and page 72 for
notes on the airbags.KEY
* C = Category, see page 290.
1 Key needs possibly to be replaced. Line 1 Line 2 C*
RESTRAINT SYSTEM VISIT WORKSHOP! 1Line 1 Line 2 C*
REPLACE KEY
1
VISIT WORKSHOP! 2
AUTOM. LIGHT ON REMOVE KEY! 1
Page 310 of 399
307 Malfunction and warning messages
Te ch n i c a l
data Instruments
and controlsOperation DrivingInstrument
cluster displayPractical hints Car care Index FUEL RESERVE
* C = Category, see page 290.
UNDERVOLTAGE* C = Category, see page 290. Line 1 Line 2 C*
RESERVE FUEL VISIT FILLING STATION! 2Line 1 Line 2 C*
UNDERVOLTAGE ENGINE ON! 1
UNDERVOLTAGE CONSUMER DEFECTIVE! 1
Page 311 of 399
308 Malfunction and warning messages
Te ch n i c a l
data Instruments
and controlsOperation DrivingInstrument
cluster displayPractical hints Car care Index
STEERING WHEEL ADJUST
* C = Category, see page 290.For locking the manual steering wheel adjustment,
seepage87.Line 1 Line 2 C*
STEERING WHEEL ADJUST LOCK! 1
Page 314 of 399

311 Fuses
Te ch n i c a l
data Instruments
and controlsOperation DrivingInstrument
cluster displayPractical hintsCar care Index Stowing things in the vehicle Fuses
Most of your vehicle’s electrical components are fused
with safety fuses. With the exception of the brake lights,
all individual lighting system components are
electronically fused. Before replacing a blown safety
fuse, determine the cause of the short circuit. Always
observe amperage and color of fuse.
The circuit for components is protected by a cycled
circuit breaker interrupted if too much current is being
drawn. The circuit closes automatically after a short
time; the circuit is broken again if the malfunction
reoccurs.
Always use a new fuse for replacement. Never attempt to
repair or bridge a blown fuse.
A fuse chart is located in fuse box (1).
A special fuse puller is located in the auxiliary fuse box
in the trunk, see page 314.
Wa r n i n g !
To help avoid personal injury during a collision or
sudden maneuver, exercise care when stowing
things. Put luggage or cargo in the trunk if
possible. Do not pile luggage or cargo higher than
the seat backs. Do not place anything on the shelf
below the rear window.
Page 321 of 399

318 Engine compartment
Te ch n i c a l
data Instruments
and controlsOperation DrivingInstrument
cluster displayPractical hintsCar care Index
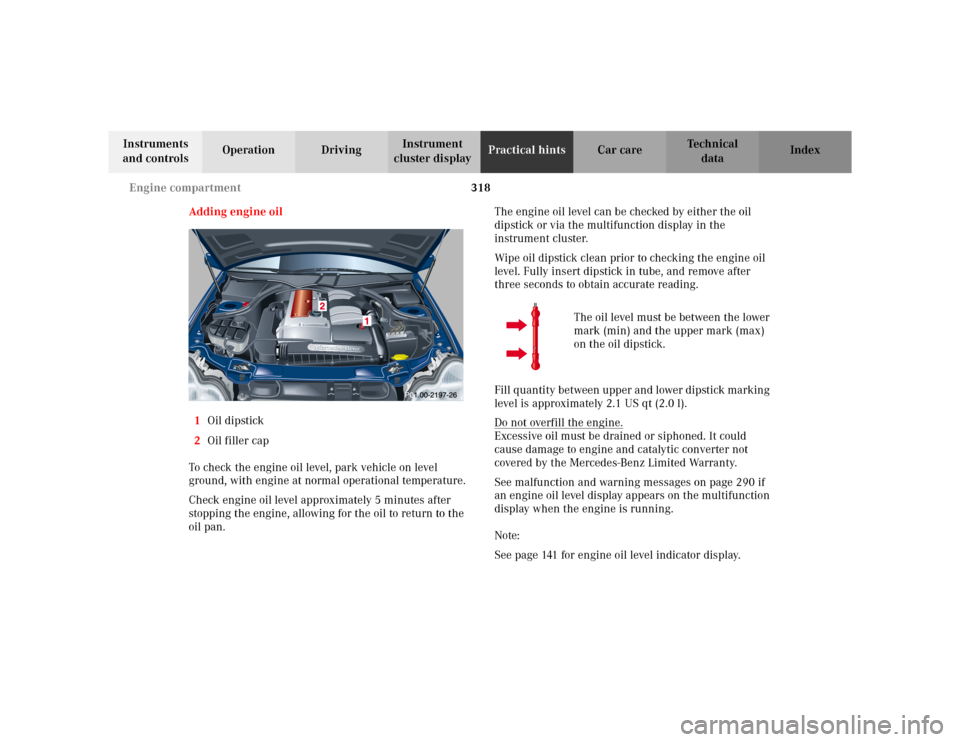
Adding engine oil
1Oil dipstick
2Oil filler cap
To check the engine oil level, park vehicle on level
ground, with engine at normal operational temperature.
Check engine oil level approximately 5 minutes after
stopping the engine, allowing for the oil to return to the
oil pan.The engine oil level can be checked by either the oil
dipstick or via the multifunction display in the
instrument cluster.
Wipe oil dipstick clean prior to checking the engine oil
level. Fully insert dipstick in tube, and remove after
three seconds to obtain accurate reading.
The oil level must be between the lower
mark (min) and the upper mark (max)
on the oil dipstick.
Fill quantity between upper and lower dipstick marking
level is approximately 2.1 US qt (2.0 l).
Do not overfill the engine.
Excessive oil must be drained or siphoned. It could
cause damage to engine and catalytic converter not
covered by the Mercedes-Benz Limited Warranty.
See malfunction and warning messages on page 290 if
an engine oil level display appears on the multifunction
display when the engine is running.
Note:
See page 141 for engine oil level indicator display.
Page 322 of 399

319 Engine compartment
Te ch n i c a l
data Instruments
and controlsOperation DrivingInstrument
cluster displayPractical hintsCar care Index Coolant level
1Coolant expansion tank
To check the coolant level, the vehicle must be parked
on level ground and the engine stopped.
Check coolant level only when coolant is cold.
The coolant level should reach the black top part of the
reservoir.
See page 381 for antifreeze / anticorrosion mixture.Adding coolant
If coolant has to be added, a 50/50 mixture of water and
MB anticorrosion / antifreeze should be added.
Wa r n i n g !
• In order to avoid possibly serious burns:
Use extreme caution when opening the hood if
there are any signs of steam or coolant leaking
from the cooling system, or if the coolant
temperature gauge indicates that the coolant is
overheated.• Do not remove pressure cap on coolant
reservoir if engine temperature is above 194
°F
(90
°C). Allow engine to cool down before
removing cap. The coolant reservoir contains
hot fluid and is under pressure.
• Using a rag, slowly open cap approximately
1/2 turn to relieve excess pressure. If opened
immediately, scalding hot fluid and steam will
be blown out under pressure.• Do not spill antifreeze on hot engine parts.
Antifreeze contains ethylene glycol which may
burn if it comes into contact with hot engine
parts.
Page 325 of 399
322 Spare wheel
Te ch n i c a l
data Instruments
and controlsOperation DrivingInstrument
cluster displayPractical hintsCar care Index
Vehicle tools and air pump
Vehicle tools and air pump are located in the wheel well
below the trunk floor.1Jack
2Spare wheel bolts
3Air pump
4Towin g eyes
5Alignment pin
6Wrench
To remove vehicle tools and air pump:
Turn the mounting screw (3) counterclockwise, remove
spare wheel and cover for vehicle tools, see page 321.
P68.00-2708-26
Page 328 of 399

325 Tires, Wheels
Te ch n i c a l
data Instruments
and controlsOperation DrivingInstrument
cluster displayPractical hintsCar care Index It is imperative that the wheel mounting bolts be
fastened to a tightening torque of 80 ft.lb. (110 Nm)
whenever wheels are mounted.
For rim and tire specifications, refer to “Technical Data”.Rotating wheels
The wheels can be rotated according to the degree of
tire wear while retaining the same direction of travel.
Rotating, however, should be carried out as
recommended by the tire manufacturer, before the
characteristic tire wear pattern (shoulder wear on front
wheels and tread center wear on rear wheels) becomes
visible, as otherwise the driving properties deteriorate.
Notes:
Thoroughly clean the inner side of the wheels any time
you rotate the wheels or wash the vehicle underside.
The use of retread tires is not recommended. Retread
tires may adversely affect the handling characteristics
and safety of the vehicle.
Dented or bent rims can cause tire pressure loss and
damage to the tire beads. For this reason, check rims for
damage at regular intervals. The rim flanges must be
checked for wear before a tire is mounted. Remove
burrs, if any.
Check and ensure proper tire inflation pressure after
rotating the wheels. For tire inflation pressure see
inside of fuel filler flap and also page 278.
Wa r n i n g !
Worn, old tires can cause accidents. If the tire tread
is badly worn, or if the tires have sustained
damage, replace them.When replacing rims, use only genuine
Mercedes-Benz wheel bolts specified for the
particular rim type. Failure to do so can result in
the bolts loosening and possibly an accident.