Page 6 of 248
Driver
air bag
(pg. 111) Hood
release
(pg. 169) Speed
control
(pg. 50) Parking brake
release
(pg. 130) Instrument
panel
dimmer control
(pg. 18) Power adjustable
foot pedals
(pg. 18) Rear window
defroster
control
(pg. 19) Headlamp
control
(pg. 17)Turn signal and
wiper/washer control
(pg. 49)Instrument cluster
(pg. 8)
Gearshift (includes
overdrive button)
(pg. 138)
Instrumentation
6
Page 18 of 248

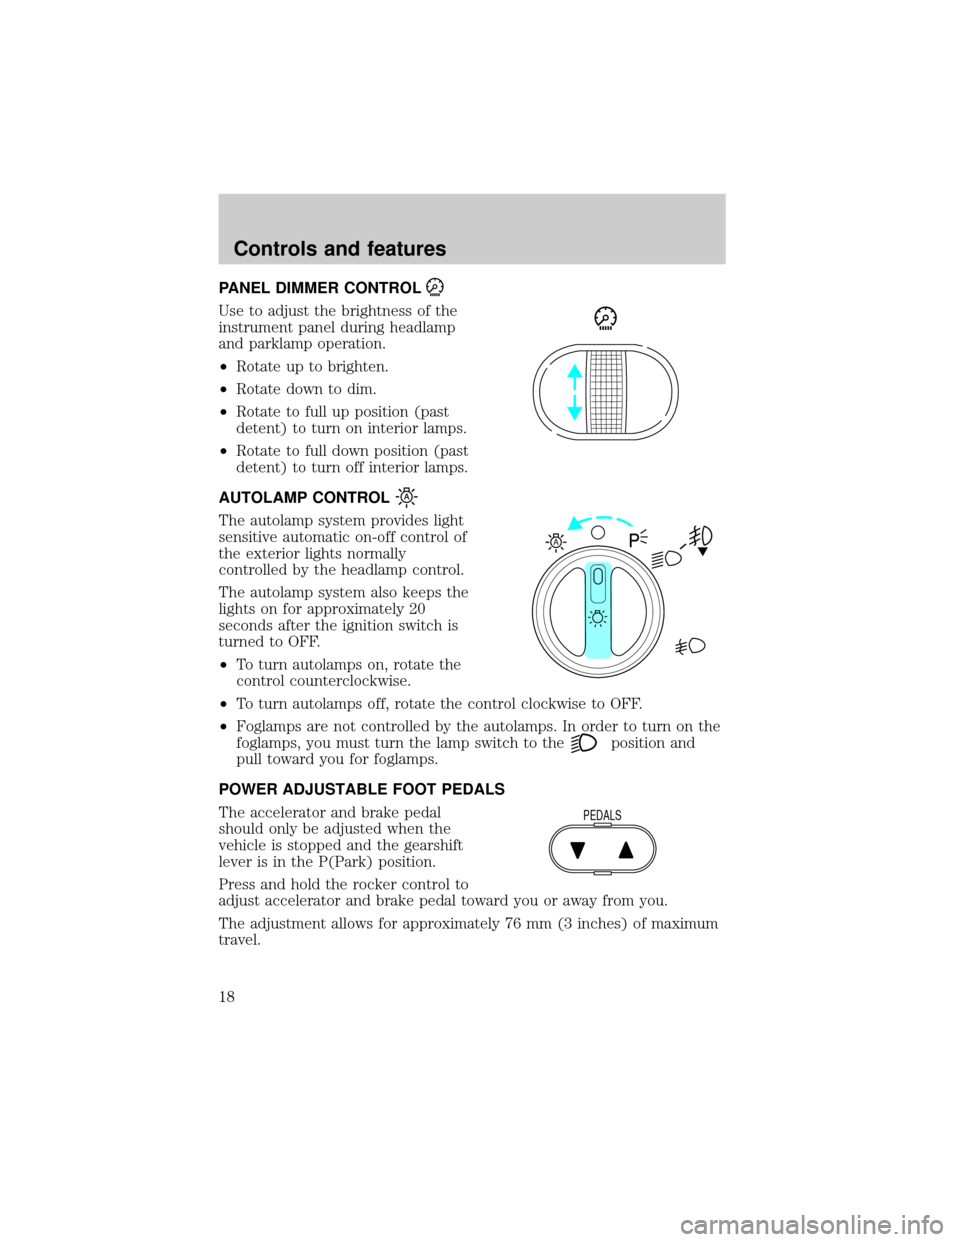
PANEL DIMMER CONTROL
Use to adjust the brightness of the
instrument panel during headlamp
and parklamp operation.
²Rotate up to brighten.
²Rotate down to dim.
²Rotate to full up position (past
detent) to turn on interior lamps.
²Rotate to full down position (past
detent) to turn off interior lamps.
AUTOLAMP CONTROL
The autolamp system provides light
sensitive automatic on-off control of
the exterior lights normally
controlled by the headlamp control.
The autolamp system also keeps the
lights on for approximately 20
seconds after the ignition switch is
turned to OFF.
²To turn autolamps on, rotate the
control counterclockwise.
²To turn autolamps off, rotate the control clockwise to OFF.
²Foglamps are not controlled by the autolamps. In order to turn on the
foglamps, you must turn the lamp switch to the
position and
pull toward you for foglamps.
POWER ADJUSTABLE FOOT PEDALS
The accelerator and brake pedal
should only be adjusted when the
vehicle is stopped and the gearshift
lever is in the P(Park) position.
Press and hold the rocker control to
adjust accelerator and brake pedal toward you or away from you.
The adjustment allows for approximately 76 mm (3 inches) of maximum
travel.
A
PEDALS
Controls and features
18
Page 110 of 248

3. Buckle then unbuckle the safety belt three times, ending with the
safety belt unbuckled. Be sure that each time you unbuckle the belt that
you retract it. This can be done before or during Belt Minder warning
activation.
4. Turn on the parklamps/headlamps, turn off the parklamps/headlamps.
5. Buckle then unbuckle the safety belt three times, ending with the
safety belt unbuckled.
²After step 5 the safety belt warning light will be turned on for three
seconds.
6. Within seven seconds of the safety belt warning light turning off,
buckle then unbuckle the safety belt.
²This will disable Belt Minder if it is currently enabled, or enable Belt
Minder if it is currently disabled.
7. Confirmation of disabling Belt Minder is provided by flashing the
safety belt warning light four times per second for three seconds.
8. Confirmation of enabling Belt Minder is provided by flashing the safety
belt warning light four times per second for three seconds, followed by
three seconds with the safety belt warning light off, then followed by
flashing the safety belt warning light four times per second for three
seconds again.
9. After receiving confirmation, the deactivation/activation procedure is
complete.
Safety belt maintenance
Inspect the safety belt systems periodically to make sure they work
properly and are not damaged. Inspect the safety belts to make sure
there are no nicks, tears or cuts. Replace if necessary. All safety belt
assemblies, including retractors, buckles, front seat belt buckle
assemblies, buckle support assemblies (slide bar-if equipped), shoulder
belt height adjusters (if equipped), shoulder belt guide on seatback
(if equipped), child safety seat tether bracket assemblies (if equipped),
LATCH child seat tether anchors and lower anchors (if equipped), and
attaching hardware, should be inspected after a collision. Ford
recommends that all safety belt assemblies used in vehicles involved in a
collision be replaced. However, if the collision was minor and a qualified
technician finds that the belts do not show damage and continue to
operate properly, they do not need to be replaced. Safety belt assemblies
not in use during a collision should also be inspected and replaced if
either damage or improper operation is noted.
Seating and safety restraints
110
Page 210 of 248

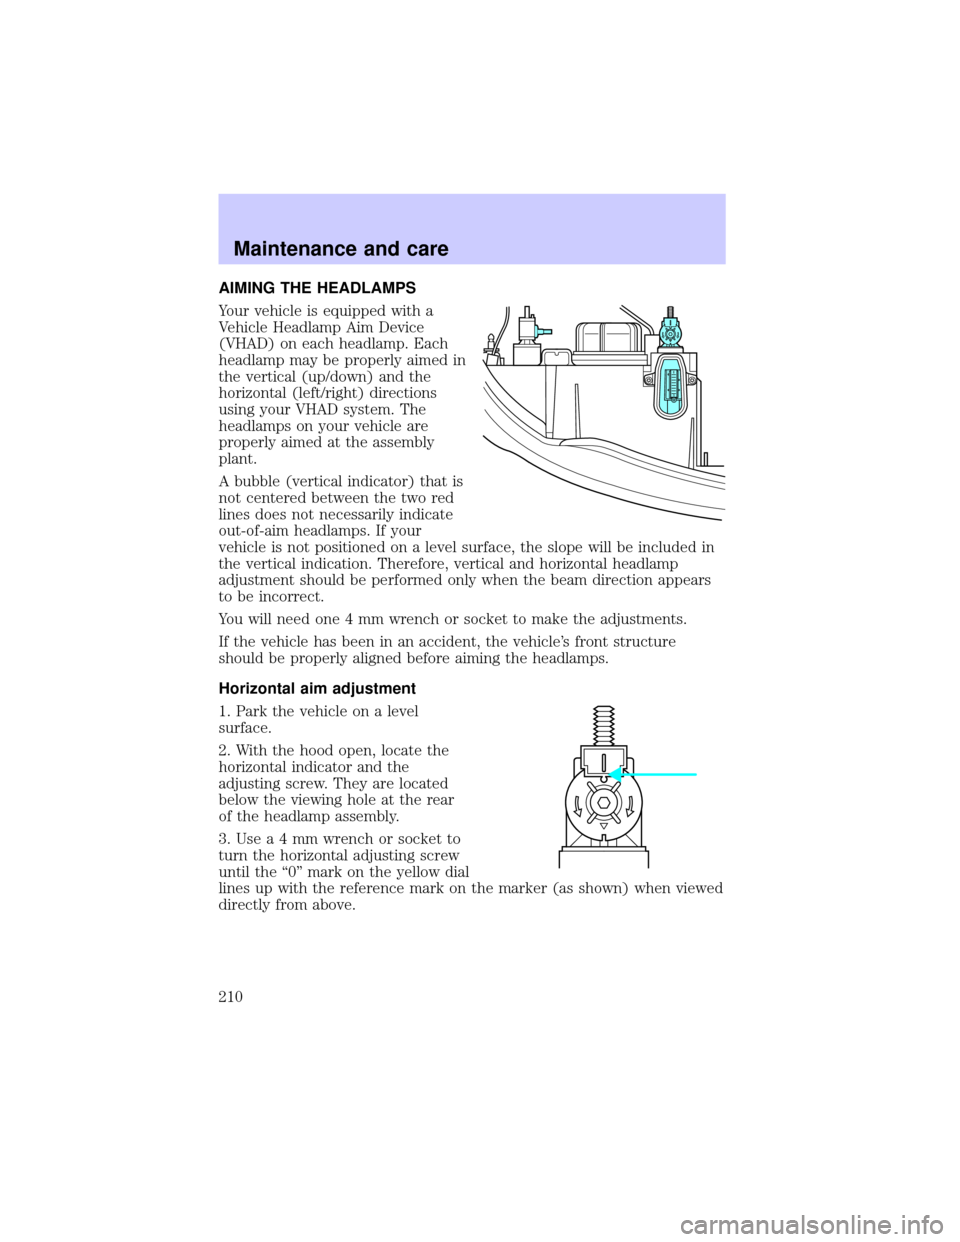
AIMING THE HEADLAMPS
Your vehicle is equipped with a
Vehicle Headlamp Aim Device
(VHAD) on each headlamp. Each
headlamp may be properly aimed in
the vertical (up/down) and the
horizontal (left/right) directions
using your VHAD system. The
headlamps on your vehicle are
properly aimed at the assembly
plant.
A bubble (vertical indicator) that is
not centered between the two red
lines does not necessarily indicate
out-of-aim headlamps. If your
vehicle is not positioned on a level surface, the slope will be included in
the vertical indication. Therefore, vertical and horizontal headlamp
adjustment should be performed only when the beam direction appears
to be incorrect.
You will need one 4 mm wrench or socket to make the adjustments.
If the vehicle has been in an accident, the vehicle's front structure
should be properly aligned before aiming the headlamps.
Horizontal aim adjustment
1. Park the vehicle on a level
surface.
2. With the hood open, locate the
horizontal indicator and the
adjusting screw. They are located
below the viewing hole at the rear
of the headlamp assembly.
3.Usea4mmwrench or socket to
turn the horizontal adjusting screw
until the ª0º mark on the yellow dial
lines up with the reference mark on the marker (as shown) when viewed
directly from above.
U
D
Maintenance and care
210
Page 211 of 248
Turning the horizontal adjusting
screw in the direction of the arrow
changes the horizontal aim as
shown.
Vertical aim adjustment
1. Park the vehicle on a level
surface.
2. With the hood open, locate the
bubble level and the vertical
adjustment screw. The adjustment
screw is located on the outboard
side of the headlamp.
3. The ªUº and ªDº on the bubble
indicate the directional change (up
or down) of the vertical aim.
4.Usea4mmwrench or socket to
turn the vertical adjusting screw
until the bubble is centered between
the two red lines which represents
the ª0º mark position.
When the horizontal and vertical indicators are set to the ª0º mark, the
headlamp has been properly aimed.
U
D
D U
Maintenance and care
211