Page 145 of 248

²After you have traveled 80 km (50 miles), thoroughly check your
hitch, electrical connections and trailer wheel lug nuts.
²When stopped in traffic for long periods of time in hot weather, place
the gearshift in P (Park). This aids engine cooling and air conditioner
efficiency.
²Vehicles with trailers should not be parked on a grade. If you must
park on a grade, place wheel chocks under the trailer's wheels.
Launching or retrieving a boat
When backing down a ramp during boat launching or retrieval,
²Disengage the traction control system to eliminate excessive wheel
spin.
²Do not allow the static water level to rise above the bottom edge of
the rear bumper.
²Do not allow waves to break higher than 15 cm (6 inches) above the
bottom edge of the rear bumper.
Exceeding these limits may allow water to enter critical vehicle
components, adversely affecting driveability, emissions, reliability and
causing internal transmission damage.
Replace the rear axle lubricant anytime the axle has been submerged in
water. Rear axle lubricant quantities are not to be checked or changed
unless a leak is suspected or repair required.
Disconnect the wiring to the trailer before backing the trailer into the
water. Reconnect the wiring to the trailer after the trailer is removed
from the water.
Recreational towing (all wheels on the ground)
Follow these guidelines for your specific powertrain combination to tow
your vehicle with all four wheels on the ground (such as behind a
recreational vehicle).
These guidelines are designed to ensure that your transmission is not
damaged due to insufficient lubrication.
All Rear Wheel Drive (RWD) vehicles
This applies to all cars and 4x2 trucks/sport utilities with rear wheel
drive capability.
Driving
145
Page 152 of 248

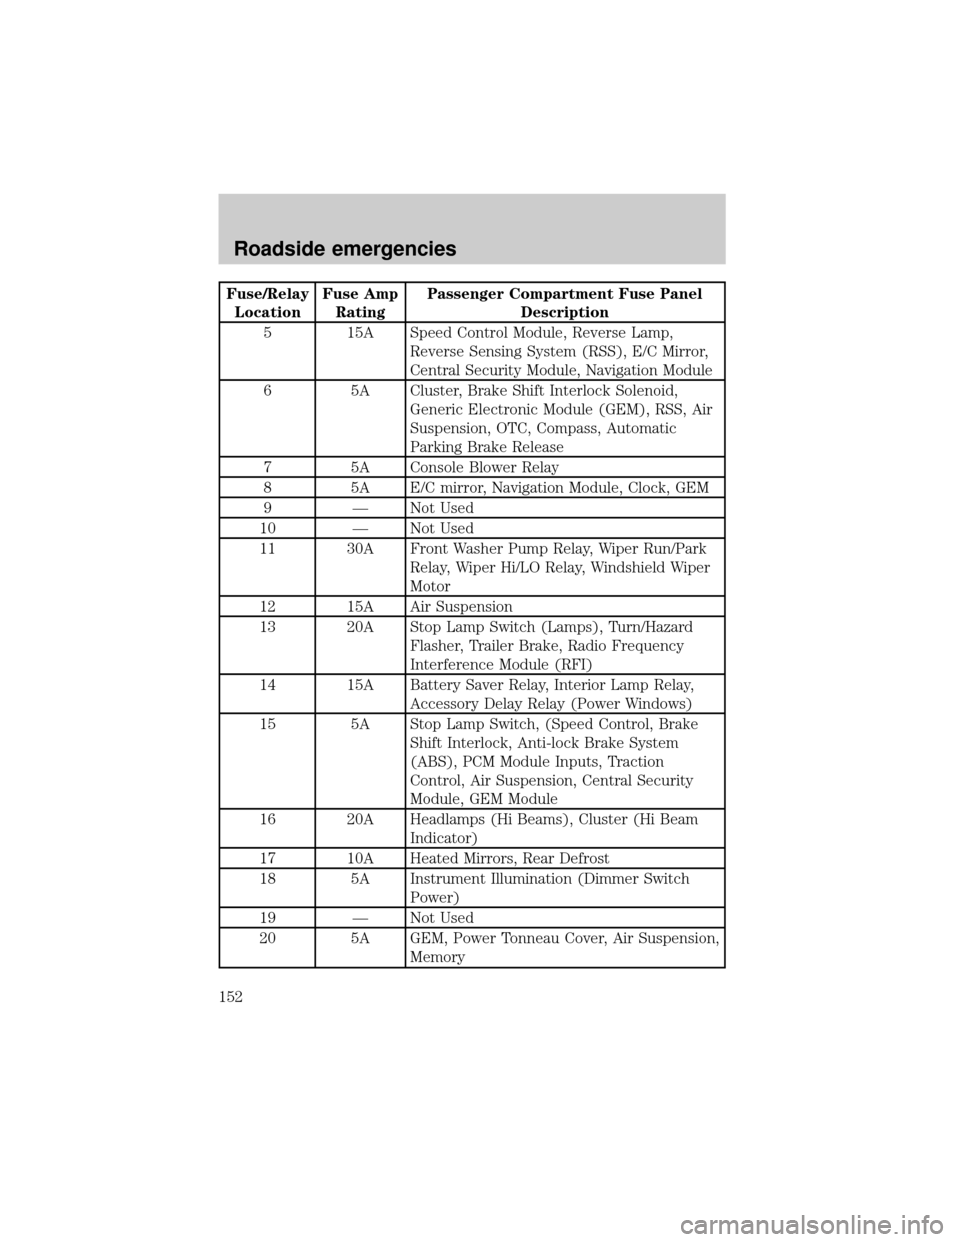
Fuse/Relay
LocationFuse Amp
RatingPassenger Compartment Fuse Panel
Description
5 15A Speed Control Module, Reverse Lamp,
Reverse Sensing System (RSS), E/C Mirror,
Central Security Module, Navigation Module
6 5A Cluster, Brake Shift Interlock Solenoid,
Generic Electronic Module (GEM), RSS, Air
Suspension, OTC, Compass, Automatic
Parking Brake Release
7 5A Console Blower Relay
8 5A E/C mirror, Navigation Module, Clock, GEM
9 Ð Not Used
10 Ð Not Used
11 30A Front Washer Pump Relay, Wiper Run/Park
Relay, Wiper Hi/LO Relay, Windshield Wiper
Motor
12 15A Air Suspension
13 20A Stop Lamp Switch (Lamps), Turn/Hazard
Flasher, Trailer Brake, Radio Frequency
Interference Module (RFI)
14 15A Battery Saver Relay, Interior Lamp Relay,
Accessory Delay Relay (Power Windows)
15 5A Stop Lamp Switch, (Speed Control, Brake
Shift Interlock, Anti-lock Brake System
(ABS), PCM Module Inputs, Traction
Control, Air Suspension, Central Security
Module, GEM Module
16 20A Headlamps (Hi Beams), Cluster (Hi Beam
Indicator)
17 10A Heated Mirrors, Rear Defrost
18 5A Instrument Illumination (Dimmer Switch
Power)
19 Ð Not Used
20 5A GEM, Power Tonneau Cover, Air Suspension,
Memory
Roadside emergencies
152
Page 153 of 248

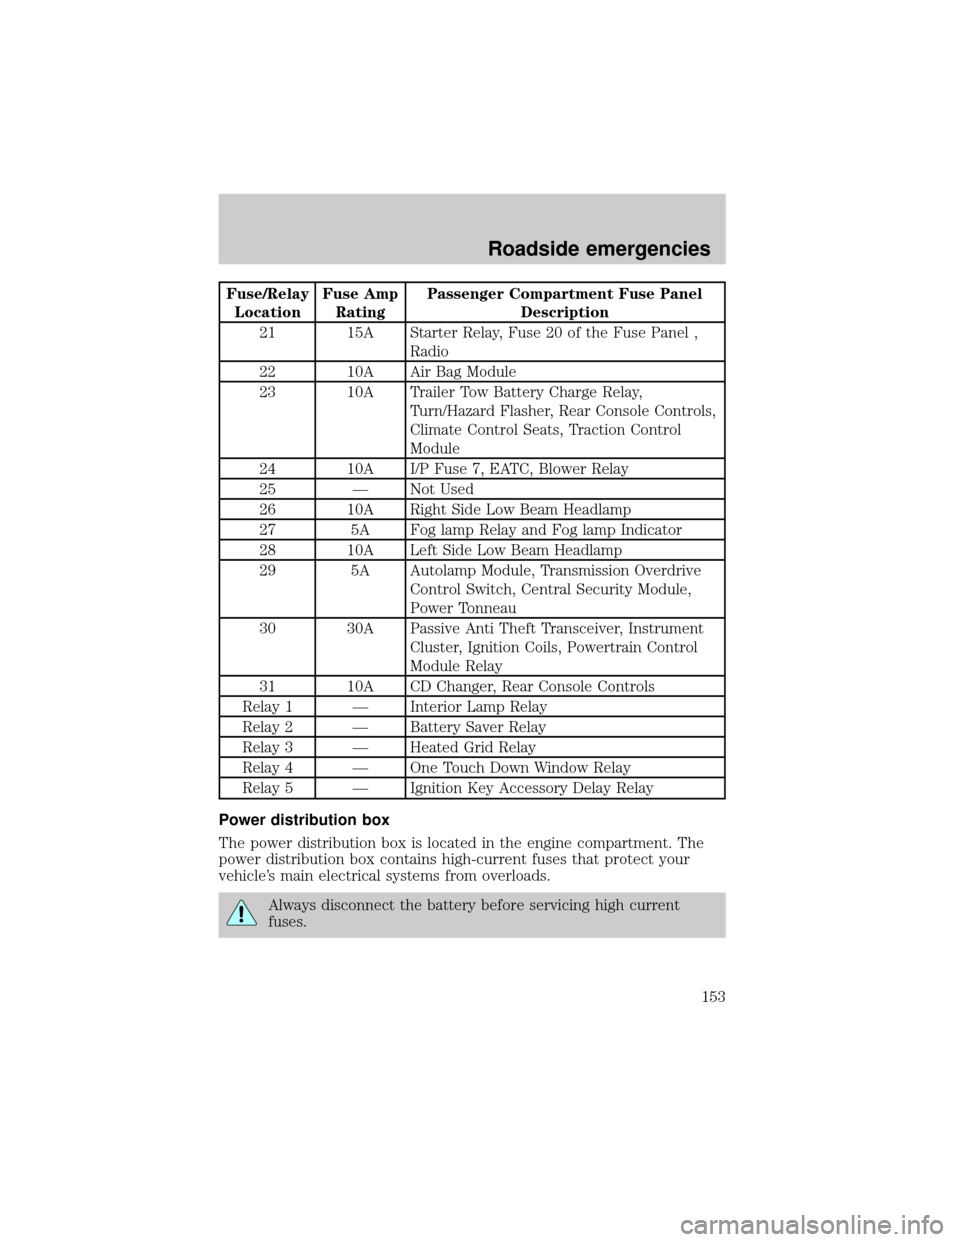
Fuse/Relay
LocationFuse Amp
RatingPassenger Compartment Fuse Panel
Description
21 15A Starter Relay, Fuse 20 of the Fuse Panel ,
Radio
22 10A Air Bag Module
23 10A Trailer Tow Battery Charge Relay,
Turn/Hazard Flasher, Rear Console Controls,
Climate Control Seats, Traction Control
Module
24 10A I/P Fuse 7, EATC, Blower Relay
25 Ð Not Used
26 10A Right Side Low Beam Headlamp
27 5A Fog lamp Relay and Fog lamp Indicator
28 10A Left Side Low Beam Headlamp
29 5A Autolamp Module, Transmission Overdrive
Control Switch, Central Security Module,
Power Tonneau
30 30A Passive Anti Theft Transceiver, Instrument
Cluster, Ignition Coils, Powertrain Control
Module Relay
31 10A CD Changer, Rear Console Controls
Relay 1 Ð Interior Lamp Relay
Relay 2 Ð Battery Saver Relay
Relay 3 Ð Heated Grid Relay
Relay 4 Ð One Touch Down Window Relay
Relay 5 Ð Ignition Key Accessory Delay Relay
Power distribution box
The power distribution box is located in the engine compartment. The
power distribution box contains high-current fuses that protect your
vehicle's main electrical systems from overloads.
Always disconnect the battery before servicing high current
fuses.
Roadside emergencies
153
Page 154 of 248
Always replace the cover to the Power Distribution Box before
reconnecting the battery or refilling fluid reservoirs.
If the battery has been disconnected and reconnected, refer to the
Batterysection of theMaintenance and specificationschapter.
The high-current fuses are coded as follows.
Fuse/Relay
LocationFuse Amp
RatingPower Distribution Box Description
1 20A * Power Point
2 30A* Powertrain Control Module
3 30A* Headlamps/Autolamps
4 20A* Console Power Point
5 20A* Trailer Tow Backup/Park Lamps
6
15A*Parklamps/Autolamps, Passenger Fuse Panel
Feed Fuse #18
7 20A* Horn
8 30A* Power Door Locks
9 15A* Fog Lamps, Power Tonneau
10 20A* Fuel Pump
11 20A* Alternator Field
Roadside emergencies
154
Page 155 of 248

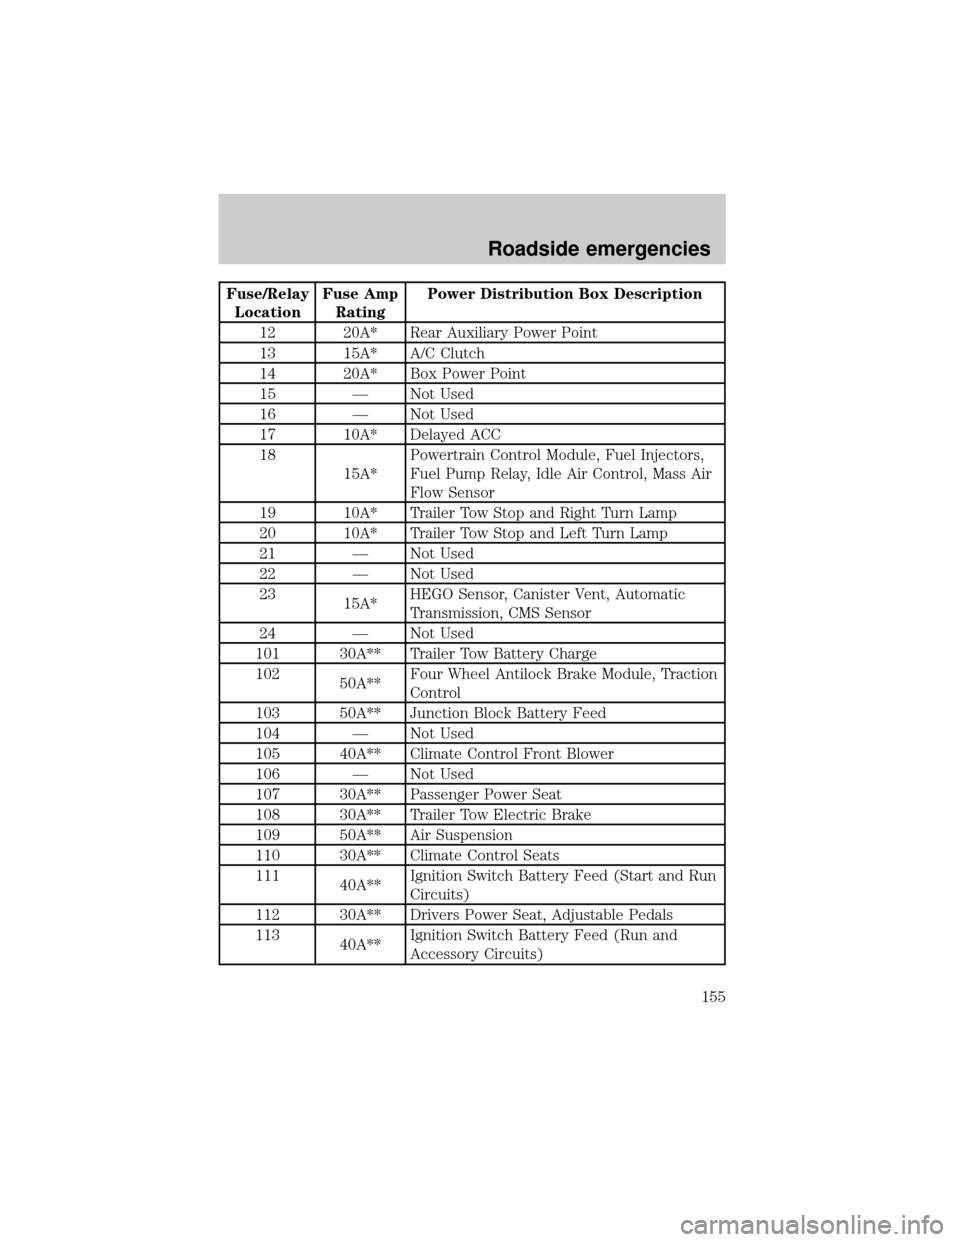
Fuse/Relay
LocationFuse Amp
RatingPower Distribution Box Description
12 20A* Rear Auxiliary Power Point
13 15A* A/C Clutch
14 20A* Box Power Point
15 Ð Not Used
16 Ð Not Used
17 10A* Delayed ACC
18
15A*Powertrain Control Module, Fuel Injectors,
Fuel Pump Relay, Idle Air Control, Mass Air
Flow Sensor
19 10A* Trailer Tow Stop and Right Turn Lamp
20 10A* Trailer Tow Stop and Left Turn Lamp
21 Ð Not Used
22 Ð Not Used
23
15A*HEGO Sensor, Canister Vent, Automatic
Transmission, CMS Sensor
24 Ð Not Used
101 30A** Trailer Tow Battery Charge
102
50A**Four Wheel Antilock Brake Module, Traction
Control
103 50A** Junction Block Battery Feed
104 Ð Not Used
105 40A** Climate Control Front Blower
106 Ð Not Used
107 30A** Passenger Power Seat
108 30A** Trailer Tow Electric Brake
109 50A** Air Suspension
110 30A** Climate Control Seats
111
40A**Ignition Switch Battery Feed (Start and Run
Circuits)
112 30A** Drivers Power Seat, Adjustable Pedals
113
40A**Ignition Switch Battery Feed (Run and
Accessory Circuits)
Roadside emergencies
155
Page 156 of 248
Fuse/Relay
LocationFuse Amp
RatingPower Distribution Box Description
114 Ð Not Used
115 Ð Not Used
116 40A** Heated Grid / Mirrors
117 Ð Not Used
118 Ð Not Used
201 Ð Trailer Tow Park Lamp Relay
202 Ð Front Wiper Run/Park Relay
203 Ð Trailer Tow Backup Lamp Relay
204 Ð A/C Clutch Relay
205 Ð Not Used
206 Ð Fog Lamp Relay
207 Ð Front Washer Pump Relay
208 Ð Not Used
209 Ð Not Used
301 Ð Fuel Pump Relay
302 Ð Trailer Tow Battery Charge Relay
303 Ð Wiper High / Low Relay
304 Ð Powertrain Control Module Relay
401 Ð Not Used
501 Ð Powertrain Control Module Diode
502 Ð A/C Compressor Diode
503 Ð Auto Park Brake Diode
601 30A CB Power Windows, Moonroof
602 50A** Power Tonneau
*Mini fuses **Maxi fuses
Roadside emergencies
156
Page 183 of 248

TRANSMISSION FLUID
Checking automatic transmission fluid
Refer to your scheduled maintenance guide for scheduled intervals for
fluid checks and changes. Your transmission does not consume fluid.
However, the fluid level should be checked if the transmission is not
working properly, i.e., if the transmission slips or shifts slowly or if you
notice some sign of fluid leakage.
Automatic transmission fluid expands when warmed. To obtain an
accurate fluid check, drive the vehicle until it is at normal operating
temperature (approximately 30 km [20 miles]). If your vehicle has been
operated for an extended period at high speeds, in city traffic during hot
weather or pulling a trailer, the vehicle should be turned off for about 30
minutes to allow fluid to cool before checking.
1. Drive the vehicle 30 km (20 miles) or until it reaches normal operating
temperature.
2. Park the vehicle on a level surface and engage the parking brake.
3. With the parking brake engaged and your foot on the brake pedal,
start the engine and move the gearshift lever through all of the gear
ranges. Allow sufficient time for each gear to engage.
4. Latch the gearshift lever in P (Park) and leave the engine running.
5. Remove the dipstick, wiping it clean with a clean, dry lint free rag. If
necessary, refer toIdentifying components in the engine compartment
in this chapter for the location of the dipstick.
6. Install the dipstick making sure it is fully seated in the filler tube.
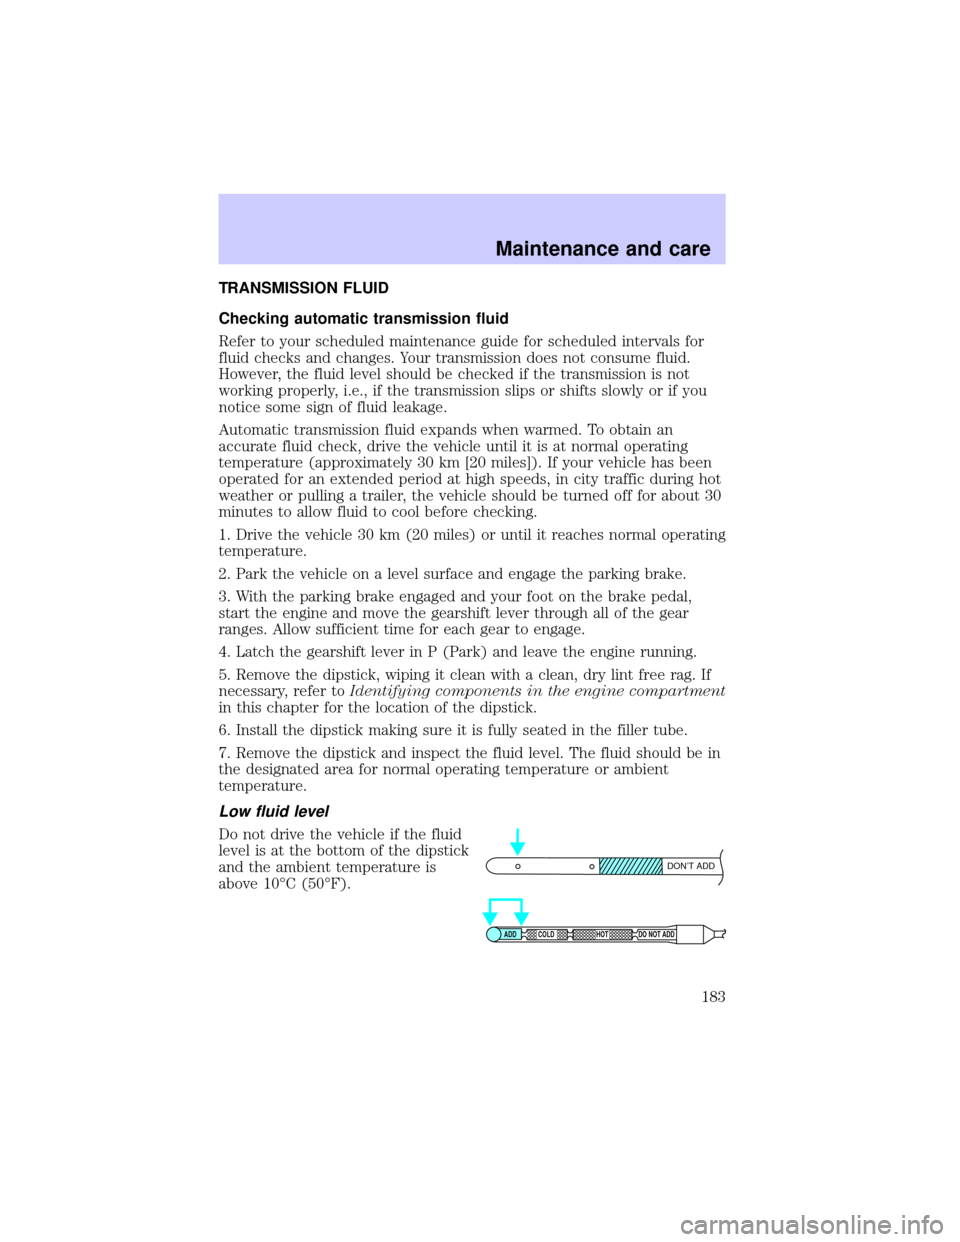
7. Remove the dipstick and inspect the fluid level. The fluid should be in
the designated area for normal operating temperature or ambient
temperature.
Low fluid level
Do not drive the vehicle if the fluid
level is at the bottom of the dipstick
and the ambient temperature is
above 10ÉC (50ÉF).
DON’T ADD
ADD COLD HOT DO NOT ADD
Maintenance and care
183
Page 201 of 248

²Using the air conditioner or defroster may reduce fuel economy.
²You may want to turn off the speed control in hilly terrain if
unnecessary shifting between third and fourth gear occurs.
Unnecessary shifting of this type could result in reduced fuel
economy.
²Warming up a vehicle on cold mornings is not required and may
reduce fuel economy.
²Resting your foot on the brake pedal while driving may reduce fuel
economy.
²Combine errands and minimize stop-and-go driving.
Maintenance
²Keep tires properly inflated and use only recommended size.
²Operating a vehicle with the wheels out of alignment will reduce fuel
economy.
²Use recommended engine oil. Refer toLubricant specificationsin
theMaintenance and Specificationschapter.
²Perform all regularly scheduled maintenance items. Follow the
recommended maintenance schedule and owner maintenance checks
found in your vehicle scheduled maintenance guide.
Conditions
²Heavily loading a vehicle or towing a trailer may reduce fuel economy
at any speed.
²Carrying unnecessary weight may reduce fuel economy (approximately
0.4 km/L [1 mpg] is lost for every 180 kg [400 lb] of weight carried).
²Adding certain accessories to your vehicle (for example bug
deflectors, rollbars/light bars, running boards, ski/luggage racks) may
reduce fuel economy.
²To maximize the fuel economy, drive with the tonneau cover installed
(if equipped).
²Using fuel blended with alcohol may lower fuel economy.
²Fuel economy may decrease with lower temperatures during the first
12±16 km (8±10 miles) of driving.
²Driving on flat terrain offers improved fuel economy as compared to
driving on hilly terrain.
Maintenance and care
201