Page 13 of 248
Headlamps on warning chime
Sounds when the headlamps or parking lamps are on, the key is removed
from the ignition and the driver's door is opened.
GAUGES
Fuel gauge
Displays approximately how much
fuel is in the fuel tank. The fuel
gauge may vary slightly when the
vehicle is in motion or on a grade.
When refueling the vehicle from
empty indication, the amount of fuel
that can be added will be less than
the advertised capacity due to the
reserve fuel.
A minimum of 22.2 L (six gallons)
must be added or removed from the fuel tank in order for the gauge to
instantaneously update. If less than six gallons is the change, the gauge
will take between five to twenty minutes to update.
L
C
EL
H
FMPHRPMX1000km/hkm/h
DPRND2
LOW
FUEL
BRAKESELECT
RESET
DOOR
AJAR
CK
SUSP SERVICE
ENGINE
SOONTHEFT
20406080
60402000H
H
E
F
FUEL DOOR
Instrumentation
13
Page 15 of 248
Odometer
Registers the total kilometers
(miles) of the vehicle.
Trip odometer
Registers the kilometers (miles) of
individual journeys. Press and
release the reset button until a ªTº
appears in the display (this
represents the trip mode). Press
and hold the button for three seconds to reset.
Tachometer
Indicates the engine speed in
revolutions per minute.
Driving with your tachometer
pointer continuously at the top of
the scale may damage the engine.
Battery voltage gauge
Indicates battery voltage. If the
pointer moves and stays outside the
normal operating range (as
indicated by the arrows), have the
vehicle's electrical system checked
as soon as possible.
DPRND2SELECT
RESET
RPMX1000
L
H
Instrumentation
15
Page 31 of 248

Shuffle feature
The shuffle feature operates in CD
mode and plays all tracks on the
current disc in random order. If
equipped with the CD changer, the
shuffle feature continues to the next
disc after all tracks are played.
Press the SHUFFLE control to start this feature. Random order play will
continue until the SHUFFLE control is pressed again.
Setting the clock
Your vehicle is equipped with a separate instrument panel mounted
clock. Please refer toClockin this chapter for instructions on setting the
clock.
Radio data system (RDS) feature
This feature allows your audio
system to receive text information
from RDS-equipped FM radio
stations.
Press the RDS control until the display reads RDS OFF. Press the SEL
control to engage this feature (RDS ON). Once the RDS feauture is on,
press the RDS control to scroll through the following selections:
Traffic
²Press the RDS control until
TRAFFIC is displayed.
²Use the SEL control to select ON
or OFF. With the feature on, use
the SEEK or SCAN control to
find a radio station broadcasting a
traffic report (if it is broadcasting
RDS data).
Traffic information is not available in
most US markets.
SHUFF
6
RDS
RDS
SEL
Controls and features
31
Page 32 of 248
Program type
²Press the RDS control until FIND
program type is displayed.
²Use the SEL control to select the
program type. With the feature
on, use the SEEK or SCAN
control to find the desired
program type from the following
selections:
²Classic
²Country
²Info
²Jazz
²Oldies
²R&B
²Religious
²Rock
²Soft
²To p 4 0
Show
²With RDS activated, press the
RDS control until SHOW is
displayed.
²Use the SEL control to select
TYPE, NAME or NONE.
RDS
SEL
RDS
SEL
Controls and features
32
Page 33 of 248
Mute mode
Press the control to mute the
playing media. Press the control
again to return to the playing media.
Digital signal processing (if equipped)
The digital signal processing (DSP)
feature allows you to change the
signal mode to suit your listening
tastes.
Press the control to turn the feature on or off.
Use the SEL control to select the
desired signal mode (the selected
mode will appear in the display).
The following signal modes can be
selected:
²JAZZ CLUBÐjazz club with
clearly reflected sounds
²HALLÐrectangular concert hall capacity of about 2 000
²CHURCHÐchurch with a high vault
²STADIUMÐoutdoor stadium with a capacity of about 30 000
²NEWSкvoice-onlyº type of sound with a limited audio band
Press the DSP control until one of
the following appears:
²ALL SEATS
²DRIVER SEAT
²REAR SEATS
Use the SEL control to change the
equalization to the desired mode.
MUTE
DSP RDS
SEL
DSP RDS
SEL
Controls and features
33
Page 34 of 248

Rear seat controls
The Personal Audio System allows
front and rear seat passengers to
listen to different media sources
(radio, cassette or CD)
simultaneously. However, the front
and rear seat passengers cannot
listen to two different radio stations
at the same time.
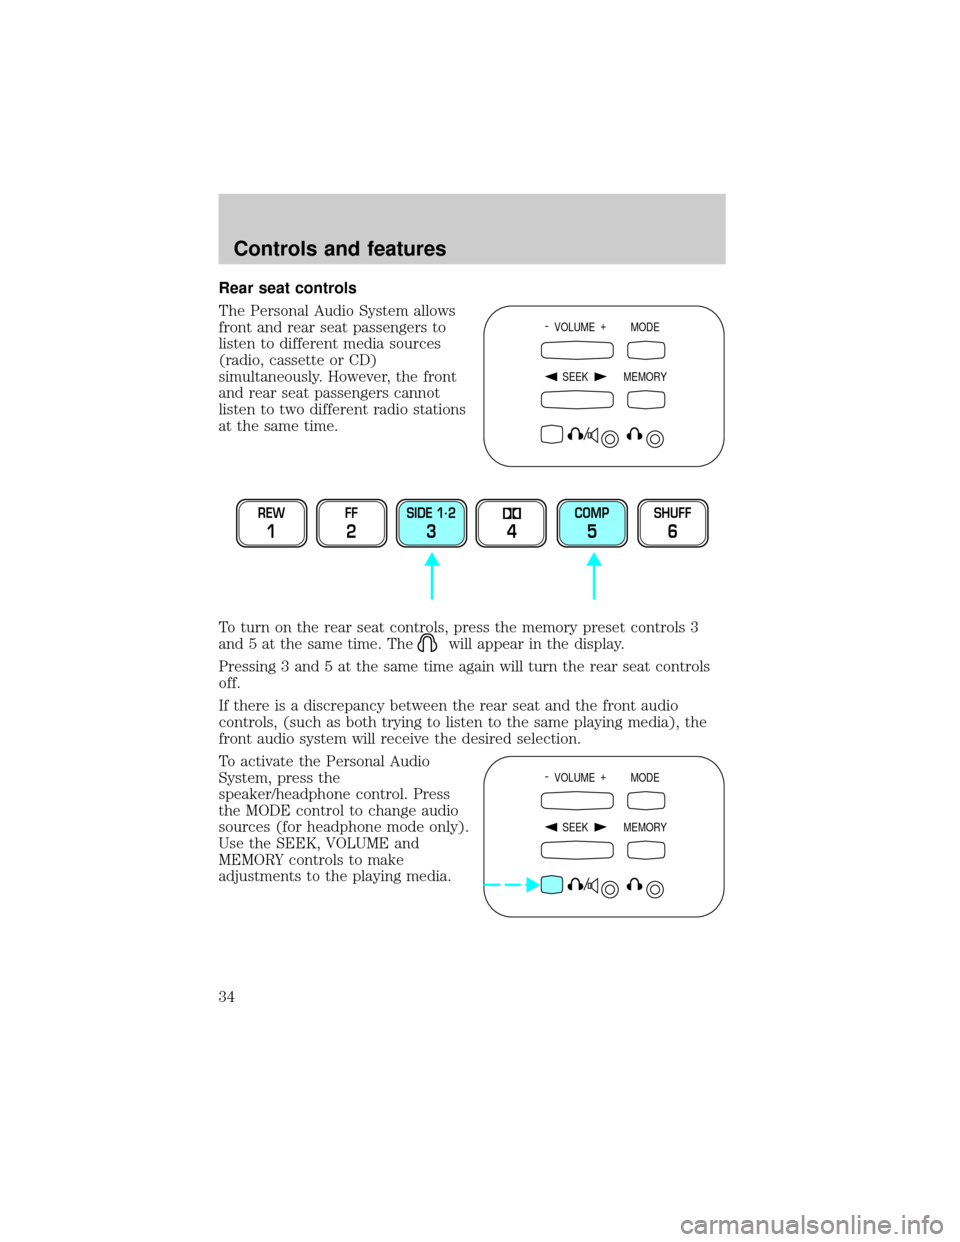
To turn on the rear seat controls, press the memory preset controls 3
and 5 at the same time. The
will appear in the display.
Pressing 3 and 5 at the same time again will turn the rear seat controls
off.
If there is a discrepancy between the rear seat and the front audio
controls, (such as both trying to listen to the same playing media), the
front audio system will receive the desired selection.
To activate the Personal Audio
System, press the
speaker/headphone control. Press
the MODE control to change audio
sources (for headphone mode only).
Use the SEEK, VOLUME and
MEMORY controls to make
adjustments to the playing media.
- VOLUME +
MODE
SEEK MEMORY
REW
1
FF
2
SIDE 1.
2
34
COMP
5
SHUFF
6
- VOLUME +
MODE
SEEK MEMORY
Controls and features
34
Page 35 of 248

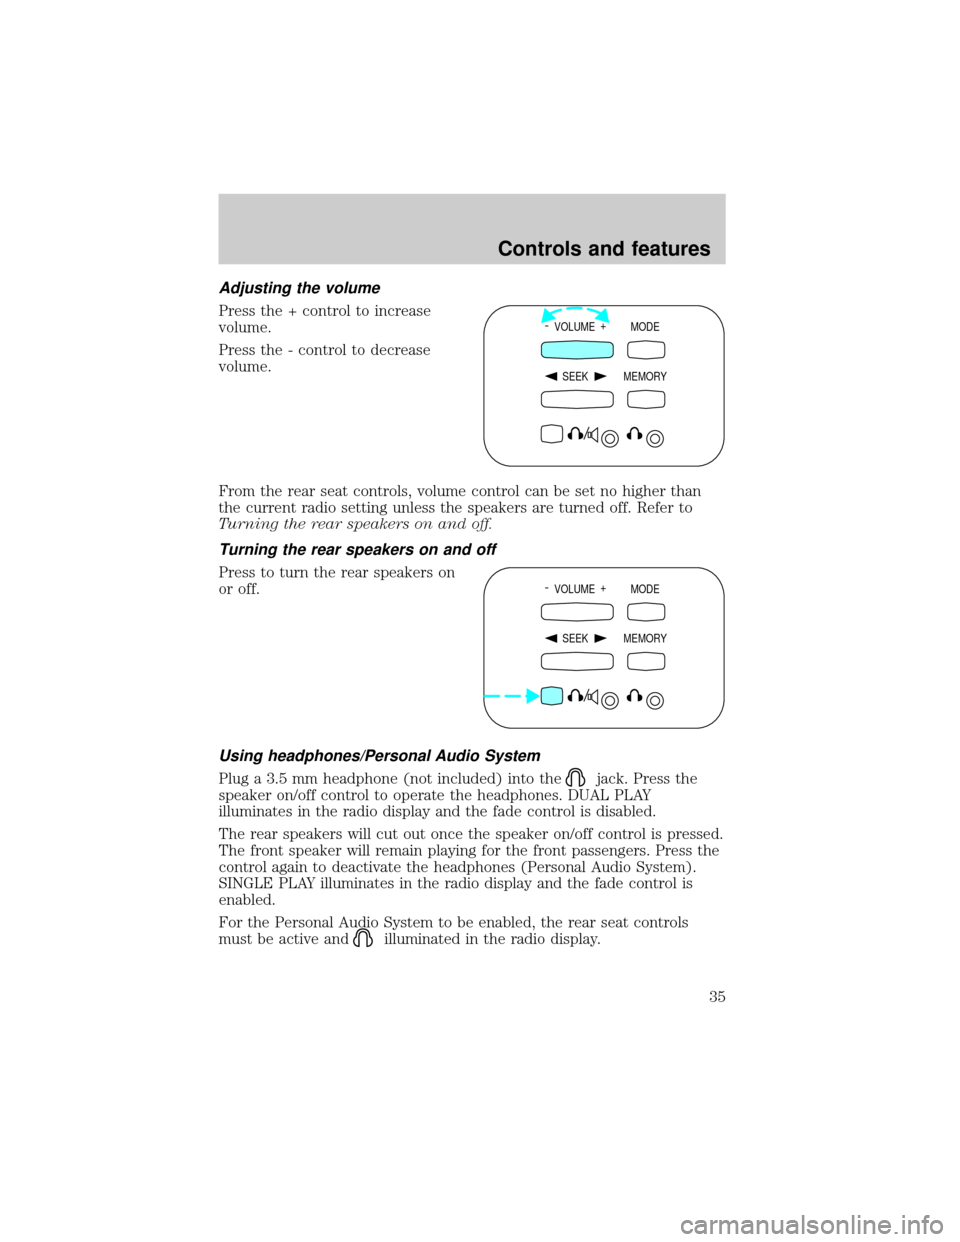
Adjusting the volume
Press the + control to increase
volume.
Press the - control to decrease
volume.
From the rear seat controls, volume control can be set no higher than
the current radio setting unless the speakers are turned off. Refer to
Turning the rear speakers on and off.
Turning the rear speakers on and off
Press to turn the rear speakers on
or off.
Using headphones/Personal Audio System
Plug a 3.5 mm headphone (not included) into thejack. Press the
speaker on/off control to operate the headphones. DUAL PLAY
illuminates in the radio display and the fade control is disabled.
The rear speakers will cut out once the speaker on/off control is pressed.
The front speaker will remain playing for the front passengers. Press the
control again to deactivate the headphones (Personal Audio System).
SINGLE PLAY illuminates in the radio display and the fade control is
enabled.
For the Personal Audio System to be enabled, the rear seat controls
must be active and
illuminated in the radio display.
- VOLUME +
MODE
SEEK MEMORY
- VOLUME +
MODE
SEEK MEMORY
Controls and features
35
Page 36 of 248
Mode select
Push the MODE control to toggle
between AM, FM1, FM2, tape, CD or
CD changer (if equipped). If in the
Personal Audio System mode,
SHARED illuminates in the radio
display when the front and rear
modes are set to the same media.
Memory preset control
Push the MEMORY control
successively to allow rear seat
passengers to scroll through the 6
memory presets in AM, FM1 or
FM2.
Push the MEMORY control in CD
changer mode (if equipped) to
advance to the next disc.
Seek function
²In radio mode, pressto find
the next listenable station down
the frequency band.
²In radio mode, press
to find
the next listenable station up the
frequency band.
²In tape mode, use the SEEK
function to access the next
or
previous
selection.
²In CD mode (if equipped), use
the SEEK function to access the next
or previousselection.
- VOLUME +
MODE
SEEK MEMORY
- VOLUME +
MODE
SEEK MEMORY
- VOLUME +
MODE
SEEK MEMORY
Controls and features
36