Page 73 of 378
 INTERIOR EQUIPMENT
60The power outlet is designed for power supply for car
accessories.
The ignition key must be in the ºACCº or ºONº position for t\
he
power outlet to be used.
NOTICE
�In the con")
INTERIOR EQUIPMENT
60The power outlet is designed for power supply for car
accessories.
The ignition key must be in the ºACCº or ºONº position for t\
he
power outlet to be used.
NOTICE
�In the console: To prevent the fuse from being blown,
do not use the electricity over the total vehiclecapacity of 12V 3.5A.
�In the luggage compartment: To prevent the fusefrom being blown, do not use the electricity over thetotal vehicle capacity of 12V/120W.
�To prevent the battery from being discharged, do notuse the power outlet longer than necessary when theengine is not running.
�Close the power outlet lid when the power outlet isnot in use. Inserting a foreign object other than theappropriate plug that fits the outlet, or allowing anyliquid into the outlet may cause electrical failure or
short circuits.
GLOVE BOX
SS14012
� 1Unlock 2Open 3Lock
To open the glove box door, pull the lever. To lock the
glove box door, insert the master key and turn it
clockwise.
With the tail lights on, the glove box light will come on when the
glove box door is open.
CAUTION
To reduce the chance of injury in case of an accident or
a sudden stop, always keep the glove box door closed
while driving.
Page 94 of 378
 EXTERIOR EQUIPMENT
81
SS15021
In case of unlocking the support rod, lift up the hood a
little, move the support rod and unlock it as shown by the
arrow marks in the illustration.
Before closing the ho")
EXTERIOR EQUIPMENT
81
SS15021
In case of unlocking the support rod, lift up the hood a
little, move the support rod and unlock it as shown by the
arrow marks in the illustration.
Before closing the hood, check to see that you have not
forgotten any tools, rags, etc. and return the support rod to its
clips±this prevents rattles. Then lower the hood and make
sure it locks into place. If necessary, press down gently on the
front edge to lock it.
CAUTION
Before driving, be sure that the hood is securely locked.
Otherwise, the hood may open unexpectedly while
driving and an accident may occur.
TRUNK LID
SS15005c
To unlock the trunk lid, insert the master key and turn it
clockwise.
To close the trunk lid, lower it and press down on it. After
closing the trunk lid, try pulling it up to make sure it is securely
closed.
The trunk lid can be unlocked using the wireless remote control
key. For details, see page 15.
If you unlock the trunk lid while the theft deterrent system is in
set, the theft deterrent system will be cancelled. (For details,
see page 172.)
Page 95 of 378
EXTERIOR EQUIPMENT
82
CAUTION
�Keep the trunk lid closed while driving. This not only
keeps the luggage from being thrown out, but also
prevents exhaust gases from entering the vehicle.
� Always lock the trunk lid and all doors, and keep
away the vehicle keys out of children's reaches.
� Never leave children unattended in the vehicle.
Unsupervised children may lock themselves in the
vehicle or trunk and suffer serious injuries or death.
Lock release lever
SS15006
To open the trunk lid from the driver's seat, pull up on the
lock release lever.
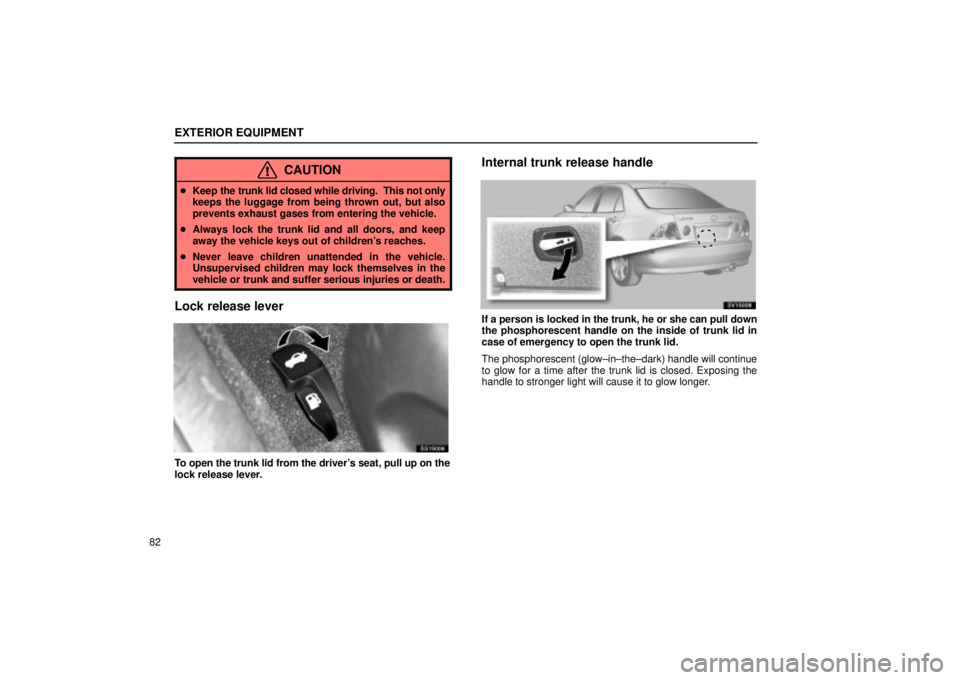
Internal trunk release handle
SV15008
If a person is locked in the trunk, he or she can pull down
the phosphorescent handle on the inside of trunk lid in
case of emergency to open the trunk lid.
The phosphorescent (glow±in±the±dark) handle will continue
to glow for a time after the trunk lid is closed. Exposing the
handle to stronger light will cause it to glow longer.
Page 96 of 378
EXTERIOR EQUIPMENT
83
Luggage security system
SS15013
After closing the trunk lid, insert the master key and turn
it counterclockwise to deactivate the lock release lever.
At this time, the trunk lid can be opened only by the
phosphorescent handle lever inside the trunk.
FUEL TANK CAP
SS15008
1. To open the fuel filler door, pull the lever up.
When refueling, turn off the engine.
CAUTION
�Do not smoke, cause sparks or allow open flames
when refueling. The fumes are flammable.
� When opening the cap, do not remove the cap
quickly. In hot weather, fuel under pressure could
cause injury by spraying out of the filler neck if the
cap is suddenly removed.
Page 98 of 378
 EXTERIOR EQUIPMENT
85
MOON ROOF
SV15003
� 1Open 2Close
To slide open the moon roof, push the switch on the rear
side briefly. The moon roof will open and stop partway 80
mm (3.2 in.) from the fully")
EXTERIOR EQUIPMENT
85
MOON ROOF
SV15003
� 1Open 2Close
To slide open the moon roof, push the switch on the rear
side briefly. The moon roof will open and stop partway 80
mm (3.2 in.) from the fully opened position. When you
push the switch again, the moon roof will open fully. To
stop partway, push the same switch or ºTILTº switch
briefly while the moon roof is moving.
As driving with the moon roof opened fully will cause wind
throbs, we recommend you to drive with the moon roof partway
80 mm (3.2 in.) from the fully opened position.
To operate the moon roof, the ignition key must be in the ºONº
position.
The sun shade can be opened or closed manually. However,
if you open the moon roof, the sun shade will be opened with
the moon roof. To close the moon roof, push the switch on the front side.
The moon roof will fully close. To stop partway, push the
same switch or ºTILTº switch.
SS15012
� 1Tilt up 2Lower
To tilt up the rear end of the moon roof fully, push the
switch on the rear side or on the front side to lower it.
To operate the moon roof, the ignition key must be in the ºONº
position.
Key off operation:
Even if the ignition key is turned to the
ºACCº or ºLOCKº position, the moon roof can be operated until
either of the front doors is opened (or for about 45 seconds).
Page 99 of 378
 EXTERIOR EQUIPMENT
86
Jam protection function
During closing operation, the moon roof stops and is open if
something gets caught into the roof opening.
If the moon roof receives a strong impact, this")
EXTERIOR EQUIPMENT
86
Jam protection function
During closing operation, the moon roof stops and is open if
something gets caught into the roof opening.
If the moon roof receives a strong impact, this function may
work even if nothing is caught.
CAUTION
To avoid serious personal injury, you must do the
following.
�While the vehicle is moving, always keep the heads,
hands and other parts of the bodies of all occupants
away from the roof opening. Otherwise, they could
be seriously injured if the vehicle stops suddenly or
if the vehicle is involved in an accident.
� Always make sure nobody places his/her head,
hands and other parts of the body in the roof opening
before you close the roof. If someone's neck, head or
hands gets caught in the closing roof, it could result
in a serious injury. When anyone closes the roof, first
make sure it is safe to do so.
� Never leave small children alone in the vehicle,
especially with the ignition key still inserted. They
could use the moon roof switches and get trapped in
the roof opening. Unattended children can be
involved in serious accidents.
� Never sit on top of the vehicle around the roof
opening.
�Never try jamming any part of your body to make the
jam protection function work intentionally.
� The jam protection function may not work if
something gets caught just before the moon roof
fully closed.
Page 116 of 378
 COMFORT ADJUSTMENT
103
CAUTION
�Do not adjust the mirror while the vehicle is moving.
Doing so may cause the driver to mishandle the
vehicle and an accident may occur, resulting in
personal death or i")
COMFORT ADJUSTMENT
103
CAUTION
�Do not adjust the mirror while the vehicle is moving.
Doing so may cause the driver to mishandle the
vehicle and an accident may occur, resulting in
personal death or injuries.
� Since the mirror surfaces can get hot, keep your
hands off them when the rear window and outside
rear view mirror defogger switch is on or operate the
wipers.
Power rear view mirror control
SV16012
� 1Master switch 2Control switch
To adjust the power rear view mirror, first place the master
switch at ºLº (left) or ºRº (right), and push the contro\
l
switch on the desired side.
The power rear view mirror can be adjusted when the key is in
the ºACCº or ºONº position.
NOTICE
If ice should jam the mirror, do not operate the control
or scrape the mirror face. Use a spray de±icer to free themirror.
Folding rear view mirrors
SS16030
To fold the rear view mirror, push backward.
The rear view mirrors can be folded backward for parking in
restricted areas.
CAUTION
Do not drive with the mirrors folded backward. Both the
driver and passenger side rear view mirrors must be
extended and properly adjusted before driving.
Page 117 of 378
 COMFORT ADJUSTMENT
104
INSIDE REAR VIEW MIRROR
SL16013
�Type A 1Day 2Night
When driving at night, pull the lever toward you to reduce
the glare from the headlights of vehicles behind you.
Before adj")
COMFORT ADJUSTMENT
104
INSIDE REAR VIEW MIRROR
SL16013
�Type A 1Day 2Night
When driving at night, pull the lever toward you to reduce
the glare from the headlights of vehicles behind you.
Before adjusting the mirror to the position with most clarity,
push the day±night change lever forward (daylight driving
position).
Remember that by reducing glare you also lose some rear view
clarity.
CAUTION
Do not adjust the mirror while the vehicle is moving.
Doing so may cause the driver to mishandle the vehicle
and an accident may occur resulting in personal death
or injuries.
SV16128
�Type B
Adjust the m irror so that you can just see the rear of your
vehicle in the mirror.
Pushing the switch changes the mode between ºAUTOº
and ºDAYº.
The indicator comes on when the ºAUTOº mode is selected.
ºDAYº mode: The mirror surface is normal.
ºAUTOº mode: If the mirror detects light from the
headlights of the vehicle behind you, the mirror surface
darkens slightly to reduce the reflected light.
When the inside rear view mirror surface changes, the outside
rear view mirror surfaces will also become darker.
When the ignition key is inserted and turned on, the inside rear
view mirror always turns on in the ºAUTOº mode.
When the outside air temperature is low, it may take a little
longer for the mirror to darken in response to the detection of
headlights.
 EXTERIOR EQUIPMENT
83
Luggage security system
SS15013
After closing the trunk lid, insert the master key and turn
it counterclockwise to deactivate the lock release lever.
At this time, the trunk lid")