Page 68 of 378
INTERIOR EQUIPMENT
55
INTERIOR LIGHTS
SS14003
To turn on the interior light, slide the switch.
With the switch in the ºDOORº position, the light comes on
when any of the doors are opened. After all the doors are
closed, the light remains on for about 15 seconds and then
goes out.
However, in the following cases, the light goes out
immediately:
1. All the doors are closed when the ignition key is in ºACCº
or ºONº position.
2. The ignition key is turned to ºACCº or ºONº when the light
is still on.
3. All the doors are locked when the light is still on.
4. One door is closed with the lock button pushed in while the
other doors are locked.
PERSONAL LIGHTS
SS14005
�With moon roof
SS14006
�Without moon roof
To turn on the personal light, push the switch. To turn it
off, push the switch again.
Page 69 of 378
INTERIOR EQUIPMENT
56
IGNITION SWITCH LIGHT
SS14007
For easy access to the ignition switch, the ignition switch
light comes on when any of the doors are opened.
The light remains on for about 15 seconds and goes out after
all the doors are closed. However, the light goes out
immediately when all the doors are locked or the ignition key
is in the ºACCº or ºONº position.
LUGGAGE COMPARTMENT LIGHT
SV14009
To turn on the luggage compartment light, open the back
door or push the switch. Closing the back door will turn
the light off.
Page 73 of 378
 INTERIOR EQUIPMENT
60The power outlet is designed for power supply for car
accessories.
The ignition key must be in the ºACCº or ºONº position for t\
he
power outlet to be used.
NOTICE
�In the con")
INTERIOR EQUIPMENT
60The power outlet is designed for power supply for car
accessories.
The ignition key must be in the ºACCº or ºONº position for t\
he
power outlet to be used.
NOTICE
�In the console: To prevent the fuse from being blown,
do not use the electricity over the total vehiclecapacity of 12V 3.5A.
�In the luggage compartment: To prevent the fusefrom being blown, do not use the electricity over thetotal vehicle capacity of 12V/120W.
�To prevent the battery from being discharged, do notuse the power outlet longer than necessary when theengine is not running.
�Close the power outlet lid when the power outlet isnot in use. Inserting a foreign object other than theappropriate plug that fits the outlet, or allowing anyliquid into the outlet may cause electrical failure or
short circuits.
GLOVE BOX
SS14012
� 1Unlock 2Open 3Lock
To open the glove box door, pull the lever. To lock the
glove box door, insert the master key and turn it
clockwise.
With the tail lights on, the glove box light will come on when the
glove box door is open.
CAUTION
To reduce the chance of injury in case of an accident or
a sudden stop, always keep the glove box door closed
while driving.
Page 74 of 378
 INTERIOR EQUIPMENT
61
GARAGE DOOR OPENER
The garage door opener (HomeLink� Universal
Transceiver) is manufactured under license from
HomeLink
� and can be programmed to operate garage
doors, gates, en")
INTERIOR EQUIPMENT
61
GARAGE DOOR OPENER
The garage door opener (HomeLink� Universal
Transceiver) is manufactured under license from
HomeLink
� and can be programmed to operate garage
doors, gates, entry doors, door locks, home lighting
systems, and security systems, etc.
(a) Programming the HomeLink�
SV14007
� 1Buttons 2Indicator light
The HomeLink� in your vehicle has 3 buttons and you can
store one program for each button.
To ensure correct programming into the HomeLink
�, install a
new battery in the hand± held transmitter prior to
programming. The battery side of the hand± held transmitter must be pointed
away from the HomeLink
� during the programming process.
For Canadian users, follow the procedure in ªProgramming an
entrance gate/Programming all devices in the Canadian
marketº.
1. Decide which of 3 HomeLink
� buttons you want to
program.
2. Place your hand± held garage transmitter 25 to 75 mm (1
to 3 in.) away from the surface of the HomeLink
�.
Keep the indicator light on the HomeLink
� in view while
programming.
3. Simultaneously press and hold the hand± held garage
transmitter button along with the selected HomeLink
� button.
4. When the indicator light on the HomeLink
� changes from
a slow to a rapid flash after 20 seconds, you can release both
buttons.
5. Test the operation of the HomeLink
� by pressing the newly
programmed button. If programming a garage door opener,
check to see if the garage door opens and closes.
If the garage door does not operate, identify if your garage
transmitter is of the ªRolling Codeº type. Press and hold the
programmed HomeLink
� button. The garage door has the
rolling code feature if the indicator light (on the HomeLink�)
flashes rapidly and then remains lit after 2 seconds. If your
garage transmitter is the ªRolling Codeº type, proceed to the
heading ªProgramming a rolling code systemº.
6. Repeat steps 2 through 5 for each remaining HomeLink
�
button to program another device.
Page 75 of 378
 INTERIOR EQUIPMENT
62
Programming a rolling code system
If your device is ªRolling Codeº equipped, it is necessary
to follow steps 1 through 4 under the heading
ªProgramming the HomeLink
�º before")
INTERIOR EQUIPMENT
62
Programming a rolling code system
If your device is ªRolling Codeº equipped, it is necessary
to follow steps 1 through 4 under the heading
ªProgramming the HomeLink
�º before proceeding with
the steps listed below.
1. Locate the ªtrainingº button on the ceiling mounted garage
door opener motor. The exact location and color of the button
may vary by brand of garage door opener. Refer to the owner's
guide supplied by the garage door opener manufacturer for the
location of this ªtrainingº button.
2. Press the ªtrainingº button on the ceiling mounted garage
door opener motor.
Following this step, you have 30 seconds in which to initiate
step 3 below.
3. Press and release the vehicle's programmed HomeLink
�
button twice. The garage door may open. If the door does
open, the programming process in complete. If the door does
not open, press and release the button a third time. This third
press and release will complete the programming process by
opening the garage door.
The ceiling mounted garage door opener motor should now
recognize the HomeLink
� unit and be able to activate the
garage door up/down.
4. Repeat steps 1 through 3 for each remaining HomeLink
�
button to program another rolling code system.
Programming an entrance gate /
Programming all devices in the Canadian
market
1. Decide which of the 3 HomeLink� buttons you want to
program.
2. Place your hand± held gate/device transmitter 25 to 75 mm
(1 to 3 in.) away from the surface of the HomeLink
�.
Keep the indicator light on the HomeLink
� in view while
programming.
3. Press and hold the selected HomeLink
� button.
4. Continuously press and release (cycle) the hand± held
gate/device transmitter button every two seconds until step 5
is complete.
5. When the indicator light on the HomeLink
� changes from
a slow to a rapid flash after 20 seconds, you can release both
buttons.
6. Test the operation of the HomeLink
� by pressing the newly
programmed button. Check to see if the gate/device operates
correctly.
7. Repeat steps 1 through 6 for each remaining HomeLink
�
button to program another device.
Programming other devices
To program other devices such as home security systems,
home door locks or lighting, contact your authorized Lexus
dealer for assistance.
Page 95 of 378
EXTERIOR EQUIPMENT
82
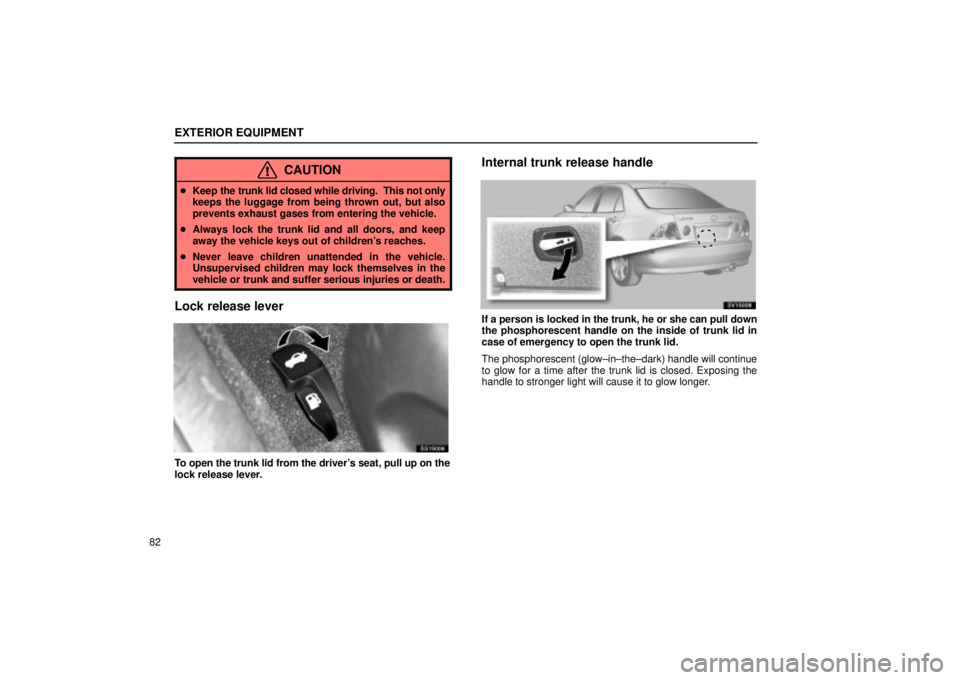
CAUTION
�Keep the trunk lid closed while driving. This not only
keeps the luggage from being thrown out, but also
prevents exhaust gases from entering the vehicle.
� Always lock the trunk lid and all doors, and keep
away the vehicle keys out of children's reaches.
� Never leave children unattended in the vehicle.
Unsupervised children may lock themselves in the
vehicle or trunk and suffer serious injuries or death.
Lock release lever
SS15006
To open the trunk lid from the driver's seat, pull up on the
lock release lever.
Internal trunk release handle
SV15008
If a person is locked in the trunk, he or she can pull down
the phosphorescent handle on the inside of trunk lid in
case of emergency to open the trunk lid.
The phosphorescent (glow±in±the±dark) handle will continue
to glow for a time after the trunk lid is closed. Exposing the
handle to stronger light will cause it to glow longer.
Page 96 of 378
EXTERIOR EQUIPMENT
83
Luggage security system
SS15013
After closing the trunk lid, insert the master key and turn
it counterclockwise to deactivate the lock release lever.
At this time, the trunk lid can be opened only by the
phosphorescent handle lever inside the trunk.
FUEL TANK CAP
SS15008
1. To open the fuel filler door, pull the lever up.
When refueling, turn off the engine.
CAUTION
�Do not smoke, cause sparks or allow open flames
when refueling. The fumes are flammable.
� When opening the cap, do not remove the cap
quickly. In hot weather, fuel under pressure could
cause injury by spraying out of the filler neck if the
cap is suddenly removed.
Page 98 of 378
 EXTERIOR EQUIPMENT
85
MOON ROOF
SV15003
� 1Open 2Close
To slide open the moon roof, push the switch on the rear
side briefly. The moon roof will open and stop partway 80
mm (3.2 in.) from the fully")
EXTERIOR EQUIPMENT
85
MOON ROOF
SV15003
� 1Open 2Close
To slide open the moon roof, push the switch on the rear
side briefly. The moon roof will open and stop partway 80
mm (3.2 in.) from the fully opened position. When you
push the switch again, the moon roof will open fully. To
stop partway, push the same switch or ºTILTº switch
briefly while the moon roof is moving.
As driving with the moon roof opened fully will cause wind
throbs, we recommend you to drive with the moon roof partway
80 mm (3.2 in.) from the fully opened position.
To operate the moon roof, the ignition key must be in the ºONº
position.
The sun shade can be opened or closed manually. However,
if you open the moon roof, the sun shade will be opened with
the moon roof. To close the moon roof, push the switch on the front side.
The moon roof will fully close. To stop partway, push the
same switch or ºTILTº switch.
SS15012
� 1Tilt up 2Lower
To tilt up the rear end of the moon roof fully, push the
switch on the rear side or on the front side to lower it.
To operate the moon roof, the ignition key must be in the ºONº
position.
Key off operation:
Even if the ignition key is turned to the
ºACCº or ºLOCKº position, the moon roof can be operated until
either of the front doors is opened (or for about 45 seconds).
 INTERIOR EQUIPMENT
55
INTERIOR LIGHTS
SS14003
To turn on the interior light, slide the switch.
With the switch in the ºDOORº position, the light comes on
when any of the doors are opened. After all")
 INTERIOR EQUIPMENT
56
IGNITION SWITCH LIGHT
SS14007
For easy access to the ignition switch, the ignition switch
light comes on when any of the doors are opened.
The light remains on for about 15 secon")
 EXTERIOR EQUIPMENT
83
Luggage security system
SS15013
After closing the trunk lid, insert the master key and turn
it counterclockwise to deactivate the lock release lever.
At this time, the trunk lid")