Page 199 of 307
STARTING AND DRIVING
186
�Driving on rough, gravel or snow±covered roads.
� Driving with tire chains installed.
� Driving over the steps such as the joints on the road.
� Driving on roads where the road surface is pitted or
has other differences in surface height.
Install all 4 tires of specified size at appropriate
pressure: The anti±lock brake system detects vehicle
speeds using the speed sensors for respective wheels'
turning speeds. The use of tires other than specified
may fail to detect the accurate turning speed resulting
in a longer stopping distance.ºABSº warning light
SV31014
�U.S.A.
SV31031
�CANADA
The light comes on when the ignition key is turned to the ºONº
position. If the anti±lock brake system works properly, the light
turns off after a few seconds. Thereafter, if the system
malfunctions, the light comes on again.
Page 200 of 307
 STARTING AND DRIVING
187
When the ºABSº warning light is on (and the brake system
warning light is off), the anti±lock brake system and/or the
traction control system do/does not operate, but the b")
STARTING AND DRIVING
187
When the ºABSº warning light is on (and the brake system
warning light is off), the anti±lock brake system and/or the
traction control system do/does not operate, but the brake
system still operates conventionally.
When the ºABSº warning light is on (and the brake system
warning light is off), the anti±lock brake system and/or the
traction
control system do/does not operate so that the wheels
could lock up during a sudden braking or braking on slippery
road surfaces.
If either of the following conditions occurs, this indicates
a malfunction somewhere in the parts monitored by the
warning light system. Contact your Lexus dealer as soon
as possible to service the vehicle.
� The light does not come on when the ignition key is turned
to the ºONº position, or remains on.
� The light comes on while you are driving.
A warning light turning on briefly during operation does not
indicate a problem.
CAUTION
If the ºABSº warning light remains on together with the
brake system warning light, immediately stop your
vehicle at a safe place and contact your Lexus dealer.
In this case, not only the anti±lock brake system will fail
but also the vehicle will become extremely unstable
during braking.
Drum±in±disc type parking brake system
Your vehicle has a drum±in±disc type parking brake system.
This type of brake system needs bedding±down of the brake
shoes periodically or whenever the parking brake shoes
and/or drums are replaced.
Have your Lexus dealer perform the bedding±down.
Page 206 of 307
 DRIVING TIPS
193
TIPS FOR DRIVING IN VARIOUSCONDITIONS
�Always slow down in gusty crosswinds. This will allow you
much better control.
� Drive slowly onto curbs and, if possible, at a right angle.
Av")
DRIVING TIPS
193
TIPS FOR DRIVING IN VARIOUSCONDITIONS
�Always slow down in gusty crosswinds. This will allow you
much better control.
� Drive slowly onto curbs and, if possible, at a right angle.
Avoid driving onto high, sharp±edged objects and other
road hazards. Failure to do so can lead to severe tire
damage resulting in tire bursts.
� When parking on a hill, turn the front wheels until they touch
the curb so that the vehicle will not roll. Apply the parking
brake, and place the transmission in ºPº. If necessary, block
the wheels.
� Washing your vehicle or driving through deep water may get
the brakes wet. To see whether they are wet, check that
there is no traffic near you and then press the pedal lightly.
If you do not feel a normal braking force, the brakes are
probably wet. To dry them, drive the vehicle cautiously while
lightly pressing the brake pedal with the parking brake
applied. If they still do not work safely, pull to the side of the
road and call a Lexus dealer for assistance.
CAUTION
� Before driving off, make sure the parking brake is
fully released and that the parking brake reminder
light is off.
� Do not leave your vehicle unattended while the
engine is running.
�Do not rest your foot on the brake pedal while driving.
It can cause dangerous overheating, needless wear,
and poor fuel economy.
� To drive down a long or steep hill, reduce your speed
and downshift. Remember, if you ride the brakes
excessively, they may overheat and not work
properly. See page 175.
� Be careful when accelerating, upshifting,
downshifting or braking on a slippery surface. The
abrupt change in engine speed, such as sudden
acceleration or engine braking, could cause the
vehicle to spin or skid.
� Do not drive in excess of the speed limit. Even if the
legal speed limit permits it, do not drive over 140 km/h
(85 mph) unless your vehicle has high±speed
capability tires. Driving over 140 km/h (85 mph) may
result in tire failure, loss of control and possible
injury. Be sure to consult a tire dealer to determine
whether the tires on your vehicle are high±speed
capability tires or not before driving at such speeds.
� Do not continue normal driving when the brakes are
wet. If they are wet, your vehicle will require a longer
stopping distance, and it may pull to one side when
the brakes are applied. Also, the parking brake will
not hold the vehicle securely.
Page 207 of 307
 DRIVING TIPS
194
WINTER DRIVING TIPS
Make sure you have a proper freeze protection of engine
coolant.
Your coolant must contain ethylene±glycol type coolant for a
proper corrosion protection of alumi")
DRIVING TIPS
194
WINTER DRIVING TIPS
Make sure you have a proper freeze protection of engine
coolant.
Your coolant must contain ethylene±glycol type coolant for a
proper corrosion protection of aluminum components. Use
ºToyota Long Life Coolantº or equivalent. See ºChecking the
engine coolant levelº on page 245 for instructions.
NOTICE
Do not use alcohol type antifreeze or plain water alone.
When it is extremely cold, we recommend to use 60% solution
for your Lexus, to provide protection down to about ±50�C
(±58 �F). Do not use more than 70% solution for better coolant
performance.
Check the condition of the battery and cables.
Cold temperatures reduce the capacity of any battery, so it
must be in top shape to provide enough power for winter
starting. Page 268 tells you how to visually inspect the battery.
Your Lexus dealer and most service stations will be pleased to
check the battery charge level.
Make sure the engine oil viscosity is suitable for the cold
weather.
See page 244 for recommended viscosity. Leaving a heavy
summer oil in your vehicle during winter months may cause
harder starting. If you are not sure about which oil to use, call
your Lexus dealer ± they will be pleased to help. Check the electronic ignition system for loose
connections or obvious damage.
Keep the door locks from freezing.
Squirt
lock de±icer or glycerine into the locks to keep them from
freezing.
Use a washer fluid containing an antifreeze solution.
This product is available at your Lexus dealer and most auto
parts stores. Follow the manufacturer's directions for how
much to mix with water.
NOTICE
Do not use engine antifreeze or any other substitute because it may damage your vehicle's paint.
Do not use your parking brake when there is a possibility
it could freeze.
When parking, put the transmission into ºPº and block the front
wheels. Do not use the parking brake, or snow or water
accumulated in and around the parking brake mechanism may
freeze the parking brake, making it hard to release.
Keep ice and snow from accumulating under the fenders.
Ice and snow built up under your fenders can make steering
difficult. During bad winter driving, stop and check under the
fenders occasionally.
Page 212 of 307
SECTION 4
199
IN CASE OF AN EMERGENCY
If your engine stalls while driving200
. . . . . . . . . . . . . . . . . . . . . . . . . . .
If your vehicle will not start 200
. . . . . . . . . . . . . . . . . . . . . . . . . . . . . . . .
If your vehicle overheats 204
. . . . . . . . . . . . . . . . . . . . . . . . . . . . . . . . . .
If you have a flat tire 205
. . . . . . . . . . . . . . . . . . . . . . . . . . . . . . . . . . . . .\
.
If your vehicle needs to be towed 214
. . . . . . . . . . . . . . . . . . . . . . . . . .
If you cannot shift automatic transmission selector lever 218
. . . . . .
If you lose your keys or lock yourself out 219
. . . . . . . . . . . . . . . . . . . .
Page 219 of 307
 IN CASE OF AN EMERGENCY
206
�Stop the vehicle on a level firm ground, firmly set the
parking brake and put the transmission in ºPº. Block
the wheel diagonally opposite to the one being
changed if")
IN CASE OF AN EMERGENCY
206
�Stop the vehicle on a level firm ground, firmly set the
parking brake and put the transmission in ºPº. Block
the wheel diagonally opposite to the one being
changed if necessary.
� Make sure to set the jack properly in the jack point.
Raising the vehicle with jack improperly positioned
will damage the vehicle or may allow the vehicle to fall
off the jack and cause personal injury.
� Never get under the vehicle when the vehicle is
supported by the jack alone.
� Use the jack only for lifting your vehicle during wheel
changing.
� Do not raise the vehicle with someone in the vehicle.
� When raising the vehicle, do not put an object on or
under the jack.
� Raise the vehicle only high enough to remove and
change the tire.
NOTICE
Do not continue driving with a deflated tire. Driving
even a short distance can damage a tire and wheelbeyond repair.
Spare tire with turning direction indicators
(Some models)
SV41014
The spare tire with turning direction indicators is of a
uni±directional type and is intended for use on the
passenger side of the vehicle.
Installing the wheel on the driver side of the vehicle will not
affect tire performance. If the spare tire is used on the driver
side of the vehicle, it should be used only temporarily and then
replaced with the correct one.
Page 221 of 307
IN CASE OF AN EMERGENCY
208
SV04016
To remove the spare tire:
1Remove the tool tray.
2Remove the spare tire cover.
3Loosen the bolt and remove it.
When storing the spare tire, place it with the inner side of the
wheel facing up. Then bolt the tire in place and install the spare
tire cover to prevent the tire from flying forward during a
collision or sudden braking.
SV04018
2. Block the wheel diagonally opposite the flat tire to keep
the vehicle from rolling when it is jacked up.
When blocking the wheel, place a wheel block in front of the
front wheels or behind the rear wheels.
Page 222 of 307
IN CASE OF AN EMERGENCY
209
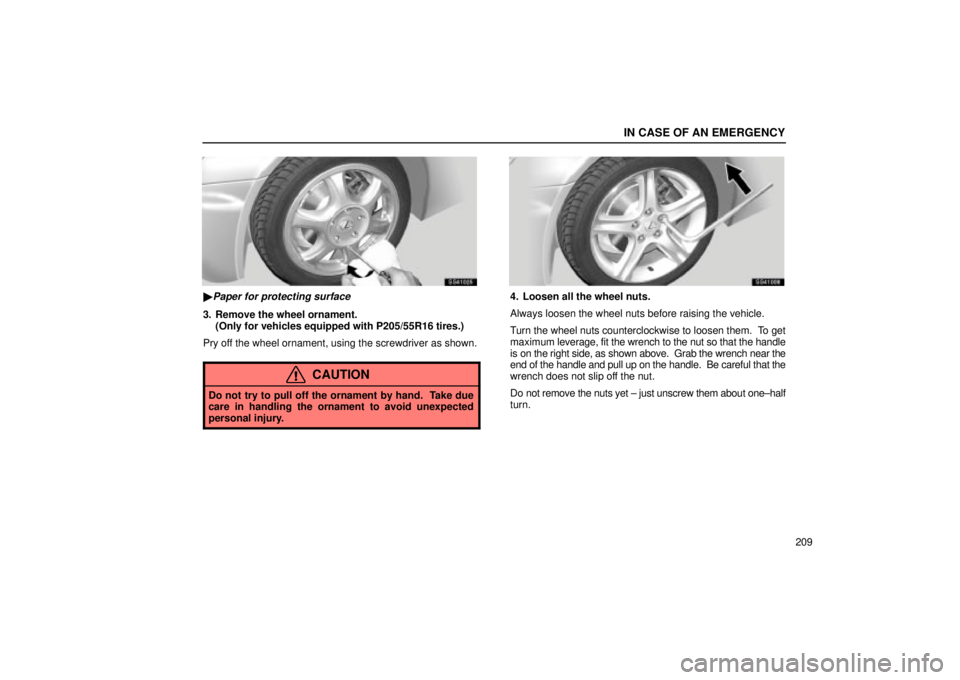
SS41025
�Paper for protecting surface
3. Remove the wheel ornament.(Only for vehicles equipped with P205/55R16 tires.)
Pry off the wheel ornament, using the screwdriver as shown.
CAUTION
Do not try to pull off the ornament by hand. Take due
care in handling the ornament to avoid unexpected
personal injury.
SS41008
4. Loosen all the wheel nuts.
Always loosen the wheel nuts before raising the vehicle.
Turn the wheel nuts counterclockwise to loosen them. To get
maximum leverage, fit the wrench to the nut so that the handle
is on the right side, as shown above. Grab the wrench near the
end of the handle and pull up on the handle. Be careful that the
wrench does not slip off the nut.
Do not remove the nuts yet ± just unscrew them about one±half
turn.

 SECTION 4
199
IN CASE OF AN EMERGENCY
If your engine stalls while driving200
. . . . . . . . . . . . . . . . . . . . . . . . . . .
If your vehicle will not start 200
. . . . . . . . . . . . . . . .")
 IN CASE OF AN EMERGENCY
208
SV04016
To remove the spare tire:
1Remove the tool tray.
2Remove the spare tire cover.
3Loosen the bolt and remove it.
When storing the spare tire, place it with the inn")