Page 81 of 307
 EXTERIOR EQUIPMENT
68
SV15009
2. To remove the fuel tank cap, turn the cap slowly
counterclockwise, then pause slightly before removing it.
After removing the cap, hang the tether as shown in the
illu")
EXTERIOR EQUIPMENT
68
SV15009
2. To remove the fuel tank cap, turn the cap slowly
counterclockwise, then pause slightly before removing it.
After removing the cap, hang the tether as shown in the
illustration.
It is not unusual to hear a slight swoosh when the cap is
opened. When installing the cap, turn the cap clockwise until
you hear a click.
If the cap is not tightened securely, the malfunction indicator
lamp comes on. Make sure the cap is tightened securely.
The indicator lamp goes off after driving several times. If the
indicator lamp does not go off, contact your Lexus dealer as
soon as possible.
CAUTION
� Make sure the cap is tightened securely to prevent
fuel spillage in case of an accident.
� Use only a genuine Lexus fuel tank cap for
replacement. It is designed to regulate fuel tank
pressure.
Refueling the vehicle
As soon as the correctly operated nozzle switches off
automatically for the first time, the tank is full. Do not try
to add more fuel, because fuel may spill out.
Page 82 of 307
 EXTERIOR EQUIPMENT
69
MOON ROOF
SV15003
� 1Open 2Close
To slide open the moon roof, push the switch on the rear
side briefly. The moon roof will open and stop partway 30
mm (1.2 in.) from the fully")
EXTERIOR EQUIPMENT
69
MOON ROOF
SV15003
� 1Open 2Close
To slide open the moon roof, push the switch on the rear
side briefly. The moon roof will open and stop partway 30
mm (1.2 in.) from the fully opened position. When you
push the switch again, the moon roof will open fully. To
stop partway, push the same switch or ºTILTº switch
briefly while the moon roof is moving.
As driving with the moon roof opened fully will cause wind
throbs, we recommend you to drive with the moon roof partway
30 mm (1.2 in.) from the fully opened position.
To operate the moon roof, the ignition key must be in the ºONº
position.
The sun shade can be opened or closed manually. However,
if you open the moon roof, the sun shade will be opened with
the moon roof. To close the moon roof, push the switch on the front side.
The moon roof will fully close. To stop partway, push the
same switch or ºTILTº switch.
SS15012
� 1Tilt up 2Lower
To tilt up the rear end of the moon roof fully, push the
switch on the rear side or on the front side to lower it.
To operate the moon roof, the ignition key must be in the ºONº
position.
Key off operation:
Even if the ignition key is turned to the
ºACCº or ºLOCKº position, the moon roof can be operated until
either of the front doors is opened (or for about 45 seconds).
Page 85 of 307
 COMFORT ADJUSTMENT
72
FRONT SEATS
(MANUAL TYPE)
Front seat precautions
CAUTION
The side airbags are installed in the driver and front
passenger seats. Observe the following precautions.
� Do not lean")
COMFORT ADJUSTMENT
72
FRONT SEATS
(MANUAL TYPE)
Front seat precautions
CAUTION
The side airbags are installed in the driver and front
passenger seats. Observe the following precautions.
� Do not lean over the front door when the vehicle is in
use. The side airbag inflates with considerable speed
and force; you may be killed or severely injured.
� Do not modify or replace the seats or the upholstery
of the seats with side airbags. Such changes may
disable the system, or cause the side airbags to
inflate accidentally, resulting in death or serious
injury. Consult your Lexus dealer if you insist on
modifications of this kind.
� Do not use accessories for the seats which cover the
parts where the side airbags inflate. Such
accessories may prevent the side airbags from
activating correctly, causing death or serious injury.
Seat adjustment precautions
Adjust the driver's seat so that the foot pedals, steering wheel
and instrument panel controls are within easy reach of the
driver.
CAUTION
�Do not adjust the seat while the vehicle is moving as
the seat may unexpectedly move and cause the
driver to lose control of the vehicle.
� Be careful that the seat does not hit a passenger,
luggage or the rear seat.
� After adjusting the seat position, try sliding it forward
and backward to make sure it is locked in position.
� After adjusting the seatback, exert body pressure to
make sure it is locked in position.
� Do not put objects under the seats. The objects may
interfere with the seat±lock mechanism or
unexpectedly push up the seat position adjusting
lever; the seat may suddenly move, causing the
driver to lose control of the vehicle.
� While adjusting the seat, do not put your hands under
the seat or near the moving parts. You may catch and
injure your hands of fingers.
Page 86 of 307
COMFORT ADJUSTMENT
73
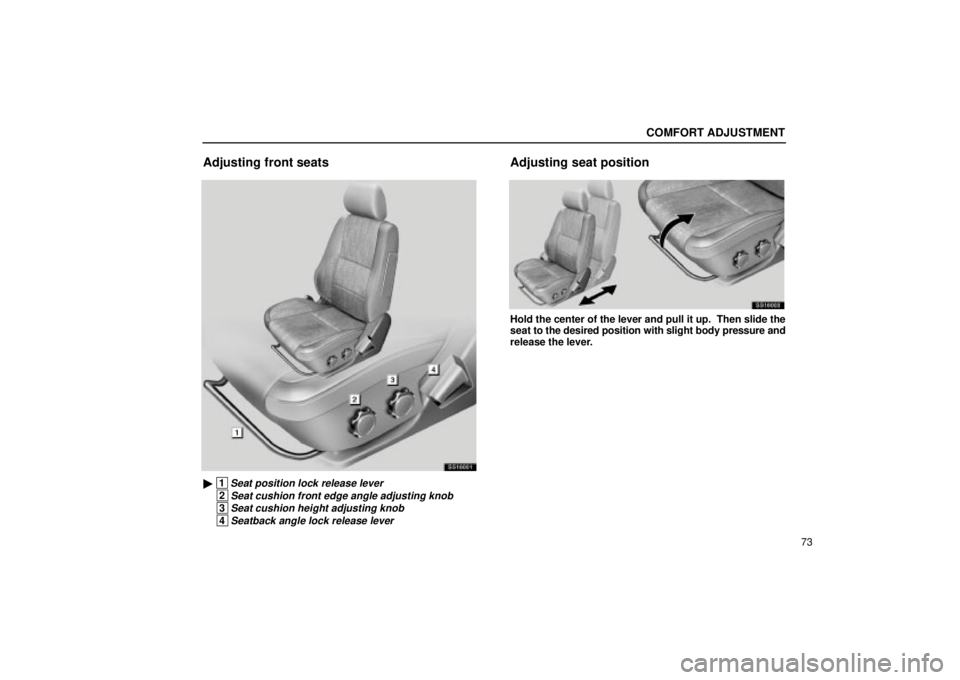
Adjusting front seats
SS16001
� 1Seat position lock release lever
2Seat cushion front edge angle adjusting knob
3Seat cushion height adjusting knob
4Seatback angle lock release lever
Adjusting seat position
SS16003
Hold the center of the lever and pull it up. Then slide the
seat to the desired position with slight body pressure and
release the lever.
Page 92 of 307
COMFORT ADJUSTMENT
79
SV16082
2. Pull the lever, lift the cover (b) up and fix it to the upper
part of the trunk using the magnet attached on the cover
(b).
Be sure to use ºLEXUS Genuine Sports Gear, Bagº for carrying
long objects (ski board, poles, etc.) properly.
For installation and handling of the ºLEXUS Genuine Sports
Gearº, follow the instructions provided with goods.
CAUTION
Be sure to close the cover (a) and (b) when the trunk
storage extension is not in use. Goods in the luggage
compartment may be thrown into the passenger
compartment in a sudden stop or crash resulting in
injury.
HEAD RESTRAINTS
Front seats
SV16006
To raise the head restraint, pull it up. To lower it, press the
lock release button and push the head restraint down. To
move the head restraint forward or rearward, pull or push
on the top.
The head restraint is most effective when it is close to your
head. Therefore, using a cushion on the seatback is not
recommended.
Page 93 of 307
COMFORT ADJUSTMENT
80
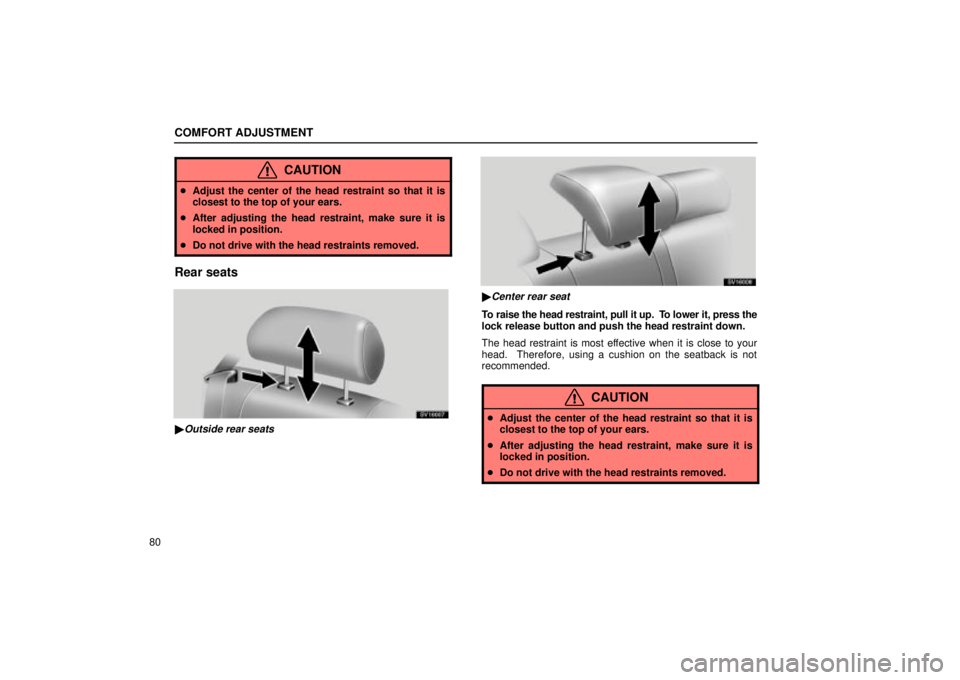
CAUTION
�Adjust the center of the head restraint so that it is
closest to the top of your ears.
� After adjusting the head restraint, make sure it is
locked in position.
� Do not drive with the head restraints removed.
Rear seats
SV16007
�Outside rear seats
SV16008
�Center rear seat
To raise the head restraint, pull it up. To lower it, press the
lock release button and push the head restraint down.
The head restraint is most effective when it is close to your
head. Therefore, using a cushion on the seatback is not
recommended.
CAUTION
�Adjust the center of the head restraint so that it is
closest to the top of your ears.
� After adjusting the head restraint, make sure it is
locked in position.
� Do not drive with the head restraints removed.
Page 94 of 307
 COMFORT ADJUSTMENT
81
TILT STEERING WHEEL
SV16064
To change the steering wheel angle, hold the steering
wheel, pull the lock release lever toward you, tilt the
steering wheel to the desired angle and")
COMFORT ADJUSTMENT
81
TILT STEERING WHEEL
SV16064
To change the steering wheel angle, hold the steering
wheel, pull the lock release lever toward you, tilt the
steering wheel to the desired angle and release the lever.
When the steering wheel is in a low position, it will spring up as
you release the lock release lever.
CAUTION
� Do not adjust the steering wheel while the vehicle is
moving. It may cause the driver to mishandle the
vehicle and an accident may occur resulting in death
or injuries.
� After adjusting the steering wheel, try moving it up
and down to make sure it is locked in position.
OUTSIDE REAR VIEW MIRRORS
SV16010
Adjust the mirror so that you can just see the side of your
vehicle in the mirror.
Be careful when judging the size or distance of any object seen
in the outside rear view mirror on the passenger's side. It is a
convex mirror with a curved surface. Any object seen in a
convex m irror will look smaller and farther away than if seen in
a normal flat mirror.
When the ignition switch is turned ºONº, the heater panels in
the outside rear view mirrors will quickly clear the surface.
The outside rear view mirror heater will operate while the
ignition switch is ºONº.
Page 97 of 307
 COMFORT ADJUSTMENT
84Injured person. Lexus recommends the use of a seat belt.
Depending on the injury, first check with your doctor for specific
recommendations.
CAUTION
Persons should ride in their")
COMFORT ADJUSTMENT
84Injured person. Lexus recommends the use of a seat belt.
Depending on the injury, first check with your doctor for specific
recommendations.
CAUTION
Persons should ride in their seats properly wearing
their seat belts whenever the vehicle is moving.
Otherwise, they are much more likely to suffer serious
bodily injury or death in the event of sudden braking or
a collision.
When using the seat belts, observe the following:
�
Use the belt for only one person at a time. Do not use
a single belt for two or more people ± even children.
� Avoid reclining the seatbacks too much. The seat
belts provide maximum protection when the
seatbacks are in the upright position. (See
ºAdjusting seatback angleº on page 74.)
� Be careful not to damage the belt webbing or
hardware. Take care that they do not get caught or
pinched in the seat or doors.
� Inspect the belt system periodically. Check for cuts,
fraying, and loose parts. Damaged parts should be
replaced. Do not disassemble or modify the system.
�Keep the belts clean and dry. If they need cleaning,
use a mild soap solution or lukewarm water. Never
use bleach, dye, or abrasive cleaners ± they may
severely weaken the belts. (See ºCleaning the
interiorº on page 284 for instructions.)
� Replace the belt assembly (including bolts) if it has
been used in a severe impact. The entire assembly
should be replaced even if damage is not obvious.
Fastening front and rear seat belts
SV16013
Adjust the seat as needed and sit up straight and well back
in the seat. To fasten your belt, pull it out of the retractor
and insert the tab into the buckle.
You will hear a click when the tab locks into the buckle.
The seat belt length automatically adjusts to your size and the
seat position.
 COMFORT ADJUSTMENT
79
SV16082
2. Pull the lever, lift the cover (b) up and fix it to the upper
part of the trunk using the magnet attached on the cover
(b).
Be sure to use ºLEXUS Genuine Sports Gear,")