Page 123 of 307
COMFORT ADJUSTMENT
11 0
SV16035
CAUTION
Push and pull the child restraint system in different
directions to be sure it is secure. Follow all the
installation instructions provided by its manufacturer.
SV16070
4. To remove the infant seat, press the buckle±release button
and allow the belt to retract completely. The belt will move
freely again and be ready to work for an adult or older child
passenger.
Page 126 of 307
 COMFORT ADJUSTMENT
11 3
SV16039
1. Run the lap and shoulder belt through or around the
convertible seat following the instructions provided by its
manufacturer and inserting the tab into the buckle ta")
COMFORT ADJUSTMENT
11 3
SV16039
1. Run the lap and shoulder belt through or around the
convertible seat following the instructions provided by its
manufacturer and inserting the tab into the buckle taking care
not to twist the belt. Keep the lap portion of the belt tight.
CAUTION
�After inserting the tab, make sure the tab and buckle
are locked and that the lap and shoulder portions of
the belt are not twisted.
� Do not insert coins, clips, etc. in the buckle as this
may prevent you from properly latching the tab and
buckle.
� If the seat belt does not function normally,
immediately contact your Lexus dealer. Do not use
the child restraint seat until the seat belt is fixed. It
cannot protect your child from injury.
SV16040
2. Fully extend the shoulder belt to put it in the lock mode.
When the belt is then retracted slightly, it cannot be extended.
To hold the convertible seat securely, make sure the belt is in
the lock mode before letting the belt retract.
SV16041
3. While pressing the convertible seat firmly against the seat
cushion and seatback, let the shoulder belt retract as far as it
will go to hold the convertible seat securely.
Page 127 of 307
COMFORT ADJUSTMENT
11 4
SV16042
CAUTION
Push and pull the child restraint system in different
directions to be sure it is secure. Follow all the
installation instructions provided by its manufacturer.
SV16058
4. To remove the convertible seat, press the buckle±release
button and allow the belt to retract completely. The belt will
move freely again and be ready to work for an adult or older
child passenger.
Page 131 of 307
COMFORT ADJUSTMENT
11 8
SV16072
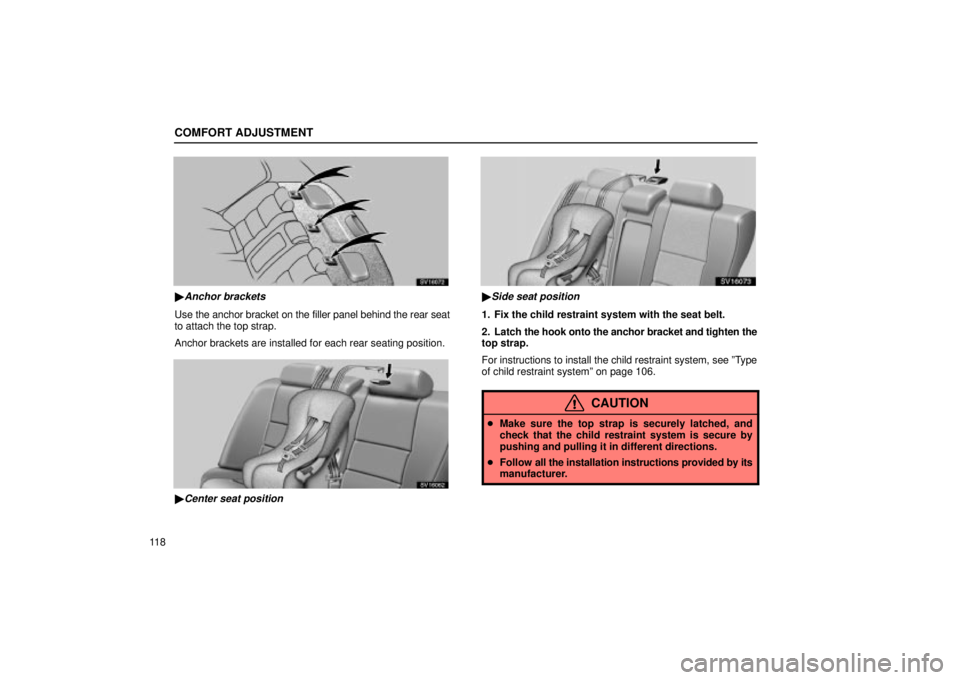
�Anchor brackets
Use the anchor bracket on the filler panel behind the rear seat
to attach the top strap.
Anchor brackets are installed for each rear seating position.
SV16062
�Center seat position
SV16073
�Side seat position
1. Fix the child restraint system with the seat belt.
2. Latch the hook onto the anchor bracket and tighten the
top strap.
For instructions to install the child restraint system, see ºType
of child restraint systemº on page 106.
CAUTION
� Make sure the top strap is securely latched, and
check that the child restraint system is secure by
pushing and pulling it in different directions.
� Follow all the installation instructions provided by its
manufacturer.
Page 190 of 307
 STARTING AND DRIVING
177
(f) Parking
SV31026
� 1Brake pedal 2Parking brake lever
3ºPº (Park) position
1. Bring the vehicle to a complete stop.
2. Pull the parking brake lever up fully to securely")
STARTING AND DRIVING
177
(f) Parking
SV31026
� 1Brake pedal 2Parking brake lever
3ºPº (Park) position
1. Bring the vehicle to a complete stop.
2. Pull the parking brake lever up fully to securely apply the
parking brake.
3. With the brake pedal held down with your foot, shift the
selector lever to the ºPº position.
CAUTION
Never attempt to move the selector lever into ºPº under
any circumstances while the vehicle is moving. Serious
mechanical damage and loss of vehicle control may
result.
(g) Good driving practice
If the transmission repeatedly shifts up and down between the
fourth and overdrive gears when climbing a gentle slope, shift
the selector lever to the ºMº position and select the forth gear
by pushing the transmission switch. Be sure to shift the
selector lever to the ºDº position after climbing the slope.
CAUTION
Always keep your foot on the brake pedal while stopped
with the engine running. This prevents the vehicle from
creeping.
NOTICE
Do not hold the vehicle on an upgrade with the accelerator pedal. This can cause the transmission tooverheat. Always use the brake pedal or parking brake.
Page 206 of 307
 DRIVING TIPS
193
TIPS FOR DRIVING IN VARIOUSCONDITIONS
�Always slow down in gusty crosswinds. This will allow you
much better control.
� Drive slowly onto curbs and, if possible, at a right angle.
Av")
DRIVING TIPS
193
TIPS FOR DRIVING IN VARIOUSCONDITIONS
�Always slow down in gusty crosswinds. This will allow you
much better control.
� Drive slowly onto curbs and, if possible, at a right angle.
Avoid driving onto high, sharp±edged objects and other
road hazards. Failure to do so can lead to severe tire
damage resulting in tire bursts.
� When parking on a hill, turn the front wheels until they touch
the curb so that the vehicle will not roll. Apply the parking
brake, and place the transmission in ºPº. If necessary, block
the wheels.
� Washing your vehicle or driving through deep water may get
the brakes wet. To see whether they are wet, check that
there is no traffic near you and then press the pedal lightly.
If you do not feel a normal braking force, the brakes are
probably wet. To dry them, drive the vehicle cautiously while
lightly pressing the brake pedal with the parking brake
applied. If they still do not work safely, pull to the side of the
road and call a Lexus dealer for assistance.
CAUTION
� Before driving off, make sure the parking brake is
fully released and that the parking brake reminder
light is off.
� Do not leave your vehicle unattended while the
engine is running.
�Do not rest your foot on the brake pedal while driving.
It can cause dangerous overheating, needless wear,
and poor fuel economy.
� To drive down a long or steep hill, reduce your speed
and downshift. Remember, if you ride the brakes
excessively, they may overheat and not work
properly. See page 175.
� Be careful when accelerating, upshifting,
downshifting or braking on a slippery surface. The
abrupt change in engine speed, such as sudden
acceleration or engine braking, could cause the
vehicle to spin or skid.
� Do not drive in excess of the speed limit. Even if the
legal speed limit permits it, do not drive over 140 km/h
(85 mph) unless your vehicle has high±speed
capability tires. Driving over 140 km/h (85 mph) may
result in tire failure, loss of control and possible
injury. Be sure to consult a tire dealer to determine
whether the tires on your vehicle are high±speed
capability tires or not before driving at such speeds.
� Do not continue normal driving when the brakes are
wet. If they are wet, your vehicle will require a longer
stopping distance, and it may pull to one side when
the brakes are applied. Also, the parking brake will
not hold the vehicle securely.
Page 220 of 307
IN CASE OF AN EMERGENCY
207
Changing procedure
SV04015
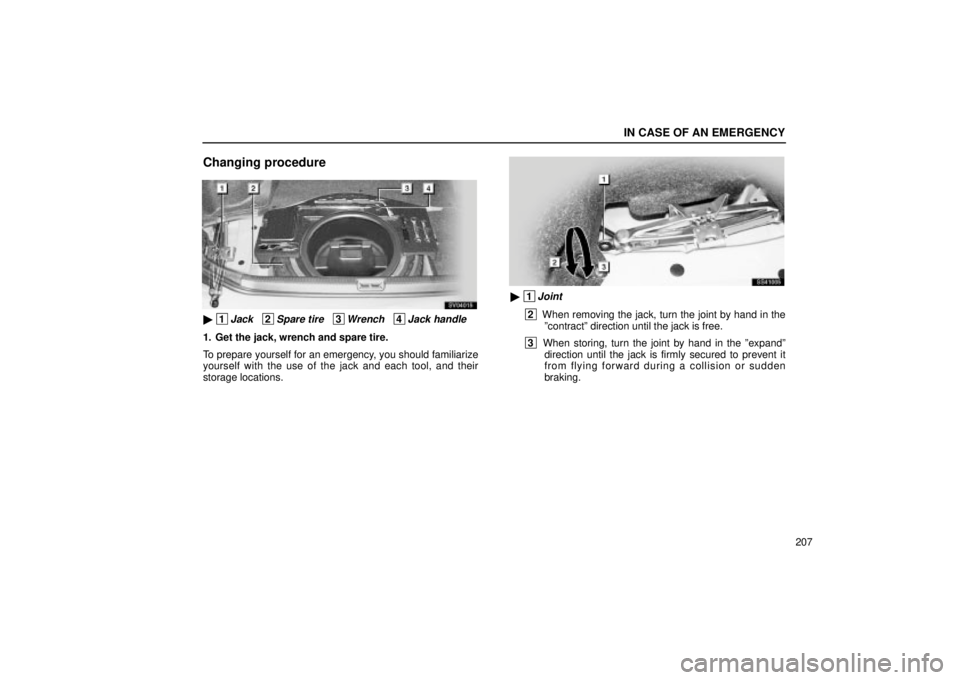
� 1Jack 2Spare tire 3Wrench 4Jack handle
1. Get the jack, wrench and spare tire.
To prepare yourself for an emergency, you should familiarize
yourself with the use of the jack and each tool, and their
storage locations.
SS41005
� 1Joint
2 When removing the jack, turn the joint by hand in the
ºcontractº direction until the jack is free.
3 When storing, turn the joint by hand in the ºexpandº
direction until the jack is firmly secured to prevent it
from flying forward during a collision or sudden
braking.
Page 225 of 307
 IN CASE OF AN EMERGENCY
212
SS41013
8. Reinstall all the wheel nuts finger tight.
Align the holes in the wheel with the bolts. Then lift up the
wheel and get at least the top bolt started through its")
IN CASE OF AN EMERGENCY
212
SS41013
8. Reinstall all the wheel nuts finger tight.
Align the holes in the wheel with the bolts. Then lift up the
wheel and get at least the top bolt started through its hole.
Wiggle the tire and press it back over the other bolts.
Reinstall the wheel nuts and tighten them as much as you can
by hand. Press the tire back and see if you can tighten them
more.
SS41014
9. Lower the vehicle completely and tighten the wheel
nuts.
Turn the jack handle counterclockwise to lower the vehicle.
Use only the wheel nut wrench to tighten the nuts. Do not use
other tools or any additional leverage other than your hands,
such as a hammer, pipe or your foot. Make sure the wrench
is securely engaged over the nut.
Tighten each nut a little at a time in the order shown. Repeat
the process until all the nuts are tight.
CAUTION
� When lowering the vehicle, make sure all portions of
your body and all other persons around will not be
injured as the vehicle is lowered to the ground.
� As soon as possible after changing wheels, have the
wheel nuts tightened by torque wrench at 103 N´m
(10.5 kgf´m, 76 ft´lbf.).
 COMFORT ADJUSTMENT
11 0
SV16035
CAUTION
Push and pull the child restraint system in different
directions to be sure it is secure. Follow all the
installation instructions provided by its manufacturer")
 COMFORT ADJUSTMENT
11 4
SV16042
CAUTION
Push and pull the child restraint system in different
directions to be sure it is secure. Follow all the
installation instructions provided by its manufacturer")