Page 71 of 307
INTERIOR EQUIPMENT
58
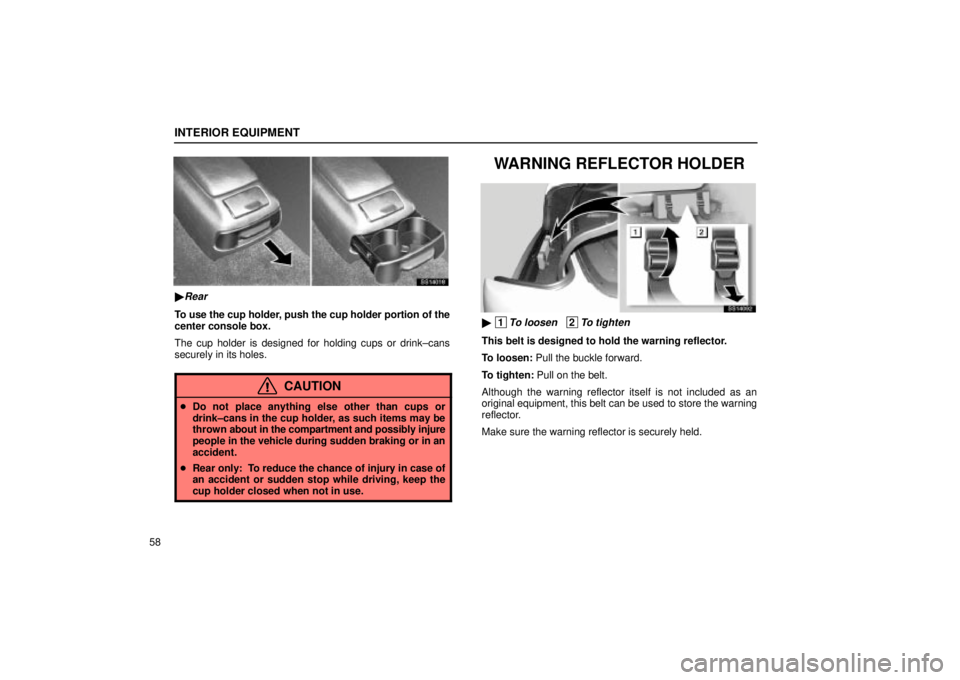
SS14018
�Rear
To use the cup holder, push the cup holder portion of the
center console box.
The cup holder is designed for holding cups or drink±cans
securely in its holes.
CAUTION
�Do not place anything else other than cups or
drink±cans in the cup holder, as such items may be
thrown about in the compartment and possibly injure
people in the vehicle during sudden braking or in an
accident.
� Rear only: To reduce the chance of injury in case of
an accident or sudden stop while driving, keep the
cup holder closed when not in use.
WARNING REFLECTOR HOLDER
SS14092
� 1To loosen 2To tighten
This belt is designed to hold the warning reflector.
To loosen: Pull the buckle forward.
To tighten: Pull on the belt.
Although the warning reflector itself is not included as an
original equipment, this belt can be used to store the warning
reflector.
Make sure the warning reflector is securely held.
Page 72 of 307
INTERIOR EQUIPMENT
59
TIE±DOWN HOOKS
SV14003
To secure your luggage, use the tie±down hooks as
shown above.
See ºLuggage stowage precautionsº on page 61 for
precautions to observe for loading luggage.
CAUTION
To avoid personal injury, keep the tie±down hooks
stored under the carpet when not in use.
FLOOR MAT
SS14019
Use a floor mat of the correct size.
If the floor carpet and floor mat have a hole, then it is designed
for use with a locking clip. Fix the floor mat with locking clip into
the hole in the floor carpet.
Page 73 of 307
INTERIOR EQUIPMENT
60
SS14021a
CAUTION
Make sure the floor mat is properly placed on the floor
carpet. If the floor mat slips and interferes with the
movement of the pedals during driving, it may cause an
accident.
FIRST±AID KIT HOLDER
SS14022a
� 1To loosen 2To tighten
This belt is designed to hold the first±aid kit.
To loosen: Pull the buckle forward.
To tighten: Pull on the belt.
Make sure the first±aid kit is securely held.
Page 74 of 307
INTERIOR EQUIPMENT
61
LUGGAGE STOWAGEPRECAUTIONS
When stowing luggage or cargo in the vehicle, observe
the following:
�Put luggage or cargo in the trunk when at all possible. Be
sure all items are secured in place.
� Be careful to keep the vehicle level. Placing the weight as
far forward as possible helps maintain vehicle balance.
� For better fuel economy, do not carry unnecessary weight.
CAUTION
�Do not place anything on the package tray behind the
rear seatback. Such items may be thrown about and
possibly injure people in the vehicle during sudden
braking or in an accident.
� Do not drive with objects left on top of the instrument
panel. They may interfere with the driver's field of
view. Or they may move during sharp vehicle
acceleration or turning, and impair the driver's
control of the vehicle. In an accident they may injure
the vehicle occupants.
NOTICE
Do not load the vehicle beyond the vehicle capacity
weight specified on the tire pressure label.
Page 77 of 307
EXTERIOR EQUIPMENT
64
HOOD
SS15001
1. To open the hood, pull the hood lock release lever
under the instrument panel. The hood will spring up
slightly.
SV15005
2. Insert your fingers under the hood, push up the
auxiliary catch lever and lift the hood.
SV15002
3. Hold the hood open by inserting the support rod into
the slot.
CAUTION
After inserting the support rod into the slot, make sure
the rod supports the hood securely from falling down on
to your head or body.
NOTICE
Be sure to return the support rod to its clip beforeclosing the hood. Closing the hood with the support rod
up could cause the hood to bend.
Page 78 of 307
 EXTERIOR EQUIPMENT
65
SS15021
In case of unlocking the support rod, lift up the hood a
little, move the support rod and unlock it as shown by the
arrow marks in the illustration.
Before closing the ho")
EXTERIOR EQUIPMENT
65
SS15021
In case of unlocking the support rod, lift up the hood a
little, move the support rod and unlock it as shown by the
arrow marks in the illustration.
Before closing the hood, check to see that you have not
forgotten any tools, rags, etc. and return the support rod to its
clips±this prevents rattles. Then lower the hood and make
sure it locks into place. If necessary, press down gently on the
front edge to lock it.
CAUTION
Before driving, be sure that the hood is securely locked.
Otherwise, the hood may open unexpectedly while
driving and an accident may occur.
TRUNK LID
SS15005c
To unlock the trunk lid, insert the master key and turn it
clockwise.
To close the trunk lid, lower it and press down on it. After
closing the trunk lid, try pulling it up to make sure it is securely
closed.
The trunk lid can be unlocked using the wireless remote control
key. For details, see page 13.
If the theft deterrent system is set, unlock the trunk lid with the
wireless remote control. (For details, see page 120.)
Page 80 of 307
EXTERIOR EQUIPMENT
67
Luggage security system
SS15013
After closing the trunk lid, insert the master key and turn
it counterclockwise to deactivate the lock release lever.
At this time, the trunk lid can be opened only by the
phosphorescent handle lever inside the trunk.
FUEL TANK CAP
SS15008
1. To open the fuel filler door, pull the lever up.
When refueling, turn off the engine.
CAUTION
�Do not smoke, cause sparks or allow open flames
when refueling. The fumes are flammable.
� When opening the cap, do not remove the cap
quickly. In hot weather, fuel under pressure could
cause injury by spraying out of the filler neck if the
cap is suddenly removed.
Page 81 of 307
 EXTERIOR EQUIPMENT
68
SV15009
2. To remove the fuel tank cap, turn the cap slowly
counterclockwise, then pause slightly before removing it.
After removing the cap, hang the tether as shown in the
illu")
EXTERIOR EQUIPMENT
68
SV15009
2. To remove the fuel tank cap, turn the cap slowly
counterclockwise, then pause slightly before removing it.
After removing the cap, hang the tether as shown in the
illustration.
It is not unusual to hear a slight swoosh when the cap is
opened. When installing the cap, turn the cap clockwise until
you hear a click.
If the cap is not tightened securely, the malfunction indicator
lamp comes on. Make sure the cap is tightened securely.
The indicator lamp goes off after driving several times. If the
indicator lamp does not go off, contact your Lexus dealer as
soon as possible.
CAUTION
� Make sure the cap is tightened securely to prevent
fuel spillage in case of an accident.
� Use only a genuine Lexus fuel tank cap for
replacement. It is designed to regulate fuel tank
pressure.
Refueling the vehicle
As soon as the correctly operated nozzle switches off
automatically for the first time, the tank is full. Do not try
to add more fuel, because fuel may spill out.
 INTERIOR EQUIPMENT
59
TIE±DOWN HOOKS
SV14003
To secure your luggage, use the tie±down hooks as
shown above.
See ºLuggage stowage precautionsº on page 61 for
precautions to observe for loading lugg")
 INTERIOR EQUIPMENT
60
SS14021a
CAUTION
Make sure the floor mat is properly placed on the floor
carpet. If the floor mat slips and interferes with the
movement of the pedals during driving, it may cau")
 EXTERIOR EQUIPMENT
64
HOOD
SS15001
1. To open the hood, pull the hood lock release lever
under the instrument panel. The hood will spring up
slightly.
SV15005
2. Insert your fingers under the hood, p")
 EXTERIOR EQUIPMENT
67
Luggage security system
SS15013
After closing the trunk lid, insert the master key and turn
it counterclockwise to deactivate the lock release lever.
At this time, the trunk lid")