Page 1231 of 1672
SUNROOF
76-6-16 REPAIRS
Refit
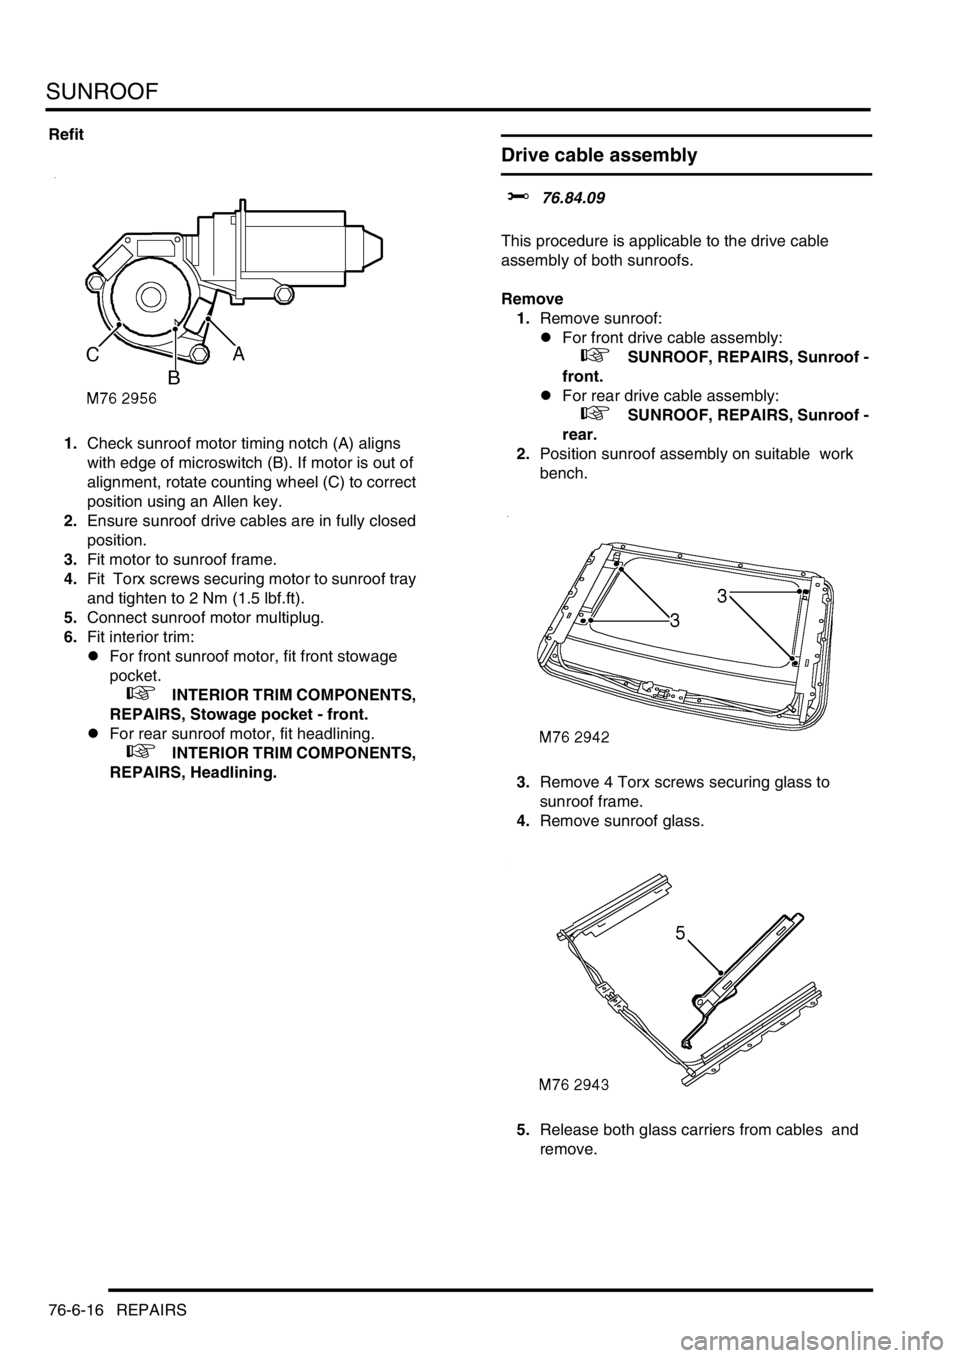
1.Check sunroof motor timing notch (A) aligns
with edge of microswitch (B). If motor is out of
alignment, rotate counting wheel (C) to correct
position using an Allen key.
2.Ensure sunroof drive cables are in fully closed
position.
3.Fit motor to sunroof frame.
4.Fit Torx screws securing motor to sunroof tray
and tighten to 2 Nm (1.5 lbf.ft).
5.Connect sunroof motor multiplug.
6.Fit interior trim:
lFor front sunroof motor, fit front stowage
pocket.
+ INTERIOR TRIM COMPONENTS,
REPAIRS, Stowage pocket - front.
lFor rear sunroof motor, fit headlining.
+ INTERIOR TRIM COMPONENTS,
REPAIRS, Headlining.
Drive cable assembly
$% 76.84.09
This procedure is applicable to the drive cable
assembly of both sunroofs.
Remove
1.Remove sunroof:
lFor front drive cable assembly:
+ SUNROOF, REPAIRS, Sunroof -
front.
lFor rear drive cable assembly:
+ SUNROOF, REPAIRS, Sunroof -
rear.
2.Position sunroof assembly on suitable work
bench.
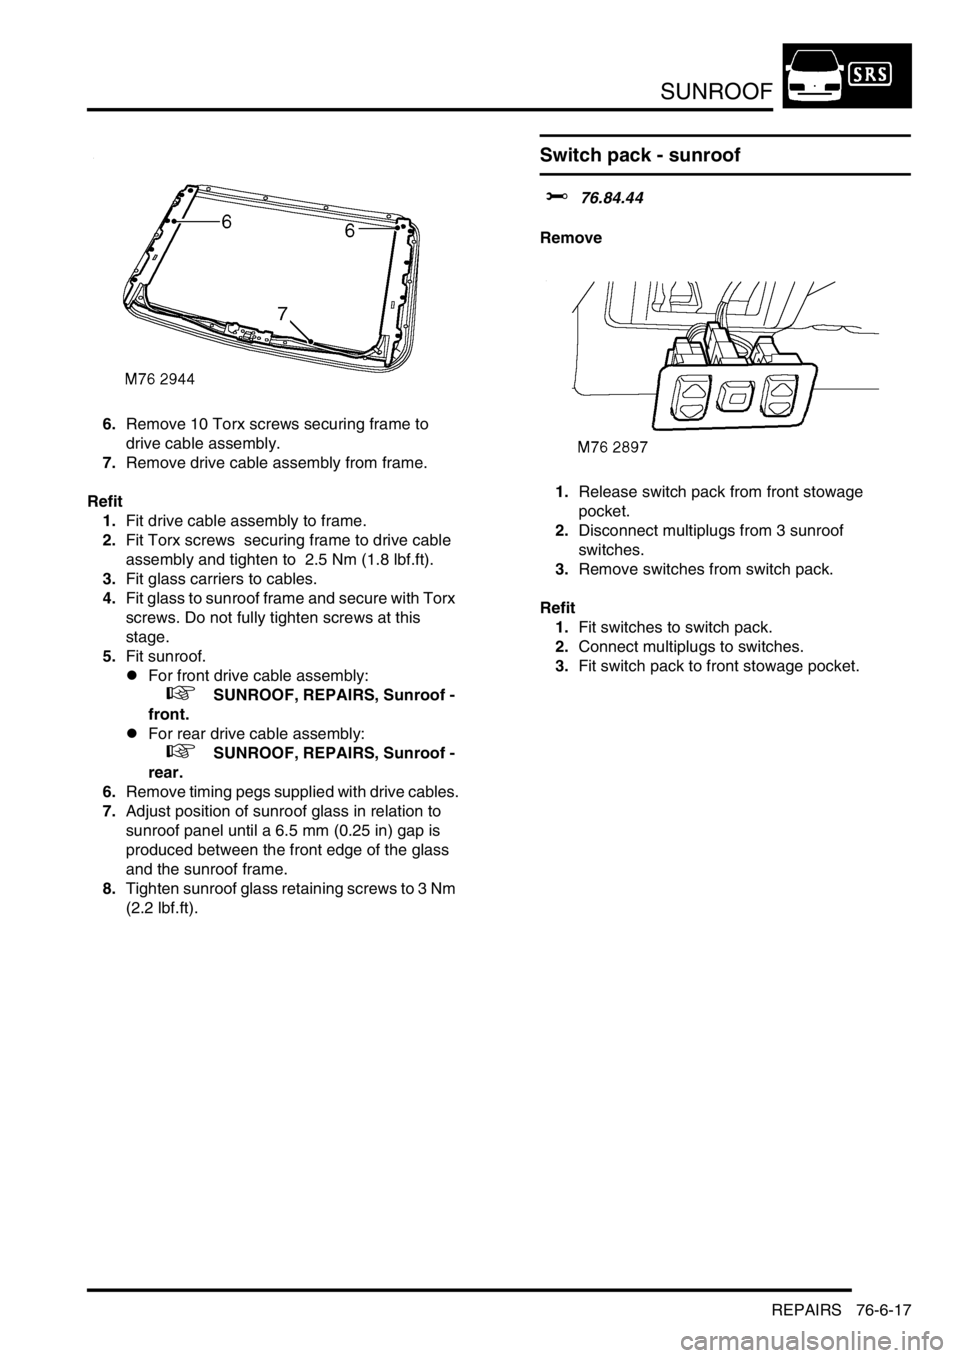
3.Remove 4 Torx screws securing glass to
sunroof frame.
4.Remove sunroof glass.
5.Release both glass carriers from cables and
remove.
Page 1232 of 1672
SUNROOF
REPAIRS 76-6-17
6.Remove 10 Torx screws securing frame to
drive cable assembly.
7.Remove drive cable assembly from frame.
Refit
1.Fit drive cable assembly to frame.
2.Fit Torx screws securing frame to drive cable
assembly and tighten to 2.5 Nm (1.8 lbf.ft).
3.Fit glass carriers to cables.
4.Fit glass to sunroof frame and secure with Torx
screws. Do not fully tighten screws at this
stage.
5.Fit sunroof.
lFor front drive cable assembly:
+ SUNROOF, REPAIRS, Sunroof -
front.
lFor rear drive cable assembly:
+ SUNROOF, REPAIRS, Sunroof -
rear.
6.Remove timing pegs supplied with drive cables.
7.Adjust position of sunroof glass in relation to
sunroof panel until a 6.5 mm (0.25 in) gap is
produced between the front edge of the glass
and the sunroof frame.
8.Tighten sunroof glass retaining screws to 3 Nm
(2.2 lbf.ft).
Switch pack - sunroof
$% 76.84.44
Remove
1.Release switch pack from front stowage
pocket.
2.Disconnect multiplugs from 3 sunroof
switches.
3.Remove switches from switch pack.
Refit
1.Fit switches to switch pack.
2.Connect multiplugs to switches.
3.Fit switch pack to front stowage pocket.
Page 1233 of 1672
SUNROOF
76-6-18 REPAIRS
ECU - sunroof
$% 76.84.46
Remove
1.Remove front stowage pocket.
+ INTERIOR TRIM COMPONENTS,
REPAIRS, Stowage pocket - front.
2.Remove 2 screws securing ECU to roof.
3.Disconnect 2 multiplugs from ECU.
4.Remove sunroof ECU.
Refit
1.Position sunroof ECU and connect multiplugs.
2.Fit and tighten screws securing ECU to roof.
3.Fit front stowage pocket.
+ INTERIOR TRIM COMPONENTS,
REPAIRS, Stowage pocket - front.
Page 1260 of 1672
PANEL REPAIRS
REPLACEMENT PANELS 77-2-11
Roof panels
1Roof panel with sunroofs and roof bar holes
2Roof panel with roof bar holes only
3Roof panel with sunroofs only
4Roof panel
M77 1674A
1
2
3
4
Page 1283 of 1672
PANEL REPAIRS
77-2-34 REPAIRS
Refit
1.Fit windscreen side finisher.
+ EXTERIOR FITTINGS, REPAIRS,
Side finisher - windscreen.
2.Fit insulation pad to engine bulkhead.
3.Fit front mud flap.
4.Fit road wheel and tighten nuts to 140 Nm (103
lbf.ft).
5.Fit wiring harness to valance assembly.
6. Models with A/C: Fit A/C pipes to valance
assembly.
7.Fit PAS/ACE reservoir.
8.Fit brake pipes to valance assembly.
9. LHD models: Fit brake servo.
+ BRAKES, REPAIRS, Servo - brake.
10.Fit ABS modulator unit.
+ BRAKES, REPAIRS, Modulator unit
- ABS.
11.Fit front bulkhead assembly.
+ PANEL REPAIRS, REPAIRS, Front
bulkhead assembly.
12.Connect leads/multiplug to alternator.
13.Connect battery leads, negative lead last.
'A' post assembly
In this procedure, the front wing and the valance
outer reinforcement (rear section) are replaced in
conjunction with the 'A' post assembly. The dash side
assembly can also be replaced in this procedure if
required.
Remove
1.Disconnect both battery leads, negative lead
first.
2.Disconnect leads/multiplug from alternator.
3.Remove bonnet.
4.Remove front wing.
+ EXTERIOR FITTINGS, REPAIRS,
Wing - front - up to 03MY.
5.Remove RH or LH front door.
+ DOORS, REPAIRS, Door - front.
6.Remove RH or LH sill finisher.
7.Remove windscreen.
+ SCREENS, REPAIRS, Windscreen.
8. Diesel models: Remove ECM.
+ ENGINE MANAGEMENT SYSTEM -
Td5, REPAIRS, Engine control module
(ECM).
9.Remove RH or LH 'A' post inner finishers and
disconnect speaker multiplug (if fitted).
10.Release sunroof drain tube and position aside.
11.Remove RH or LH front seat.
+ SEATS, REPAIRS, Seat - front.
12. RH side: Remove CD autochanger.
+ IN CAR ENTERTAINMENT,
REPAIRS, CD autochanger.
13.Remove fascia.
+ INTERIOR TRIM COMPONENTS,
REPAIRS, Fascia.
14. Driver's side: Remove steering column
support bracket.
15.Remove relevant wiring from 'A' post.
16.Remove tread plate from front door aperture.
17.Release front carpet and position aside.
18.Remove front door aperture seal.
19.Remove engine bulkhead insulation.
Page 1284 of 1672
PANEL REPAIRS
REPAIRS 77-2-35
Repair
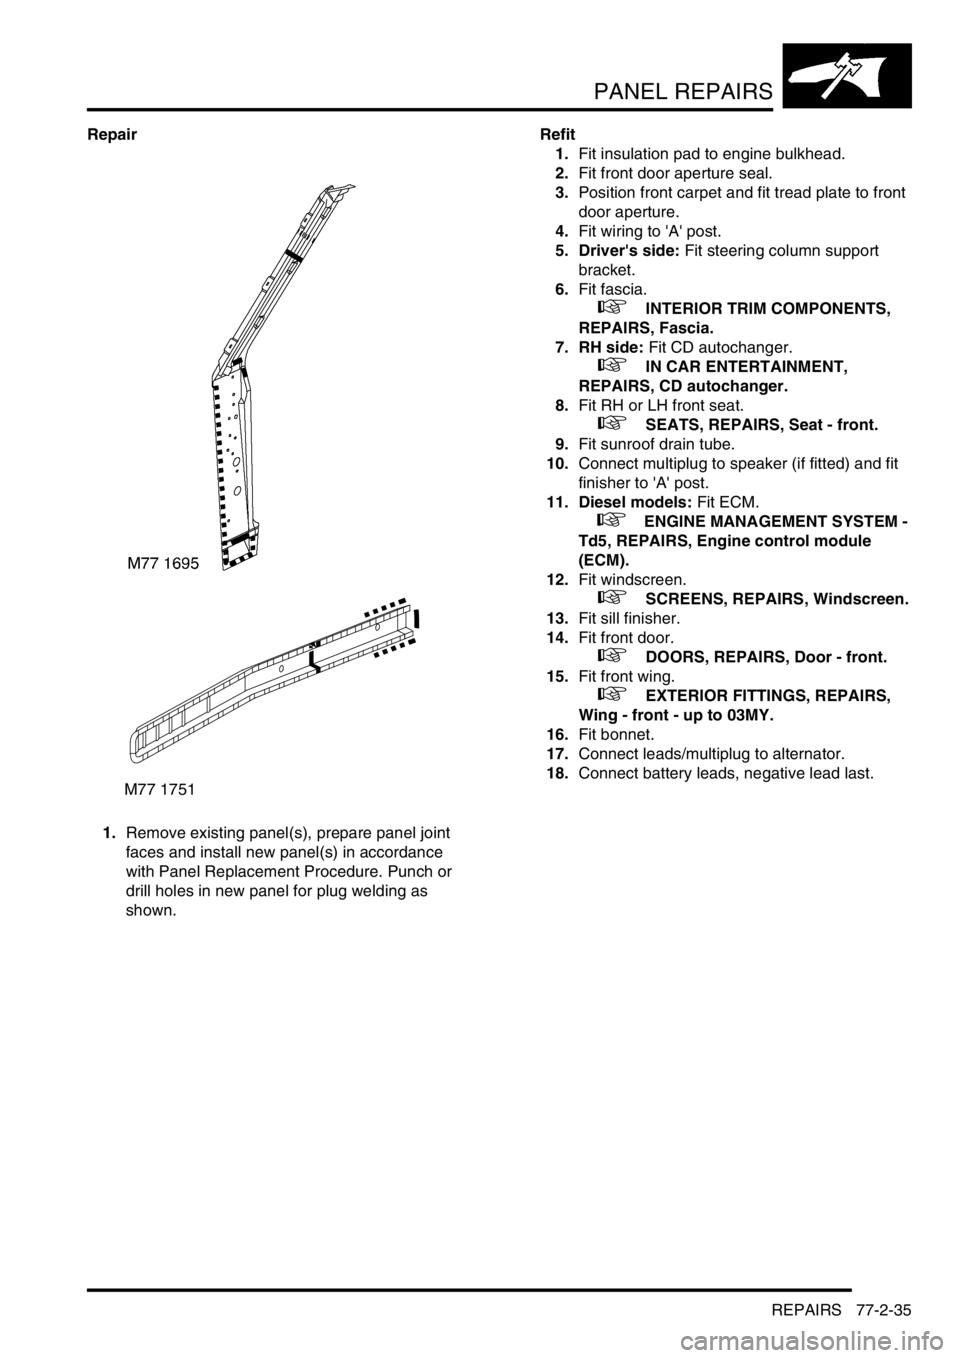
1.Remove existing panel(s), prepare panel joint
faces and install new panel(s) in accordance
with Panel Replacement Procedure. Punch or
drill holes in new panel for plug welding as
shown.Refit
1.Fit insulation pad to engine bulkhead.
2.Fit front door aperture seal.
3.Position front carpet and fit tread plate to front
door aperture.
4.Fit wiring to 'A' post.
5. Driver's side: Fit steering column support
bracket.
6.Fit fascia.
+ INTERIOR TRIM COMPONENTS,
REPAIRS, Fascia.
7. RH side: Fit CD autochanger.
+ IN CAR ENTERTAINMENT,
REPAIRS, CD autochanger.
8.Fit RH or LH front seat.
+ SEATS, REPAIRS, Seat - front.
9.Fit sunroof drain tube.
10.Connect multiplug to speaker (if fitted) and fit
finisher to 'A' post.
11. Diesel models: Fit ECM.
+ ENGINE MANAGEMENT SYSTEM -
Td5, REPAIRS, Engine control module
(ECM).
12.Fit windscreen.
+ SCREENS, REPAIRS, Windscreen.
13.Fit sill finisher.
14.Fit front door.
+ DOORS, REPAIRS, Door - front.
15.Fit front wing.
+ EXTERIOR FITTINGS, REPAIRS,
Wing - front - up to 03MY.
16.Fit bonnet.
17.Connect leads/multiplug to alternator.
18.Connect battery leads, negative lead last.
M77 1751
Page 1301 of 1672
PANEL REPAIRS
77-2-52 REPAIRS
Rear floor (RH/LH section)
In this procedure, the cross member rear assembly,
cross member outer rear panel (RH/LH section),
cross member closing rear panel, 'E' post assembly,
'E' post closing assembly and the panel body side
assembly are replaced in conjunction with the rear
floor (RH/LH section).
Remove
1.Disconnect both battery leads, negative lead
first.
2.Disconnect leads/multiplug from alternator.
3.Remove cross member rear assembly.
+ PANEL REPAIRS, REPAIRS, Cross
member rear assembly.
4.Remove mud flap mounting brackets.
5. LH side: Remove exhaust heatshield from rear
floor.
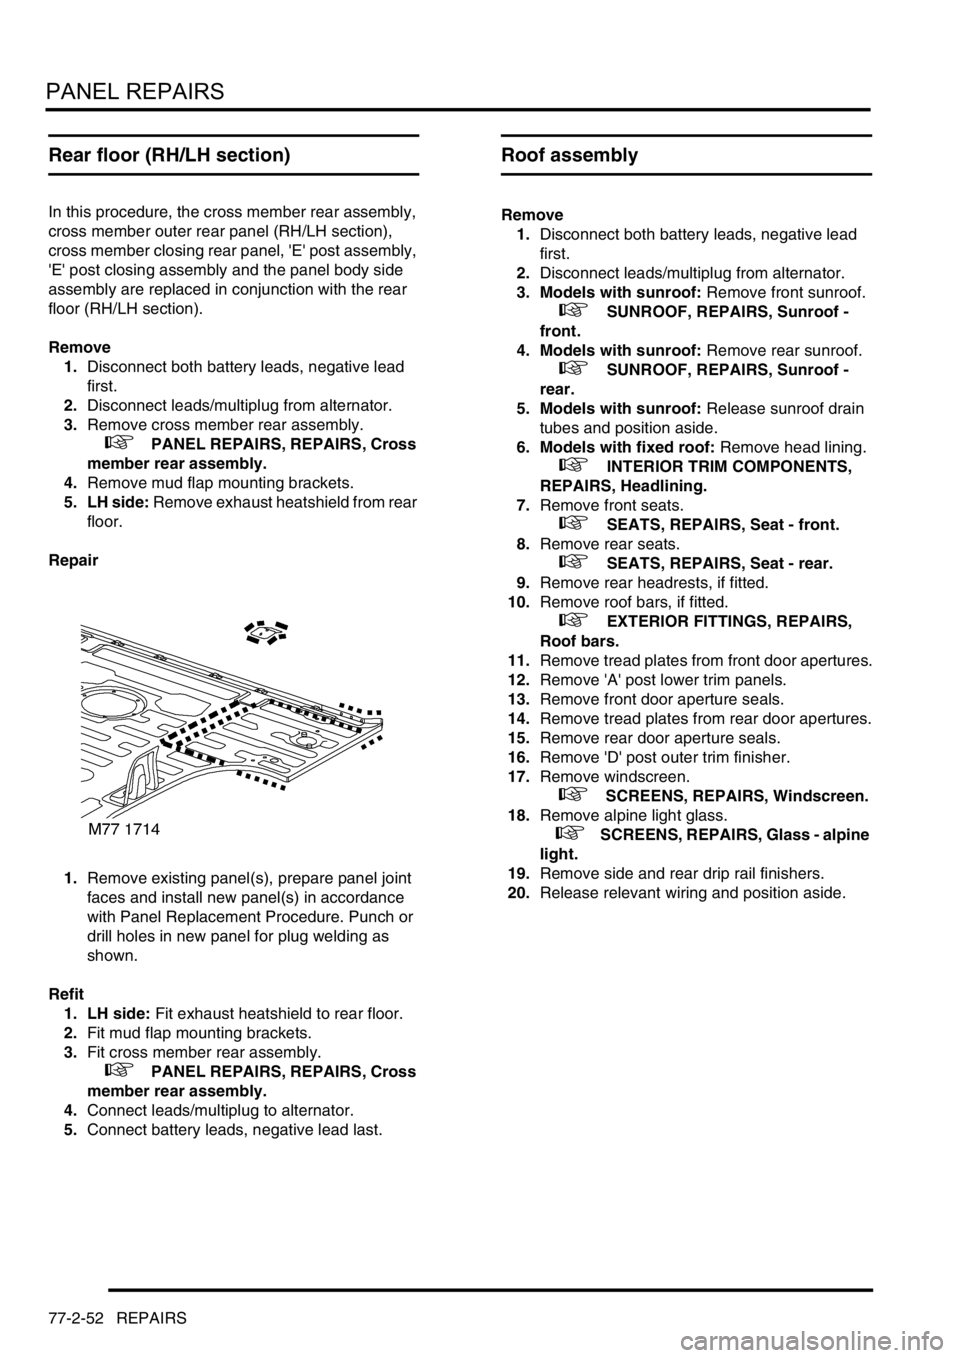
Repair
1.Remove existing panel(s), prepare panel joint
faces and install new panel(s) in accordance
with Panel Replacement Procedure. Punch or
drill holes in new panel for plug welding as
shown.
Refit
1. LH side: Fit exhaust heatshield to rear floor.
2.Fit mud flap mounting brackets.
3.Fit cross member rear assembly.
+ PANEL REPAIRS, REPAIRS, Cross
member rear assembly.
4.Connect leads/multiplug to alternator.
5.Connect battery leads, negative lead last.
Roof assembly
Remove
1.Disconnect both battery leads, negative lead
first.
2.Disconnect leads/multiplug from alternator.
3. Models with sunroof: Remove front sunroof.
+ SUNROOF, REPAIRS, Sunroof -
front.
4. Models with sunroof: Remove rear sunroof.
+ SUNROOF, REPAIRS, Sunroof -
rear.
5. Models with sunroof: Release sunroof drain
tubes and position aside.
6. Models with fixed roof: Remove head lining.
+ INTERIOR TRIM COMPONENTS,
REPAIRS, Headlining.
7.Remove front seats.
+ SEATS, REPAIRS, Seat - front.
8.Remove rear seats.
+ SEATS, REPAIRS, Seat - rear.
9.Remove rear headrests, if fitted.
10.Remove roof bars, if fitted.
+ EXTERIOR FITTINGS, REPAIRS,
Roof bars.
11.Remove tread plates from front door apertures.
12.Remove 'A' post lower trim panels.
13.Remove front door aperture seals.
14.Remove tread plates from rear door apertures.
15.Remove rear door aperture seals.
16.Remove 'D' post outer trim finisher.
17.Remove windscreen.
+ SCREENS, REPAIRS, Windscreen.
18.Remove alpine light glass.
+ SCREENS, REPAIRS, Glass - alpine
light.
19.Remove side and rear drip rail finishers.
20.Release relevant wiring and position aside.
Page 1302 of 1672
PANEL REPAIRS
REPAIRS 77-2-53
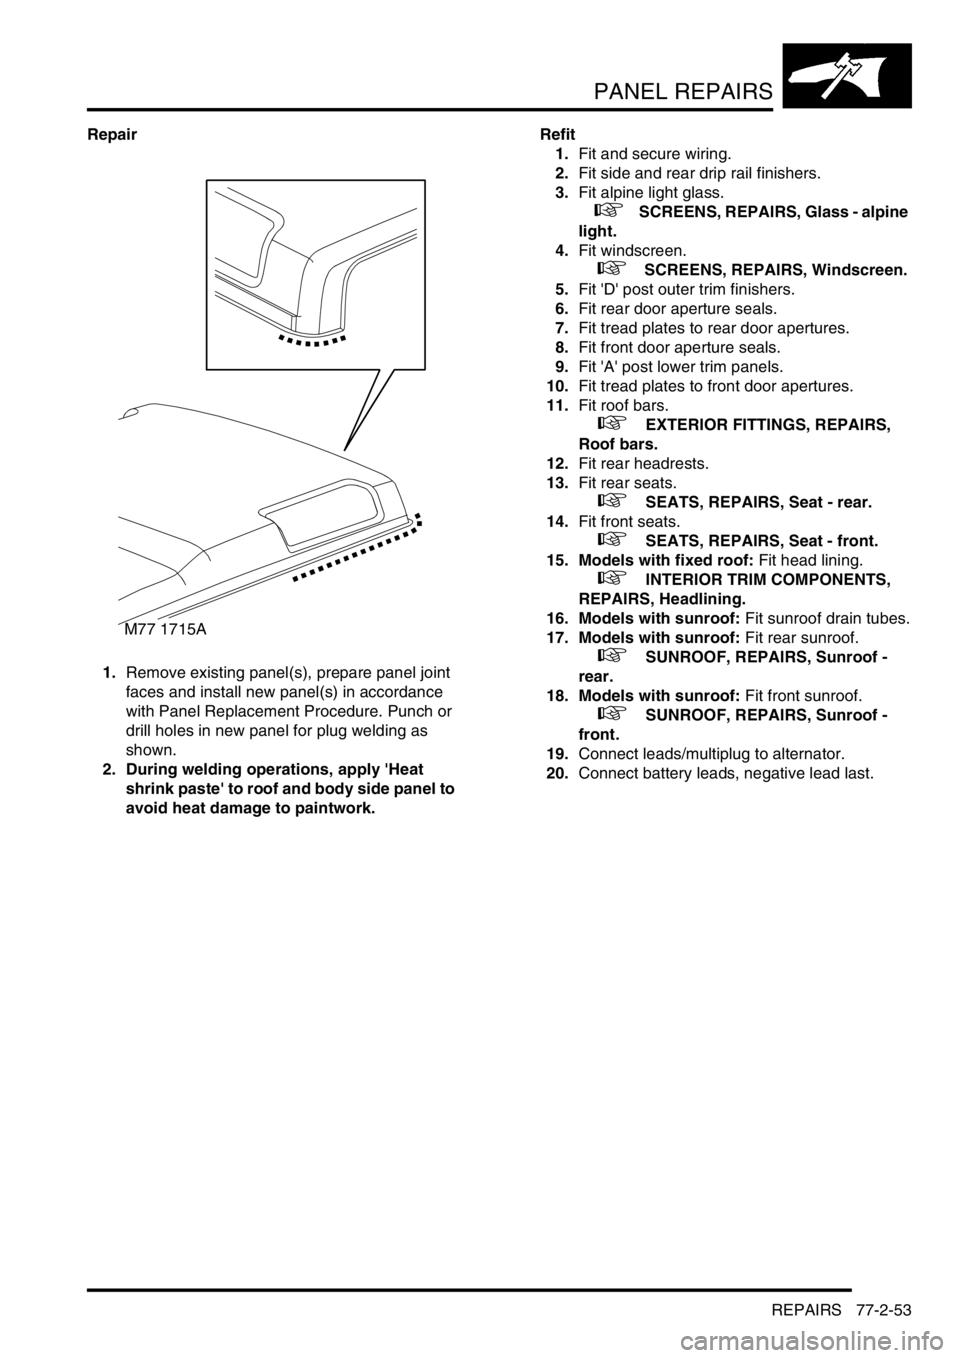
Repair
1.Remove existing panel(s), prepare panel joint
faces and install new panel(s) in accordance
with Panel Replacement Procedure. Punch or
drill holes in new panel for plug welding as
shown.
2. During welding operations, apply 'Heat
shrink paste' to roof and body side panel to
avoid heat damage to paintwork.Refit
1.Fit and secure wiring.
2.Fit side and rear drip rail finishers.
3.Fit alpine light glass.
+ SCREENS, REPAIRS, Glass - alpine
light.
4.Fit windscreen.
+ SCREENS, REPAIRS, Windscreen.
5.Fit 'D' post outer trim finishers.
6.Fit rear door aperture seals.
7.Fit tread plates to rear door apertures.
8.Fit front door aperture seals.
9.Fit 'A' post lower trim panels.
10.Fit tread plates to front door apertures.
11.Fit roof bars.
+ EXTERIOR FITTINGS, REPAIRS,
Roof bars.
12.Fit rear headrests.
13.Fit rear seats.
+ SEATS, REPAIRS, Seat - rear.
14.Fit front seats.
+ SEATS, REPAIRS, Seat - front.
15. Models with fixed roof: Fit head lining.
+ INTERIOR TRIM COMPONENTS,
REPAIRS, Headlining.
16. Models with sunroof: Fit sunroof drain tubes.
17. Models with sunroof: Fit rear sunroof.
+ SUNROOF, REPAIRS, Sunroof -
rear.
18. Models with sunroof: Fit front sunroof.
+ SUNROOF, REPAIRS, Sunroof -
front.
19.Connect leads/multiplug to alternator.
20.Connect battery leads, negative lead last.
M77 1715A