2002 LAND ROVER DISCOVERY reset
[x] Cancel search: resetPage 810 of 1672

AUTOMATIC GEARBOX - ZF4HP22 - 24
DESCRIPTION AND OPERATION 44-13
Oil cooler
1Inlet connection
2Fixing bracket
3Outlet connection
4Fixing bracket
5Temperature sensor
Transmission fluid from the gearbox is circulated through a cooler attached to the front of the radiator. Quick release
connectors on the transmission fluid lines attach to connections on each end tank of the cooler. A temperature sensor
on the RH end tank provides the instrument pack with an input of transmission fluid temperature. If the temperature
exceeds a preset limit, the instrument pack illuminates the transmission temperature warning lamp. The warning lamp
remains illuminated until the temperature of the fluid returns within limits.
EAT ECU
The EAT ECU operates the solenoid valves in the gearbox to provide automatic control of gear shifts and torque
converter lock-up. The EAT ECU is attached to a protective bracket which is secured to the cabin floor below the LH
front seat. A 55 pin connector links the EAT ECU to the vehicle wiring.
Software in the EAT ECU monitors hard wired inputs and exchanges information with the ECM on a Controller Area
Network (CAN) bus to determine gear shift and torque converter lock-up requirements. Resultant control signals are
then output to the gearbox solenoid valves.
Page 815 of 1672

AUTOMATIC GEARBOX - ZF4HP22 - 24
44-18 DESCRIPTION AND OPERATION
With time, the components in a gearbox wear and the duration of the gear shifts tends to increase, which has an
adverse effect on the brake clutches. To counteract this, the EAT ECU applies a pressure adaptation to each shift.
To calculate the adaptations, the EAT ECU monitors the pressure modulation used, and time taken, for each shift. If
a subsequent shift of the same type, in terms of throttle position and engine speed, has a longer duration, the EAT
ECU stores an adaptation for that type of shift in a volatile memory. The adaptation is then included in future pressure
calculations for that type of shift, to restore shift duration to the nominal.
Kickdown
The EAT ECU monitors the input of the throttle position sensor to determine when kickdown is required. When it
detects a kickdown situation, the EAT ECU immediately initiates a down shift provided the target gear will not cause
the engine speed limit to be exceeded.
Torque converter lock-up
The EAT ECU energises the lock-up solenoid valve to engage the lock-up clutch. Lock-up clutch operation is
dependent on throttle position, engine speed, operating mode and the range selected on the transfer box.
High range
Unique lock-up maps, similar to the shift maps, are incorporated in the economy and sport modes for all forward gears.
Engagement and disengagement of the lock-up clutch is dependent on throttle position and engine speed.
Low range
To enhance off road control, particularly when manoeuvring at low speeds, torque converter lock-up does not occur
when there is any degree of throttle opening. When the throttle is closed above a preset engine speed, the lock-up
clutch engages to provide maximum engine braking.
Increased load/reduced torque compensation
To aid performance and driveability in the high range economy mode, the EAT ECU has three adaptive shift and lock-
up maps. These maps delay upshifts and torque converter lock-up similar to the sport mode if the inputs from the
engine indicate:
lA sustained high load on the engine, such as occurs when the vehicle is ascending a steep gradient or towing a
trailer.
lA lower than normal engine torque, such as occurs at altitude or high ambient temperatures.
The EAT ECU monitors the engine inputs and selects the most appropriate adaptive map for the prevailing conditions.
Diagnostics
While the ignition is on, the EAT ECU diagnoses the system for faults. The extent of the diagnostic capability at any
particular time depends on the prevailing operating conditions, e.g. it is not possible to check torque converter lock-
up while the vehicle is stationary, or to check for a short circuit to earth if the circuit concerned is already at a low
potential.
If a fault is detected, the EAT ECU immediately stores a fault code and the values of three operating parameters
associated with the fault. Depending on the fault, there are four possible effects:
lThe fault has little effect on gearbox operation or vehicle emissions. The driver will probably not notice any
change and the warning lamps remain extinguished.
lThe fault has little effect on gearbox operation but may effect vehicle emissions. On NAS vehicles, if the fault is
detected on a second consecutive drive cycle, the MIL illuminates.
lAll gears are available but kickdown does not function. The sport and manual warning lamps flash. The MIL
remains extinguished.
lLimp home mode is selected and vehicle performance is greatly reduced. The sport and manual warning lamps
flash. In all markets, if the fault is detected on a second consecutive drive cycle, the MIL illuminates.
Page 1022 of 1672

REAR SUSPENSION
DESCRIPTION AND OPERATION 64-17
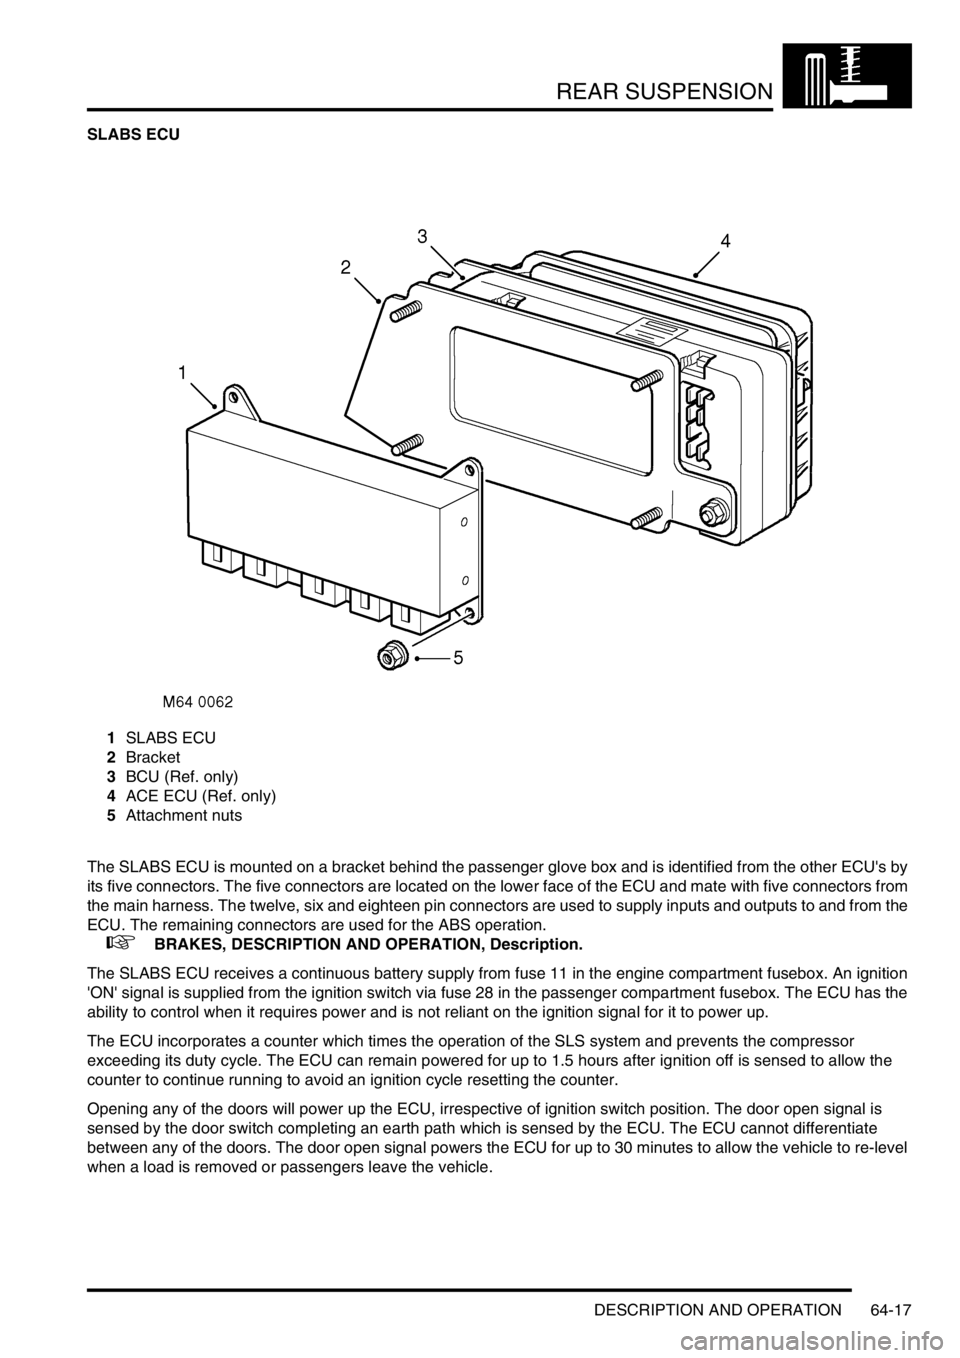
SLABS ECU
1SLABS ECU
2Bracket
3BCU (Ref. only)
4ACE ECU (Ref. only)
5Attachment nuts
The SLABS ECU is mounted on a bracket behind the passenger glove box and is identified from the other ECU's by
its five connectors. The five connectors are located on the lower face of the ECU and mate with five connectors from
the main harness. The twelve, six and eighteen pin connectors are used to supply inputs and outputs to and from the
ECU. The remaining connectors are used for the ABS operation.
+ BRAKES, DESCRIPTION AND OPERATION, Description.
The SLABS ECU receives a continuous battery supply from fuse 11 in the engine compartment fusebox. An ignition
'ON' signal is supplied from the ignition switch via fuse 28 in the passenger compartment fusebox. The ECU has the
ability to control when it requires power and is not reliant on the ignition signal for it to power up.
The ECU incorporates a counter which times the operation of the SLS system and prevents the compressor
exceeding its duty cycle. The ECU can remain powered for up to 1.5 hours after ignition off is sensed to allow the
counter to continue running to avoid an ignition cycle resetting the counter.
Opening any of the doors will power up the ECU, irrespective of ignition switch position. The door open signal is
sensed by the door switch completing an earth path which is sensed by the ECU. The ECU cannot differentiate
between any of the doors. The door open signal powers the ECU for up to 30 minutes to allow the vehicle to re-level
when a load is removed or passengers leave the vehicle.
Page 1027 of 1672

REAR SUSPENSION
64-22 DESCRIPTION AND OPERATION
Pressing the lower button will signal the SLABS ECU, via the RF receiver and the BCU, to energise the exhaust valve
and air control valves. The SLS will lower up to 60 mm (2.36 in) below normal ride height if the button is held. If the
button is released the SLS will stop at that point.
Pressing the raise button will signal the SLABS ECU, via the RF receiver and the BCU, to start the compressor and
energise the exhaust valve and air control valves. The SLS will raise to normal ride height if the button is held. If the
button is released the SLS will stop at that point.
When raising or lowering the SLS using the remote handset, the SLS warning lamp will flash and the audible warning
will sound when the system is operating. When the SLS is fully lowered the warning lamp will stay illuminated. The
SLS will reset to normal ride height if the vehicle speed exceeds 3 mph (5 km/h) for 10 seconds when the SLS is
lowered.
Transportation mode
Transportation mode must be used when the vehicle is transported on a trailer and secured by the chassis. The
transportation mode can only be enabled and disabled with TestBook.
The transportation mode lowers the rear suspension onto the bump stops with the engine not running. When the
suspension is in transportation mode, the SLS warning lamp is continuously illuminated when the ignition is in position
II.
When the engine is started in transportation mode, the SLS system will raise the rear suspension until a gap of 25
mm (1 in.) exists between the bump stop and the axle. The SLS warning lamp will flash continuously while the SLS
system is raising the suspension. When the gap between the bump stop and the axle is achieved, the warning lamp
will illuminate continuously.
When TestBook is used to disable the transportation mode, the rear suspension will raise to normal ride height when
the engine is running.
Page 1067 of 1672

BRAKES
70-22 DESCRIPTION AND OPERATION
Minimum target speed
The minimum target speed depends on which gear is engaged. Reduced minimum target speeds are employed for
some gears if rough terrain or sharp bends are encountered while already travelling at the normal minimum target
speed. If loss of traction makes it impossible to maintain the minimum target speed, the SLABS ECU temporarily
increases the minimum target speed to maintain stability, then restores the normal minimum target speed when
traction improves.
HDC minimum target speeds
Fade out
To provide a safe transition from active braking to brakes off, the SLABS ECU invokes a fade out strategy if it detects
any of the following during active braking:
lA system fault.
lThe conditions for HDC are no longer being met.
lPossible brake overheat.
The fade out strategy increases the target speed at a low constant acceleration rate, independent of actual throttle
position. This results in the braking effort being gradually reduced and then discontinued. The SLABS ECU operates
warning indications during fade out that are dependent on the cause.
Fade out warning indications
Clutch disengagement/neutral selection
During active braking, if the SLABS ECU detects the clutch is disengaged or neutral is selected, it flashes the HDC
information warning lamp and sounds the audible warning continuously to indicate that conditions for HDC are no
longer being met. Initially, the SLABS ECU also fixes the target speed to the applicable minimum target speed, but if
the condition continues for approximately 60 seconds the SLABS ECU invokes fade out.
Brake overheat prevention
To prevent the brakes overheating, the SLABS ECU monitors the amount of active braking employed and, from this,
estimates brake temperature. If the SLABS ECU estimates the brake temperature has exceeded a preset limit, it
flashes the HDC fault warning lamp and sounds the audible warning continuously, to indicate that HDC should be
deselected to allow the brakes to cool. If active braking continues and the SLABS ECU estimates that brake
temperature has increased to an unacceptable level, fade out is employed and HDC is disabled. After fade out, the
audible warning is discontinued but the HDC fault warning lamp continues to flash, while HDC is selected, until the
SLABS ECU estimates brake temperature to be at an acceptable level. This calculation continues even if the ignition
is turned off, so turning the ignition off and back on will not reduce the disabled time. When the SLABS ECU estimates
the brake temperature to be acceptable, it extinguishes the HDC fault warning lamp and illuminates the HDC
information warning lamp to indicate that HDC is re-enabled. The disabled time is dependent on vehicle speed; typical
times at constant vehicle speeds are as follows:
Gear Speed, mph (km/h)
Manual gearbox Automatic gearbox
Normal Reduced Normal Reduced
1 4.4 (7.0) 4.4 (7.0) 4.4 (7.0) 4.4 (7.0)
2 5.2 (8.3) 4.4 (7.0) 4.4 (7.0) 4.4 (7.0)
3 6.0 (9.6) 4.4 (7.0) 7.5 (12.0) 6.0 (9.6)
4 7.5 (12.0) 6.0 (9.6) 7.5 (12.0) 6.0 (9.6)
5 8.8 (14.0) 7.0 (11.2) - -
Reverse 3.5 (5.6) 3.5 (5.6) 3.5 (5.6) 3.5 (5.6)
Neutral or clutch
disengaged8.8 (14.0) Last off road speed 4.4 (7.0) 4.4 (7.0)
Cause Warning indication
HDC fault warning lamp HDC information
warning lampAudible warning
Fault detected On Flashes Continuous
HDC conditions not met Off Flashes Continuous
Brake overheat prevention Flashes Off Continuous
Page 1082 of 1672

BRAKES
REPAIRS 70-37
Switch - brake light
$% 70.35.42
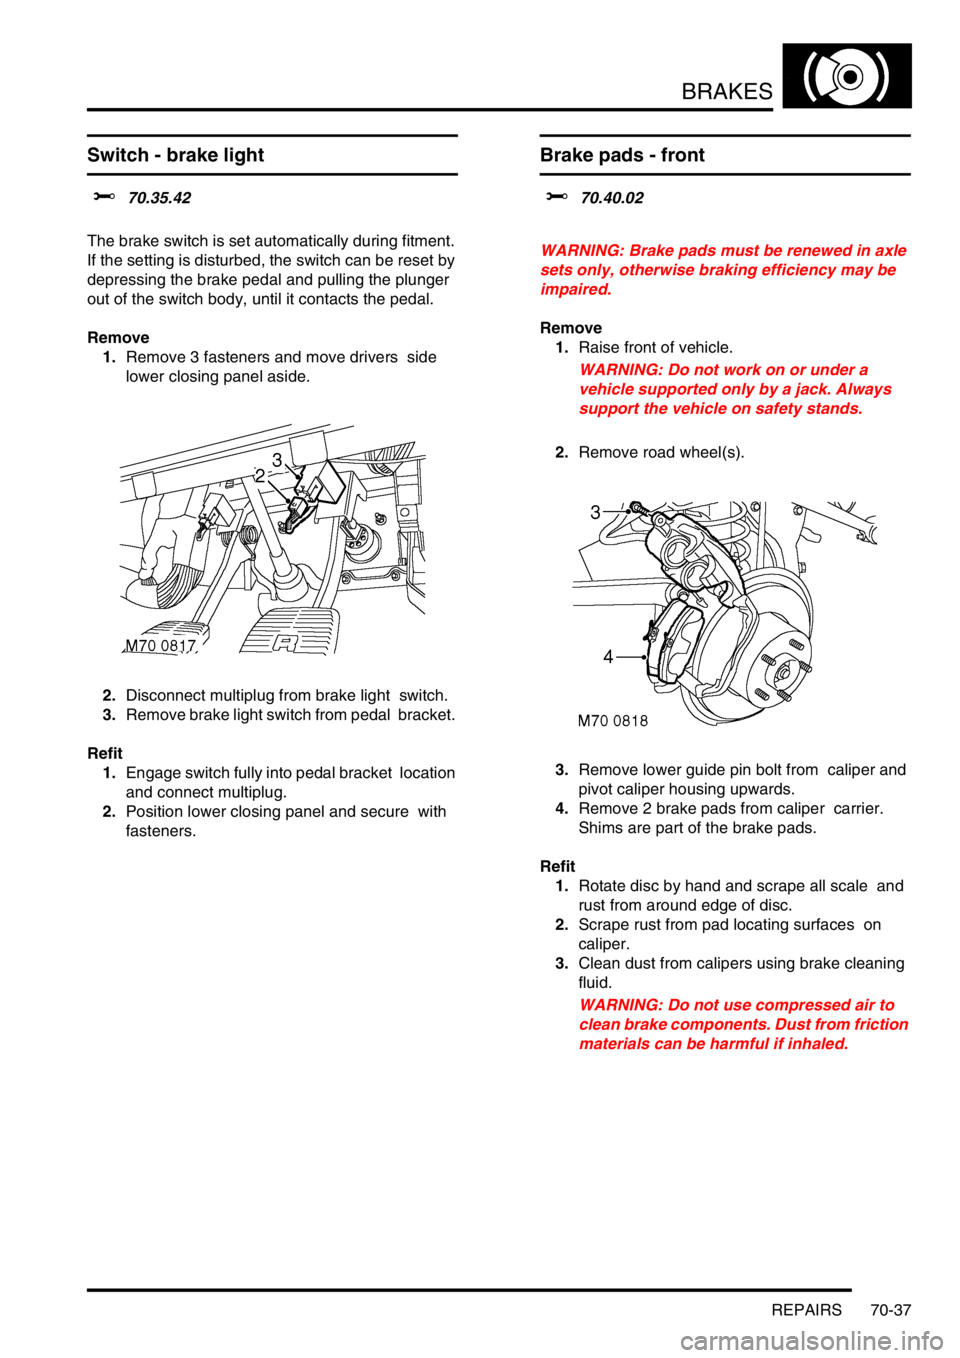
The brake switch is set automatically during fitment.
If the setting is disturbed, the switch can be reset by
depressing the brake pedal and pulling the plunger
out of the switch body, until it contacts the pedal.
Remove
1.Remove 3 fasteners and move drivers side
lower closing panel aside.
2.Disconnect multiplug from brake light switch.
3.Remove brake light switch from pedal bracket.
Refit
1.Engage switch fully into pedal bracket location
and connect multiplug.
2.Position lower closing panel and secure with
fasteners.
Brake pads - front
$% 70.40.02
WARNING: Brake pads must be renewed in axle
sets only, otherwise braking efficiency may be
impaired.
Remove
1.Raise front of vehicle.
WARNING: Do not work on or under a
vehicle supported only by a jack. Always
support the vehicle on safety stands.
2.Remove road wheel(s).
3.Remove lower guide pin bolt from caliper and
pivot caliper housing upwards.
4.Remove 2 brake pads from caliper carrier.
Shims are part of the brake pads.
Refit
1.Rotate disc by hand and scrape all scale and
rust from around edge of disc.
2.Scrape rust from pad locating surfaces on
caliper.
3.Clean dust from calipers using brake cleaning
fluid.
WARNING: Do not use compressed air to
clean brake components. Dust from friction
materials can be harmful if inhaled.
Page 1190 of 1672

SEATS
DESCRIPTION AND OPERATION 76-5-5
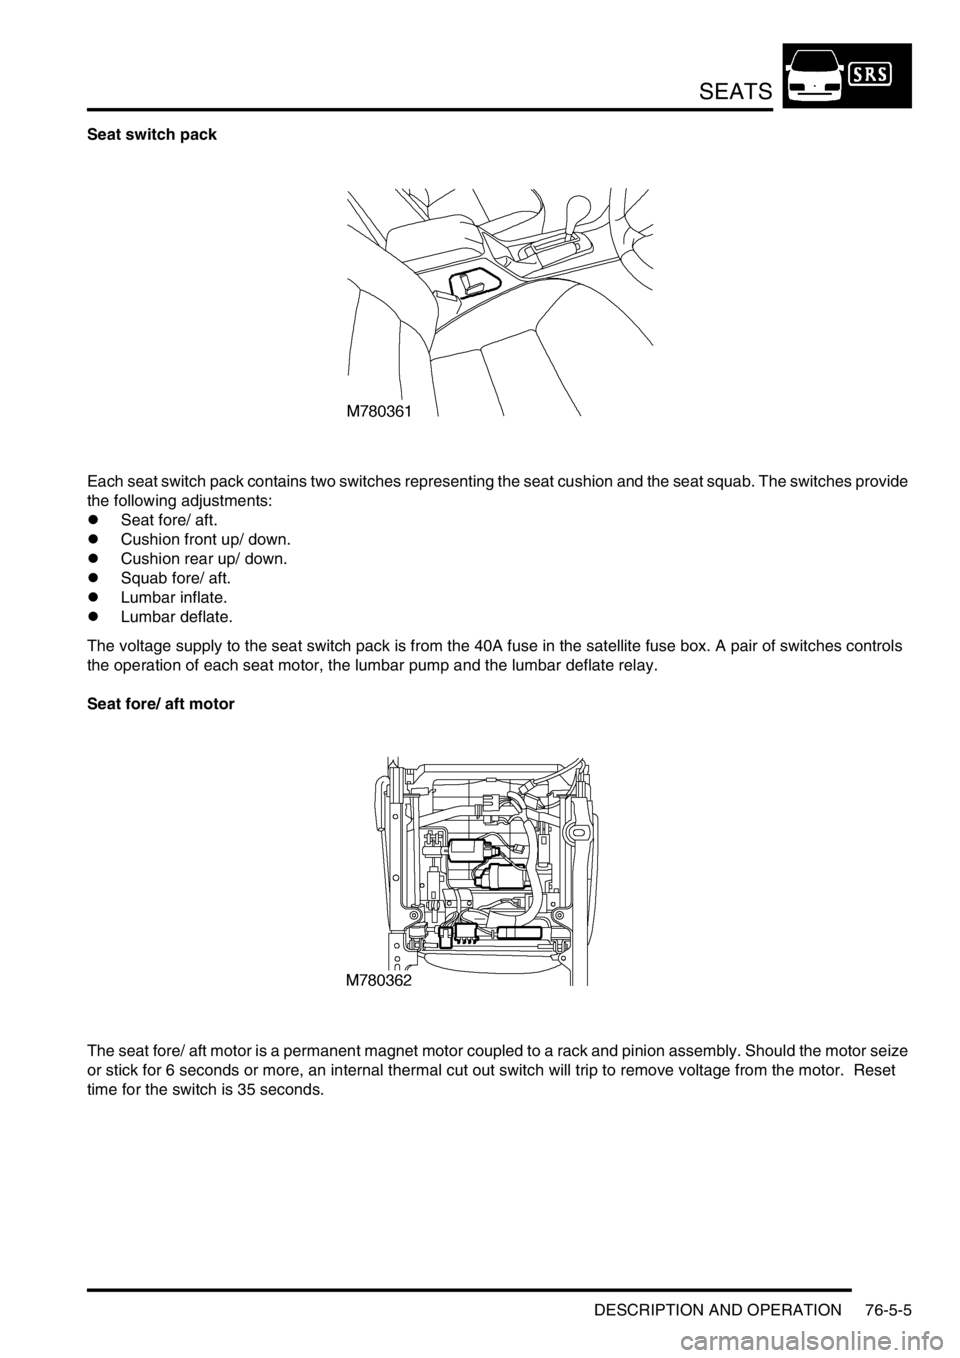
Seat switch pack
Each seat switch pack contains two switches representing the seat cushion and the seat squab. The switches provide
the following adjustments:
lSeat fore/ aft.
lCushion front up/ down.
lCushion rear up/ down.
lSquab fore/ aft.
lLumbar inflate.
lLumbar deflate.
The voltage supply to the seat switch pack is from the 40A fuse in the satellite fuse box. A pair of switches controls
the operation of each seat motor, the lumbar pump and the lumbar deflate relay.
Seat fore/ aft motor
The seat fore/ aft motor is a permanent magnet motor coupled to a rack and pinion assembly. Should the motor seize
or stick for 6 seconds or more, an internal thermal cut out switch will trip to remove voltage from the motor. Reset
time for the switch is 35 seconds.
Page 1191 of 1672

SEATS
76-5-6 DESCRIPTION AND OPERATION
Two pins within the seat switch pack control the seat fore/ aft motor. Both pins are normally earthed. Operating the
backward switch applies voltage to that pin while the other pin remains earthed. Operating the forward switch reverses
power and earth to the motor allowing the motor to run in the opposite direction.
Seat cushion front up/ down motor
The seat cushion front up/ down motor is a permanent magnet motor coupled to a rack and pinion assembly. Should
the motor seize or stick for 6 seconds or more an internal thermal cut out switch will trip to remove voltage from the
motor. Reset time for the switch is 35 seconds.
Two pins within the seat switch pack control the seat cushion front up/ down motor. Both pins are normally earthed.
Operating the up switch applies voltage to that pin while the other pin remains earthed. Operating the down switch
reverses power and earth to the motor allowing the motor to run in the opposite direction.
Seat cushion rear up/ down motor
The seat cushion rear up/ down motor is a permanent magnet motor coupled to a rack and pinion assembly. Should
the motor seize or stick for 6 seconds or more, an internal thermal cut out switch will trip to remove voltage from the
motor. Reset time for the switch is 35 seconds.
Two pins within the seat switch pack control the seat cushion rear up/ down motor. Both pins are normally earthed.
Operating the up switch applies voltage to that pin while the other pin remains earthed. Operating the down switch
reverses power and earth to the motor allowing the motor to run in the opposite direction.
Seat squab fore/ aft motor
The squab fore/ aft motor is a permanent magnet motor coupled to a rotary rack and pinion assembly. Should the
motor seize or stick for 6 seconds or more, an internal thermal cut out switch will trip to remove voltage from the motor.
Reset time for the switch is 35 seconds.
Two pins within the seat switch pack control the squab fore/ aft motor. Both pins are normally earthed. Operating the
fore switch applies voltage to that pin while the other pin remains earthed. Operating the aft switch reverses power
and earth to the motor allowing the motor to run in the opposite direction.
Lumbar pump
The lumbar pump inflates a bladder in the squab which provides extra support for the seat occupant. With no load on
the seat it takes approximately 10 seconds to completely inflate the bladder. With a load of 25 kg (55 lb) it takes
approximately 15 seconds to inflate the bladder. A pressure cut off switch in the system will operate at 0.12 to 1.93
bar (1.8 to 28 lbf.in
2). If a problem occurs with the lumbar bladder, e.g. a rupture, the whole lumbar system must be
replaced. The components are not serviceable.
Power comes from the seat switch pack through a 3A fuse in the satellite fuse box. The lumbar pump and the lumbar
deflate solenoid share an earth.
Lumbar deflate solenoid
The lumbar deflate solenoid vents the lumbar bladder to atmosphere to allow air to evacuate the bladder. The average
time to evacuate the bladder with a load of 25 kg (55 lb) is 9 seconds.
Power comes from the seat switch pack through a 3A fuse in the satellite fuse box. The lumbar deflate solenoid and
the lumbar pump share an earth.