2002 LAND ROVER DISCOVERY air bleeding
[x] Cancel search: air bleedingPage 1001 of 1672
FRONT SUSPENSION
60-62 REPAIRS
4.Remove 2 nuts securing rear anti-roll bar links
to axle.
5.Release links from axle and pull long arm down
for access to actuator pipe unions.
6.Position container under actuator to collect
fluid spillage.
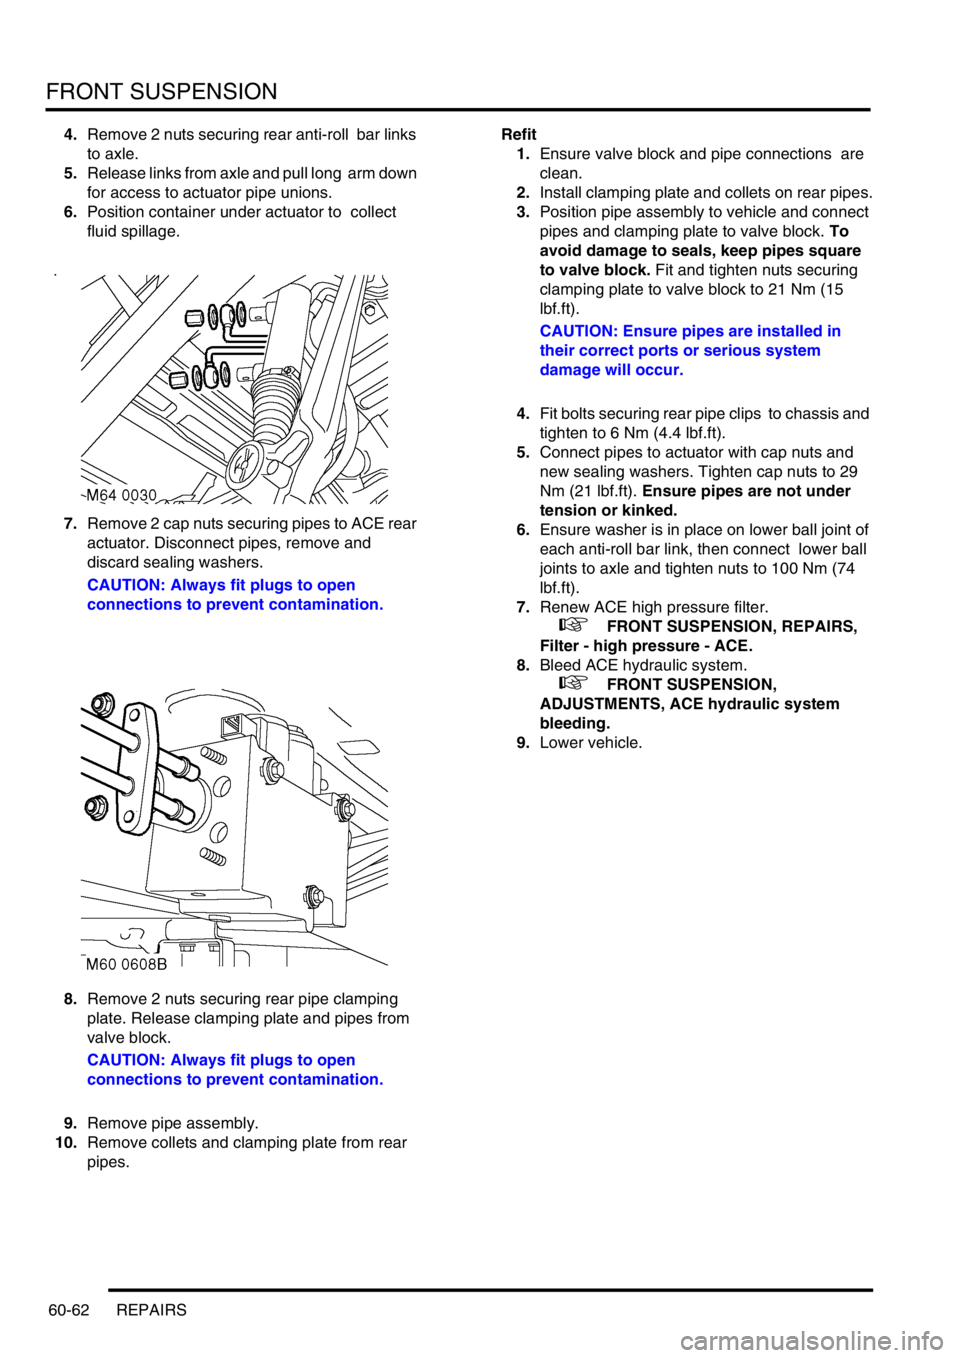
7.Remove 2 cap nuts securing pipes to ACE rear
actuator. Disconnect pipes, remove and
discard sealing washers.
CAUTION: Always fit plugs to open
connections to prevent contamination.
8.Remove 2 nuts securing rear pipe clamping
plate. Release clamping plate and pipes from
valve block.
CAUTION: Always fit plugs to open
connections to prevent contamination.
9.Remove pipe assembly.
10.Remove collets and clamping plate from rear
pipes. Refit
1.Ensure valve block and pipe connections are
clean.
2.Install clamping plate and collets on rear pipes.
3.Position pipe assembly to vehicle and connect
pipes and clamping plate to valve block. To
avoid damage to seals, keep pipes square
to valve block. Fit and tighten nuts securing
clamping plate to valve block to 21 Nm (15
lbf.ft).
CAUTION: Ensure pipes are installed in
their correct ports or serious system
damage will occur.
4.Fit bolts securing rear pipe clips to chassis and
tighten to 6 Nm (4.4 lbf.ft).
5.Connect pipes to actuator with cap nuts and
new sealing washers. Tighten cap nuts to 29
Nm (21 lbf.ft). Ensure pipes are not under
tension or kinked.
6.Ensure washer is in place on lower ball joint of
each anti-roll bar link, then connect lower ball
joints to axle and tighten nuts to 100 Nm (74
lbf.ft).
7.Renew ACE high pressure filter.
+ FRONT SUSPENSION, REPAIRS,
Filter - high pressure - ACE.
8.Bleed ACE hydraulic system.
+ FRONT SUSPENSION,
ADJUSTMENTS, ACE hydraulic system
bleeding.
9.Lower vehicle.
Page 1003 of 1672
FRONT SUSPENSION
60-64 REPAIRS
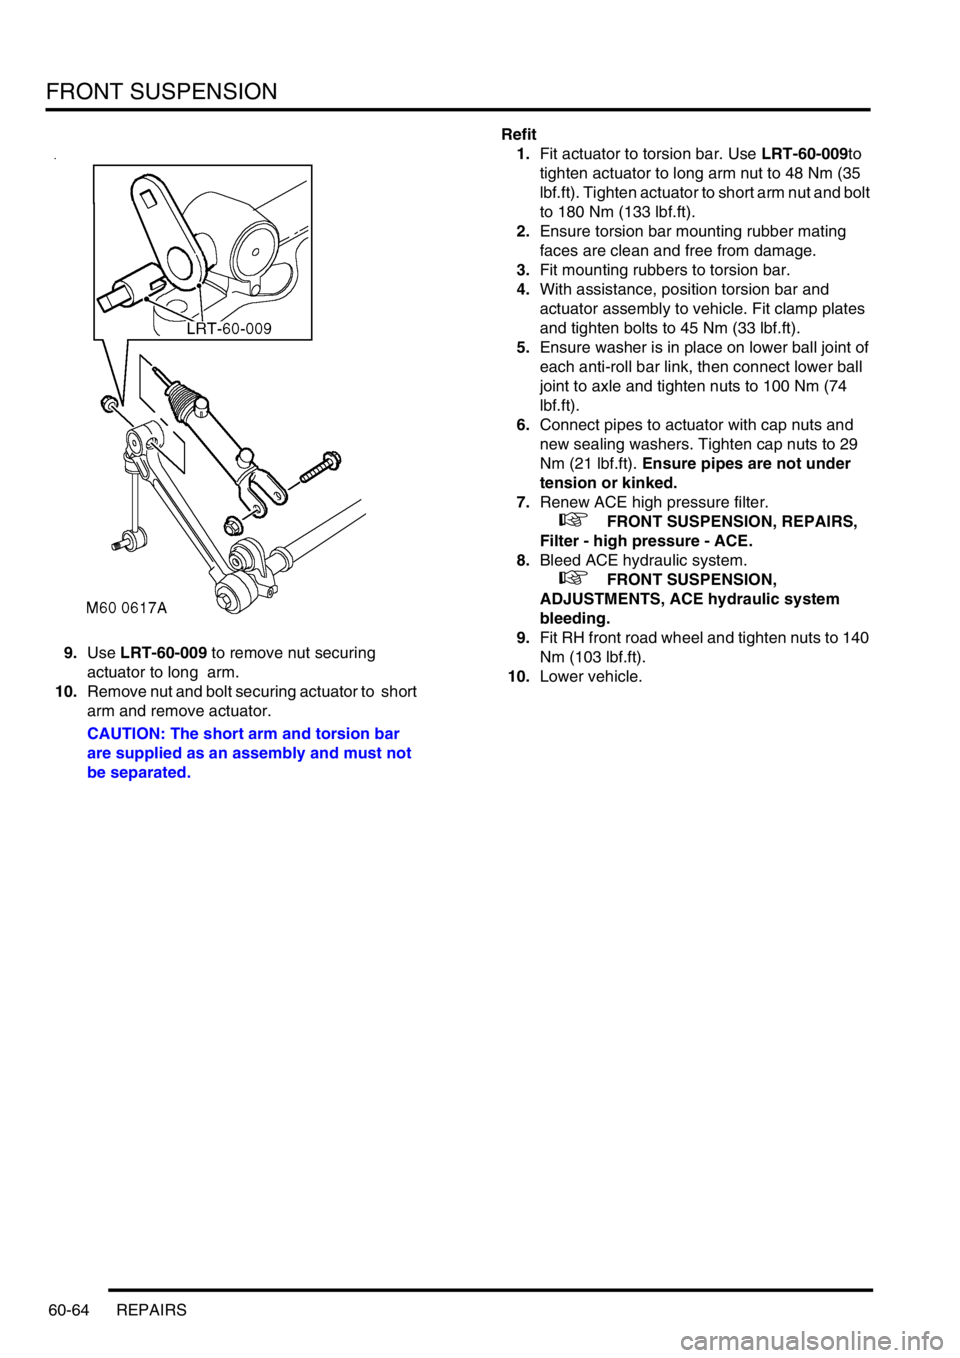
9.Use LRT-60-009 to remove nut securing
actuator to long arm.
10.Remove nut and bolt securing actuator to short
arm and remove actuator.
CAUTION: The short arm and torsion bar
are supplied as an assembly and must not
be separated.Refit
1.Fit actuator to torsion bar. Use LRT-60-009to
tighten actuator to long arm nut to 48 Nm (35
lbf.ft). Tighten actuator to short arm nut and bolt
to 180 Nm (133 lbf.ft).
2.Ensure torsion bar mounting rubber mating
faces are clean and free from damage.
3.Fit mounting rubbers to torsion bar.
4.With assistance, position torsion bar and
actuator assembly to vehicle. Fit clamp plates
and tighten bolts to 45 Nm (33 lbf.ft).
5.Ensure washer is in place on lower ball joint of
each anti-roll bar link, then connect lower ball
joint to axle and tighten nuts to 100 Nm (74
lbf.ft).
6.Connect pipes to actuator with cap nuts and
new sealing washers. Tighten cap nuts to 29
Nm (21 lbf.ft). Ensure pipes are not under
tension or kinked.
7.Renew ACE high pressure filter.
+ FRONT SUSPENSION, REPAIRS,
Filter - high pressure - ACE.
8.Bleed ACE hydraulic system.
+ FRONT SUSPENSION,
ADJUSTMENTS, ACE hydraulic system
bleeding.
9.Fit RH front road wheel and tighten nuts to 140
Nm (103 lbf.ft).
10.Lower vehicle.
Page 1042 of 1672
REAR SUSPENSION
REPAIRS 64-37
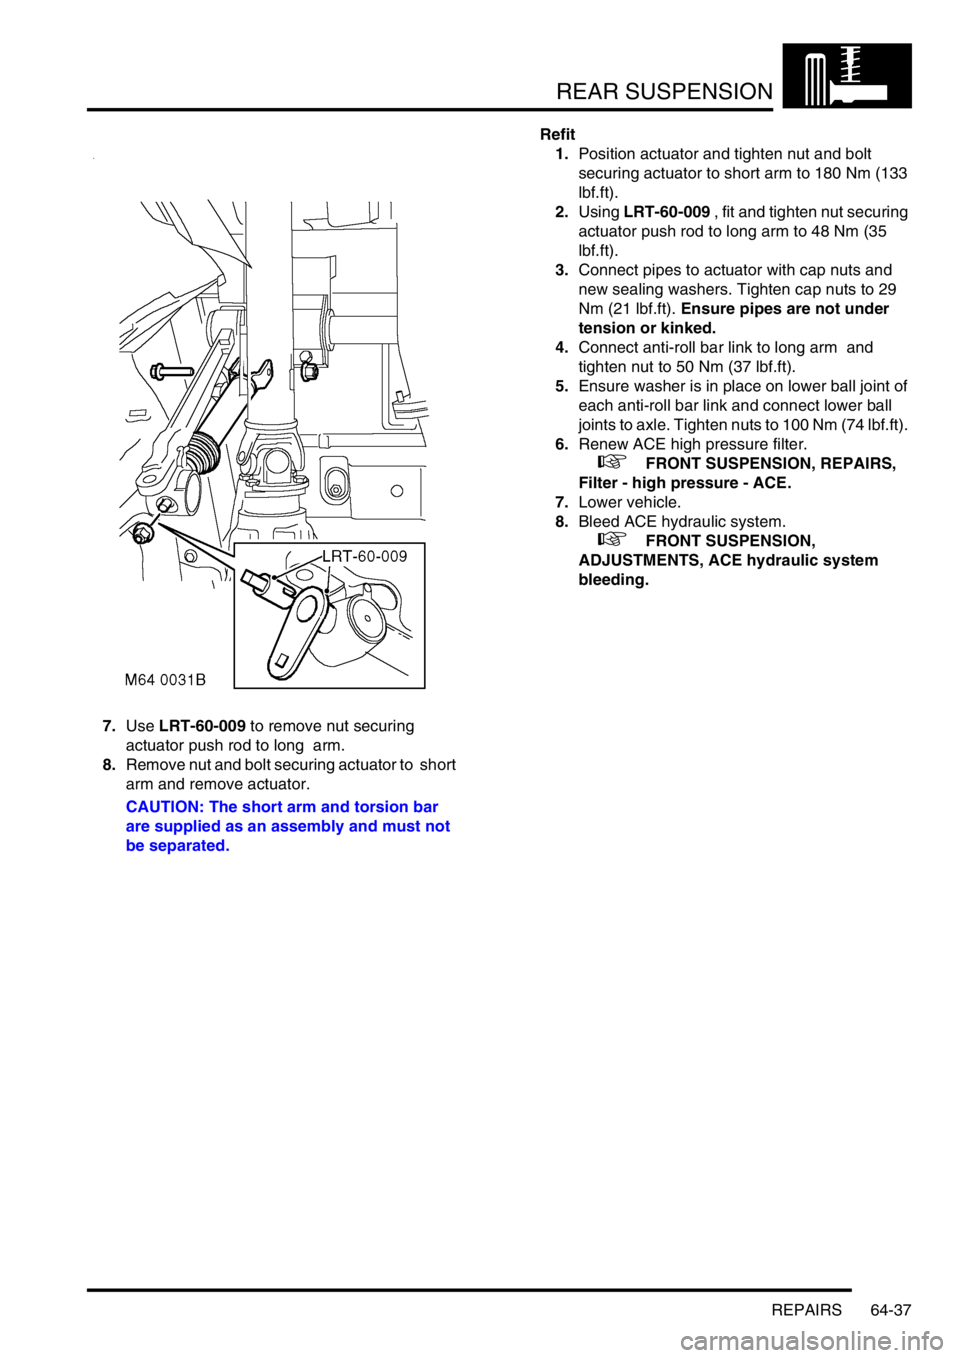
7.Use LRT-60-009 to remove nut securing
actuator push rod to long arm.
8.Remove nut and bolt securing actuator to short
arm and remove actuator.
CAUTION: The short arm and torsion bar
are supplied as an assembly and must not
be separated.Refit
1.Position actuator and tighten nut and bolt
securing actuator to short arm to 180 Nm (133
lbf.ft).
2.Using LRT-60-009 , fit and tighten nut securing
actuator push rod to long arm to 48 Nm (35
lbf.ft).
3.Connect pipes to actuator with cap nuts and
new sealing washers. Tighten cap nuts to 29
Nm (21 lbf.ft). Ensure pipes are not under
tension or kinked.
4.Connect anti-roll bar link to long arm and
tighten nut to 50 Nm (37 lbf.ft).
5.Ensure washer is in place on lower ball joint of
each anti-roll bar link and connect lower ball
joints to axle. Tighten nuts to 100 Nm (74 lbf.ft).
6.Renew ACE high pressure filter.
+ FRONT SUSPENSION, REPAIRS,
Filter - high pressure - ACE.
7.Lower vehicle.
8.Bleed ACE hydraulic system.
+ FRONT SUSPENSION,
ADJUSTMENTS, ACE hydraulic system
bleeding.
Page 1045 of 1672
REAR SUSPENSION
64-40 REPAIRS
Refit
1.Clean bush locations in long arm.
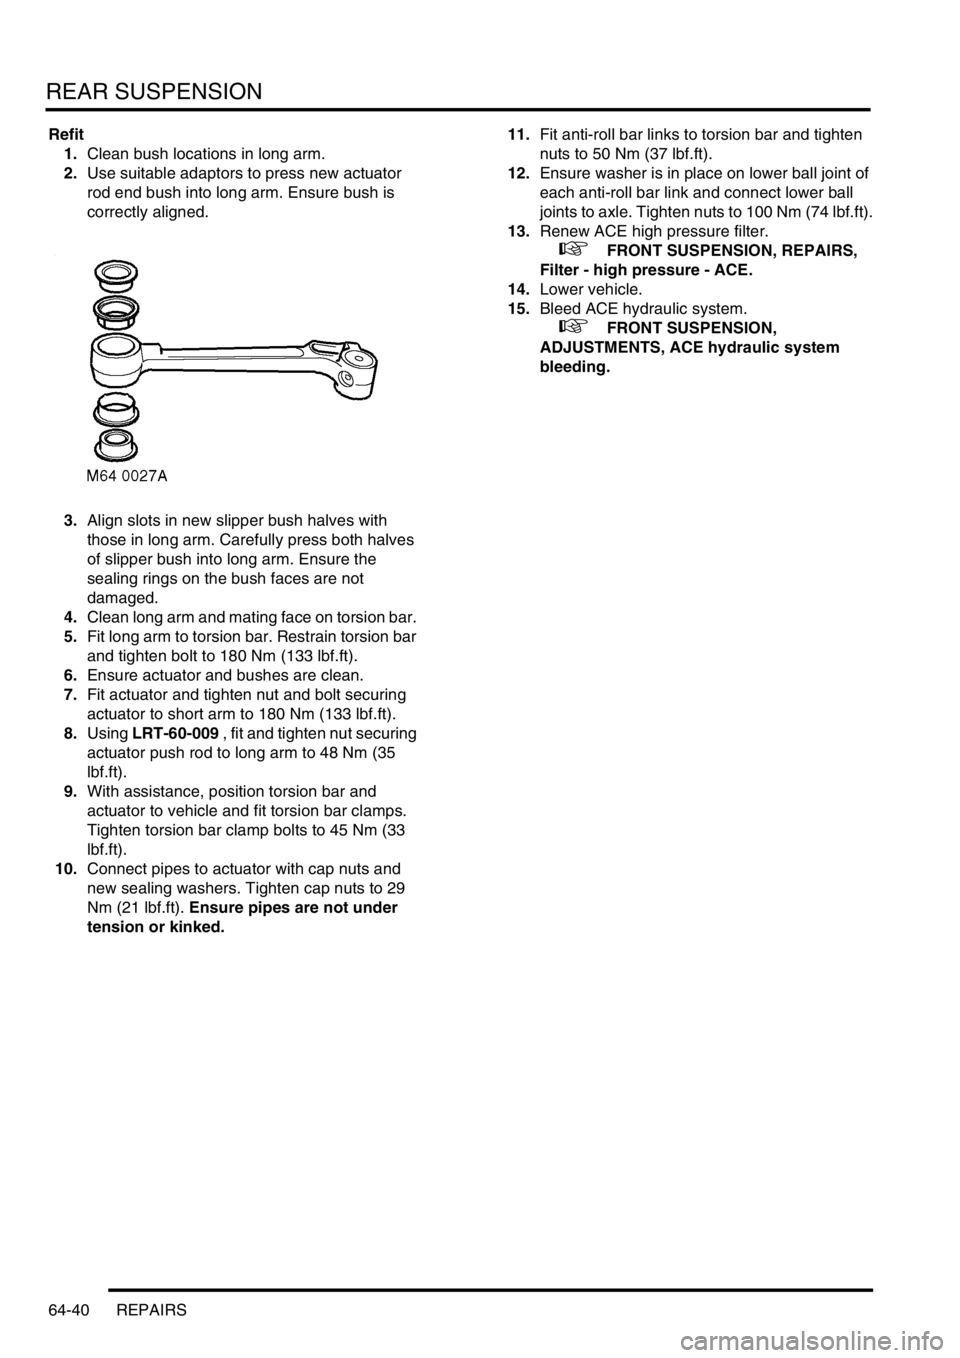
2.Use suitable adaptors to press new actuator
rod end bush into long arm. Ensure bush is
correctly aligned.
3.Align slots in new slipper bush halves with
those in long arm. Carefully press both halves
of slipper bush into long arm. Ensure the
sealing rings on the bush faces are not
damaged.
4.Clean long arm and mating face on torsion bar.
5.Fit long arm to torsion bar. Restrain torsion bar
and tighten bolt to 180 Nm (133 lbf.ft).
6.Ensure actuator and bushes are clean.
7.Fit actuator and tighten nut and bolt securing
actuator to short arm to 180 Nm (133 lbf.ft).
8.Using LRT-60-009 , fit and tighten nut securing
actuator push rod to long arm to 48 Nm (35
lbf.ft).
9.With assistance, position torsion bar and
actuator to vehicle and fit torsion bar clamps.
Tighten torsion bar clamp bolts to 45 Nm (33
lbf.ft).
10.Connect pipes to actuator with cap nuts and
new sealing washers. Tighten cap nuts to 29
Nm (21 lbf.ft). Ensure pipes are not under
tension or kinked.11.Fit anti-roll bar links to torsion bar and tighten
nuts to 50 Nm (37 lbf.ft).
12.Ensure washer is in place on lower ball joint of
each anti-roll bar link and connect lower ball
joints to axle. Tighten nuts to 100 Nm (74 lbf.ft).
13.Renew ACE high pressure filter.
+ FRONT SUSPENSION, REPAIRS,
Filter - high pressure - ACE.
14.Lower vehicle.
15.Bleed ACE hydraulic system.
+ FRONT SUSPENSION,
ADJUSTMENTS, ACE hydraulic system
bleeding.
Page 1075 of 1672
BRAKES
70-30 ADJUSTMENTS
Brake system bleeding
$% 70.25.02
Bleeding of the brake system can be carried out
using the procedures given on TestBook, or by
following the manual procedure given below.
WARNING: If any components upstream of brake
modulator, including the modulator itself are
replaced, the brake system must be bled using
the procedure on TestBook/T4, to ensure that all
air is expelled from the new component(s).
WARNING: Do not allow brake fluid to come into
contact with eyes or skin.
Bleed
NOTE: This procedure covers bleeding the
complete system, but where only the primary or
secondary circuit have been disturbed in
isolation, it should only be necessary to bleed
that circuit. Partial bleeding of the hydraulic
system is only permissible if a brake pipe or
hose has been disconnected with only minor
loss of fluid.
1.Do not allow fluid level in master cylinder to fall
below 'MIN' mark during bleeding.
2.Do not fill reservoir above 'MAX' level.
3.Raise front and rear of vehicle.
WARNING: Do not work on or under a
vehicle supported only by a jack. Always
support the vehicle on safety stands.
4.Check all pipe and hose connections are tight
and there are no signs of leakage.
5.Top-up fluid level in brake reservoir to 'MAX'
mark.
WARNING: Do not allow dirt or foreign
liquids to enter the reservoir. Use only new
DOT 4 brake fluid from airtight containers.
Do not mix brands of brake fluid as they
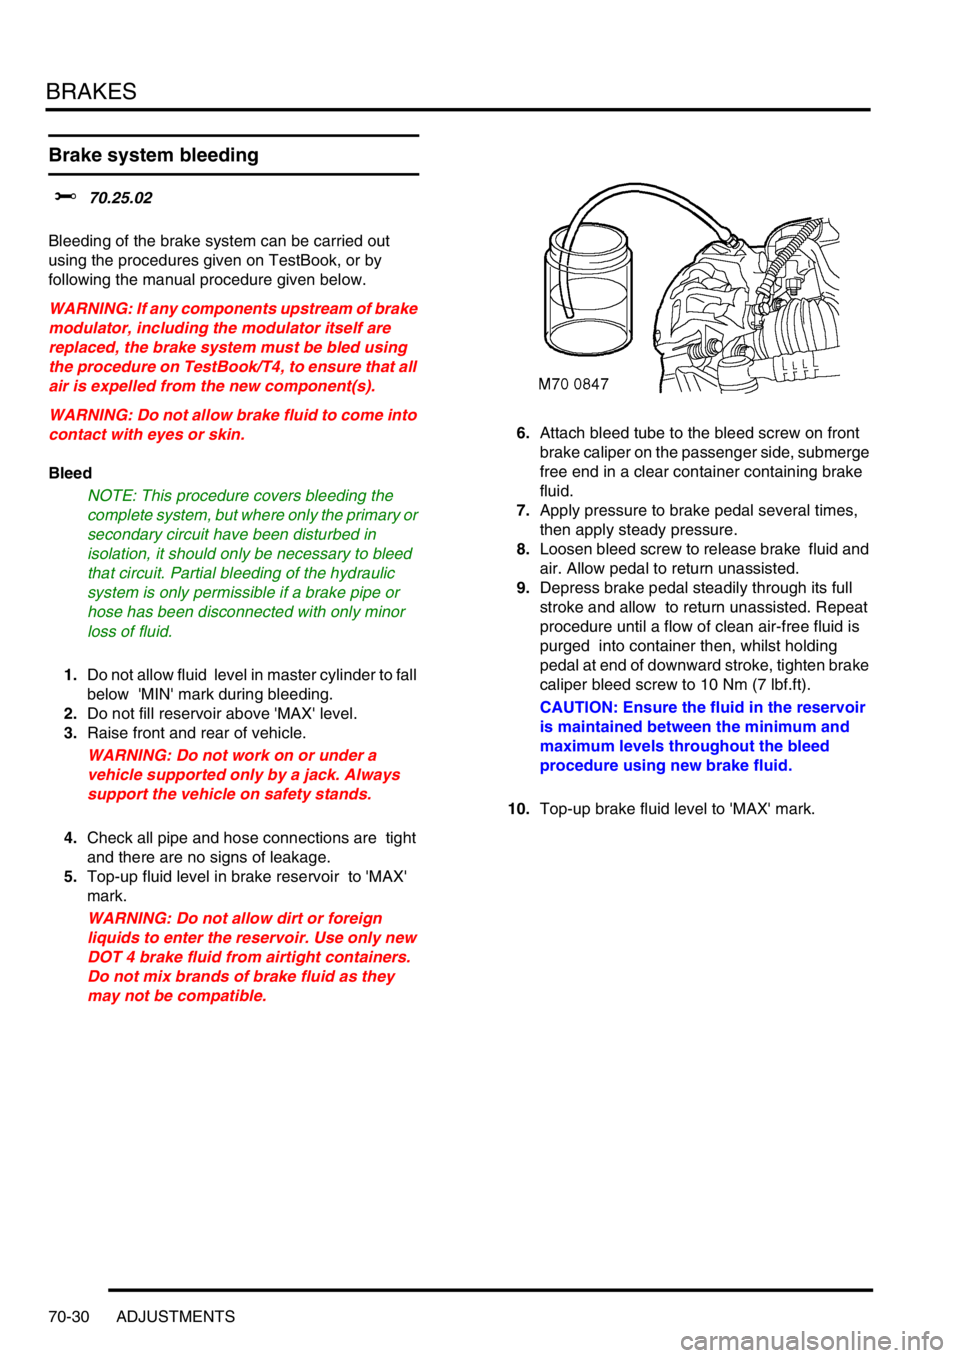
may not be compatible.6.Attach bleed tube to the bleed screw on front
brake caliper on the passenger side, submerge
free end in a clear container containing brake
fluid.
7.Apply pressure to brake pedal several times,
then apply steady pressure.
8.Loosen bleed screw to release brake fluid and
air. Allow pedal to return unassisted.
9.Depress brake pedal steadily through its full
stroke and allow to return unassisted. Repeat
procedure until a flow of clean air-free fluid is
purged into container then, whilst holding
pedal at end of downward stroke, tighten brake
caliper bleed screw to 10 Nm (7 lbf.ft).
CAUTION: Ensure the fluid in the reservoir
is maintained between the minimum and
maximum levels throughout the bleed
procedure using new brake fluid.
10.Top-up brake fluid level to 'MAX' mark.
Page 1080 of 1672
BRAKES
REPAIRS 70-35
Master cylinder - brake
$% 70.30.08
Remove
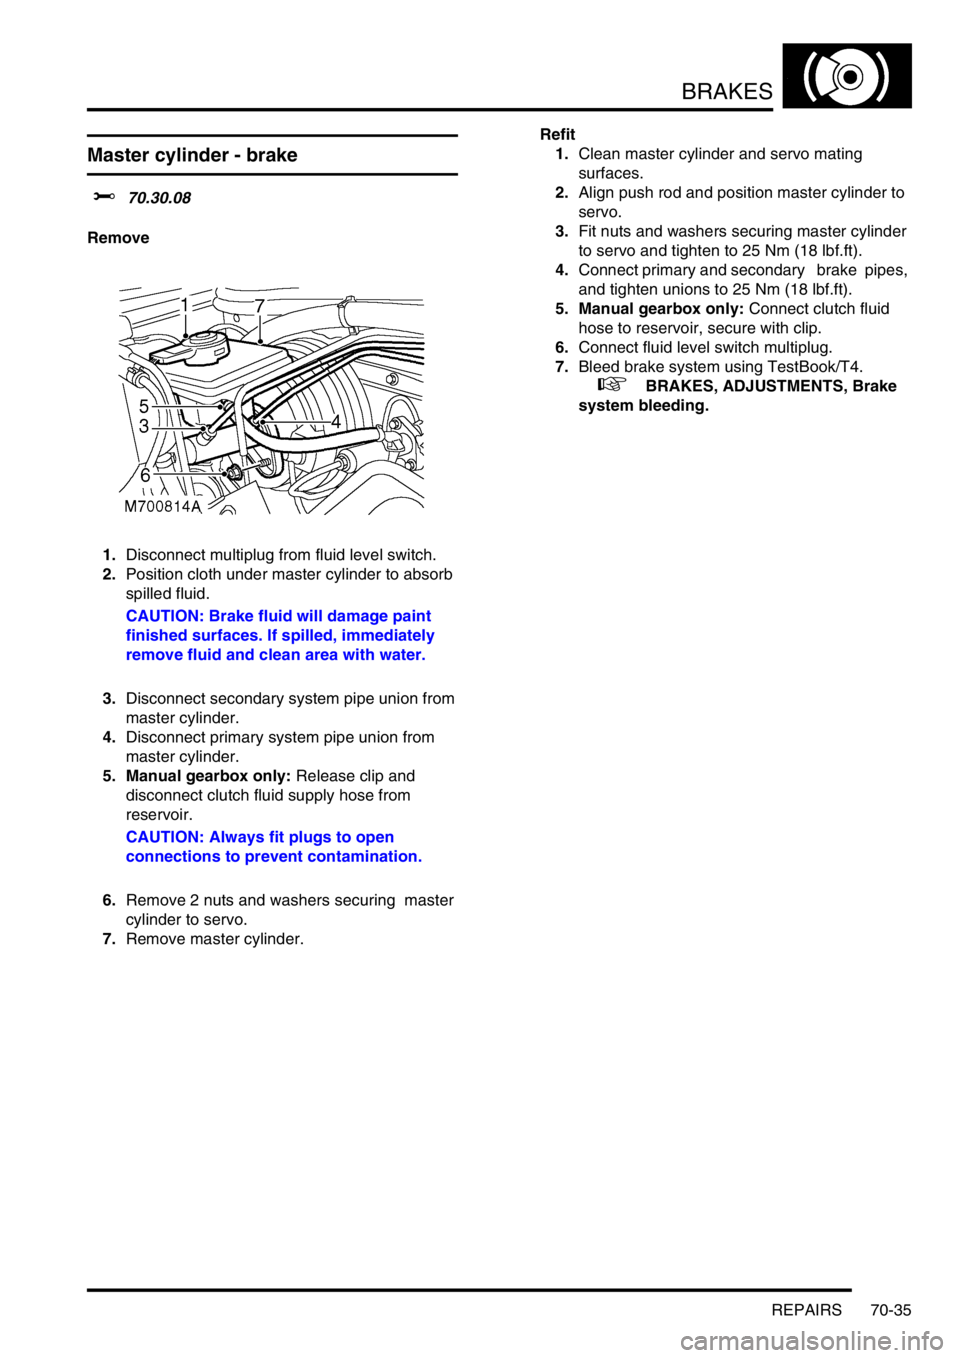
1.Disconnect multiplug from fluid level switch.
2.Position cloth under master cylinder to absorb
spilled fluid.
CAUTION: Brake fluid will damage paint
finished surfaces. If spilled, immediately
remove fluid and clean area with water.
3.Disconnect secondary system pipe union from
master cylinder.
4.Disconnect primary system pipe union from
master cylinder.
5. Manual gearbox only: Release clip and
disconnect clutch fluid supply hose from
reservoir.
CAUTION: Always fit plugs to open
connections to prevent contamination.
6.Remove 2 nuts and washers securing master
cylinder to servo.
7.Remove master cylinder. Refit
1.Clean master cylinder and servo mating
surfaces.
2.Align push rod and position master cylinder to
servo.
3.Fit nuts and washers securing master cylinder
to servo and tighten to 25 Nm (18 lbf.ft).
4.Connect primary and secondary brake pipes,
and tighten unions to 25 Nm (18 lbf.ft).
5. Manual gearbox only: Connect clutch fluid
hose to reservoir, secure with clip.
6.Connect fluid level switch multiplug.
7.Bleed brake system using TestBook/T4.
+ BRAKES, ADJUSTMENTS, Brake
system bleeding.
Page 1089 of 1672
BRAKES
70-44 REPAIRS
Refit
1.Rotate disc by hand and scrape all scale and
rust from around edge of disc. Clean location
surfaces on caliper bracket.
2.Clean dust from brake parts using brake
cleaning fluid.
WARNING: Do not use compressed air to
clean brake components. Dust from friction
materials can be harmful if inhaled.
3.Fit brake pads to caliper carrier.
4.Position caliper housing to carrier, align flats on
guide pins with caliper housing.
5.Fit guide pin bolts and tighten to 30 Nm (22
lbf.ft).
6.Clean banjo bolt and fit new sealing washers.
7.Position hose to caliper and tighten banjo bolt
to 32 Nm (24 lbf.ft).
8.Remove clamp from brake hose.
9.Bleed brake system.
+ BRAKES, ADJUSTMENTS, Brake
system bleeding.
10.Fit road wheel(s) and tighten nuts to 140 Nm
(103 lbf.ft).
11.Remove stand(s) and lower vehicle.
Housing - caliper - rear
$% 70.55.25
Remove
1.Raise rear of vehicle, one side.
WARNING: Do not work on or under a
vehicle supported only by a jack. Always
support the vehicle on safety stands.
2.Remove road wheel(s).
3.Clamp brake hose to prevent fluid loss.
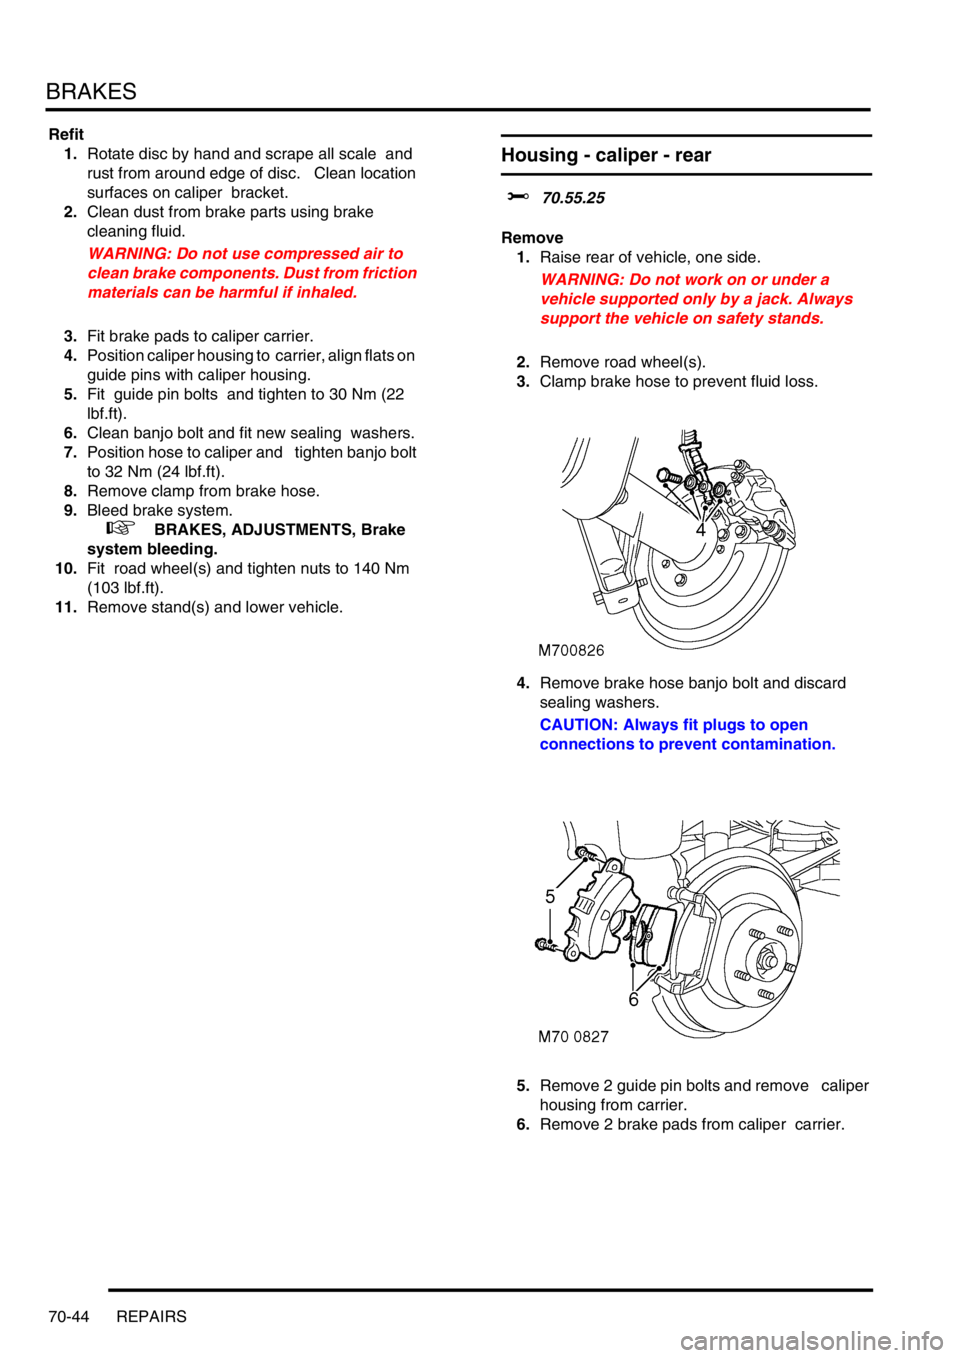
4.Remove brake hose banjo bolt and discard
sealing washers.
CAUTION: Always fit plugs to open
connections to prevent contamination.
5.Remove 2 guide pin bolts and remove caliper
housing from carrier.
6.Remove 2 brake pads from caliper carrier.
Page 1090 of 1672
BRAKES
REPAIRS 70-45
Refit
1.Rotate disc by hand and scrape all scale and
rust from around edge of disc. Clean location
surfaces on caliper bracket.
2.Clean dust from brake parts using brake
cleaning fluid.
WARNING: Do not use compressed air to
clean brake components. Dust from friction
materials can be harmful if inhaled.
3.Fit brake pads to caliper carrier.
4.Position caliper housing to carrier, align flats on
guide pins with caliper housing.
5.Fit guide pin bolts and tighten to 30 Nm (22
lbf.ft).
6.Clean banjo bolt and fit new sealing washers.
7.Position hose to caliper and tighten banjo bolt
to 32 Nm (24 lbf.ft).
8.Remove clamp from brake hose.
9.Bleed brakes.
+ BRAKES, ADJUSTMENTS, Brake
system bleeding.
10.Fit road wheel(s) and tighten nuts to 140 Nm
(103 lbf.ft).
11.Remove stand(s) and lower vehicle.
ECU - Self levelling and anti locking
brakes (SLABS)
$% 70.65.01
Remove
1.Remove BCU.
+ BODY CONTROL UNIT, REPAIRS,
Body control unit (BCU).
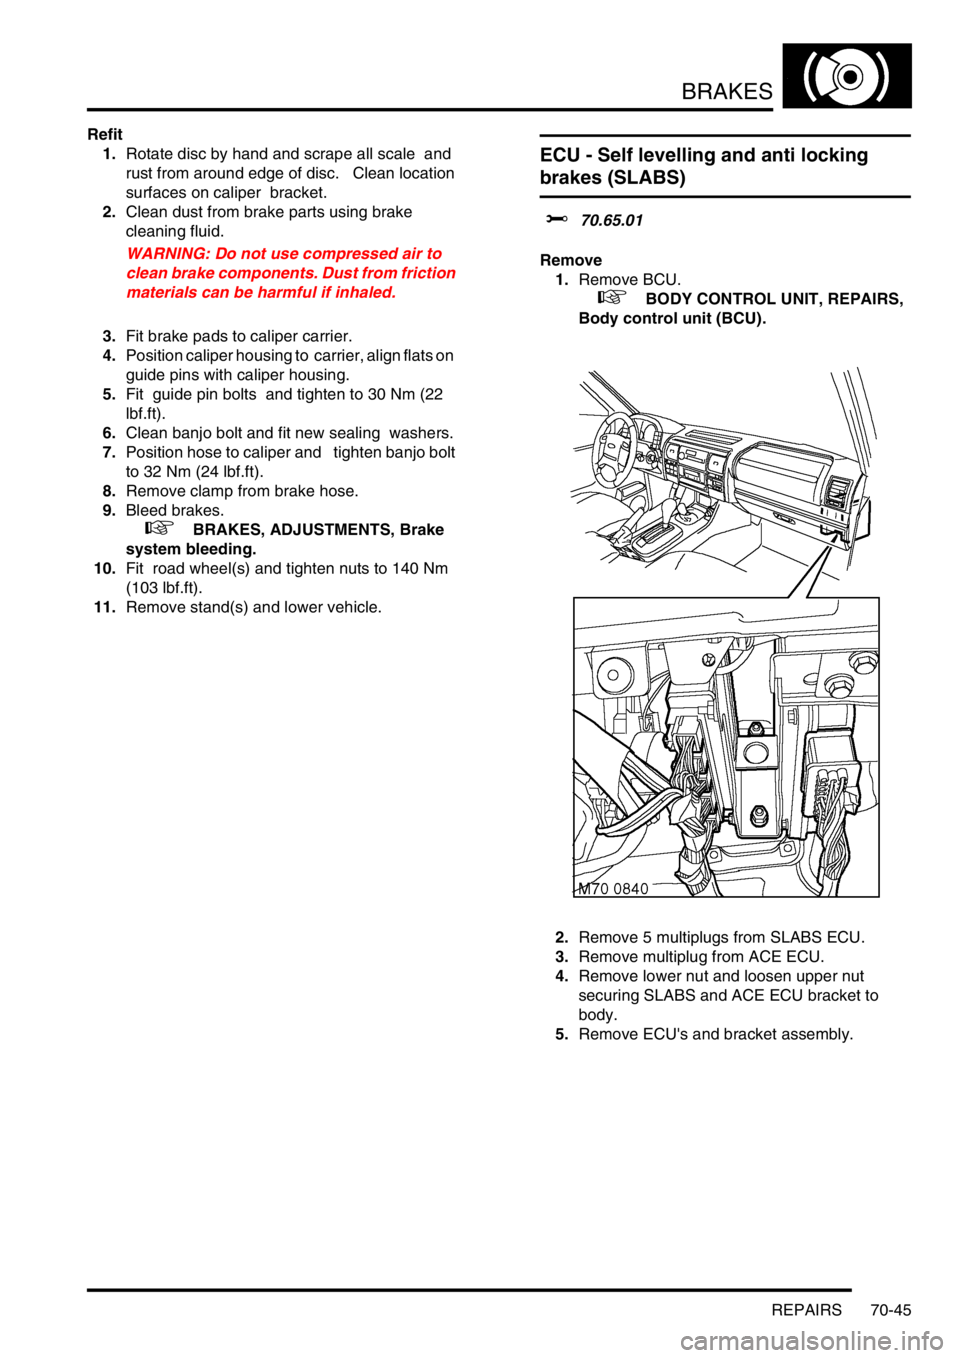
2.Remove 5 multiplugs from SLABS ECU.
3.Remove multiplug from ACE ECU.
4.Remove lower nut and loosen upper nut
securing SLABS and ACE ECU bracket to
body.
5.Remove ECU's and bracket assembly.