Page 1574 of 1672
HARNESSES
REPAIRS 86-7-3
14.Release 2 cable clips securing body harness to
sunroof harness.
15.Drill out 4 rivets securing air conditioning
ducting to body, release ducting.
16.Release 2 cable ties securing harness to LH
side of body.
17.Release retainer securing harness to LH side
of body. 18.Disconnect Lucar from radio aerial LH
amplifier.
19.Remove both luggage compartment trim
casings.
+ INTERIOR TRIM COMPONENTS,
REPAIRS, Trim casing - side - loadspace.
20.Disconnect 2 multiplugs from rear air
conditioning unit.
Page 1575 of 1672
HARNESSES
86-7-4 REPAIRS
21.Remove 6 clips securing harness to LH side of
body.
22.Remove both rear tail lamps.
+ LIGHTING, REPAIRS, Lamp - tail.
23.Disconnect multiplugs from both tail/flasher
lamps.
24.Release 2 clips securing harness to rear
bumper. 25.Remove nut securing earth header to LH 'E'
post and remove grommet from 'E' post.
26.Disconnect multiplug from RF receiver.
27.Feed harness back to air conditioning ducting.
Page 1578 of 1672

HARNESSES
REPAIRS 86-7-7
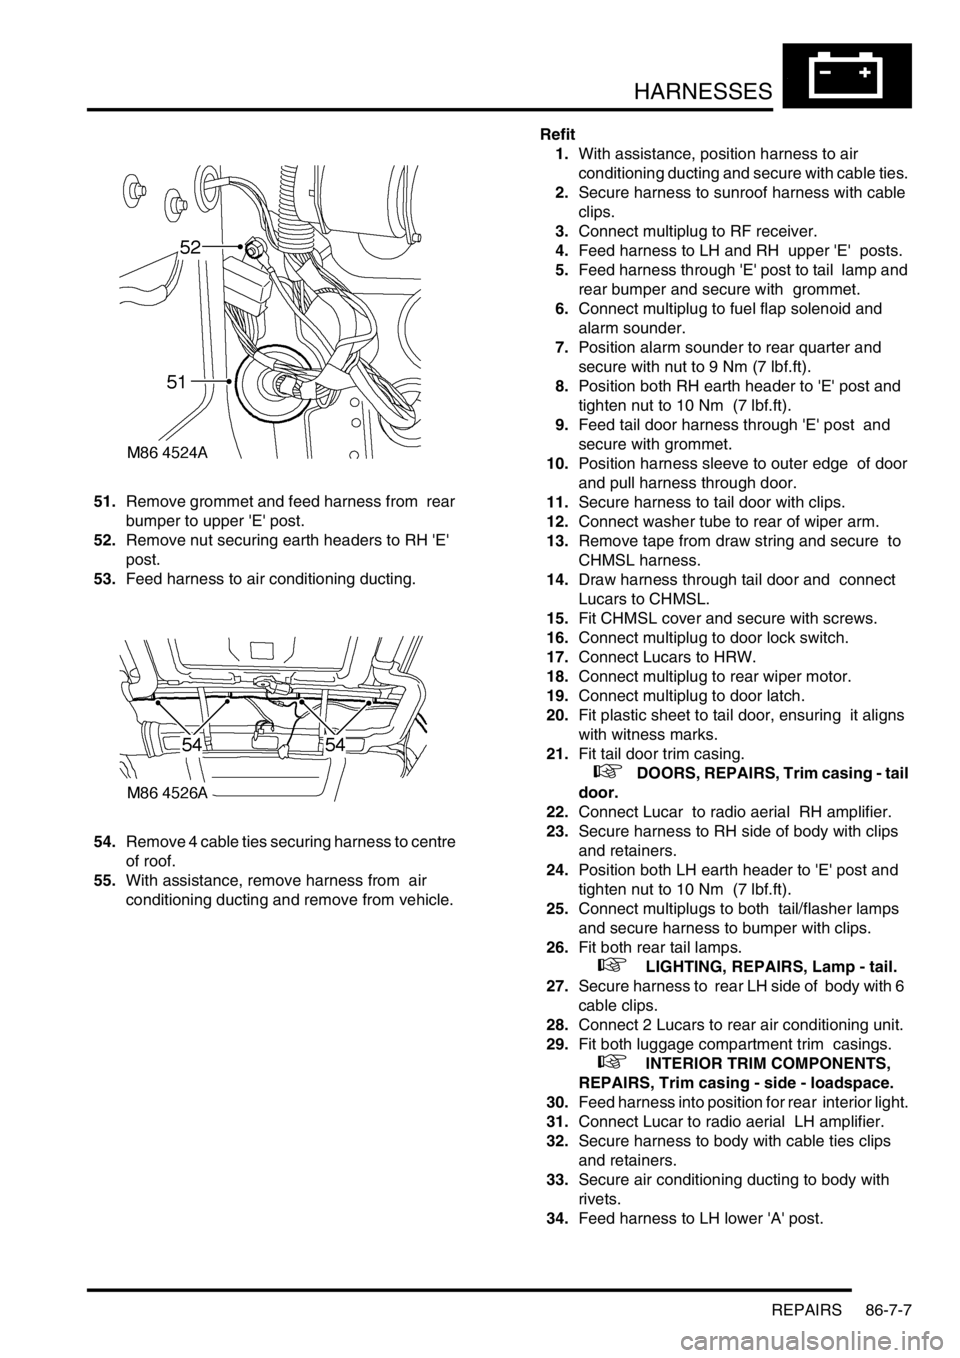
51.Remove grommet and feed harness from rear
bumper to upper 'E' post.
52.Remove nut securing earth headers to RH 'E'
post.
53.Feed harness to air conditioning ducting.
54.Remove 4 cable ties securing harness to centre
of roof.
55.With assistance, remove harness from air
conditioning ducting and remove from vehicle. Refit
1.With assistance, position harness to air
conditioning ducting and secure with cable ties.
2.Secure harness to sunroof harness with cable
clips.
3.Connect multiplug to RF receiver.
4.Feed harness to LH and RH upper 'E' posts.
5.Feed harness through 'E' post to tail lamp and
rear bumper and secure with grommet.
6.Connect multiplug to fuel flap solenoid and
alarm sounder.
7.Position alarm sounder to rear quarter and
secure with nut to 9 Nm (7 lbf.ft).
8.Position both RH earth header to 'E' post and
tighten nut to 10 Nm (7 lbf.ft).
9.Feed tail door harness through 'E' post and
secure with grommet.
10.Position harness sleeve to outer edge of door
and pull harness through door.
11.Secure harness to tail door with clips.
12.Connect washer tube to rear of wiper arm.
13.Remove tape from draw string and secure to
CHMSL harness.
14.Draw harness through tail door and connect
Lucars to CHMSL.
15.Fit CHMSL cover and secure with screws.
16.Connect multiplug to door lock switch.
17.Connect Lucars to HRW.
18.Connect multiplug to rear wiper motor.
19.Connect multiplug to door latch.
20.Fit plastic sheet to tail door, ensuring it aligns
with witness marks.
21.Fit tail door trim casing.
+ DOORS, REPAIRS, Trim casing - tail
door.
22.Connect Lucar to radio aerial RH amplifier.
23.Secure harness to RH side of body with clips
and retainers.
24.Position both LH earth header to 'E' post and
tighten nut to 10 Nm (7 lbf.ft).
25.Connect multiplugs to both tail/flasher lamps
and secure harness to bumper with clips.
26.Fit both rear tail lamps.
+ LIGHTING, REPAIRS, Lamp - tail.
27.Secure harness to rear LH side of body with 6
cable clips.
28.Connect 2 Lucars to rear air conditioning unit.
29.Fit both luggage compartment trim casings.
+ INTERIOR TRIM COMPONENTS,
REPAIRS, Trim casing - side - loadspace.
30.Feed harness into position for rear interior light.
31.Connect Lucar to radio aerial LH amplifier.
32.Secure harness to body with cable ties clips
and retainers.
33.Secure air conditioning ducting to body with
rivets.
34.Feed harness to LH lower 'A' post.
Page 1580 of 1672
HARNESSES
REPAIRS 86-7-9
4.Release and disconnect both HS2O sensor
multiplugs.
5.Disconnect CKP sensor multiplug. 6.Disconnect air conditioning compressor
multiplug.
7.Remove 2 nuts securing alternator cables and
release cables.
Page 1587 of 1672
HARNESSES
86-7-16 REPAIRS
Harness - main
$% 86.70.07
Remove
1.Remove heater assembly.
+ HEATING AND VENTILATION,
REPAIRS, Heater assembly - models with
air conditioning.
+ HEATING AND VENTILATION,
REPAIRS, Heater assembly - models
without air conditioning.
2.Remove 4 clips securing LH and RH trim
panels to lower 'A' post.
3.Remove both lower 'A' post trim panels.
4.Remove air filter assembly.
+ ENGINE MANAGEMENT SYSTEM -
V8, REPAIRS, Air cleaner assembly.
5.Remove battery tray.
6.Remove front bumper.
+ EXTERIOR FITTINGS, REPAIRS,
Bumper assembly - front.7.Disconnect multiplugs from receiver drier and
air temperature sensor.
8.Release 3 cable tie clips securing harness to
lower support rail.
Page 1599 of 1672

HARNESSES
86-7-28 REPAIRS
18.Secure multiplugs to steering column support
bracket and connect brake and clutch pedal
multiplugs.
19.Connect multiplugs to column switch and
passive coil.
20.Position passenger compartment fusebox,
connect multiplugs, fit fusebox to fascia and
secure with nut.
21.Connect ignition switch multiplug to fuse box.
22.With assistance feed LH side of harness into
engine bay.
23.Connect multiplugs to front door harness and
body harness.
24.Position earth headers to LH lower 'A' post and
secure with nuts.
25.Connect multiplugs to ECU pack.
26.Position harness in engine bay.
27.Connect and secure heated front screen
multiplugs.
28.Fit plenum molding.
+ HEATING AND VENTILATION,
REPAIRS, Plenum Air Intake.
29.Connect multiplugs to ABS sensor and fuel
cut-off switch.
30.Using draw string feed harness through inner
wing, remove draw string, connect repeater
lamp multiplug and fit lamp.
31.Connect multiplugs to ABS modulator.
32.Feed harness through to front panel.
33.Position body earth leads and secure with
bolts.
34.Connect washer reservoir multiplugs and
pipes, secure pipes with clips.
35.Secure fog lamp multiplug.
36.Secure earth header behind headlamp.
37.Connect multiplugs to headlamp level motor,
headlamp and side lamp.
38.Fit indicator lamp
+ LIGHTING, REPAIRS, Lamp - front
repeater.
39.Connect multiplug to LH horn.
40.Feed harness to ACE accelerometer, connect
multiplug and secure with cable ties.
41.Connect cruise control, ABS sensor and brake
fluid level switch multiplugs.
42.Connect engine harness multiplug and feed
harness along RH wing to fuse box.
43.Using draw string pull harness through inner
wing, remove draw string, connect repeater
lamp multiplug and fit lamp. 44.Connect chassis harness multiplugs.
45.Position engine bay fuse box and connect
multiplugs, fit fuse box and secure with screws.
46.Connect multiplugs to front of fuse box.
47.Position battery and starter cables and secure
with screws.
48.Fit fuse box cover.
49.Position earth lead and secure with nut.
50.Feed harness through to front panel.
51.Secure fog lamp multiplug.
52.Connect headlamp level motor, headlamp and
side lamp multiplugs.
53.Fit indicator lamp.
+ LIGHTING, REPAIRS, Lamp - front
repeater.
54.Secure harness to RH front panel.
55.Connect cooling fan and horn multiplug.
56.Secure harness to lower support rail.
57.Connect receiver drier and air temperature
sensor multiplugs.
58.Fit front bumper.
+ EXTERIOR FITTINGS, REPAIRS,
Bumper assembly - front.
59.Fit battery tray.
60.Fit air filter assembly.
+ ENGINE MANAGEMENT SYSTEM -
V8, REPAIRS, Air cleaner assembly.
61.Position both lower 'A' post trims and secure
with studs.
62.Fit heater assembly.
+ HEATING AND VENTILATION,
REPAIRS, Heater assembly - models with
air conditioning.
+ HEATING AND VENTILATION,
REPAIRS, Heater assembly - models
without air conditioning.
Page 1603 of 1672

DRIVING AIDS
86-8-4 DESCRIPTION AND OPERATION
Description
General
Park Distance Control (PDC) is introduced on vehicles from 03 model year. PDC provides an audible warning to the
driver when any obstacles are in the path of the vehicle during a reversing manoeuvre. The purpose of the system is
to assist the driver when parking and is not designed as a crash avoidance system or a replacement for visual
interpretation by the driver.
The system comprises four ultrasonic sensors in the rear bumper, an ECU, a fascia mounted momentary switch and
a sounder unit. The system operates using ultrasonic signals which are transmitted by the sensors. The reflected echo
from this output is received by the sensors and used by the PDC ECU to calculate the distance from an object.
The fascia mounted switch allows the driver to de-activate the PDC system if operation is not required or the vehicle
has a trailer attached.
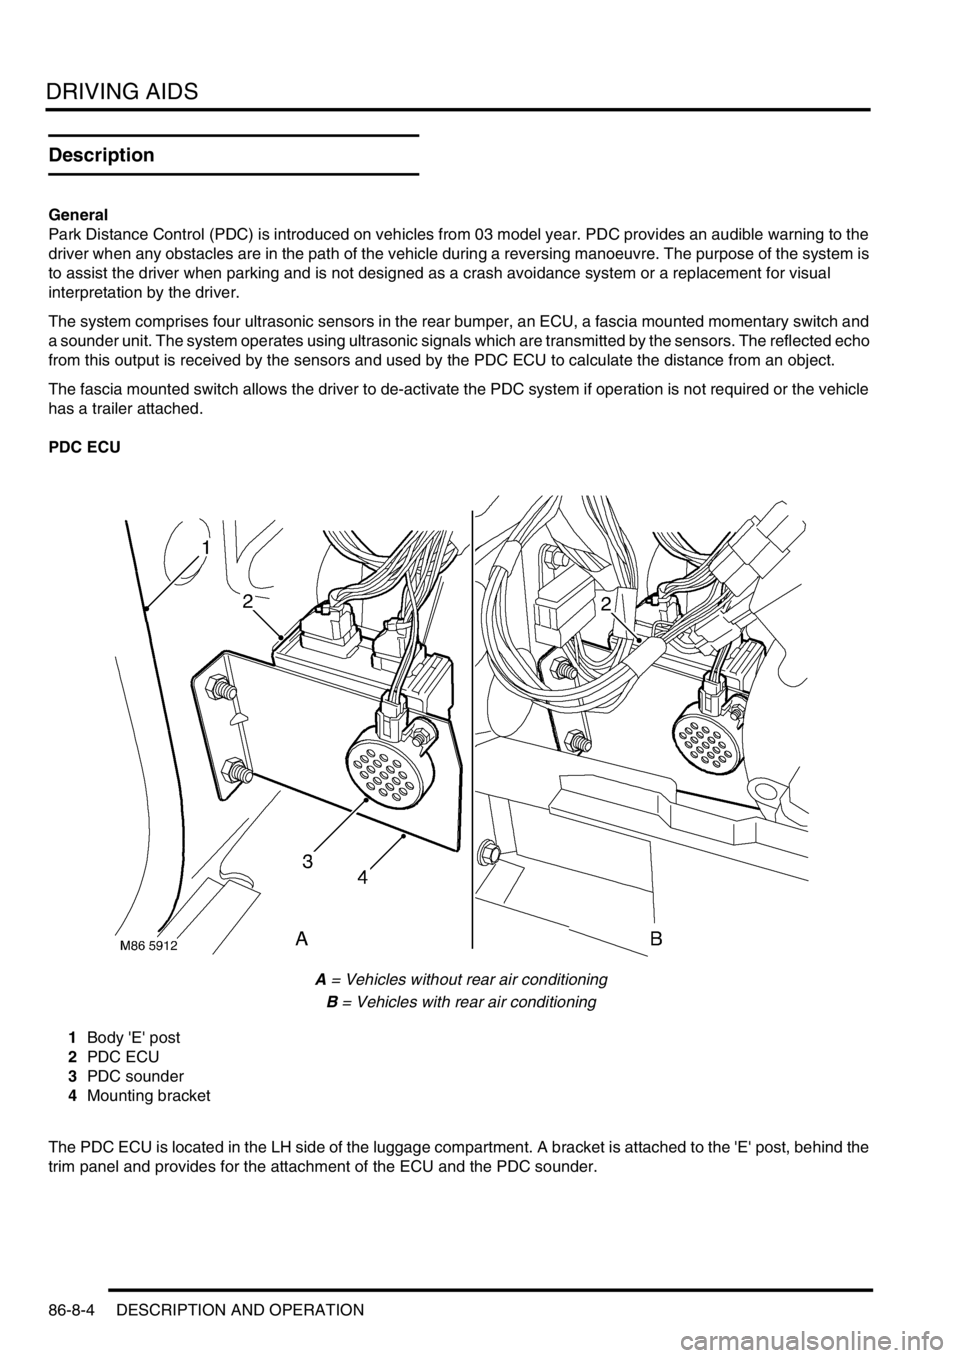
PDC ECU
A = Vehicles without rear air conditioning
B = Vehicles with rear air conditioning
1Body 'E' post
2PDC ECU
3PDC sounder
4Mounting bracket
The PDC ECU is located in the LH side of the luggage compartment. A bracket is attached to the 'E' post, behind the
trim panel and provides for the attachment of the ECU and the PDC sounder.
Page 1604 of 1672
DRIVING AIDS
DESCRIPTION AND OPERATION 86-8-5
On vehicles without rear air conditioning, the bracket is located inboard on the LH 'E' post, adjacent to the luggage
compartment trim panel. On vehicles with rear air conditioning, the bracket is located outboard on the LH 'E' post,
adjacent to the outer body panel.
The bracket has integral studs which provide for the attachment of the ECU with nuts. The ECU is located with the
harness connectors uppermost to assist access. The PDC sounder is located on the opposite side of the bracket and
is secured with screws, lockwashers and nuts.
PDC ECU Connector Pin Details
aConnector C0958
bConnector C0957
Connector C0958
Pin No. Description Input/Output
1 Ignition switch power supply Input
2 Sounder - Negative Input
3 Not used–
4 PDC Switch Input
5 Not used–
6 Reverse Gear signal Input
7 Not used–
8 Ground–
9 Not used–
10 Sounder - Positive 12V supply Output
11 Not used–
12 Not used–
13 PDC Switch LED Output
14 to 16 Not used–