2002 JEEP LIBERTY turn
[x] Cancel search: turnPage 92 of 1803

(4) Remove the dial indicator.
(5) Install differential case in the housing. Ensure
differential bearing cups remain on the bearings and
preload shims are seated in the housing. Tap differ-
ential case to ensure bearings cups are seated in the
housing.
(6) Install bearing caps to their original locations
and loosely install cap bolts.
(7) Remove differential housing spreader (Fig. 43).
(8) Tighten the bearing cap bolts in a criss-cross
pattern to 54-68 N´m (39-50 ft. lbs.).
(9) Install the right axle shaft.
(10) Apply a 6.38mm (1/4 in.) bead of red Mopar
Silicone Sealer or equivalent to the housing cover.
CAUTION: If cover is not installed within 3 to 5 min-
utes, the cover must be cleaned and new RTV
applied or adhesion quality will be compromised.
(11) Install differential housing cover and tighten
bolts in a criss-cross pattern to 19-26 N´m (14-19 ft.
lbs.).(12) Install axle assembly in vehicle.
(13) Fill differential with lubricant and install fill
plug.
DIFFERENTIAL CASE
BEARINGS
REMOVAL
(1) Remove differential from the housing.
(2) Remove bearings from the differential case
with Puller/Press C-293-PA, Adapters C-293-39 and
Plug SP-3289 (Fig. 44).
Fig. 43 DIFFERENTIAL SPREADER
1 - DIFFERENTIAL HOUSING
2 - SAFETY CLAMPS
3 - SPREADER
4 - TURNBUCKLE
Fig. 44 DIFFERENTIAL BEARING PULLER
1 - PULLER
2 - ADAPTERS
3 - BEARING
4 - DIFFERENTIAL
5 - PLUG
KJFRONT AXLE - 186FIA 3 - 43
DIFFERENTIAL (Continued)
Page 99 of 1803

rear propeller shaft is connected to the pinion gear
which rotates the differential through the gear mesh
with the ring gear bolted to the differential case. The
engine power is transmitted to the axle shafts
through the pinion mate and side gears. The side
gears are splined to the axle shafts.
STANDARD DIFFERENTIAL
During straight-ahead driving, the differential pin-
ion gears do not rotate on the pinion mate shaft. This
occurs because input torque applied to the gears is
divided and distributed equally between the two side
gears. As a result, the pinion gears revolve with the
pinion mate shaft but do not rotate around it (Fig. 2).
When turning corners, the outside wheel must
travel a greater distance than the inside wheel to
complete a turn. The difference must be compensated
for to prevent the tires from scuffing and skidding
through turns. To accomplish this, the differential
allows the axle shafts to turn at unequal speeds (Fig.
3). In this instance, the input torque applied to the
pinion gears is not divided equally. The pinion gears
now rotate around the pinion mate shaft in opposite
directions. This allows the side gear and axle shaft
attached to the outside wheel to rotate at a faster
speed.
TRAC-LOKŸ DIFFERENTIAL
The Trac-lokŸ clutches are engaged by two concur-
rent forces. The first being the preload force exerted
through Belleville spring washers within the clutch
packs. The second is the separating forces generated
by the side gears as torque is applied through the
ring gear (Fig. 4).
Fig. 2 DIFFERENTIAL-STRAIGHT AHEAD DRIVING
1 - IN STRAIGHT AHEAD DRIVING EACH WHEEL ROTATES AT
100% OF CASE SPEED
2 - PINION GEAR
3 - SIDE GEAR
4 - PINION GEARS ROTATE WITH CASE
Fig. 3 DIFFERENTIAL-ON TURNS
1 - PINION GEARS ROTATE ON PINION SHAFT
Fig. 4 TRAC-LOK DIFFERENTIAL
1 - CASE
2 - RING GEAR
3 - DRIVE PINION
4 - PINION GEAR
5 - MATE SHAFT
6 - CLUTCH PACK
7 - SIDE GEAR
8 - CLUTCH PACK
3 - 50 REAR AXLE - 198RBIKJ
REAR AXLE - 198RBI (Continued)
Page 100 of 1803

The Trac-lokŸ design provides the differential
action needed for turning corners and for driving
straight ahead during periods of unequal traction.
When one wheel looses traction, the clutch packs
transfer additional torque to the wheel having the
most traction. Trac-lokŸ differentials resist wheel
spin on bumpy roads and provide more pulling power
when one wheel looses traction. Pulling power is pro-
vided continuously until both wheels loose traction. If
both wheels slip due to unequal traction, Trac-lokŸ
operation is normal. In extreme cases of differences
of traction, the wheel with the least traction may
spin.
DIAGNOSIS AND TESTING - AXLE
GEAR NOISE
Axle gear noise can be caused by insufficient lubri-
cant, incorrect backlash, incorrect pinion depth, tooth
contact, worn/damaged gears, or the carrier housing
not having the proper offset and squareness.
Gear noise usually happens at a specific speed
range. The noise can also occur during a specific type
of driving condition. These conditions are accelera-
tion, deceleration, coast, or constant load.
When road testing, first warm-up the axle fluid by
driving the vehicle at least 5 miles and then acceler-
ate the vehicle to the speed range where the noise is
the greatest. Shift out-of-gear and coast through the
peak-noise range. If the noise stops or changes
greatly:
²Check for insufficient lubricant.
²Incorrect ring gear backlash.
²Gear damage.
Differential side gears and pinions can be checked
by turning the vehicle. They usually do not cause
noise during straight-ahead driving when the gears
are unloaded. The side gears are loaded during vehi-
cle turns. A worn pinion shaft can also cause a snap-
ping or a knocking noise.
BEARING NOISE
The axle shaft, differential and pinion bearings can
all produce noise when worn or damaged. Bearing
noise can be either a whining, or a growling sound.
Pinion bearings have a constant-pitch noise. This
noise changes only with vehicle speed. Pinion bearing
noise will be higher pitched because it rotates at a
faster rate. Drive the vehicle and load the differen-
tial. If bearing noise occurs, the rear pinion bearing
is the source of the noise. If the bearing noise is
heard during a coast, the front pinion bearing is the
source.
Worn or damaged differential bearings usually pro-
duce a low pitch noise. Differential bearing noise is
similar to pinion bearing noise. The pitch of differen-tial bearing noise is also constant and varies only
with vehicle speed.
Axle shaft bearings produce noise and vibration
when worn or damaged. The noise generally changes
when the bearings are loaded. Road test the vehicle.
Turn the vehicle sharply to the left and to the right.
This will load the bearings and change the noise
level. Where axle bearing damage is slight, the noise
is usually not noticeable at speeds above 30 mph.
LOW SPEED KNOCK
Low speed knock is generally caused by a worn
U-joint or by worn side±gear thrust washers. A worn
pinion shaft bore will also cause low speed knock.
VIBRATION
Vibration at the rear of the vehicle is usually
caused by a:
²Damaged drive shaft.
²Missing drive shaft balance weight(s).
²Worn or out-of-balance wheels.
²Loose wheel lug nuts.
²Worn U-joint(s).
²Loose/broken springs.
²Damaged axle shaft bearing(s).
²Loose pinion gear nut.
²Excessive pinion yoke run out.
²Bent axle shaft(s).
Check for loose or damaged front-end components
or engine/transmission mounts. These components
can contribute to what appears to be a rearend vibra-
tion. Do not overlook engine accessories, brackets
and drive belts.
NOTE: All driveline components should be exam-
ined before starting any repair.
DRIVELINE SNAP
A snap or clunk noise when the vehicle is shifted
into gear (or the clutch engaged), can be caused by:
²High engine idle speed.
²Transmission shift operation.
²Loose engine/transmission/transfer case mounts.
²Worn U-joints.
²Loose spring mounts.
²Loose pinion gear nut and yoke.
²Excessive ring gear backlash.
²Excessive side gear to case clearance.
The source of a snap or a clunk noise can be deter-
mined with the assistance of a helper. Raise the vehi-
cle on a hoist with the wheels free to rotate. Instruct
the helper to shift the transmission into gear. Listen
for the noise, a mechanics stethoscope is helpful in
isolating the source of a noise.
KJREAR AXLE - 198RBI 3 - 51
REAR AXLE - 198RBI (Continued)
Page 109 of 1803

(24) Rotate dial indicator out of the way on pilot
stud.
(25) Remove differential case and dummy bearings
from the housing.
(26) Install new side bearing cones and cups on
differential case.
(27) Install spreader W-129-B and some compo-
nents of Adapter Set 6987 on differential housing and
spread axle opening enough to receive differential
case.
(28) Place side bearing shims into the housing
against the axle tubes.
(29) Install differential case in the housing.
(30) Rotate the differential case several times to
seat the side bearings.
(31) Position the indicator plunger against a ring
gear tooth (Fig. 22).
(32) Push and hold ring gear upward while not
allowing the pinion gear to rotate.
(33) Zero dial indicator face to pointer.
(34) Push and hold ring gear downward while not
allowing the pinion gear to rotate. Dial indicator
reading should be between 0.13-0.20 mm (0.005-0.008
in.). If backlash is not within specifications transfer
the necessary amount of shim thickness from one
side of the differential housing to the other (Fig. 23).
(35) Verify differential case and ring gear runout
by measuring ring to pinion gear backlash at eight
locations around the ring gear. Readings should not
vary more than 0.05 mm (0.002 in.). If readings varymore than specified, the ring gear or the differential
case is defective.
After the proper backlash is achieved, perform the
Gear Contact Pattern Analysis procedure.
GEAR CONTACT PATTERN
The ring gear and pinion teeth contact patterns
will show if the pinion depth is correct in the hous-
ing. It will also show if the ring gear backlash has
been adjusted correctly. The backlash can be adjusted
within specifications to achieve desired tooth contact
patterns.
(1) Apply a thin coat of hydrated ferric oxide or
equivalent to the drive and coast side of the ring gear
teeth.
(2) Wrap, twist, and hold a shop towel around the
pinion yoke to increase the turning resistance of the
pinion. This will provide a more distinct contact pat-
tern.
(3) With a boxed end wrench on a ring gear bolt,
rotate the differential case one complete revolution in
both directions while a load is being applied from
shop towel.
The areas on the ring gear teeth with the greatest
degree of contact against the pinion teeth will
squeeze the compound to the areas with the least
amount of contact. Note and compare patterns on the
ring gear teeth to Gear Tooth Contact Patterns chart
(Fig. 24) and adjust pinion depth and gear backlash
as necessary.
Fig. 22 RING GEAR BACKLASH
1 - DIAL INDICATOR
Fig. 23 BACKLASH SHIM
3 - 60 REAR AXLE - 198RBIKJ
REAR AXLE - 198RBI (Continued)
Page 121 of 1803

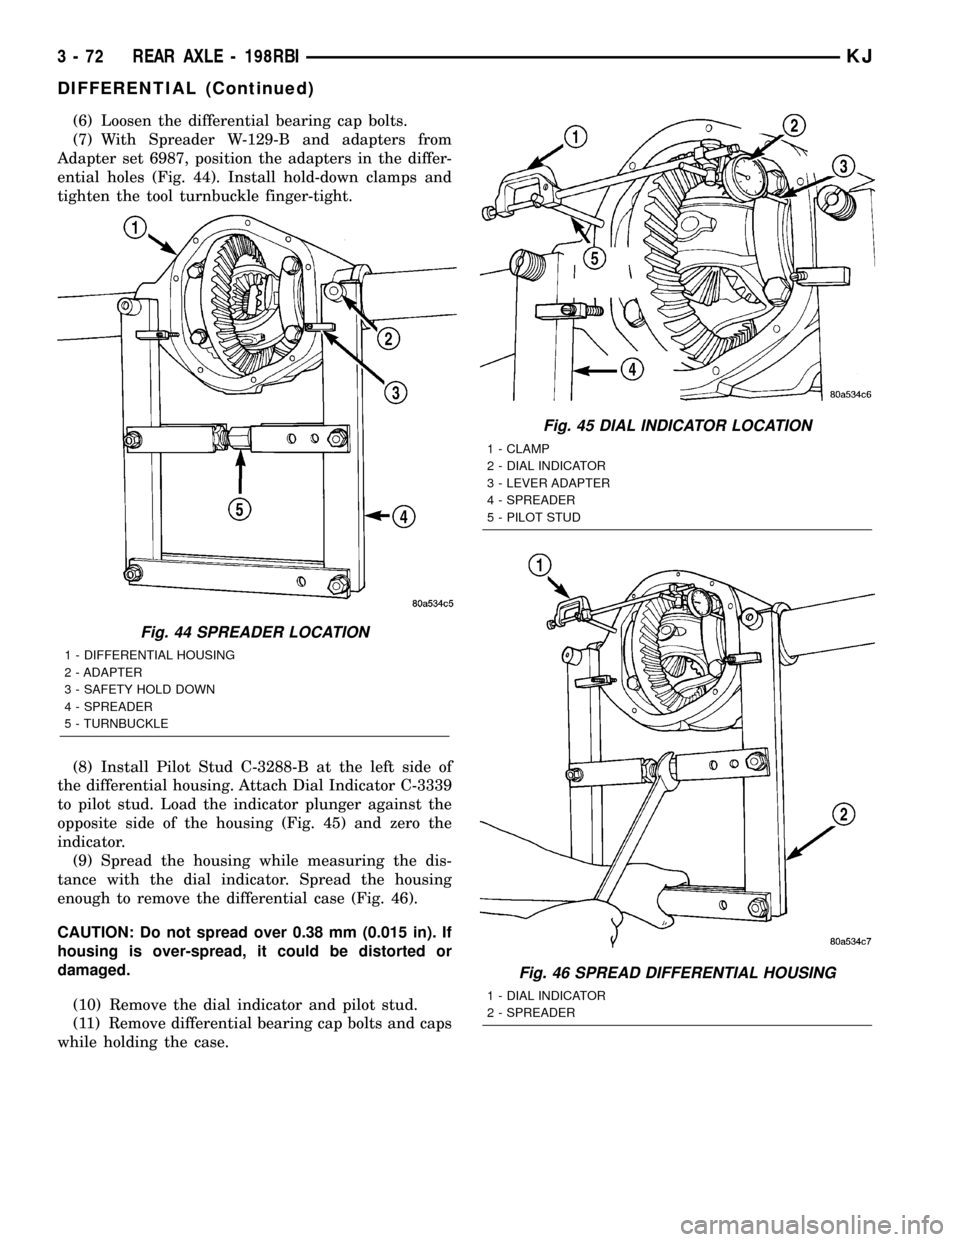
(6) Loosen the differential bearing cap bolts.
(7) With Spreader W-129-B and adapters from
Adapter set 6987, position the adapters in the differ-
ential holes (Fig. 44). Install hold-down clamps and
tighten the tool turnbuckle finger-tight.
(8) Install Pilot Stud C-3288-B at the left side of
the differential housing. Attach Dial Indicator C-3339
to pilot stud. Load the indicator plunger against the
opposite side of the housing (Fig. 45) and zero the
indicator.
(9) Spread the housing while measuring the dis-
tance with the dial indicator. Spread the housing
enough to remove the differential case (Fig. 46).
CAUTION: Do not spread over 0.38 mm (0.015 in). If
housing is over-spread, it could be distorted or
damaged.
(10) Remove the dial indicator and pilot stud.
(11) Remove differential bearing cap bolts and caps
while holding the case.
Fig. 44 SPREADER LOCATION
1 - DIFFERENTIAL HOUSING
2 - ADAPTER
3 - SAFETY HOLD DOWN
4 - SPREADER
5 - TURNBUCKLE
Fig. 45 DIAL INDICATOR LOCATION
1 - CLAMP
2 - DIAL INDICATOR
3 - LEVER ADAPTER
4 - SPREADER
5 - PILOT STUD
Fig. 46 SPREAD DIFFERENTIAL HOUSING
1 - DIAL INDICATOR
2 - SPREADER
3 - 72 REAR AXLE - 198RBIKJ
DIFFERENTIAL (Continued)
Page 122 of 1803

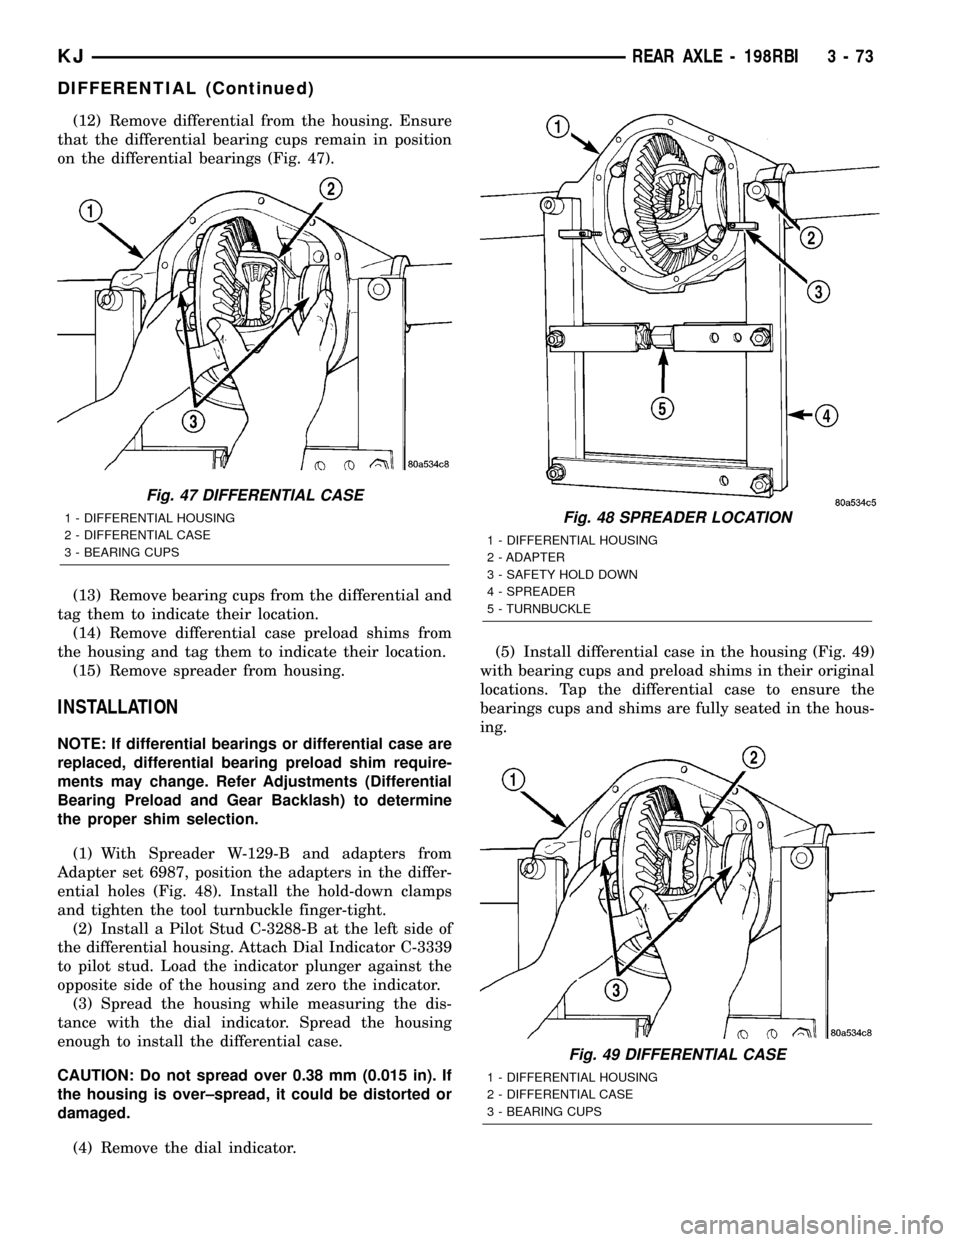
(12) Remove differential from the housing. Ensure
that the differential bearing cups remain in position
on the differential bearings (Fig. 47).
(13) Remove bearing cups from the differential and
tag them to indicate their location.
(14) Remove differential case preload shims from
the housing and tag them to indicate their location.
(15) Remove spreader from housing.
INSTALLATION
NOTE: If differential bearings or differential case are
replaced, differential bearing preload shim require-
ments may change. Refer Adjustments (Differential
Bearing Preload and Gear Backlash) to determine
the proper shim selection.
(1) With Spreader W-129-B and adapters from
Adapter set 6987, position the adapters in the differ-
ential holes (Fig. 48). Install the hold-down clamps
and tighten the tool turnbuckle finger-tight.
(2) Install a Pilot Stud C-3288-B at the left side of
the differential housing. Attach Dial Indicator C-3339
to pilot stud. Load the indicator plunger against the
opposite side of the housing and zero the indicator.
(3) Spread the housing while measuring the dis-
tance with the dial indicator. Spread the housing
enough to install the differential case.
CAUTION: Do not spread over 0.38 mm (0.015 in). If
the housing is over±spread, it could be distorted or
damaged.
(4) Remove the dial indicator.(5) Install differential case in the housing (Fig. 49)
with bearing cups and preload shims in their original
locations. Tap the differential case to ensure the
bearings cups and shims are fully seated in the hous-
ing.
Fig. 47 DIFFERENTIAL CASE
1 - DIFFERENTIAL HOUSING
2 - DIFFERENTIAL CASE
3 - BEARING CUPSFig. 48 SPREADER LOCATION
1 - DIFFERENTIAL HOUSING
2 - ADAPTER
3 - SAFETY HOLD DOWN
4 - SPREADER
5 - TURNBUCKLE
Fig. 49 DIFFERENTIAL CASE
1 - DIFFERENTIAL HOUSING
2 - DIFFERENTIAL CASE
3 - BEARING CUPS
KJREAR AXLE - 198RBI 3 - 73
DIFFERENTIAL (Continued)
Page 123 of 1803

(6) Install the bearing caps in their original loca-
tions (Fig. 50).
(7) Loosely install differential bearing cap bolts.
(8) Remove axle housing spreader.
(9) Tighten the bearing cap bolts to 64-91 N´m
(47-67 ft. lbs.).
(10) Install the axle shafts.
(11) Apply a 6.35mm (1/4 in.) bead of red Mopar
Silicone Rubber Sealant or equivalent to the housing
cover (Fig. 51).
CAUTION: If cover is not installed within 3 to 5 min-
utes, the cover must be cleaned and new RTV
applied or adhesion quality will be compromised.
(12) Install the cover and tighten cover bolts in a
criss-cross pattern to 38-45 N´m (28-33 ft. lbs.).
(13) Refill the differential with lubricant and
install fill plug.
(14) Remove support and lower the vehicle.
DIFFERENTIAL - TRAC-LOK
DIAGNOSIS AND TESTING - TRAC-LOKT
The most common problem is a chatter noise when
turning corners. Before removing the unit for repair,
drain, flush and refill the axle with the specified
lubricant. A container of Mopar Trac-loktLubricant
(friction modifier) should be added after repair ser-
vice or during a lubricant change.
After changing the lubricant, drive the vehicle and
make 10 to 12 slow, figure-eight turns. This maneu-
ver will pump lubricant through the clutches. This
will correct the condition in most instances. If the
chatter persists, clutch damage could have occurred.
DIFFERENTIAL TEST
The differential can be tested without removing the
differential case by measuring rotating torque. Make
sure brakes are not dragging during this measure-
ment.
(1) Place blocks in front and rear of both front
wheels.
(2) Raise one rear wheel until it is completely off
the ground.
(3) Engine off, transmission in neutral, and park-
ing brake off.
(4) Remove wheel and bolt Special Tool 6790 or
equivalent tool to studs.
(5) Use torque wrench on special tool to rotate
wheel and read rotating torque (Fig. 52).
(6) If rotating torque is less than 41 N´m (56 ft.
lbs.) or more than 271 N´m (200 ft. lbs.) on either
wheel the unit should be serviced.
Fig. 50 BEARING CAP REFERENCE
1 - REFERENCE LETTERS
2 - REFERENCE LETTERS
Fig. 51 DIFFERENTIAL COVER - TYPICAL
1 - SEALING SURFACE
2 - SEALANT BEAD
3 - SEALANT THICKNESS
3 - 74 REAR AXLE - 198RBIKJ
DIFFERENTIAL (Continued)
Page 125 of 1803

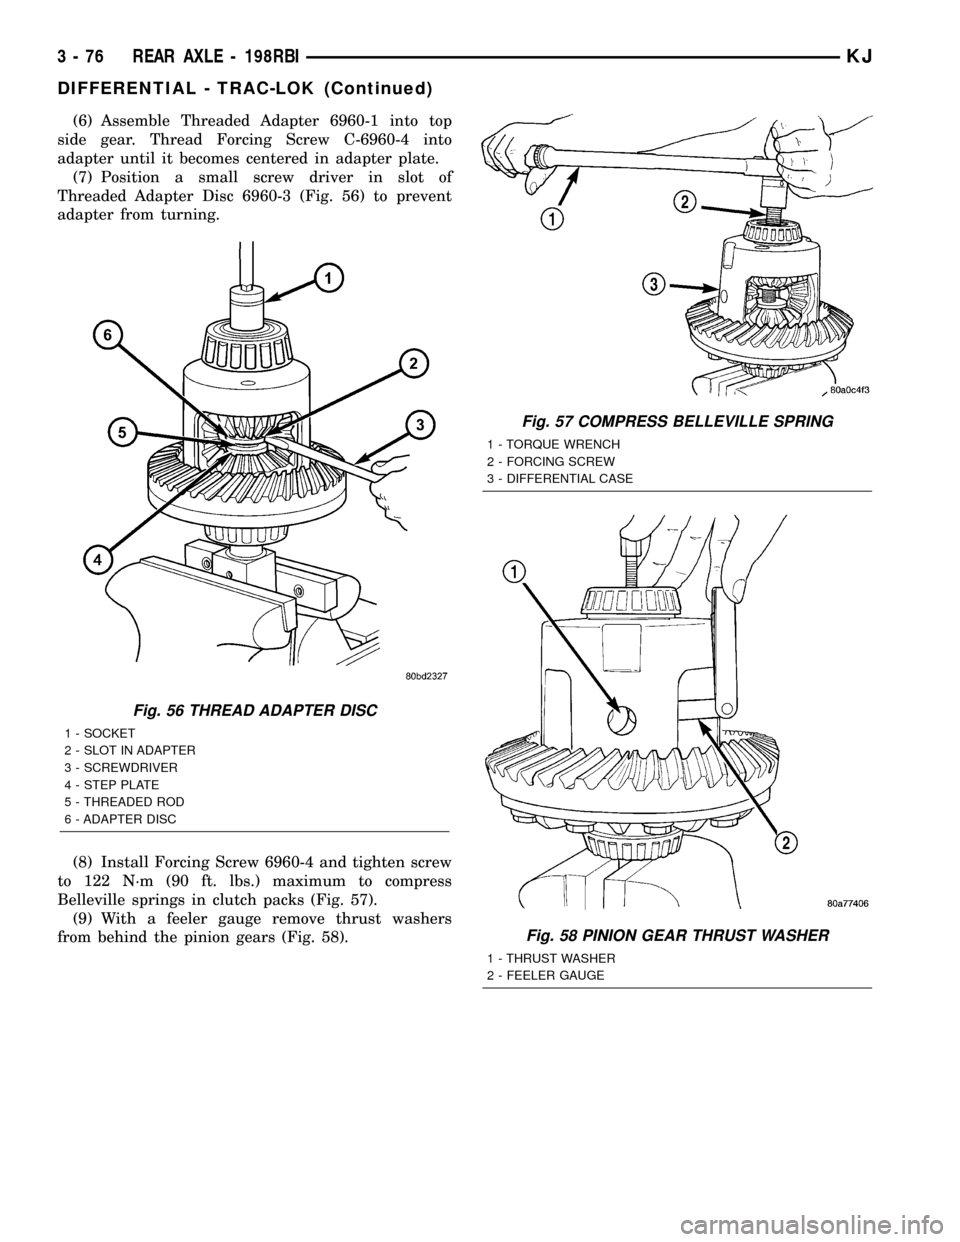
(6) Assemble Threaded Adapter 6960-1 into top
side gear. Thread Forcing Screw C-6960-4 into
adapter until it becomes centered in adapter plate.
(7) Position a small screw driver in slot of
Threaded Adapter Disc 6960-3 (Fig. 56) to prevent
adapter from turning.
(8) Install Forcing Screw 6960-4 and tighten screw
to 122 N´m (90 ft. lbs.) maximum to compress
Belleville springs in clutch packs (Fig. 57).
(9) With a feeler gauge remove thrust washers
from behind the pinion gears (Fig. 58).
Fig. 56 THREAD ADAPTER DISC
1 - SOCKET
2 - SLOT IN ADAPTER
3 - SCREWDRIVER
4 - STEP PLATE
5 - THREADED ROD
6 - ADAPTER DISC
Fig. 57 COMPRESS BELLEVILLE SPRING
1 - TORQUE WRENCH
2 - FORCING SCREW
3 - DIFFERENTIAL CASE
Fig. 58 PINION GEAR THRUST WASHER
1 - THRUST WASHER
2 - FEELER GAUGE
3 - 76 REAR AXLE - 198RBIKJ
DIFFERENTIAL - TRAC-LOK (Continued)