2002 JEEP LIBERTY Body control module
[x] Cancel search: Body control modulePage 1452 of 1803

(6) Install the serpentine belt (Refer to 7 - COOL-
ING/ACCESSORY DRIVE/DRIVE BELTS - INSTAL-
LATION).
(7) Install the fan shroud.
(8) Install the fan (Refer to 7 - COOLING/EN-
GINE/RADIATOR FAN - INSTALLATION).
(9) Install the radiator crossmember (Refer to 23 -
BODY/EXTERIOR/RADIATOR CROSSMEMBER -
INSTALLATION).
(10) Refill the power steering fluid (Refer to 19 -
STEERING/PUMP - STANDARD PROCEDURE).
INSTALLATION - RETURN HOSE (GEAR TO THE
COOLER)
(1) Install the return hose to the vehicle. (Fig. 7)
(2) Install the return hose mounting bracket bolts
to the front cradle.
(3) Install the return hose at the cooler.
(4) Install the return hose at the gear 28 N´m (21
ft.lbs.).
(5) Install the serpentine belt (Refer to 7 - COOL-
ING/ACCESSORY DRIVE/DRIVE BELTS - INSTAL-
LATION).
(6) Install the fan shroud.
(7) Install the fan (Refer to 7 - COOLING/EN-
GINE/RADIATOR FAN - INSTALLATION).
(8) Install the radiator crossmember (Refer to 23 -
BODY/EXTERIOR/RADIATOR CROSSMEMBER -
INSTALLATION).
(9) Refill the power steering fluid (Refer to 19 -
STEERING/PUMP - STANDARD PROCEDURE).
INSTALLATION - RETURN HOSE (RESERVOIR
TO THE COOLER)
(1) Install the return hose to the vehicle.
(2) Install the return hose to the pump reservoir.
(3) Install the return hose at the cooler.
(4) Refill the power steering fluid (Refer to 19 -
STEERING/PUMP - STANDARD PROCEDURE).
POWER STEERING PRESSURE
SWITCH
DESCRIPTION
A pressure sensing switch is used in the power
steering system. It is mounted on the high-pressure
steering hose. This switch will be used with both
2.4L and 3.7L engines.
OPERATION
The switch is used on both the 2.4L 4±cylinder and
3.7L V-6 engines.
The power steering pressure switch provides an
input to the Powertrain Control Module (PCM). This
input is provided during periods of high steering
pump load and low engine rpm; such as during park-
ing maneuvers. The PCM increases the idle speed
through the Idle Air Control (IAC) motor. This is
done to prevent the engine from stalling under the
increased load.
When steering pump pressure exceeds 3275 kPa
690 kPa (475 psi 100 psi), the Normally Closed
(NC) switch will open and the PCM will increase the
engine idle speed. This will prevent the engine from
stalling.
When pump pressure drops to approximately 1379
kPa (200 psi), the switch circuit will re-close and
engine idle speed will return to its previous setting.
REMOVAL
The power steering pressure switch is installed in
the power steering high-pressure hose (Fig. 9).
(1) Remove the high pressure power steering
hose(Refer to 19 - STEERING/PUMP/HOSES -
REMOVAL).
(2) Disconnect electrical connector from power
steering pressure switch.
(3) Place a small container or shop towel beneath
switch to collect any excess fluid.
(4) Remove switch. Use back-up wrench on power
steering line to prevent line bending.
INSTALLATION
(1) Install power steering switch into power steer-
ing line. (Fig. 9)
(2) Tighten to 9.6 N´m (85 in. lbs.) torque.
Fig. 8 HIGH PRESSURE HOSE ASSEMBLY
1 - HIGH PRESSURE POWER STEERING HOSE
2 - MOUNTING BRACKET
3 - POWER STEERING PRESURE SWITCH
19 - 22 PUMPKJ
HOSES (Continued)
Page 1585 of 1803

LATCH
REMOVAL
(1) Remove the grill. (Refer to 23 - BODY/EXTERI-
OR/GRILLE - REMOVAL)
(2) Remove the latch support bracket bolts and
position the latch assembly aside. (Fig. 1)
(3) Remove the two latch nuts.
(4) Disconnect the release cable.
INSTALLATION
(1) Connect the release cable and install the latch
onto the support bracket.
(2) Install the two nuts and tighten to 12 N´m (9
ft. lbs.).
(3) Install the support bracket and the bolts.
(4) Tighten the bolts to 12 N´m (9 ft. lbs.).
(5) Install the grill. (Refer to 23 - BODY/EXTERI-
OR/GRILLE - INSTALLATION)
LATCH RELEASE CABLE
REMOVAL
(1) Remove the battery. (Refer to 8 - ELECTRI-
CAL/BATTERY SYSTEM/BATTERY - REMOVAL)
(2) Remove the hood latch. (Refer to 23 - BODY/
HOOD/LATCH - REMOVAL)(3) Remove the powertrain control module. (Refer
to 8 - ELECTRICAL/ELECTRONIC CONTROL
MODULES/POWERTRAIN CONTROL MODULE -
REMOVAL)
(4) Remove the hood release handle. (Refer to 23 -
BODY/HOOD/LATCH RELEASE HANDLE -
REMOVAL)
(5) Disconnect the attaching clips and remove the
cable from the inside.
INSTALLATION
(1) Install the cable from the inside and attach the
retaining clips.
(2) Install the hood latch release handle. (Refer to
23 - BODY/HOOD/LATCH RELEASE HANDLE -
INSTALLATION)
(3) Install the powertrain control module. (Refer to
8 - ELECTRICAL/ELECTRONIC CONTROL MOD-
ULES/POWERTRAIN CONTROL MODULE -
INSTALLATION)
(4) Install the hood latch. (Refer to 23 - BODY/
HOOD/LATCH - INSTALLATION)
(5) Install the battery. (Refer to 8 - ELECTRICAL/
BATTERY SYSTEM/BATTERY - INSTALLATION)
SUPPORT CYLINDER
REMOVAL
(1) Open the hood and support.
(2) Release the upper and lower clips.
(3) Remove the support cylinder.
INSTALLATION
(1) Install the support cylinder over the ball studs
with the thin end down.
(2) Install the retaining clips and remove the sup-
port from the hood.
LATCH RELEASE HANDLE
REMOVAL
(1) Remove the cowl trim panel. (Refer to 23 -
BODY/INTERIOR/COWL TRIM COVER -
REMOVAL)
(2) Remove the three screws and remove the han-
dle.
(3) Disconnect the hood release cable.
INSTALLATION
(1) Connect the hood release cable to the handle.
(2) Install the handle and install the three screws.
(3) Install the cowl trim cover. (Refer to 23 -
BODY/INTERIOR/COWL TRIM COVER - INSTAL-
LATION)
Fig. 1 RADIATOR CROSSMEMBER
1 - CROSSMEMBER
2 - BOLTS (2)
3 - BOLTS (4)
4 - BOLTS (2)
5 - HOOD LATCH SUPPORT
23 - 120 HOODKJ
Page 1640 of 1803

SUNROOF
TABLE OF CONTENTS
page page
SUNROOF
DESCRIPTION........................175
DIAGNOSIS AND TESTING
WATER DRAINAGE AND WIND NOISE
DIAGNOSIS.........................176
DIAGNOSTIC PROCEDURES...........176
GLASS PANEL
REMOVAL............................178
INSTALLATION........................178
ADJUSTMENTS
SUNROOF GLASS PANEL ADJUSTMENT . . 178
GLASS PANEL SEAL
REMOVAL............................178
INSTALLATION........................178
SUNSHADE
REMOVAL............................179
INSTALLATION........................179
GUIDE ASSEMBLY
REMOVAL............................179
INSTALLATION........................179
WIND DEFLECTOR
REMOVAL............................180INSTALLATION........................180
OPENING TRIM LACE
REMOVAL............................180
INSTALLATION........................180
DRAIN TUBE
REMOVAL............................180
INSTALLATION........................181
MODULE ASSEMBLY
REMOVAL............................181
INSTALLATION........................181
DRIVE MOTOR
REMOVAL............................182
INSTALLATION........................182
CONTROL MODULE
REMOVAL............................183
INSTALLATION........................183
CONTROL SWITCH
DESCRIPTION........................184
OPERATION..........................184
DIAGNOSIS AND TESTING...............184
REMOVAL............................184
INSTALLATION........................184
SUNROOF
DESCRIPTION
WARNING: Keep fingers and other body parts out
of sunroof opening at all times.
The sunroof features a power sliding glass panel
and a sunshade which can be manually positioned
anywhere along its travel, rearward of glass panel
front edge.
The sunroof is electrically operated from two
switches located on the windshield header, rearwardof the map lamp. To operate the sunroof the ignition
switch must be in either the Accessory or On/Run
position. One switch (vent) is a push button type and
opens the sunroof to the vent position only. The other
switch (open/close) is a rocker type for opening and
closing the sunroof. Pressing and releasing the open
button once the sunroof will express open and the
wind deflector will raise. If the button is pressed a
second time the sunroof will stop in that position.
Pressing and holding the close button will close the
sunroof. If the close button is released the sunroof
will stop in that position.
KJSUNROOF 23 - 175
Page 1642 of 1803

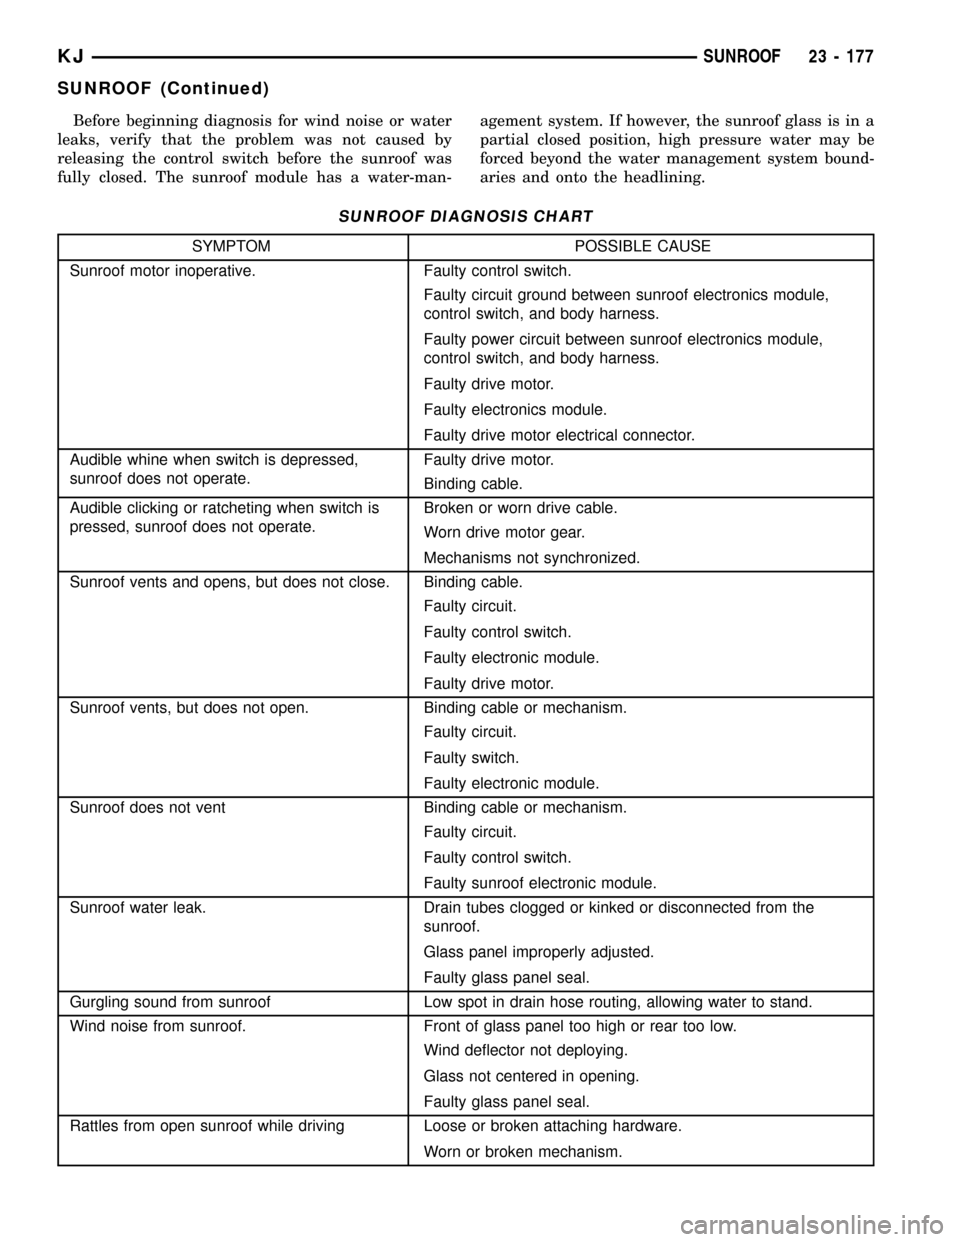
Before beginning diagnosis for wind noise or water
leaks, verify that the problem was not caused by
releasing the control switch before the sunroof was
fully closed. The sunroof module has a water-man-agement system. If however, the sunroof glass is in a
partial closed position, high pressure water may be
forced beyond the water management system bound-
aries and onto the headlining.
SUNROOF DIAGNOSIS CHART
SYMPTOM POSSIBLE CAUSE
Sunroof motor inoperative. Faulty control switch.
Faulty circuit ground between sunroof electronics module,
control switch, and body harness.
Faulty power circuit between sunroof electronics module,
control switch, and body harness.
Faulty drive motor.
Faulty electronics module.
Faulty drive motor electrical connector.
Audible whine when switch is depressed,
sunroof does not operate.Faulty drive motor.
Binding cable.
Audible clicking or ratcheting when switch is
pressed, sunroof does not operate.Broken or worn drive cable.
Worn drive motor gear.
Mechanisms not synchronized.
Sunroof vents and opens, but does not close. Binding cable.
Faulty circuit.
Faulty control switch.
Faulty electronic module.
Faulty drive motor.
Sunroof vents, but does not open. Binding cable or mechanism.
Faulty circuit.
Faulty switch.
Faulty electronic module.
Sunroof does not vent Binding cable or mechanism.
Faulty circuit.
Faulty control switch.
Faulty sunroof electronic module.
Sunroof water leak. Drain tubes clogged or kinked or disconnected from the
sunroof.
Glass panel improperly adjusted.
Faulty glass panel seal.
Gurgling sound from sunroof Low spot in drain hose routing, allowing water to stand.
Wind noise from sunroof. Front of glass panel too high or rear too low.
Wind deflector not deploying.
Glass not centered in opening.
Faulty glass panel seal.
Rattles from open sunroof while driving Loose or broken attaching hardware.
Worn or broken mechanism.
KJSUNROOF 23 - 177
SUNROOF (Continued)
Page 1647 of 1803

(5) Connect wire harness.
(6) Install the headliner. (Refer to 23 - BODY/IN-
TERIOR/HEADLINER - INSTALLATION)
(7) Install the opening trim lace. (Refer to 23 -
BODY/SUNROOF/OPENING TRIM LACE - INSTAL-
LATION)
(8) Connect battery negative cable.
(9) Test sunroof operation, adjust as necessary.
(Refer to 23 - BODY/SUNROOF/GLASS PANEL -
ADJUSTMENTS)
DRIVE MOTOR
REMOVAL
(1) Remove headliner. (Refer to 23 - BODY/INTE-
RIOR/HEADLINER - REMOVAL)
(2) Cut wire retaining tape being careful not to cut
wires.
(3) Disconnect the electrical connector (Fig. 11).
(4) Remove three motor assembly attaching screws
from bottom side of motor assembly and remove
motor assembly from the motor bracket.
INSTALLATION
(1) Place motor into position and install screws
attaching motor to bracket.
NOTE: Hold electronics module to motor bracket
when inserting motor shaft to avoid disengaging
drive cables.
(2) Connect electrical connector.
(3) Tape wires to drive cables to prevent rattles.
Fig. 9 WIRE HARNESS
1 - CLIPS
2 - ELECTRICAL CONNECTOR
3 - WIRE HARNESS
Fig. 10 MODULE ASSEMBLY
1 - U-NUTS
2 - DRIVE MOTOR
3 - BOLTS
4 - GLASS OPENING
5 - MODULE ASSEMBLY
Fig. 11 DRIVE MOTOR ASSEMBLY
1 - CONTROL MODULE
2 - SCREWS
3 - DRIVE MOTOR
4 - SCREW
5 - ELECTRICAL CONNECTOR
23 - 182 SUNROOFKJ
MODULE ASSEMBLY (Continued)
Page 1648 of 1803

(4) Test sunroof operation, adjust as necessary.
(5) Install headliner. (Refer to 23 - BODY/INTERI-
OR/HEADLINER - INSTALLATION)
CONTROL MODULE
REMOVAL
(1) Remove the module assembly. (Refer to 23 -
BODY/SUNROOF/MODULE ASSEMBLY -
REMOVAL)
(2) Remove three motor assembly retaining screws
from bottom side of motor, and remove motor assem-
bly (Fig. 11).
(3) From top side of module assembly, remove one
attaching screw from electronics module. (Fig. 12)
(4) Remove old timing module.
INSTALLATION
(1) Check glass assembly position. Adjust to full
closed position. Insert pin into holes in lift arm
assembly to check position (Fig. 13).
(2) Set new electronic module in position on top
side of motor mounting bracket engaging drive cables
with pinion gear in electronics module.
(3) Install one screw to attach electronics module
to motor bracket. Tighten screw to 3 N´m (27 in. lbs.)
torque.
(4) Install motor assembly to motor bracket and
electronics module with three screws. Tighten screw
to 1.75 N´m (15.5 in. lbs.) torque.
(5) Remove the new module's timing pin and dis-
card. (Fig. 14)(6) Connect electrical connector to module assem-
bly wire harness. Secure any loose wires.
(7) Install module assembly. (Refer to 23 - BODY/
SUNROOF/MODULE ASSEMBLY - INSTALLA-
TION)
(8) Test operation, adjust as necessary. (Refer to 23
- BODY/SUNROOF/GLASS PANEL - ADJUST-
MENTS)
(9) Install opening trim lace. (Refer to 23 - BODY/
SUNROOF/OPENING TRIM LACE - INSTALLA-
TION)
Fig. 12 CONTROL MODULE
1 - MOTOR BRACKET
2 - CABLES
3 - SCREW
4 - CONTROL MODULE
Fig. 13 LIFT ARM POSITIONING
1 - GLASS BRACKET
2 - LIFT ARM
3 - ALIGNMENT PIN
Fig. 14 MODULE TIMING PIN
1 - CONTROL MODULE
2 - TIMING PIN
KJSUNROOF 23 - 183
DRIVE MOTOR (Continued)
Page 1649 of 1803

CONTROL SWITCH
DESCRIPTION
Vehicles equipped with a power sunroof utilize an
sunroof control switch. On this model, the sunroof
control switch is located in the overhead console, in
between the two reading lamps. The switch is
mounted in the overhead console with four plastic
retaining tabs, molded into the switch housing.
This switch incorporates four selections of opera-
tion open, auto open, close and vent. The individual
switches in the sunroof control switch unit cannot be
repaired. If one switch is damaged or faulty, the
entire sunroof control switch unit must be replaced.
OPERATION
With the operation of the sunroof control switch,
voltage is directed to the sunroof motor, through the
switch contacts or control module. If the control
switch is depressed and held depressed the voltage
signal is controlled manually through the switch con-
tacts, so when the switch is released the sunroof
stops.
Refer to the owners manual for more information
on the operation of the sunroof switch and system.
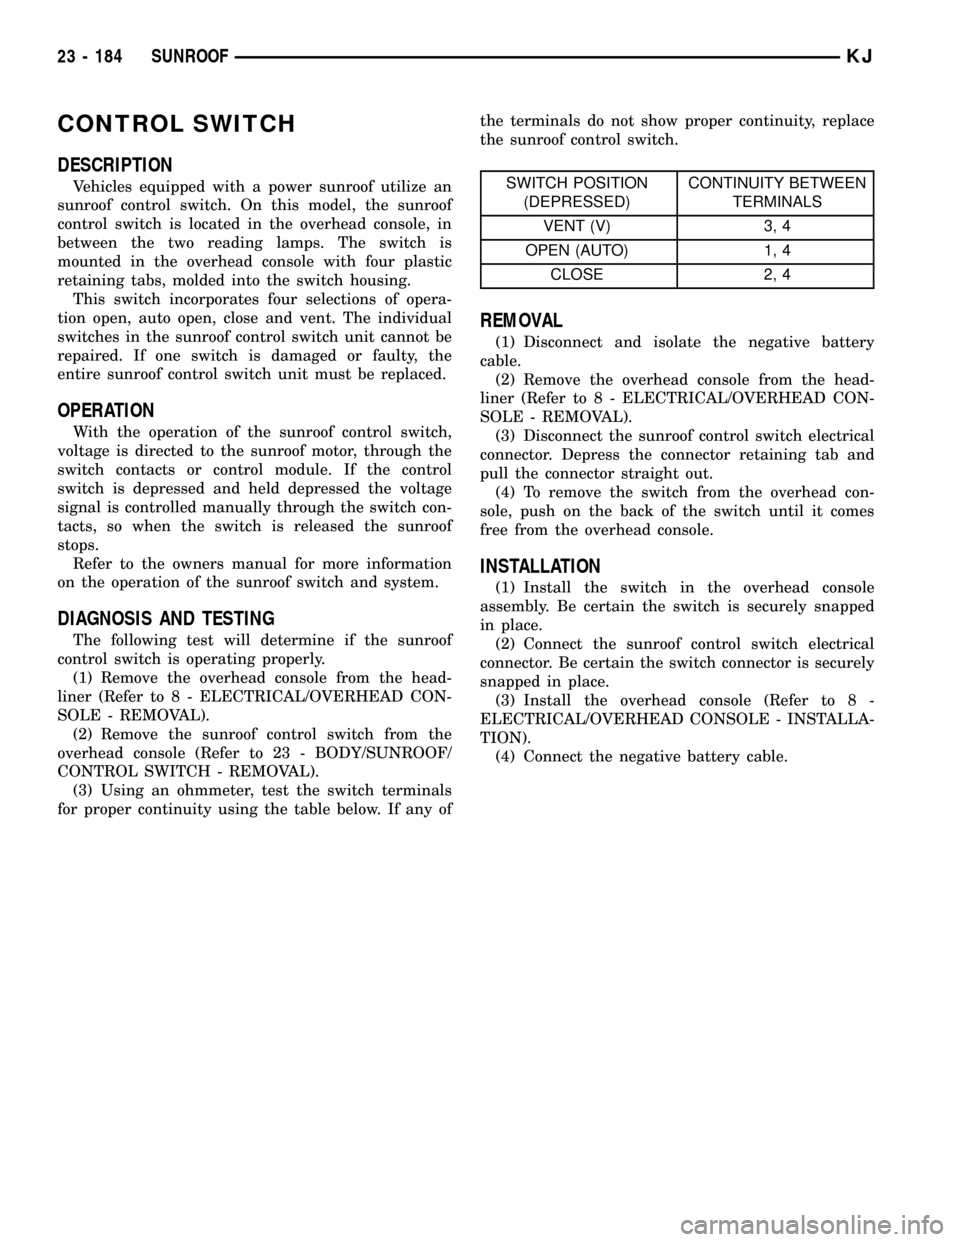
DIAGNOSIS AND TESTING
The following test will determine if the sunroof
control switch is operating properly.
(1) Remove the overhead console from the head-
liner (Refer to 8 - ELECTRICAL/OVERHEAD CON-
SOLE - REMOVAL).
(2) Remove the sunroof control switch from the
overhead console (Refer to 23 - BODY/SUNROOF/
CONTROL SWITCH - REMOVAL).
(3) Using an ohmmeter, test the switch terminals
for proper continuity using the table below. If any ofthe terminals do not show proper continuity, replace
the sunroof control switch.
SWITCH POSITION
(DEPRESSED)CONTINUITY BETWEEN
TERMINALS
VENT (V) 3, 4
OPEN (AUTO) 1, 4
CLOSE 2, 4
REMOVAL
(1) Disconnect and isolate the negative battery
cable.
(2) Remove the overhead console from the head-
liner (Refer to 8 - ELECTRICAL/OVERHEAD CON-
SOLE - REMOVAL).
(3) Disconnect the sunroof control switch electrical
connector. Depress the connector retaining tab and
pull the connector straight out.
(4) To remove the switch from the overhead con-
sole, push on the back of the switch until it comes
free from the overhead console.
INSTALLATION
(1) Install the switch in the overhead console
assembly. Be certain the switch is securely snapped
in place.
(2) Connect the sunroof control switch electrical
connector. Be certain the switch connector is securely
snapped in place.
(3) Install the overhead console (Refer to 8 -
ELECTRICAL/OVERHEAD CONSOLE - INSTALLA-
TION).
(4) Connect the negative battery cable.
23 - 184 SUNROOFKJ
Page 1721 of 1803

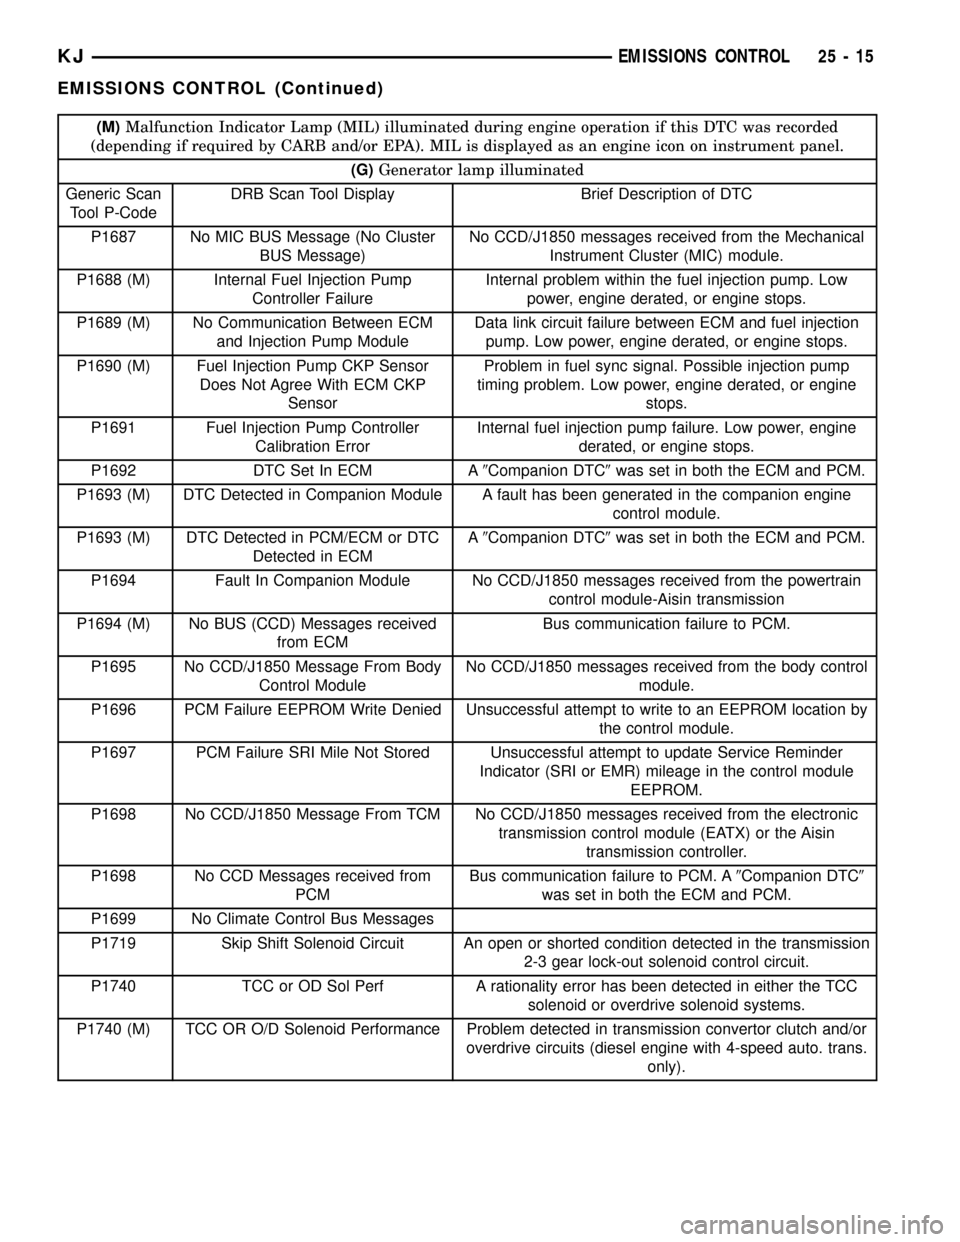
(M)Malfunction Indicator Lamp (MIL) illuminated during engine operation if this DTC was recorded
(depending if required by CARB and/or EPA). MIL is displayed as an engine icon on instrument panel.
(G)Generator lamp illuminated
Generic Scan
Tool P-CodeDRB Scan Tool Display Brief Description of DTC
P1687 No MIC BUS Message (No Cluster
BUS Message)No CCD/J1850 messages received from the Mechanical
Instrument Cluster (MIC) module.
P1688 (M) Internal Fuel Injection Pump
Controller FailureInternal problem within the fuel injection pump. Low
power, engine derated, or engine stops.
P1689 (M) No Communication Between ECM
and Injection Pump ModuleData link circuit failure between ECM and fuel injection
pump. Low power, engine derated, or engine stops.
P1690 (M) Fuel Injection Pump CKP Sensor
Does Not Agree With ECM CKP
SensorProblem in fuel sync signal. Possible injection pump
timing problem. Low power, engine derated, or engine
stops.
P1691 Fuel Injection Pump Controller
Calibration ErrorInternal fuel injection pump failure. Low power, engine
derated, or engine stops.
P1692 DTC Set In ECM A9Companion DTC9was set in both the ECM and PCM.
P1693 (M) DTC Detected in Companion Module A fault has been generated in the companion engine
control module.
P1693 (M) DTC Detected in PCM/ECM or DTC
Detected in ECMA9Companion DTC9was set in both the ECM and PCM.
P1694 Fault In Companion Module No CCD/J1850 messages received from the powertrain
control module-Aisin transmission
P1694 (M) No BUS (CCD) Messages received
from ECMBus communication failure to PCM.
P1695 No CCD/J1850 Message From Body
Control ModuleNo CCD/J1850 messages received from the body control
module.
P1696 PCM Failure EEPROM Write Denied Unsuccessful attempt to write to an EEPROM location by
the control module.
P1697 PCM Failure SRI Mile Not Stored Unsuccessful attempt to update Service Reminder
Indicator (SRI or EMR) mileage in the control module
EEPROM.
P1698 No CCD/J1850 Message From TCM No CCD/J1850 messages received from the electronic
transmission control module (EATX) or the Aisin
transmission controller.
P1698 No CCD Messages received from
PCMBus communication failure to PCM. A9Companion DTC9
was set in both the ECM and PCM.
P1699 No Climate Control Bus Messages
P1719 Skip Shift Solenoid Circuit An open or shorted condition detected in the transmission
2-3 gear lock-out solenoid control circuit.
P1740 TCC or OD Sol Perf A rationality error has been detected in either the TCC
solenoid or overdrive solenoid systems.
P1740 (M) TCC OR O/D Solenoid Performance Problem detected in transmission convertor clutch and/or
overdrive circuits (diesel engine with 4-speed auto. trans.
only).
KJEMISSIONS CONTROL 25 - 15
EMISSIONS CONTROL (Continued)