2002 JEEP GRAND CHEROKEE cylinder head
[x] Cancel search: cylinder headPage 742 of 2199

8W-15 GROUND DISTRIBUTION
Component Page
A/C Compressor Clutch.................. 8W-15-4
Adjustable Pedals Module............. 8W-15-17, 21
Airbag Control Module.................. 8W-15-16
Ash Receiver Lamp.................... 8W-15-14
Automatic Day/Night Mirror.............. 8W-15-19
Automatic Zone Control Module........... 8W-15-15
Battery............................ 8W-15-2, 3
Blower Motor Controller................. 8W-15-15
Body Control Module.............. 8W-15-12, 13, 15
Brake Lamp Switch................. 8W-15-17, 22
Center High Mounted Stop Lamp.......... 8W-15-20
Cigar Lighter........................ 8W-15-14
Cigar Lighter Relay.................... 8W-15-12
Controller Antilock Brake................ 8W-15-12
Coolant Level Sensor............... 8W-15-9, 10, 11
Crankcase Heater...................... 8W-15-4
Data Link Connector.................. 8W-15-2, 3
Driver Cylinder Lock Switch.............. 8W-15-16
Driver Door Lock Motor/Ajar Switch........ 8W-15-16
Driver Door Module.................... 8W-15-16
Driver Heated Seat Switch............... 8W-15-14
Driver Lumbar Switch............... 8W-15-18, 21
Driver Power Seat Switch............. 8W-15-18, 21
Driver Rear Power Window Switch....... 8W-15-18, 21
Electric Brake........................ 8W-15-17
Electronic Speed Control Servo.......... 8W-15-9, 10
Engine Control Module.................. 8W-15-3
Front Power Outlet.................... 8W-15-14
Front Washer Pump................... 8W-15-6, 7
Front Wiper Motor.................... 8W-15-6, 7
Fuel Pump Module.................... 8W-15-19
G100............................. 8W-15-2, 3
G101............................. 8W-15-2, 3
G102............................... 8W-15-2
G103............................. 8W-15-2, 3
G104............................... 8W-15-4
G105............................... 8W-15-4
G106............................. 8W-15-6, 7
G107.............................. 8W-15-12
G108.......................... 8W-15-9, 10, 11
G200......................... 8W-15-13, 14, 15
G201.............................. 8W-15-16
G300......................... 8W-15-16, 17, 18
G301......................... 8W-15-19, 21, 22
Headlamp Leveling Switch............... 8W-15-15
Hood Ajar Switch..................... 8W-15-6, 7
Horn No. 1...................... 8W-15-9, 10, 11
Horn No. 2...................... 8W-15-9, 10, 11
Hydraulic Cooling Module........... 8W-15-9, 10, 11
Ignition Switch....................... 8W-15-15
Instrument Cluster.................. 8W-15-13, 14
Intake Port Swirl Actuator................ 8W-15-3
Intrusion Transceiver Module.......... 8W-15-21, 22
Junction Block.................. 8W-15-12, 13, 15
Left Fog Lamp...................... 8W-15-6, 7
Left Front Park Lamp................... 8W-15-5
Left Front Park/Turn Signal Lamp.......... 8W-15-5
Left Front Turn Signal Lamp.............. 8W-15-5
Left Headlamp Leveling Motor............. 8W-15-5
Left High Beam Headlamp................ 8W-15-5
Component Page
Left Liftgate Ajar Switch................ 8W-15-20
Left Low Beam Headlamp................ 8W-15-5
Left Multi-Function Switch............... 8W-15-15
Left Rear Door Lock Motor/Ajar Switch.... 8W-15-21, 22
Left Rear Lamp Assembly............... 8W-15-19
Left Side Repeater Lamp............... 8W-15-6, 7
License Lamp No. 1.................... 8W-15-20
License Lamp No. 2.................... 8W-15-20
Liftgate Flip-Up Ajar Switch.............. 8W-15-20
Liftgate Flip-Up Release Solenoid.......... 8W-15-20
Line Pressure Sensor.................... 8W-15-2
Low Beam/Daytime Running Lamp Relay.... 8W-15-12
Manual Temperature Control........... 8W-15-13, 15
Oxygen Sensor 1/2 Downstream............ 8W-15-4
Oxygen Sensor 2/2 Downstream............ 8W-15-4
Park Lamp Relay..................... 8W-15-12
Passenger Door Lock Motor/Ajar Switch...... 8W-15-16
Passenger Door Module................. 8W-15-16
Passenger Heated Seat Switch............ 8W-15-14
Passenger Lumbar Switch............. 8W-15-17, 22
Passenger Power Seat Switch.......... 8W-15-17, 22
Passenger Rear Power Window Switch.... 8W-15-16, 22
Power Amplifier.................... 8W-15-17, 18
Power Connector...................... 8W-15-15
Powertrain Control Module............... 8W-15-2
Radio........................... 8W-15-17, 18
Rain Sensor....................... 8W-15-21, 22
Rear Power Outlet.................. 8W-15-17, 18
Rear Washer Pump................... 8W-15-6, 7
Rear Window Defogger.................. 8W-15-20
Rear Wiper Motor..................... 8W-15-20
Remote Keyless Module................. 8W-15-16
Right Fog Lamp.................. 8W-15-9, 10, 11
Right Front Park Lamp.................. 8W-15-8
Right Front Park/Turn Signal Lamp......... 8W-15-8
Right Front Turn Signal Lamp............. 8W-15-8
Right Headlamp Leveling Motor............ 8W-15-8
Right High Beam Headlamp............... 8W-15-8
Right Low Beam Headlamp............... 8W-15-8
Right Rear Door Lock Motor/Ajar Switch . . 8W-15-16, 18
Right Rear Lamp Assembly............ 8W-15-17, 18
Right Side Repeater Lamp........... 8W-15-9, 10, 11
Seat Module...................... 8W-15-18, 21
Sentry Key Immobilizer Module........... 8W-15-13
Shifter Assembly................... 8W-15-14, 15
Siren............................. 8W-15-6, 7
Sunroof Control Module................. 8W-15-19
Sunroof Motor........................ 8W-15-19
Sunroof Switch....................... 8W-15-19
Temperature Valve Actuator.............. 8W-15-13
Trailer Tow Brake Lamp Relay............ 8W-15-19
Trailer Tow Connector.................. 8W-15-19
Trailer Tow Left Turn Relay.............. 8W-15-19
Trailer Tow Right Turn Relay............. 8W-15-19
Transmission Control Module.............. 8W-15-2
Transmission Control Relay............ 8W-15-9, 10
Underhood Lamp..................... 8W-15-6, 7
Vehicle Information Center............ 8W-15-21, 22
Viscous/Cabin Heater................... 8W-15-4
Washer Fluid Level Switch.............. 8W-15-6, 7
WJ8W-15 GROUND DISTRIBUTION 8W - 15 - 1
Page 864 of 2199

8W-39 VEHICLE THEFT SECURITY SYSTEM
Component Page
Automatic Headlamp Light
Sensor/VTSS LED.................. 8W-39-3
Body Control Module . . . 8W-39-2, 3, 4, 5, 7, 8, 9, 10
Clockspring....................... 8W-39-7, 8
Diagnostic Junction Port............... 8W-39-9
Driver Cylinder Lock Switch............ 8W-39-6
Driver Door Lock Motor/Ajar Switch...... 8W-39-6
Driver Door Module................ 8W-39-6, 11
Engine Starter Motor Relay............ 8W-39-2
Fuse 7........................ 8W-39-3, 9, 11
Fuse 8............................. 8W-39-2
Fuse 18.......................... 8W-39-7, 8
Fuse 22.......................... 8W-39-2, 9
Fuse 28............................ 8W-39-2
G106............................. 8W-39-10
G108............................ 8W-39-7, 8
G200.............................. 8W-39-9
G300............................ 8W-39-5, 6Component Page
G301....................... 8W-39-4, 5, 6, 11
Hood Ajar Switch................... 8W-39-10
Horn No. 1....................... 8W-39-7, 8
Horn No. 2....................... 8W-39-7, 8
Horn Relay....................... 8W-39-7, 8
Horn Switch...................... 8W-39-7, 8
Ignition Switch...................... 8W-39-2
Junction Block........ 8W-39-2, 3, 4, 5, 7, 8, 9, 11
Left Liftgate Ajar Switch.............. 8W-39-4
Left Rear Door Lock Motor/Ajar Switch . . . 8W-39-5
Liftgate Flip-Up Ajar Switch............ 8W-39-4
Passenger Door Lock Motor/Ajar Switch . . . 8W-39-6
Passenger Door Module............... 8W-39-6
Power Distribution Center......... 8W-39-2, 7, 8
Remote Keyless Module.............. 8W-39-11
Right Liftgate Ajar Switch............. 8W-39-4
Right Rear Door Lock Motor/Ajar Switch . . 8W-39-5
Sentry Key Immobilizer Module......... 8W-39-9
WJ8W-39 VEHICLE THEFT SECURITY SYSTEM 8W - 39 - 1
Page 1184 of 2199
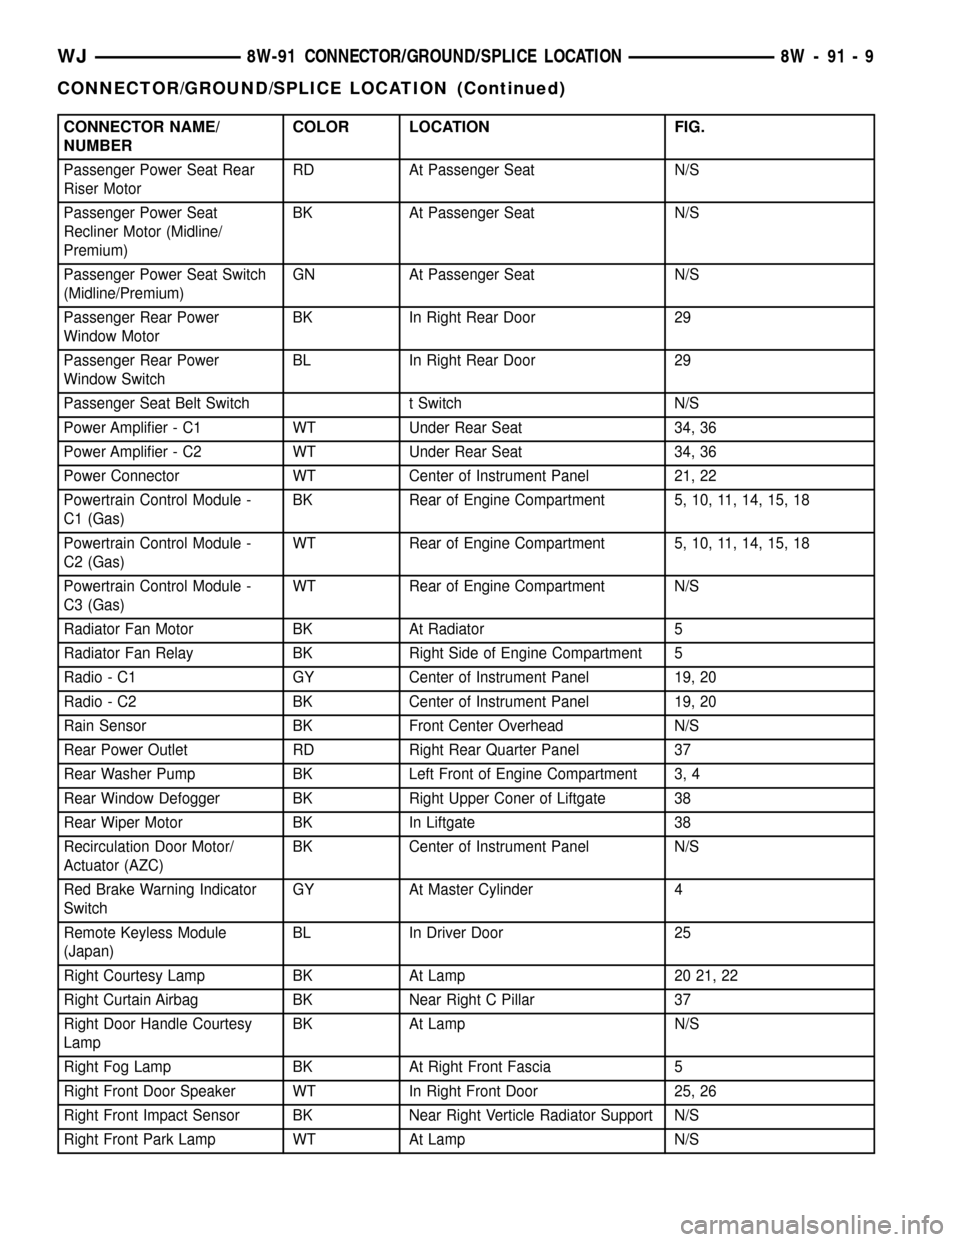
CONNECTOR NAME/
NUMBERCOLOR LOCATION FIG.
Passenger Power Seat Rear
Riser MotorRD At Passenger Seat N/S
Passenger Power Seat
Recliner Motor (Midline/
Premium)BK At Passenger Seat N/S
Passenger Power Seat Switch
(Midline/Premium)GN At Passenger Seat N/S
Passenger Rear Power
Window MotorBK In Right Rear Door 29
Passenger Rear Power
Window SwitchBL In Right Rear Door 29
Passenger Seat Belt Switch t Switch N/S
Power Amplifier - C1 WT Under Rear Seat 34, 36
Power Amplifier - C2 WT Under Rear Seat 34, 36
Power Connector WT Center of Instrument Panel 21, 22
Powertrain Control Module -
C1 (Gas)BK Rear of Engine Compartment 5, 10, 11, 14, 15, 18
Powertrain Control Module -
C2 (Gas)WT Rear of Engine Compartment 5, 10, 11, 14, 15, 18
Powertrain Control Module -
C3 (Gas)WT Rear of Engine Compartment N/S
Radiator Fan Motor BK At Radiator 5
Radiator Fan Relay BK Right Side of Engine Compartment 5
Radio - C1 GY Center of Instrument Panel 19, 20
Radio - C2 BK Center of Instrument Panel 19, 20
Rain Sensor BK Front Center Overhead N/S
Rear Power Outlet RD Right Rear Quarter Panel 37
Rear Washer Pump BK Left Front of Engine Compartment 3, 4
Rear Window Defogger BK Right Upper Coner of Liftgate 38
Rear Wiper Motor BK In Liftgate 38
Recirculation Door Motor/
Actuator (AZC)BK Center of Instrument Panel N/S
Red Brake Warning Indicator
SwitchGY At Master Cylinder 4
Remote Keyless Module
(Japan)BL In Driver Door 25
Right Courtesy Lamp BK At Lamp 20 21, 22
Right Curtain Airbag BK Near Right C Pillar 37
Right Door Handle Courtesy
LampBK At Lamp N/S
Right Fog Lamp BK At Right Front Fascia 5
Right Front Door Speaker WT In Right Front Door 25, 26
Right Front Impact Sensor BK Near Right Verticle Radiator Support N/S
Right Front Park Lamp WT At Lamp N/S
WJ8W-91 CONNECTOR/GROUND/SPLICE LOCATION 8W - 91 - 9
CONNECTOR/GROUND/SPLICE LOCATION (Continued)
Page 1244 of 2199
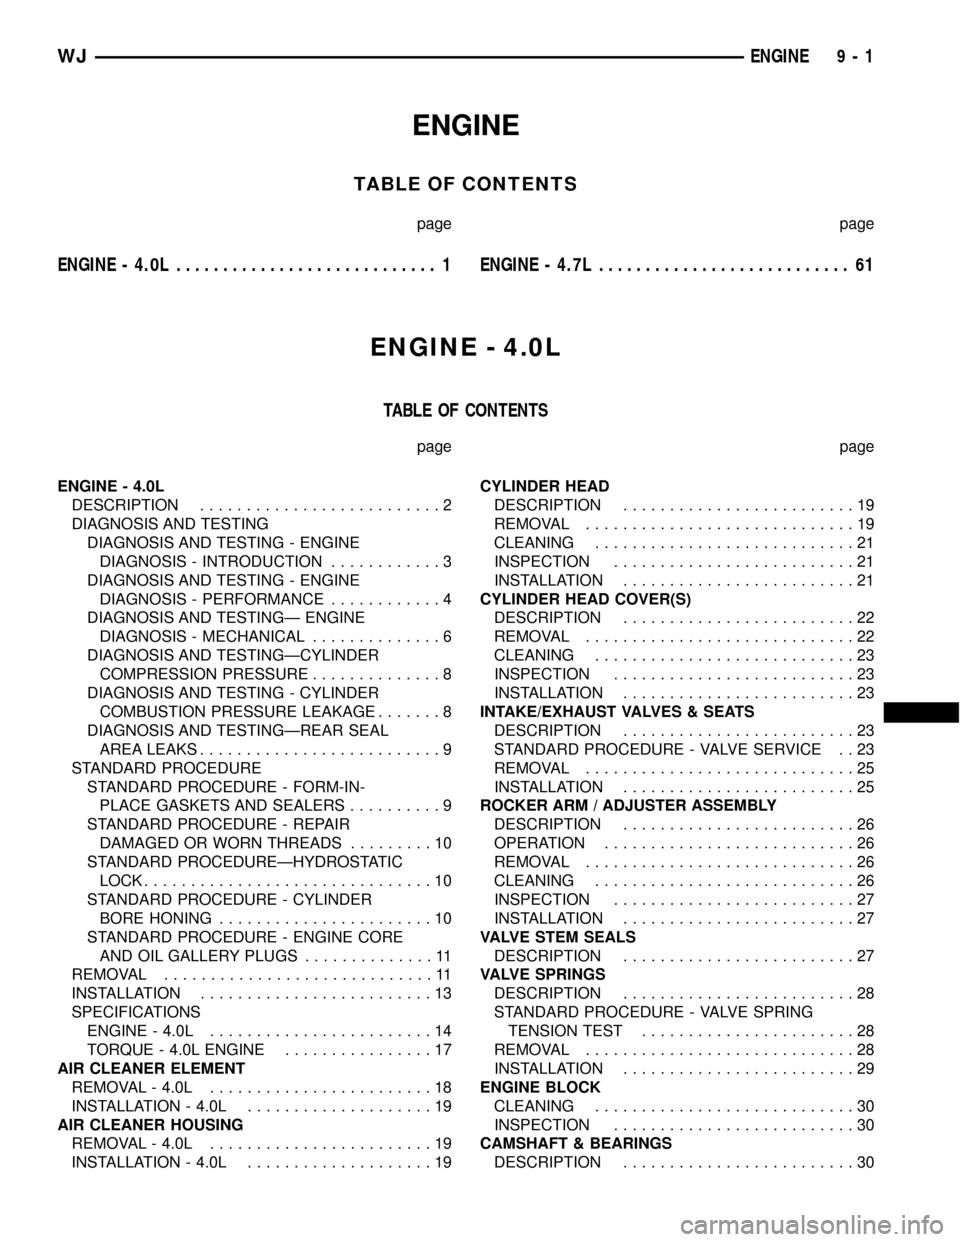
ENGINE
TABLE OF CONTENTS
page page
ENGINE - 4.0L............................ 1ENGINE - 4.7L........................... 61
ENGINE - 4.0L
TABLE OF CONTENTS
page page
ENGINE - 4.0L
DESCRIPTION..........................2
DIAGNOSIS AND TESTING
DIAGNOSIS AND TESTING - ENGINE
DIAGNOSIS - INTRODUCTION............3
DIAGNOSIS AND TESTING - ENGINE
DIAGNOSIS - PERFORMANCE............4
DIAGNOSIS AND TESTINGÐ ENGINE
DIAGNOSIS - MECHANICAL..............6
DIAGNOSIS AND TESTINGÐCYLINDER
COMPRESSION PRESSURE..............8
DIAGNOSIS AND TESTING - CYLINDER
COMBUSTION PRESSURE LEAKAGE.......8
DIAGNOSIS AND TESTINGÐREAR SEAL
AREA LEAKS..........................9
STANDARD PROCEDURE
STANDARD PROCEDURE - FORM-IN-
PLACE GASKETS AND SEALERS..........9
STANDARD PROCEDURE - REPAIR
DAMAGED OR WORN THREADS.........10
STANDARD PROCEDUREÐHYDROSTATIC
LOCK...............................10
STANDARD PROCEDURE - CYLINDER
BORE HONING.......................10
STANDARD PROCEDURE - ENGINE CORE
AND OIL GALLERY PLUGS..............11
REMOVAL.............................11
INSTALLATION.........................13
SPECIFICATIONS
ENGINE - 4.0L........................14
TORQUE - 4.0L ENGINE................17
AIR CLEANER ELEMENT
REMOVAL - 4.0L........................18
INSTALLATION - 4.0L....................19
AIR CLEANER HOUSING
REMOVAL - 4.0L........................19
INSTALLATION - 4.0L....................19CYLINDER HEAD
DESCRIPTION.........................19
REMOVAL.............................19
CLEANING............................21
INSPECTION..........................21
INSTALLATION.........................21
CYLINDER HEAD COVER(S)
DESCRIPTION.........................22
REMOVAL.............................22
CLEANING............................23
INSPECTION..........................23
INSTALLATION.........................23
INTAKE/EXHAUST VALVES & SEATS
DESCRIPTION.........................23
STANDARD PROCEDURE - VALVE SERVICE . . 23
REMOVAL.............................25
INSTALLATION.........................25
ROCKER ARM / ADJUSTER ASSEMBLY
DESCRIPTION.........................26
OPERATION...........................26
REMOVAL.............................26
CLEANING............................26
INSPECTION..........................27
INSTALLATION.........................27
VALVE STEM SEALS
DESCRIPTION.........................27
VALVE SPRINGS
DESCRIPTION.........................28
STANDARD PROCEDURE - VALVE SPRING
TENSION TEST.......................28
REMOVAL.............................28
INSTALLATION.........................29
ENGINE BLOCK
CLEANING............................30
INSPECTION..........................30
CAMSHAFT & BEARINGS
DESCRIPTION.........................30
WJENGINE 9 - 1
Page 1245 of 2199
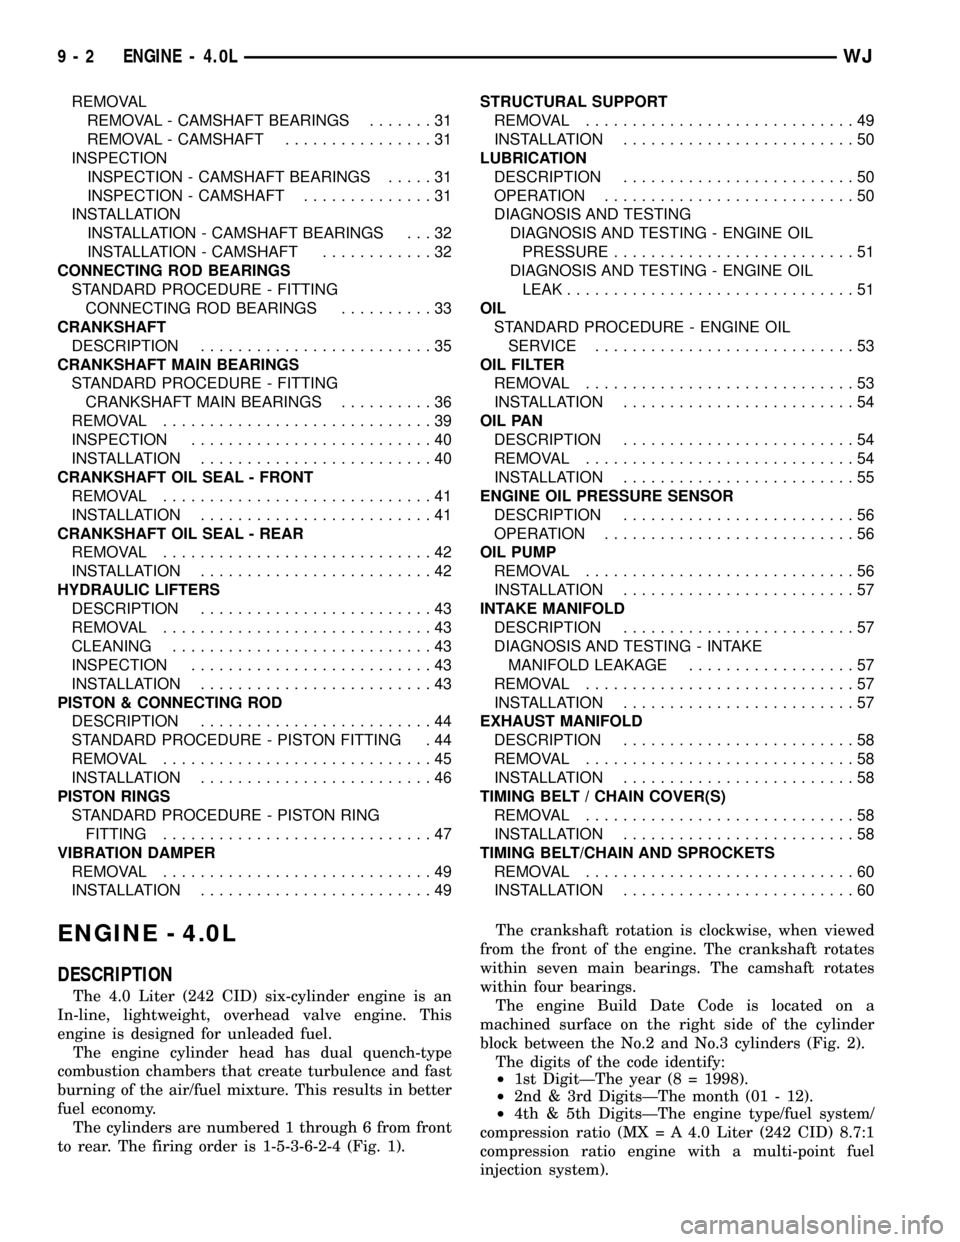
REMOVAL
REMOVAL - CAMSHAFT BEARINGS.......31
REMOVAL - CAMSHAFT................31
INSPECTION
INSPECTION - CAMSHAFT BEARINGS.....31
INSPECTION - CAMSHAFT..............31
INSTALLATION
INSTALLATION - CAMSHAFT BEARINGS . . . 32
INSTALLATION - CAMSHAFT............32
CONNECTING ROD BEARINGS
STANDARD PROCEDURE - FITTING
CONNECTING ROD BEARINGS..........33
CRANKSHAFT
DESCRIPTION.........................35
CRANKSHAFT MAIN BEARINGS
STANDARD PROCEDURE - FITTING
CRANKSHAFT MAIN BEARINGS..........36
REMOVAL.............................39
INSPECTION..........................40
INSTALLATION.........................40
CRANKSHAFT OIL SEAL - FRONT
REMOVAL.............................41
INSTALLATION.........................41
CRANKSHAFT OIL SEAL - REAR
REMOVAL.............................42
INSTALLATION.........................42
HYDRAULIC LIFTERS
DESCRIPTION.........................43
REMOVAL.............................43
CLEANING............................43
INSPECTION..........................43
INSTALLATION.........................43
PISTON & CONNECTING ROD
DESCRIPTION.........................44
STANDARD PROCEDURE - PISTON FITTING . 44
REMOVAL.............................45
INSTALLATION.........................46
PISTON RINGS
STANDARD PROCEDURE - PISTON RING
FITTING.............................47
VIBRATION DAMPER
REMOVAL.............................49
INSTALLATION.........................49STRUCTURAL SUPPORT
REMOVAL.............................49
INSTALLATION.........................50
LUBRICATION
DESCRIPTION.........................50
OPERATION...........................50
DIAGNOSIS AND TESTING
DIAGNOSIS AND TESTING - ENGINE OIL
PRESSURE..........................51
DIAGNOSIS AND TESTING - ENGINE OIL
LEAK...............................51
OIL
STANDARD PROCEDURE - ENGINE OIL
SERVICE............................53
OIL FILTER
REMOVAL.............................53
INSTALLATION.........................54
OIL PAN
DESCRIPTION.........................54
REMOVAL.............................54
INSTALLATION.........................55
ENGINE OIL PRESSURE SENSOR
DESCRIPTION.........................56
OPERATION...........................56
OIL PUMP
REMOVAL.............................56
INSTALLATION.........................57
INTAKE MANIFOLD
DESCRIPTION.........................57
DIAGNOSIS AND TESTING - INTAKE
MANIFOLD LEAKAGE..................57
REMOVAL.............................57
INSTALLATION.........................57
EXHAUST MANIFOLD
DESCRIPTION.........................58
REMOVAL.............................58
INSTALLATION.........................58
TIMING BELT / CHAIN COVER(S)
REMOVAL.............................58
INSTALLATION.........................58
TIMING BELT/CHAIN AND SPROCKETS
REMOVAL.............................60
INSTALLATION.........................60
ENGINE - 4.0L
DESCRIPTION
The 4.0 Liter (242 CID) six-cylinder engine is an
In-line, lightweight, overhead valve engine. This
engine is designed for unleaded fuel.
The engine cylinder head has dual quench-type
combustion chambers that create turbulence and fast
burning of the air/fuel mixture. This results in better
fuel economy.
The cylinders are numbered 1 through 6 from front
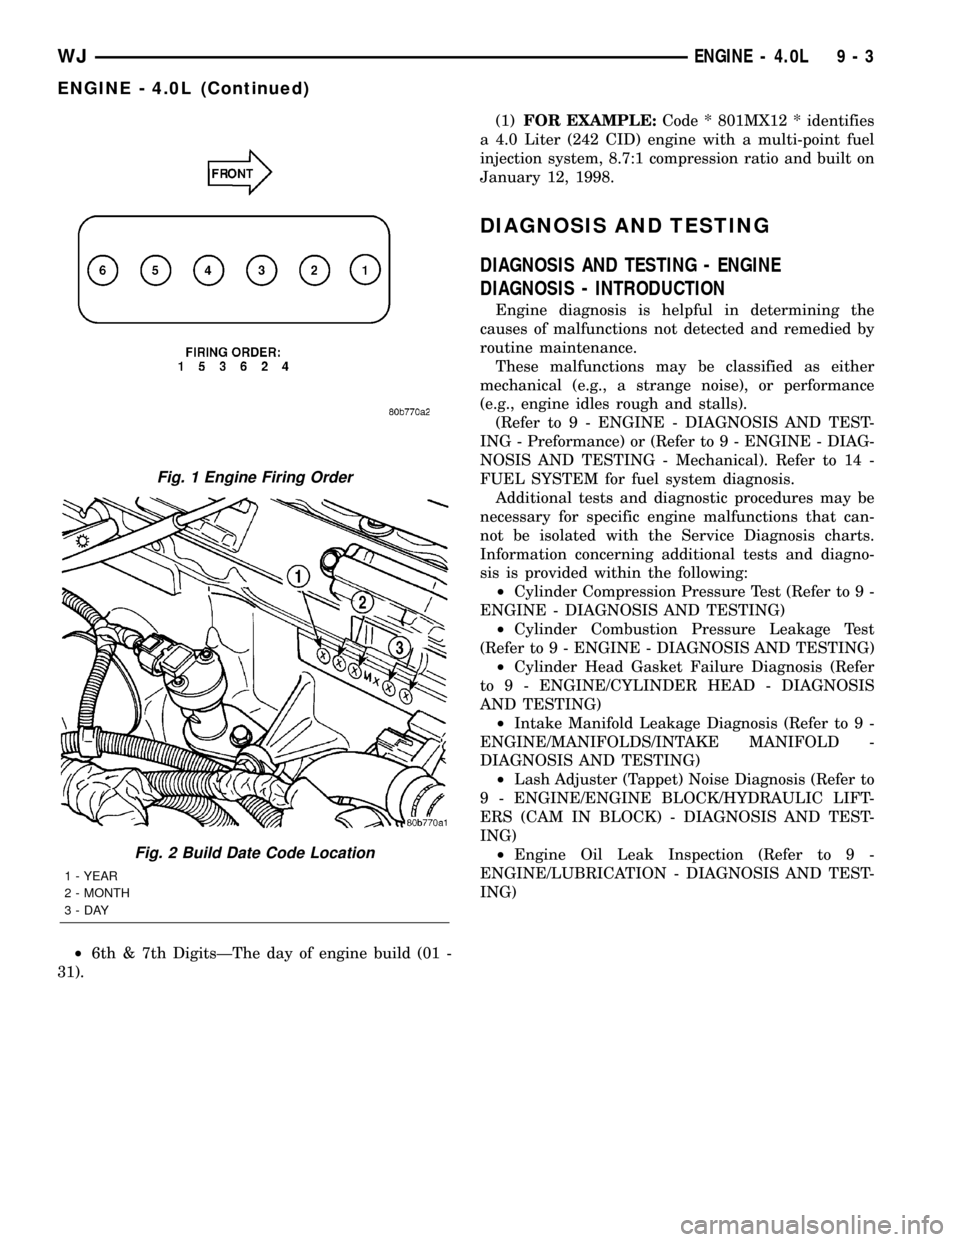
to rear. The firing order is 1-5-3-6-2-4 (Fig. 1).The crankshaft rotation is clockwise, when viewed
from the front of the engine. The crankshaft rotates
within seven main bearings. The camshaft rotates
within four bearings.
The engine Build Date Code is located on a
machined surface on the right side of the cylinder
block between the No.2 and No.3 cylinders (Fig. 2).
The digits of the code identify:
²1st DigitÐThe year (8 = 1998).
²2nd & 3rd DigitsÐThe month (01 - 12).
²4th & 5th DigitsÐThe engine type/fuel system/
compression ratio (MX = A 4.0 Liter (242 CID) 8.7:1
compression ratio engine with a multi-point fuel
injection system).
9 - 2 ENGINE - 4.0LWJ
Page 1246 of 2199
²6th & 7th DigitsÐThe day of engine build (01 -
31).(1)FOR EXAMPLE:Code * 801MX12 * identifies
a 4.0 Liter (242 CID) engine with a multi-point fuel
injection system, 8.7:1 compression ratio and built on
January 12, 1998.
DIAGNOSIS AND TESTING
DIAGNOSIS AND TESTING - ENGINE
DIAGNOSIS - INTRODUCTION
Engine diagnosis is helpful in determining the
causes of malfunctions not detected and remedied by
routine maintenance.
These malfunctions may be classified as either
mechanical (e.g., a strange noise), or performance
(e.g., engine idles rough and stalls).
(Refer to 9 - ENGINE - DIAGNOSIS AND TEST-
ING - Preformance) or (Refer to 9 - ENGINE - DIAG-
NOSIS AND TESTING - Mechanical). Refer to 14 -
FUEL SYSTEM for fuel system diagnosis.
Additional tests and diagnostic procedures may be
necessary for specific engine malfunctions that can-
not be isolated with the Service Diagnosis charts.
Information concerning additional tests and diagno-
sis is provided within the following:
²Cylinder Compression Pressure Test (Refer to 9 -
ENGINE - DIAGNOSIS AND TESTING)
²Cylinder Combustion Pressure Leakage Test
(Refer to 9 - ENGINE - DIAGNOSIS AND TESTING)
²Cylinder Head Gasket Failure Diagnosis (Refer
to 9 - ENGINE/CYLINDER HEAD - DIAGNOSIS
AND TESTING)
²Intake Manifold Leakage Diagnosis (Refer to 9 -
ENGINE/MANIFOLDS/INTAKE MANIFOLD -
DIAGNOSIS AND TESTING)
²Lash Adjuster (Tappet) Noise Diagnosis (Refer to
9 - ENGINE/ENGINE BLOCK/HYDRAULIC LIFT-
ERS (CAM IN BLOCK) - DIAGNOSIS AND TEST-
ING)
²Engine Oil Leak Inspection (Refer to 9 -
ENGINE/LUBRICATION - DIAGNOSIS AND TEST-
ING)
Fig. 1 Engine Firing Order
Fig. 2 Build Date Code Location
1 - YEAR
2 - MONTH
3-DAY
WJENGINE - 4.0L 9 - 3
ENGINE - 4.0L (Continued)
Page 1248 of 2199
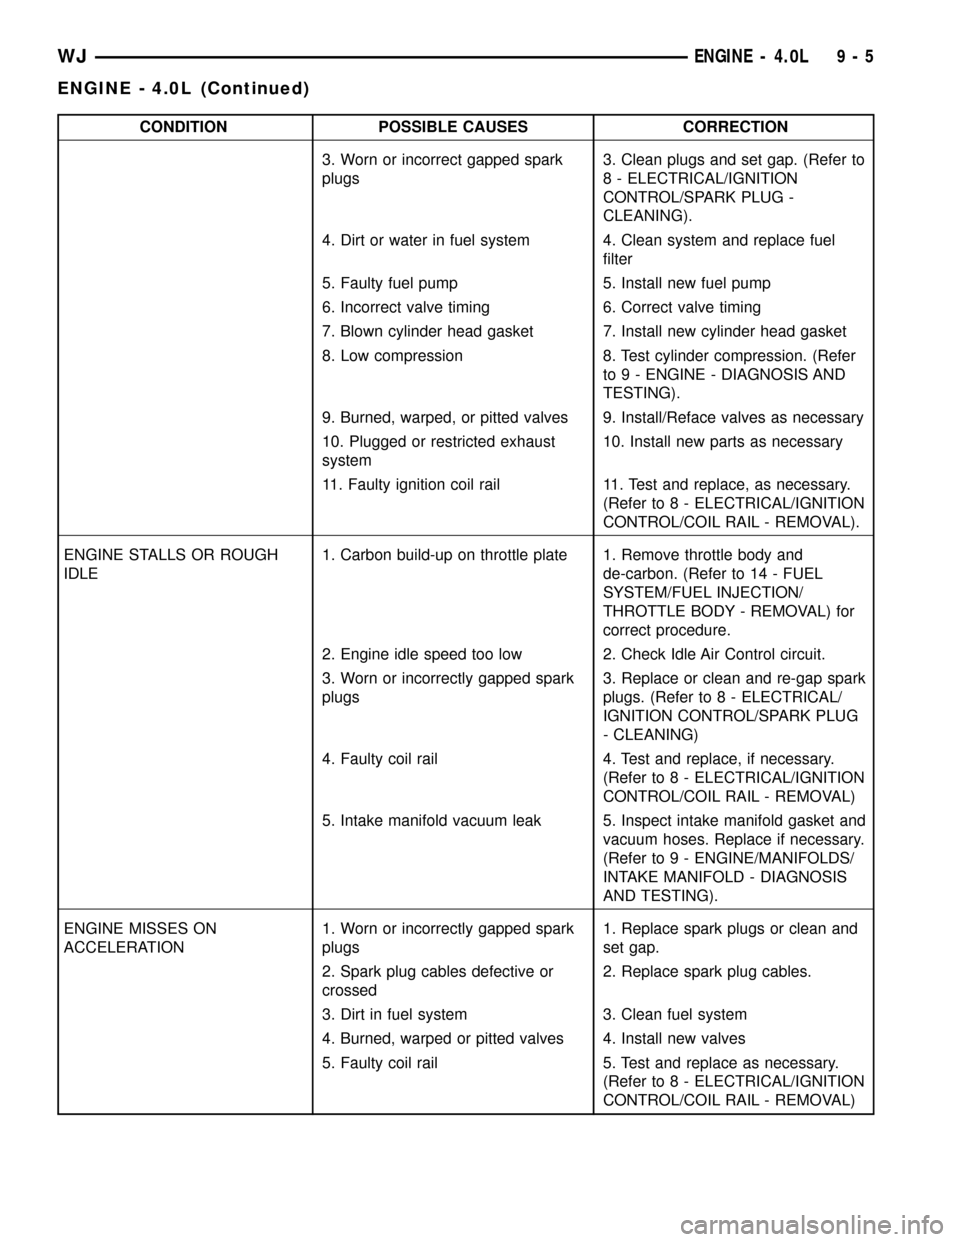
CONDITION POSSIBLE CAUSES CORRECTION
3. Worn or incorrect gapped spark
plugs3. Clean plugs and set gap. (Refer to
8 - ELECTRICAL/IGNITION
CONTROL/SPARK PLUG -
CLEANING).
4. Dirt or water in fuel system 4. Clean system and replace fuel
filter
5. Faulty fuel pump 5. Install new fuel pump
6. Incorrect valve timing 6. Correct valve timing
7. Blown cylinder head gasket 7. Install new cylinder head gasket
8. Low compression 8. Test cylinder compression. (Refer
to 9 - ENGINE - DIAGNOSIS AND
TESTING).
9. Burned, warped, or pitted valves 9. Install/Reface valves as necessary
10. Plugged or restricted exhaust
system10. Install new parts as necessary
11. Faulty ignition coil rail 11. Test and replace, as necessary.
(Refer to 8 - ELECTRICAL/IGNITION
CONTROL/COIL RAIL - REMOVAL).
ENGINE STALLS OR ROUGH
IDLE1. Carbon build-up on throttle plate 1. Remove throttle body and
de-carbon. (Refer to 14 - FUEL
SYSTEM/FUEL INJECTION/
THROTTLE BODY - REMOVAL) for
correct procedure.
2. Engine idle speed too low 2. Check Idle Air Control circuit.
3. Worn or incorrectly gapped spark
plugs3. Replace or clean and re-gap spark
plugs. (Refer to 8 - ELECTRICAL/
IGNITION CONTROL/SPARK PLUG
- CLEANING)
4. Faulty coil rail 4. Test and replace, if necessary.
(Refer to 8 - ELECTRICAL/IGNITION
CONTROL/COIL RAIL - REMOVAL)
5. Intake manifold vacuum leak 5. Inspect intake manifold gasket and
vacuum hoses. Replace if necessary.
(Refer to 9 - ENGINE/MANIFOLDS/
INTAKE MANIFOLD - DIAGNOSIS
AND TESTING).
ENGINE MISSES ON
ACCELERATION1. Worn or incorrectly gapped spark
plugs1. Replace spark plugs or clean and
set gap.
2. Spark plug cables defective or
crossed2. Replace spark plug cables.
3. Dirt in fuel system 3. Clean fuel system
4. Burned, warped or pitted valves 4. Install new valves
5. Faulty coil rail 5. Test and replace as necessary.
(Refer to 8 - ELECTRICAL/IGNITION
CONTROL/COIL RAIL - REMOVAL)
WJENGINE - 4.0L 9 - 5
ENGINE - 4.0L (Continued)
Page 1251 of 2199
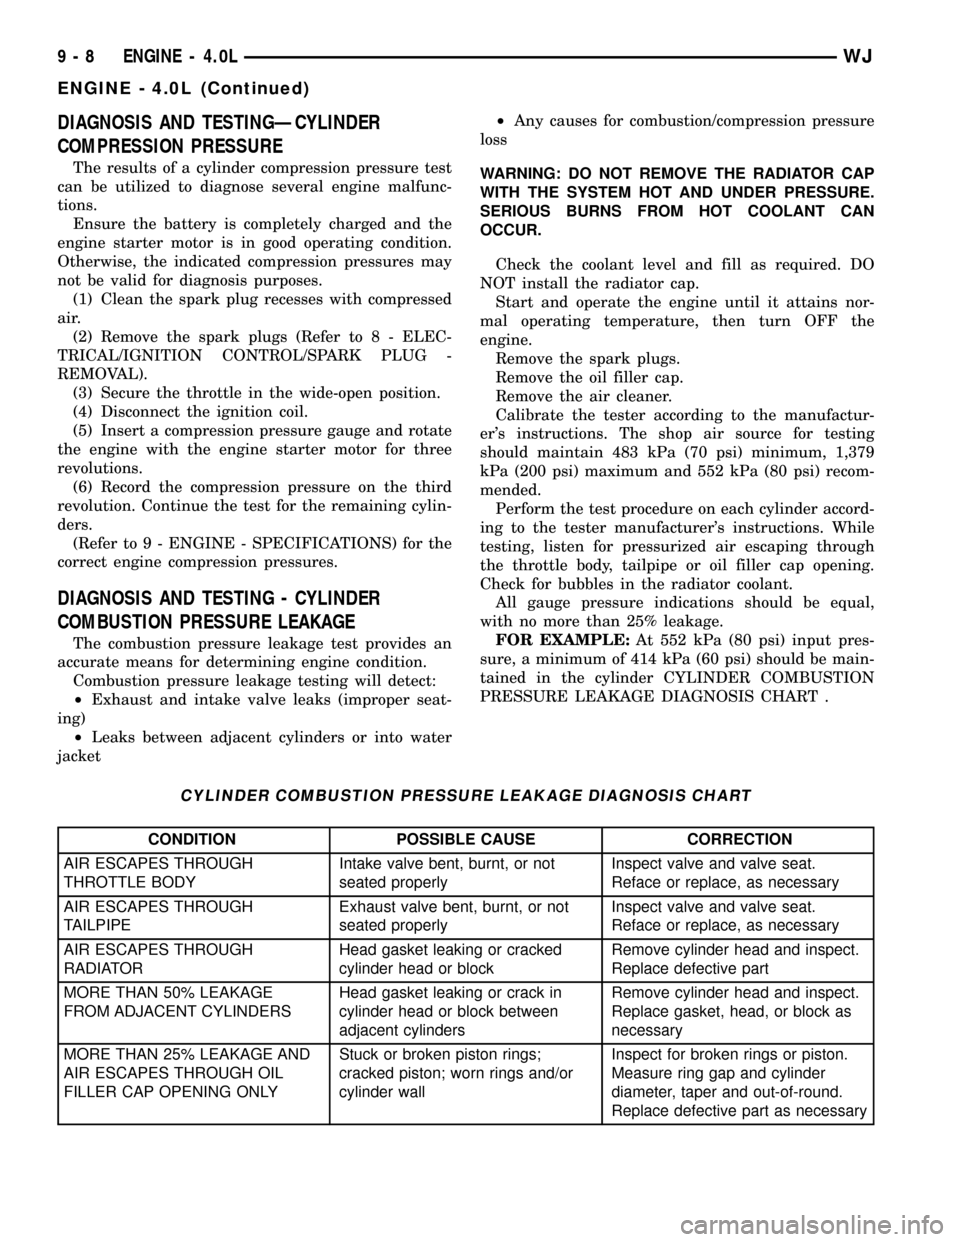
DIAGNOSIS AND TESTINGÐCYLINDER
COMPRESSION PRESSURE
The results of a cylinder compression pressure test
can be utilized to diagnose several engine malfunc-
tions.
Ensure the battery is completely charged and the
engine starter motor is in good operating condition.
Otherwise, the indicated compression pressures may
not be valid for diagnosis purposes.
(1) Clean the spark plug recesses with compressed
air.
(2) Remove the spark plugs (Refer to 8 - ELEC-
TRICAL/IGNITION CONTROL/SPARK PLUG -
REMOVAL).
(3) Secure the throttle in the wide-open position.
(4) Disconnect the ignition coil.
(5) Insert a compression pressure gauge and rotate
the engine with the engine starter motor for three
revolutions.
(6) Record the compression pressure on the third
revolution. Continue the test for the remaining cylin-
ders.
(Refer to 9 - ENGINE - SPECIFICATIONS) for the
correct engine compression pressures.
DIAGNOSIS AND TESTING - CYLINDER
COMBUSTION PRESSURE LEAKAGE
The combustion pressure leakage test provides an
accurate means for determining engine condition.
Combustion pressure leakage testing will detect:
²Exhaust and intake valve leaks (improper seat-
ing)
²Leaks between adjacent cylinders or into water
jacket²Any causes for combustion/compression pressure
loss
WARNING: DO NOT REMOVE THE RADIATOR CAP
WITH THE SYSTEM HOT AND UNDER PRESSURE.
SERIOUS BURNS FROM HOT COOLANT CAN
OCCUR.
Check the coolant level and fill as required. DO
NOT install the radiator cap.
Start and operate the engine until it attains nor-
mal operating temperature, then turn OFF the
engine.
Remove the spark plugs.
Remove the oil filler cap.
Remove the air cleaner.
Calibrate the tester according to the manufactur-
er's instructions. The shop air source for testing
should maintain 483 kPa (70 psi) minimum, 1,379
kPa (200 psi) maximum and 552 kPa (80 psi) recom-
mended.
Perform the test procedure on each cylinder accord-
ing to the tester manufacturer's instructions. While
testing, listen for pressurized air escaping through
the throttle body, tailpipe or oil filler cap opening.
Check for bubbles in the radiator coolant.
All gauge pressure indications should be equal,
with no more than 25% leakage.
FOR EXAMPLE:At 552 kPa (80 psi) input pres-
sure, a minimum of 414 kPa (60 psi) should be main-
tained in the cylinder CYLINDER COMBUSTION
PRESSURE LEAKAGE DIAGNOSIS CHART .
CYLINDER COMBUSTION PRESSURE LEAKAGE DIAGNOSIS CHART
CONDITION POSSIBLE CAUSE CORRECTION
AIR ESCAPES THROUGH
THROTTLE BODYIntake valve bent, burnt, or not
seated properlyInspect valve and valve seat.
Reface or replace, as necessary
AIR ESCAPES THROUGH
TAILPIPEExhaust valve bent, burnt, or not
seated properlyInspect valve and valve seat.
Reface or replace, as necessary
AIR ESCAPES THROUGH
RADIATORHead gasket leaking or cracked
cylinder head or blockRemove cylinder head and inspect.
Replace defective part
MORE THAN 50% LEAKAGE
FROM ADJACENT CYLINDERSHead gasket leaking or crack in
cylinder head or block between
adjacent cylindersRemove cylinder head and inspect.
Replace gasket, head, or block as
necessary
MORE THAN 25% LEAKAGE AND
AIR ESCAPES THROUGH OIL
FILLER CAP OPENING ONLYStuck or broken piston rings;
cracked piston; worn rings and/or
cylinder wallInspect for broken rings or piston.
Measure ring gap and cylinder
diameter, taper and out-of-round.
Replace defective part as necessary
9 - 8 ENGINE - 4.0LWJ
ENGINE - 4.0L (Continued)