2002 JEEP GRAND CHEROKEE instrument console
[x] Cancel search: instrument consolePage 626 of 2199

the more frequently the RSM will send wipe com-
mands to the BCM to operate the front wiper system.
The RSM operates on battery current received
through a fuse in the Junction Block (JB) on a fused
B(+) circuit. This circuit is switched by the power
accessory (sunroof) delay relay in the JB so that the
RSM will operate whenever the relay is energized by
the BCM. The RSM receives ground at all times
through a take out of the left body wire harness with
an eyelet terminal that is secured by a ground screw
to the front seat crossmember on the floor panel
under the left front seat. It is important to note that
the default condition for the wiper system is auto-
matic wipers Off; therefore, if no message is received
from the RSM by the BCM for more than about five
seconds, the automatic wipers will be disabled and
the BCM will default the front wiper system opera-
tion to the low speed continuous wipe mode.
The RSM ground and battery current inputs can be
diagnosed using conventional diagnostic tools and
methods. However, conventional diagnostic methods
may not prove conclusive in the diagnosis of the RSM
internal circuitry, the BCM, the PCI data bus net-
work, or the electronic messages received and trans-
mitted by the RSM over the PCI data bus. The most
reliable, efficient, and accurate means to diagnose
the RSM requires the use of a DRBIIItscan tool.
Refer to the appropriate diagnostic information.
REMOVAL
WARNING: ON VEHICLES EQUIPPED WITH AIR-
BAGS, DISABLE THE SUPPLEMENTAL RESTRAINT
SYSTEM BEFORE ATTEMPTING ANY STEERING
WHEEL, STEERING COLUMN, DRIVER AIRBAG,
PASSENGER AIRBAG, SIDE CURTAIN AIRBAG,
FRONT IMPACT SENSOR, SIDE IMPACT SENSOR,
OR INSTRUMENT PANEL COMPONENT DIAGNOSIS
OR SERVICE. DISCONNECT AND ISOLATE THE
BATTERY NEGATIVE (GROUND) CABLE, THEN
WAIT TWO MINUTES FOR THE SYSTEM CAPACI-
TOR TO DISCHARGE BEFORE PERFORMING FUR-
THER DIAGNOSIS OR SERVICE. THIS IS THE ONLY
SURE WAY TO DISABLE THE SUPPLEMENTAL
RESTRAINT SYSTEM. FAILURE TO TAKE THE
PROPER PRECAUTIONS COULD RESULT IN ACCI-
DENTAL AIRBAG DEPLOYMENT AND POSSIBLE
PERSONAL INJURY.
(1) Disconnect and isolate the battery negative
cable.
(2) Adjust the inside rear view mirror on the wind-
shield downward far enough to access the lower edge
of the Rain Sensor Module (RSM) trim cover (Fig.
15).
(3) Using a small thin-bladed screwdriver inserted
into the notch at the bottom of trim cover, gently prythe trim cover away from the windshield glass until
it unsnaps from the RSM.
(4) Using a small thin-bladed screwdriver, gently
pry the spring clips on each side of the RSM away
from the bracket on the windshield.
(5) Pull the RSM away from the bracket on the
windshield far enough to access and disconnect the
overhead wire harness connector for the module from
the module connector receptacle.
(6) Remove the RSM from above the inside rear
view mirror.
INSTALLATION
WARNING: ON VEHICLES EQUIPPED WITH AIR-
BAGS, DISABLE THE SUPPLEMENTAL RESTRAINT
SYSTEM BEFORE ATTEMPTING ANY STEERING
WHEEL, STEERING COLUMN, DRIVER AIRBAG,
PASSENGER AIRBAG, SIDE CURTAIN AIRBAG,
FRONT IMPACT SENSOR, SIDE IMPACT SENSOR,
OR INSTRUMENT PANEL COMPONENT DIAGNOSIS
OR SERVICE. DISCONNECT AND ISOLATE THE
BATTERY NEGATIVE (GROUND) CABLE, THEN
WAIT TWO MINUTES FOR THE SYSTEM CAPACI-
TOR TO DISCHARGE BEFORE PERFORMING FUR-
THER DIAGNOSIS OR SERVICE. THIS IS THE ONLY
SURE WAY TO DISABLE THE SUPPLEMENTAL
RESTRAINT SYSTEM. FAILURE TO TAKE THE
PROPER PRECAUTIONS COULD RESULT IN ACCI-
DENTAL AIRBAG DEPLOYMENT AND POSSIBLE
PERSONAL INJURY.
Fig. 15 Rain Sensor Module Remove/Install
1 - OVERHEAD CONSOLE
2 - REAR VIEW MIRROR CONNECTOR
3 - BRACKET
4 - REAR VIEW MIRROR BUTTON
5 - SPRING CLIP (2)
6 - RAIN SENSOR MODULE
7 - TRIM COVER
8 - WIRE HARNESS CONNECTOR
WJFRONT WIPERS/WASHERS 8R - 19
RAIN SENSOR MODULE (Continued)
Page 654 of 2199

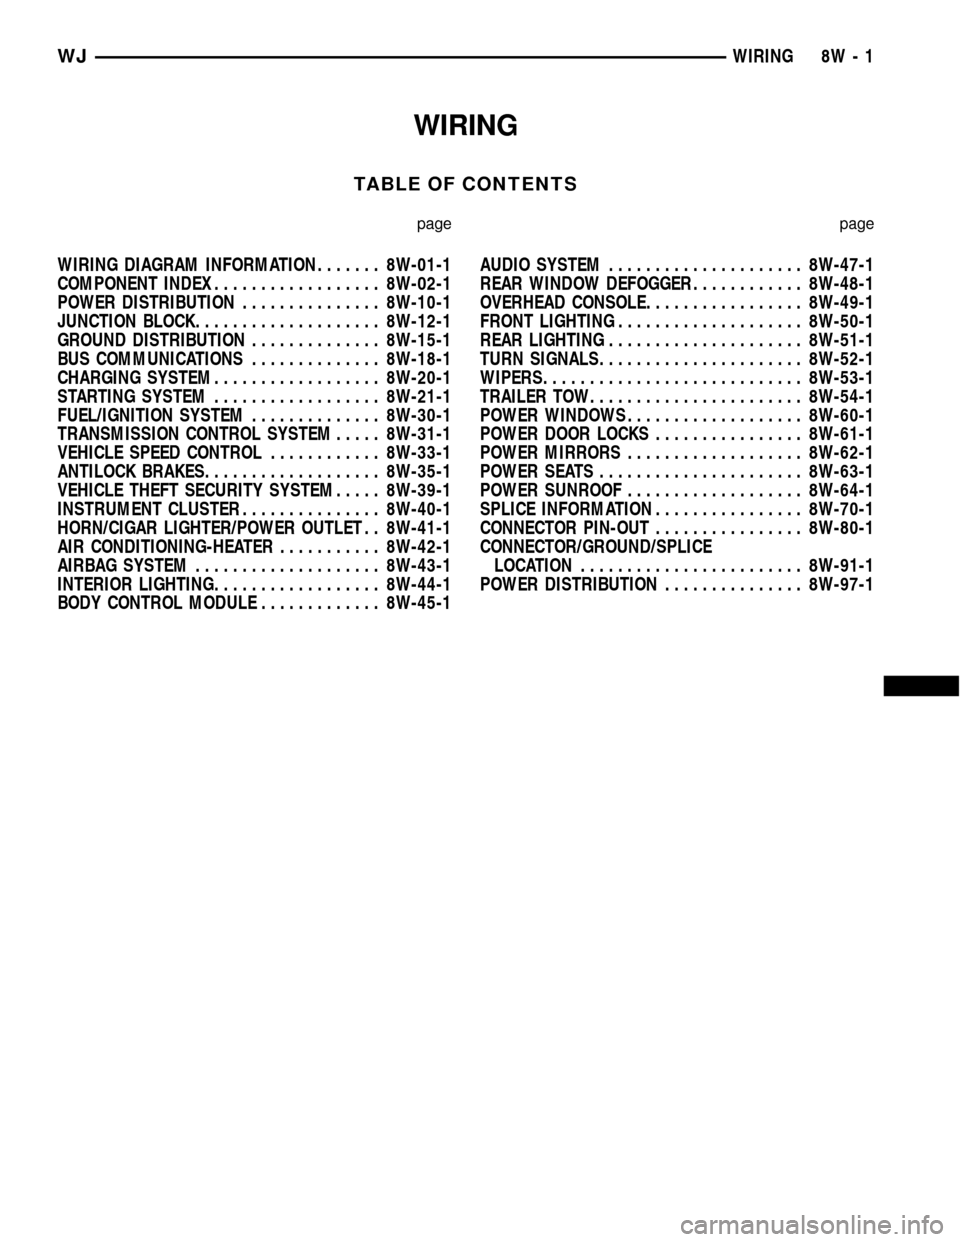
WIRING
TABLE OF CONTENTS
page page
WIRING DIAGRAM INFORMATION....... 8W-01-1
COMPONENT INDEX.................. 8W-02-1
POWER DISTRIBUTION............... 8W-10-1
JUNCTION BLOCK.................... 8W-12-1
GROUND DISTRIBUTION.............. 8W-15-1
BUS COMMUNICATIONS.............. 8W-18-1
CHARGING SYSTEM.................. 8W-20-1
STARTING SYSTEM.................. 8W-21-1
FUEL/IGNITION SYSTEM.............. 8W-30-1
TRANSMISSION CONTROL SYSTEM..... 8W-31-1
VEHICLE SPEED CONTROL............ 8W-33-1
ANTILOCK BRAKES................... 8W-35-1
VEHICLE THEFT SECURITY SYSTEM..... 8W-39-1
INSTRUMENT CLUSTER............... 8W-40-1
HORN/CIGAR LIGHTER/POWER OUTLET . . 8W-41-1
AIR CONDITIONING-HEATER........... 8W-42-1
AIRBAG SYSTEM.................... 8W-43-1
INTERIOR LIGHTING.................. 8W-44-1
BODY CONTROL MODULE............. 8W-45-1AUDIO SYSTEM..................... 8W-47-1
REAR WINDOW DEFOGGER............ 8W-48-1
OVERHEAD CONSOLE................. 8W-49-1
FRONT LIGHTING.................... 8W-50-1
REAR LIGHTING..................... 8W-51-1
TURN SIGNALS...................... 8W-52-1
WIPERS............................ 8W-53-1
TRAILER TOW....................... 8W-54-1
POWER WINDOWS................... 8W-60-1
POWER DOOR LOCKS................ 8W-61-1
POWER MIRRORS................... 8W-62-1
POWER SEATS...................... 8W-63-1
POWER SUNROOF................... 8W-64-1
SPLICE INFORMATION................ 8W-70-1
CONNECTOR PIN-OUT................ 8W-80-1
CONNECTOR/GROUND/SPLICE
LOCATION........................ 8W-91-1
POWER DISTRIBUTION............... 8W-97-1 WJWIRING 8W - 1
Page 1176 of 2199

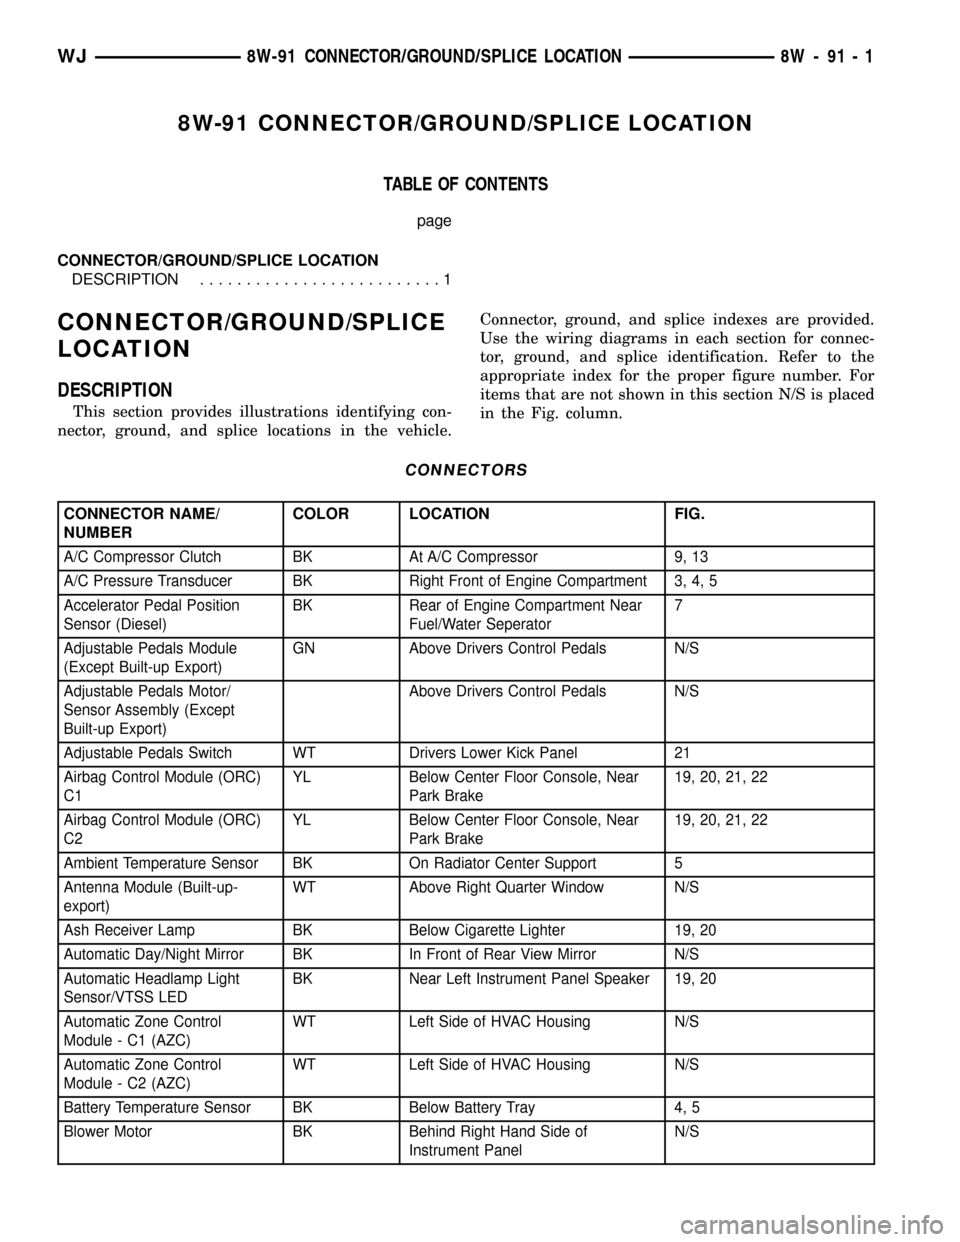
8W-91 CONNECTOR/GROUND/SPLICE LOCATION
TABLE OF CONTENTS
page
CONNECTOR/GROUND/SPLICE LOCATION
DESCRIPTION..........................1
CONNECTOR/GROUND/SPLICE
LOCATION
DESCRIPTION
This section provides illustrations identifying con-
nector, ground, and splice locations in the vehicle.Connector, ground, and splice indexes are provided.
Use the wiring diagrams in each section for connec-
tor, ground, and splice identification. Refer to the
appropriate index for the proper figure number. For
items that are not shown in this section N/S is placed
in the Fig. column.
CONNECTORS
CONNECTOR NAME/
NUMBERCOLOR LOCATION FIG.
A/C Compressor Clutch BK At A/C Compressor 9, 13
A/C Pressure Transducer BK Right Front of Engine Compartment 3, 4, 5
Accelerator Pedal Position
Sensor (Diesel)BK Rear of Engine Compartment Near
Fuel/Water Seperator7
Adjustable Pedals Module
(Except Built-up Export)GN Above Drivers Control Pedals N/S
Adjustable Pedals Motor/
Sensor Assembly (Except
Built-up Export)Above Drivers Control Pedals N/S
Adjustable Pedals Switch WT Drivers Lower Kick Panel 21
Airbag Control Module (ORC)
C1YL Below Center Floor Console, Near
Park Brake19, 20, 21, 22
Airbag Control Module (ORC)
C2YL Below Center Floor Console, Near
Park Brake19, 20, 21, 22
Ambient Temperature Sensor BK On Radiator Center Support 5
Antenna Module (Built-up-
export)WT Above Right Quarter Window N/S
Ash Receiver Lamp BK Below Cigarette Lighter 19, 20
Automatic Day/Night Mirror BK In Front of Rear View Mirror N/S
Automatic Headlamp Light
Sensor/VTSS LEDBK Near Left Instrument Panel Speaker 19, 20
Automatic Zone Control
Module - C1 (AZC)WT Left Side of HVAC Housing N/S
Automatic Zone Control
Module - C2 (AZC)WT Left Side of HVAC Housing N/S
Battery Temperature Sensor BK Below Battery Tray 4, 5
Blower Motor BK Behind Right Hand Side of
Instrument PanelN/S
WJ8W-91 CONNECTOR/GROUND/SPLICE LOCATION 8W - 91 - 1
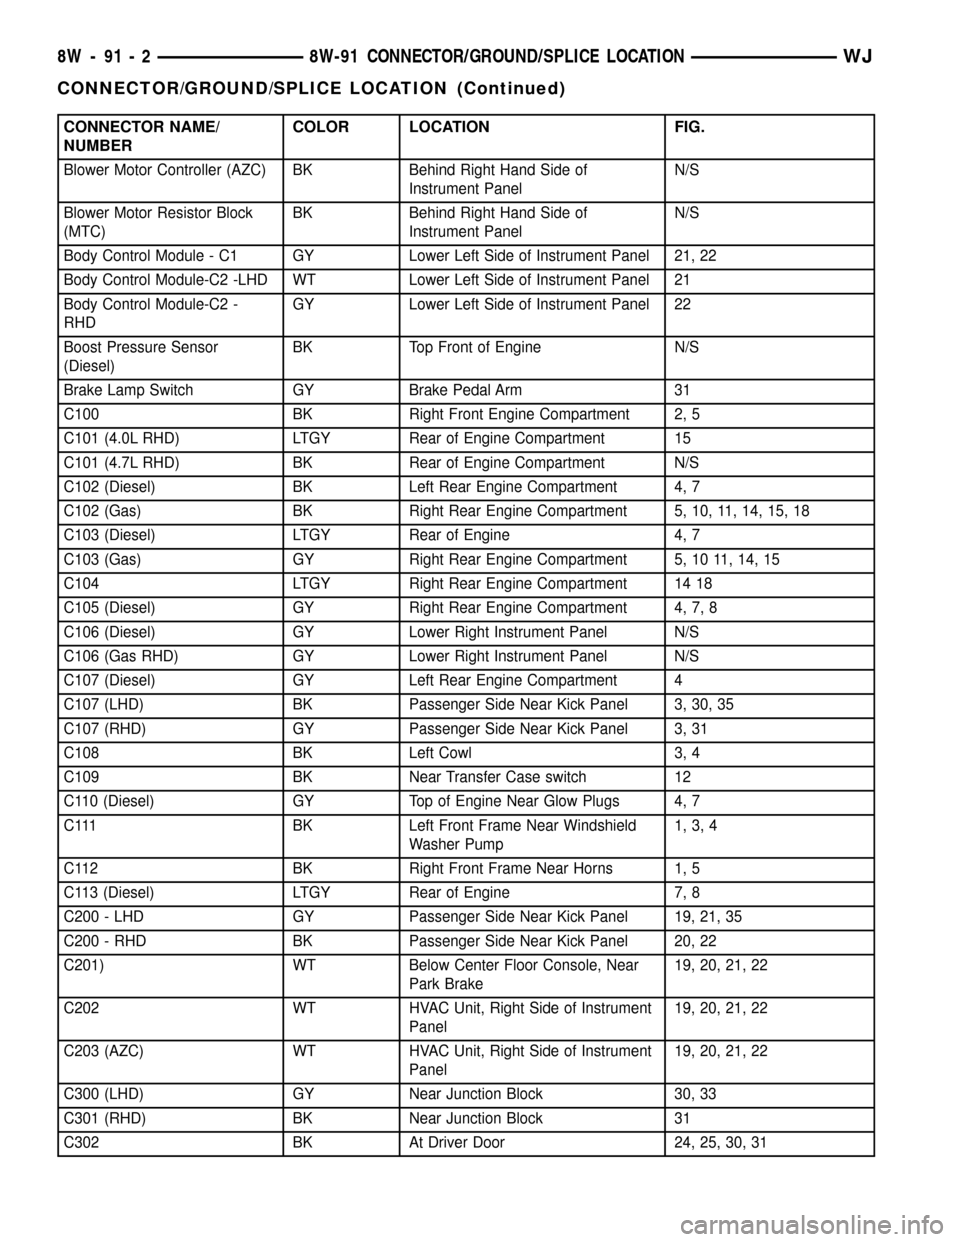
Page 1177 of 2199

CONNECTOR NAME/
NUMBERCOLOR LOCATION FIG.
Blower Motor Controller (AZC) BK Behind Right Hand Side of
Instrument PanelN/S
Blower Motor Resistor Block
(MTC)BK Behind Right Hand Side of
Instrument PanelN/S
Body Control Module - C1 GY Lower Left Side of Instrument Panel 21, 22
Body Control Module-C2 -LHD WT Lower Left Side of Instrument Panel 21
Body Control Module-C2 -
RHDGY Lower Left Side of Instrument Panel 22
Boost Pressure Sensor
(Diesel)BK Top Front of Engine N/S
Brake Lamp Switch GY Brake Pedal Arm 31
C100 BK Right Front Engine Compartment 2, 5
C101 (4.0L RHD) LTGY Rear of Engine Compartment 15
C101 (4.7L RHD) BK Rear of Engine Compartment N/S
C102 (Diesel) BK Left Rear Engine Compartment 4, 7
C102 (Gas) BK Right Rear Engine Compartment 5, 10, 11, 14, 15, 18
C103 (Diesel) LTGY Rear of Engine 4, 7
C103 (Gas) GY Right Rear Engine Compartment 5, 10 11, 14, 15
C104 LTGY Right Rear Engine Compartment 14 18
C105 (Diesel) GY Right Rear Engine Compartment 4, 7, 8
C106 (Diesel) GY Lower Right Instrument Panel N/S
C106 (Gas RHD) GY Lower Right Instrument Panel N/S
C107 (Diesel) GY Left Rear Engine Compartment 4
C107 (LHD) BK Passenger Side Near Kick Panel 3, 30, 35
C107 (RHD) GY Passenger Side Near Kick Panel 3, 31
C108 BK Left Cowl 3, 4
C109 BK Near Transfer Case switch 12
C110 (Diesel) GY Top of Engine Near Glow Plugs 4, 7
C111 BK Left Front Frame Near Windshield
Washer Pump1, 3, 4
C112 BK Right Front Frame Near Horns 1, 5
C113 (Diesel) LTGY Rear of Engine 7, 8
C200 - LHD GY Passenger Side Near Kick Panel 19, 21, 35
C200 - RHD BK Passenger Side Near Kick Panel 20, 22
C201) WT Below Center Floor Console, Near
Park Brake19, 20, 21, 22
C202 WT HVAC Unit, Right Side of Instrument
Panel19, 20, 21, 22
C203 (AZC) WT HVAC Unit, Right Side of Instrument
Panel19, 20, 21, 22
C300 (LHD) GY Near Junction Block 30, 33
C301 (RHD) BK Near Junction Block 31
C302 BK At Driver Door 24, 25, 30, 31
8W - 91 - 2 8W-91 CONNECTOR/GROUND/SPLICE LOCATIONWJ
CONNECTOR/GROUND/SPLICE LOCATION (Continued)
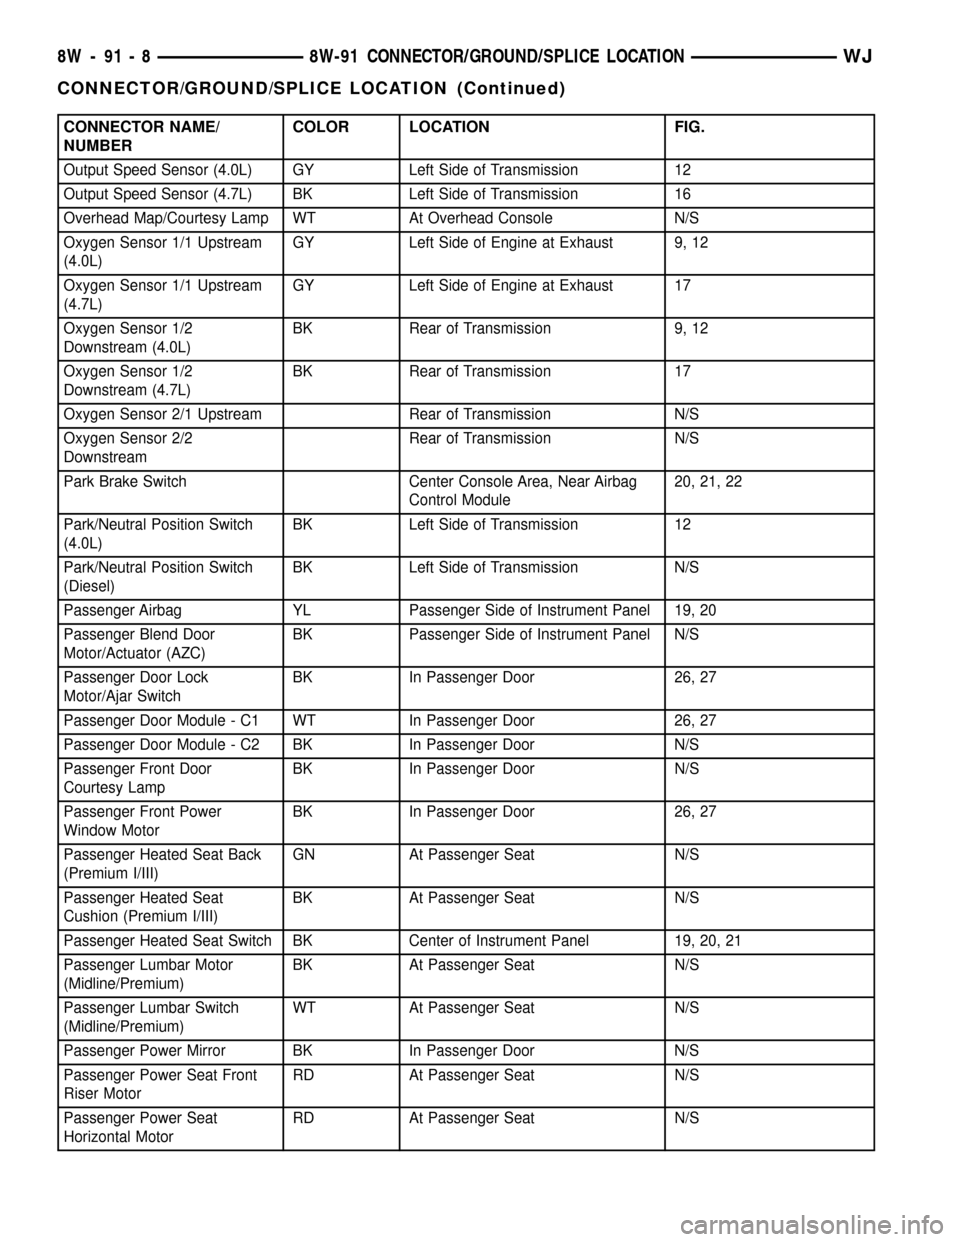
Page 1183 of 2199

CONNECTOR NAME/
NUMBERCOLOR LOCATION FIG.
Output Speed Sensor (4.0L) GY Left Side of Transmission 12
Output Speed Sensor (4.7L) BK Left Side of Transmission 16
Overhead Map/Courtesy Lamp WT At Overhead Console N/S
Oxygen Sensor 1/1 Upstream
(4.0L)GY Left Side of Engine at Exhaust 9, 12
Oxygen Sensor 1/1 Upstream
(4.7L)GY Left Side of Engine at Exhaust 17
Oxygen Sensor 1/2
Downstream (4.0L)BK Rear of Transmission 9, 12
Oxygen Sensor 1/2
Downstream (4.7L)BK Rear of Transmission 17
Oxygen Sensor 2/1 Upstream Rear of Transmission N/S
Oxygen Sensor 2/2
DownstreamRear of Transmission N/S
Park Brake Switch Center Console Area, Near Airbag
Control Module20, 21, 22
Park/Neutral Position Switch
(4.0L)BK Left Side of Transmission 12
Park/Neutral Position Switch
(Diesel)BK Left Side of Transmission N/S
Passenger Airbag YL Passenger Side of Instrument Panel 19, 20
Passenger Blend Door
Motor/Actuator (AZC)BK Passenger Side of Instrument Panel N/S
Passenger Door Lock
Motor/Ajar SwitchBK In Passenger Door 26, 27
Passenger Door Module - C1 WT In Passenger Door 26, 27
Passenger Door Module - C2 BK In Passenger Door N/S
Passenger Front Door
Courtesy LampBK In Passenger Door N/S
Passenger Front Power
Window MotorBK In Passenger Door 26, 27
Passenger Heated Seat Back
(Premium I/III)GN At Passenger Seat N/S
Passenger Heated Seat
Cushion (Premium I/III)BK At Passenger Seat N/S
Passenger Heated Seat Switch BK Center of Instrument Panel 19, 20, 21
Passenger Lumbar Motor
(Midline/Premium)BK At Passenger Seat N/S
Passenger Lumbar Switch
(Midline/Premium)WT At Passenger Seat N/S
Passenger Power Mirror BK In Passenger Door N/S
Passenger Power Seat Front
Riser MotorRD At Passenger Seat N/S
Passenger Power Seat
Horizontal MotorRD At Passenger Seat N/S
8W - 91 - 8 8W-91 CONNECTOR/GROUND/SPLICE LOCATIONWJ
CONNECTOR/GROUND/SPLICE LOCATION (Continued)
Page 1910 of 2199

INSTRUMENT PANEL SYSTEM
REMOVAL
WARNING: ON VEHICLES EQUIPPED WITH AIR-
BAGS, DISABLE THE AIRBAG SYSTEM BEFORE
ATTEMPTING ANY STEERING WHEEL, STEERING
COLUMN, OR INSTRUMENT PANEL COMPONENT
DIAGNOSIS OR SERVICE. DISCONNECT AND ISO-
LATE THE BATTERY NEGATIVE (GROUND) CABLE,
THEN WAIT TWO MINUTES FOR THE AIRBAG SYS-
TEM CAPACITOR TO DISCHARGE BEFORE PER-
FORMING FURTHER DIAGNOSIS OR SERVICE. THIS
IS THE ONLY SURE WAY TO DISABLE THE AIRBAG
SYSTEM. FAILURE TO TAKE THE PROPER PRE-
CAUTIONS COULD RESULT IN ACCIDENTAL AIR-
BAG DEPLOYMENT AND POSSIBLE PERSONAL
INJURY.
NOTE: Before starting this procedure, be certain to
turn the steering wheel until the front wheels are in
the straight-ahead position.
(1) Disconnect and isolate the battery negative
cable.
(2) Remove the trim from the right and left A-pil-
lars. (Refer to 23 - BODY/INTERIOR/A-PILLAR
TRIM - REMOVAL).(3) Remove the top cover from the instrument
panel. (Refer to 23 - BODY/INSTRUMENT PANEL/
INSTRUMENT PANEL TOP COVER - REMOVAL).
(4) Remove the four nuts that secure the instru-
ment panel to the studs on the dash panel near the
windshield fence line (Fig. 1).
(5) Remove the scuff plates from the right and left
front door sills. (Refer to 23 - BODY/INTERIOR/
DOOR SILL SCUFF PLATE - REMOVAL).
(6) Remove the trim panels from the right and left
inner cowl sides. (Refer to 23 - BODY/INTERIOR/
COWL TRIM - REMOVAL).
(7) Remove the console from the floor panel trans-
mission tunnel. (Refer to 23 - BODY/INTERIOR/
FLOOR CONSOLE - REMOVAL).
(8) Remove the fuse cover from the Junction Block
(JB). (Refer to 8 - ELECTRICAL/POWER DISTRIBU-
TION/FUSE COVER - REMOVAL).
(9) Remove the cluster bezel from the instrument
panel. (Refer to 23 - BODY/INSTRUMENT PANEL/
CLUSTER BEZEL - REMOVAL).
(10) Remove the steering column opening cover
from the instrument panel. (Refer to 23 - BODY/IN-
STRUMENT PANEL/STEERING COLUMN OPEN-
ING COVER - REMOVAL).
(11) Remove the steering column bracket from the
instrument panel steering column support bracket.
(Refer to 23 - BODY/INSTRUMENT PANEL/IP
STEERING COLUMN BRACKET - REMOVAL).
Fig. 1 Instrument Panel to Dash Panel Mounting
1 - STUD (4)
2 - NUT (4)3 - INSTRUMENT PANEL
4 - DASH PANEL
WJINSTRUMENT PANEL SYSTEM 23 - 37
Page 1917 of 2199

(23) Reconnect the instrument panel wire harness
connectors to the following floor panel transmission
tunnel components:
²the Airbag Control Module (ACM) connector
receptacle
²the park brake switch terminal
²the transmission shifter connector receptacle.
(24) Reconnect the left and right body wire har-
ness connectors, the Ignition Off Draw (IOD) wire
harness connector and the fused B(+) wire harness
connector to the connector receptacles of the Junction
Block (JB) and tighten the connector screws (Fig. 5).
Tighten the screws to 4 N´m (36 in. lbs.).
(25) Engage the lower steering column shaft with
the steering shaft coupler and position the steering
column to the mounting studs on the instrument
panel steering column support bracket (Fig. 4).
(26) Install and tighten the four nuts that secure
the steering column to the studs on the instrument
panel steering column support bracket. Tighten the
nuts to 11.8 N´m (105 in. lbs.).
(27) Install and tighten the bolt that secures the
coupler to the lower steering column shaft. Tighten
the bolt to 49 N´m (36 ft. lbs.).
(28) Turn the ignition switch to the On position,
then install the shifter interlock cable connector into
the ignition lock housing receptacle.
(29) Reconnect the instrument panel wire harness
connectors to the following steering column compo-
nents (Fig. 3):
²the two lower clockspring connector receptacles
²the left multi-function switch connector recepta-
cle
²the right multi-function switch connector recep-
tacle
²the two ignition switch connector receptacles
²the shifter interlock solenoid connector recepta-
cle
²if the vehicle is so equipped, the Sentry Key
Immobilizer Module (SKIM) connector receptacle.
(30) Position the lower tilting steering column
shroud to the steering column multi-function switchmounting housing, then install and tighten the screw
that secures the shroud to the housing (Fig. 2).
Tighten the screw to 1.9 N´m (17 in. lbs.).
(31) Position the upper tilting steering column
shroud over the steering column. Align the upper and
lower shrouds with each other and snap the two
halves together.
(32) Reinstall the steering column bracket onto the
instrument panel steering column support bracket.
(Refer to 23 - BODY/INSTRUMENT PANEL/IP
STEERING COLUMN BRACKET - INSTALLA-
TION).
(33) Reinstall the steering column opening cover
onto the instrument panel. (Refer to 23 - BODY/IN-
STRUMENT PANEL/STEERING COLUMN OPEN-
ING COVER - INSTALLATION).
(34) Reinstall the cluster bezel onto the instru-
ment panel. (Refer to 23 - BODY/INSTRUMENT
PANEL/CLUSTER BEZEL - INSTALLATION).
(35) Reinstall the fuse cover onto the Junction
Block (JB). (Refer to 8 - ELECTRICAL/POWER DIS-
TRIBUTION/FUSE COVER - INSTALLATION).
(36) Reinstall the console onto the floor panel
transmission tunnel. (Refer to 23 - BODY/INTERI-
OR/FLOOR CONSOLE - INSTALLATION).
(37) Reinstall the trim panels onto the right and
left inner cowl sides. (Refer to 23 - BODY/INTERI-
OR/COWL TRIM - INSTALLATION).
(38) Reinstall the scuff plates onto the right and
left front door sills. (Refer to 23 - BODY/INTERIOR/
DOOR SILL SCUFF PLATE - INSTALLATION).
(39) Reinstall the top cover onto the instrument
panel. (Refer to 23 - BODY/INSTRUMENT PANEL/
INSTRUMENT PANEL TOP COVER - INSTALLA-
TION).
(40) Reinstall the trim onto the right and left
A-pillars. (Refer to 23 - BODY/INTERIOR/A-PILLAR
TRIM - INSTALLATION).
(41) Reconnect the battery negative cable.
23 - 44 INSTRUMENT PANEL SYSTEMWJ
INSTRUMENT PANEL SYSTEM (Continued)
Page 1927 of 2199

(22) Remove the front bin from the floor console.
(Refer to 23 - BODY/INTERIOR/FLOOR CONSOLE -
REMOVAL).
(23) Reach through the front bin opening of the
floor console to access and remove the two screws
that secure the center floor tunnel bracket to the
instrument panel.
(24) Reach through the front bin opening of the
floor console to access and loosen the two nuts that
secure the center floor tunnel bracket to the studs on
the floor panel transmission tunnel.
(25) Slide the center floor tunnel bracket rearward
in the vehicle far enough to disengage the locating
hole in the lower flange of the top pad from the locat-
ing pin on the instrument panel structural duct (Fig.
25).
(26) Remove the instrument panel top pad from
the instrument panel structural duct.INSTALLATION
WARNING: ON VEHICLES EQUIPPED WITH AIR-
BAGS, DISABLE THE AIRBAG SYSTEM BEFORE
ATTEMPTING ANY STEERING WHEEL, STEERING
COLUMN, OR INSTRUMENT PANEL COMPONENT
DIAGNOSIS OR SERVICE. DISCONNECT AND ISO-
LATE THE BATTERY NEGATIVE (GROUND) CABLE,
THEN WAIT TWO MINUTES FOR THE AIRBAG SYS-
TEM CAPACITOR TO DISCHARGE BEFORE PER-
FORMING FURTHER DIAGNOSIS OR SERVICE. THIS
IS THE ONLY SURE WAY TO DISABLE THE AIRBAG
SYSTEM. FAILURE TO TAKE THE PROPER PRE-
CAUTIONS COULD RESULT IN ACCIDENTAL AIR-
BAG DEPLOYMENT AND POSSIBLE PERSONAL
INJURY.
If the top pad is being replaced with a new unit, be
certain to transfer or install the panel outlets and
the passenger side trim bezel to the new unit before
it is installed on the instrument panel structural
duct. (Refer to 24 - HEATING & AIR CONDITION-
ING/DISTRIBUTION/AIR OUTLETS - REMOVAL)
and (Refer to 23 - BODY/INSTRUMENT PANEL/IP
TRIM BEZEL - PASSENGER - REMOVAL).
(1) Position the instrument panel top pad over the
instrument panel structural duct and the studs on
the dash panel near the windshield fence line.
(2) Route the instrument panel wire harness take
out for the glove box lamp and switch unit to the
switch mounting hole in the upper glove box opening
reinforcement.
(3) Reach through the front bin opening of the
floor console to engage the locating hole in the lower
flange of the top pad with the locating pin on the
instrument panel structural duct (Fig. 25).
(4) Reach through the front bin opening of the
floor console to slide the center floor tunnel bracket
forward in the vehicle far enough to capture the
lower flange of the top pad between the bracket and
the structural duct.
(5) Reach through the front bin opening of the
floor console to install and tighten the two screws
that secure the center floor tunnel bracket to the
instrument panel. Tighten the screws to 11.8 N´m
(105 in. lbs.).
Fig. 25 Instrument Panel Top Pad Remove/Install
1 - STRUCTURAL DUCT
2 - LOCATING PIN
3 - INSTRUMENT PANEL TOP PAD
4 - LOWER FLANGE
5 - CENTER FLOOR TUNNEL BRACKET
23 - 54 INSTRUMENT PANEL SYSTEMWJ
INSTRUMENT PANEL TOP PAD (Continued)