2002 Hyundai Grandeur charging
[x] Cancel search: chargingPage 13 of 230
YOUR VEHICLE AT A GLANCE
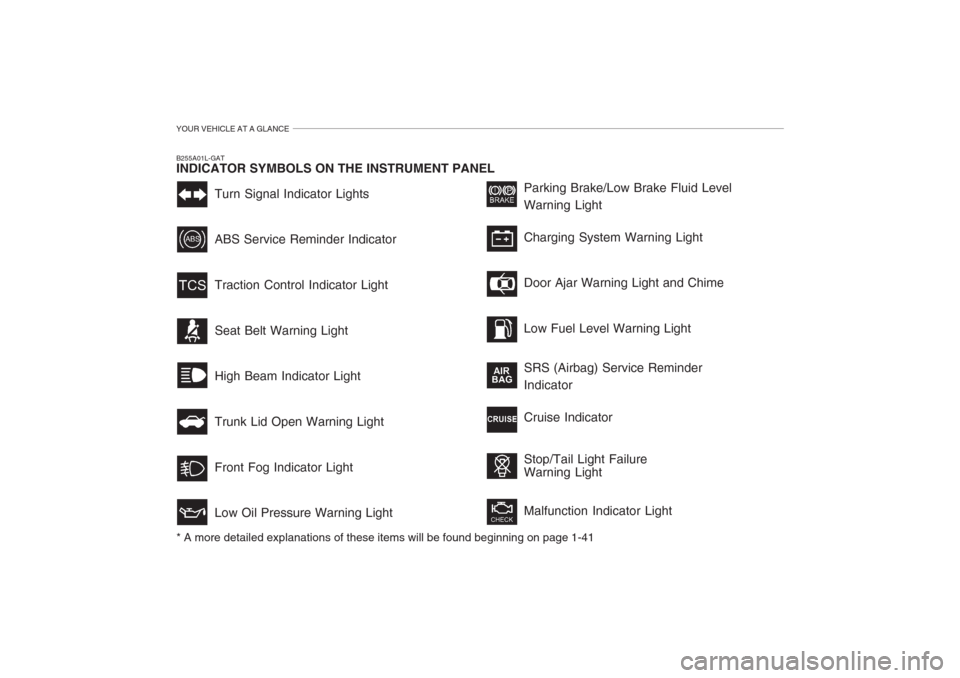
Turn Signal Indicator Lights ABS Service Reminder Indicator Traction Control Indicator LightSeat Belt Warning Light High Beam Indicator Light Trunk Lid Open Warning LightFront Fog Indicator Light Low Oil Pressure Warning LightParking Brake/Low Brake Fluid Level Warning Light Charging System Warning Light Door Ajar Warning Light and Chime Low Fuel Level Warning Light SRS (Airbag) Service Reminder Indicator Cruise Indicator Stop/Tail Light Failure Warning Light Malfunction Indicator Light
B255A01L-GAT INDICATOR SYMBOLS ON THE INSTRUMENT PANEL * A more detailed explanations of these items will be found beginning on page 1-41
Page 52 of 230
FEATURES OF YOUR HYUNDAI 1- 39
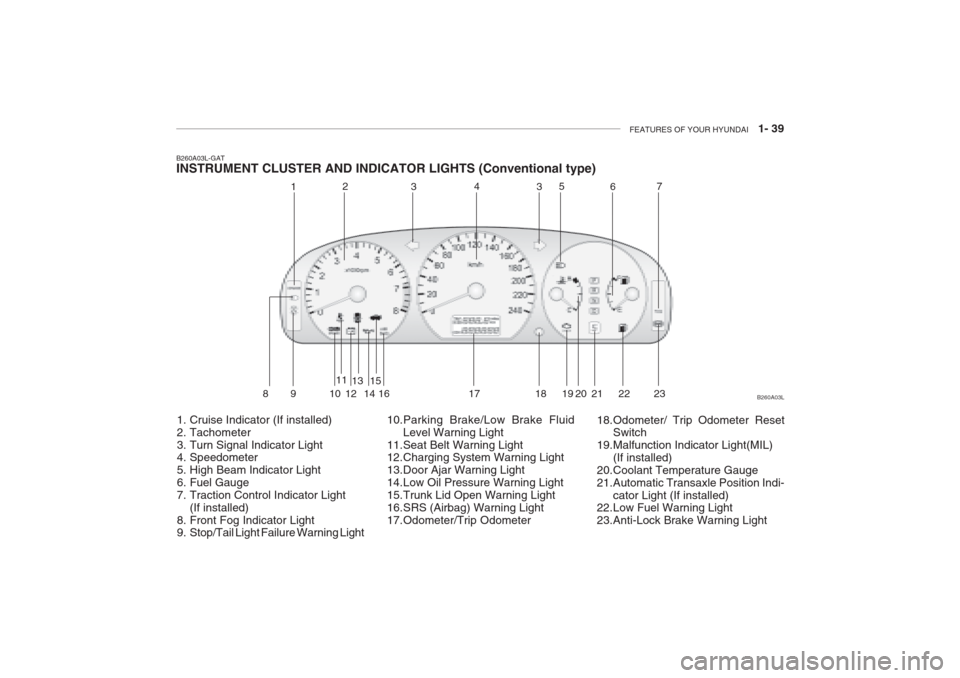
B260A03L-GAT INSTRUMENT CLUSTER AND INDICATOR LIGHTS (Conventional type)
1. Cruise Indicator (If installed)
2. Tachometer
3. Turn Signal Indicator Light
4. Speedometer
5. High Beam Indicator Light
6. Fuel Gauge
7. Traction Control Indicator Light (If installed)
8. Front Fog Indicator Light
9. Stop/Tail Light Failure Warning Light 10.Parking Brake/Low Brake Fluid
Level Warning Light
11.Seat Belt Warning Light
12.Charging System Warning Light
13.Door Ajar Warning Light
14.Low Oil Pressure Warning Light
15.Trunk Lid Open Warning Light
16.SRS (Airbag) Warning Light
17.Odometer/Trip Odometer 18.Odometer/ Trip Odometer Reset
Switch
19.Malfunction Indicator Light(MIL)
(If installed)
20.Coolant Temperature Gauge
21.Automatic Transaxle Position Indi-
cator Light (If installed)
22.Low Fuel Warning Light
23.Anti-Lock Brake Warning Light B260A03L
1
2
343
5
67
89 1 011
1213
1415
16 17 18 19 20 21 22
23
Page 53 of 230
1- 40 FEATURES OF YOUR HYUNDAI
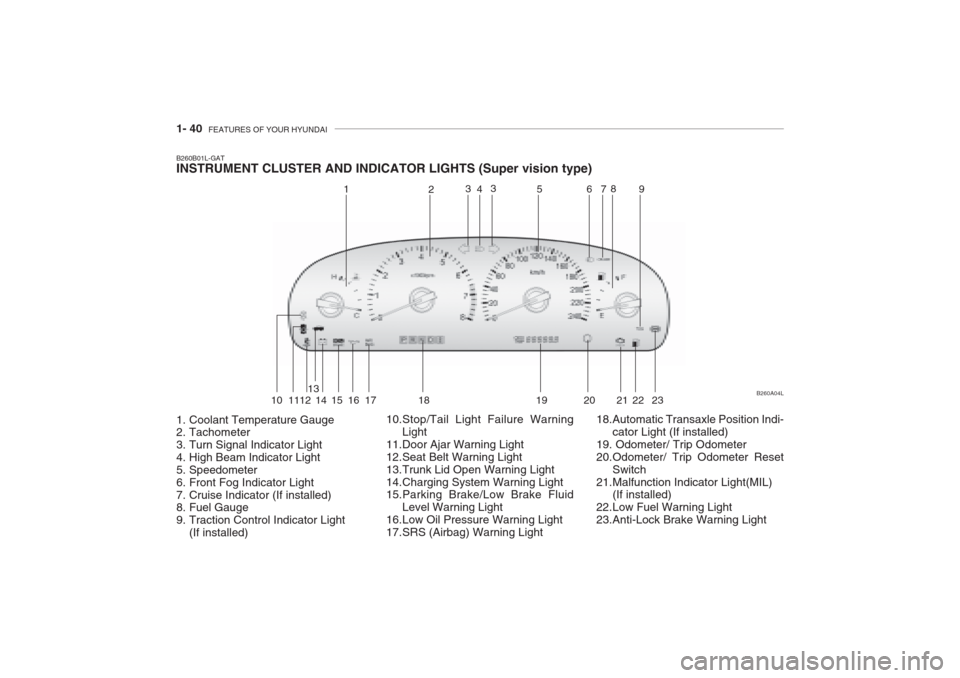
B260B01L-GAT INSTRUMENT CLUSTER AND INDICATOR LIGHTS (Super vision type)
1. Coolant Temperature Gauge
2. Tachometer
3. Turn Signal Indicator Light
4. High Beam Indicator Light
5. Speedometer
6. Front Fog Indicator Light
7. Cruise Indicator (If installed)
8. Fuel Gauge
9. Traction Control Indicator Light
(If installed) 10.Stop/Tail Light Failure Warning
Light
11.Door Ajar Warning Light
12.Seat Belt Warning Light
13.Trunk Lid Open Warning Light
14.Charging System Warning Light
15.Parking Brake/Low Brake Fluid Level Warning Light
16.Low Oil Pressure Warning Light
17.SRS (Airbag) Warning Light 18.Automatic Transaxle Position Indi-
cator Light (If installed)
19. Odometer/ Trip Odometer
20.Odometer/ Trip Odometer Reset Switch
21.Malfunction Indicator Light(MIL) (If installed)
22.Low Fuel Warning Light
23.Anti-Lock Brake Warning Light B260A04L
1
2
4
3 3
56 78
9
10 1112 13
14 15 16 17 18 19 20 21 22 23
Page 56 of 230
FEATURES OF YOUR HYUNDAI 1- 43
Your Hyundai is equipped with dual- diagonal braking systems. This meansyou still have braking on two wheelseven if one of the dual systems shouldfail. With only one of the dual systems working, more than normal pedal travel and greater pedal pressure are re-quired to stop the car. Also, the car willnot stop in as short a distance with onlyhalf of the brake system working. If thebrakes fail while you are driving, shift to a lower gear for additional engine braking and stop the car as soon as itis safe to do so. B260J01A-GAT
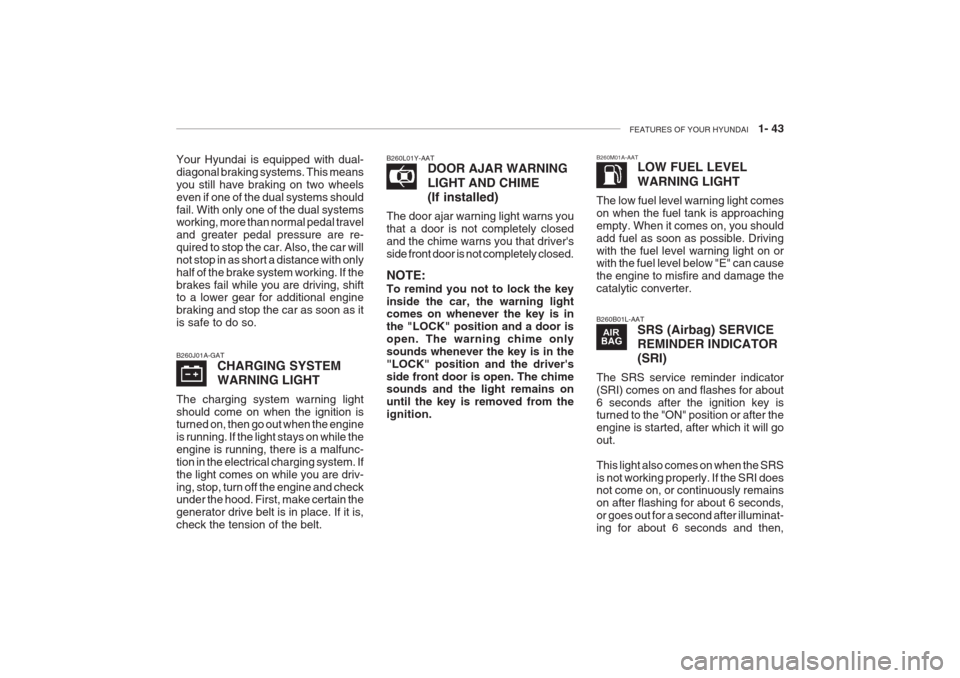
CHARGING SYSTEM WARNING LIGHT
The charging system warning light should come on when the ignition is turned on, then go out when the engine is running. If the light stays on while theengine is running, there is a malfunc-tion in the electrical charging system. Ifthe light comes on while you are driv-ing, stop, turn off the engine and check under the hood. First, make certain the generator drive belt is in place. If it is,check the tension of the belt. B260L01Y-AAT
DOOR AJAR WARNING
LIGHT AND CHIME (If installed)
The door ajar warning light warns you that a door is not completely closedand the chime warns you that driver'sside front door is not completely closed. NOTE: To remind you not to lock the key inside the car, the warning light comes on whenever the key is in the "LOCK" position and a door isopen. The warning chime onlysounds whenever the key is in the"LOCK" position and the driver'sside front door is open. The chime sounds and the light remains on until the key is removed from theignition. B260M01A-AAT
LOW FUEL LEVEL WARNING LIGHT
The low fuel level warning light comes on when the fuel tank is approachingempty. When it comes on, you shouldadd fuel as soon as possible. Drivingwith the fuel level warning light on or with the fuel level below "E" can cause the engine to misfire and damage thecatalytic converter. B260B01L-AAT SRS (Airbag) SERVICE REMINDER INDICATOR(SRI)
The SRS service reminder indicator (SRI) comes on and flashes for about6 seconds after the ignition key is turned to the "ON" position or after the engine is started, after which it will goout. This light also comes on when the SRS is not working properly. If the SRI does not come on, or continuously remains on after flashing for about 6 seconds,or goes out for a second after illuminat-ing for about 6 seconds and then,
Page 149 of 230
2- 20 DRIVING YOUR HYUNDAI
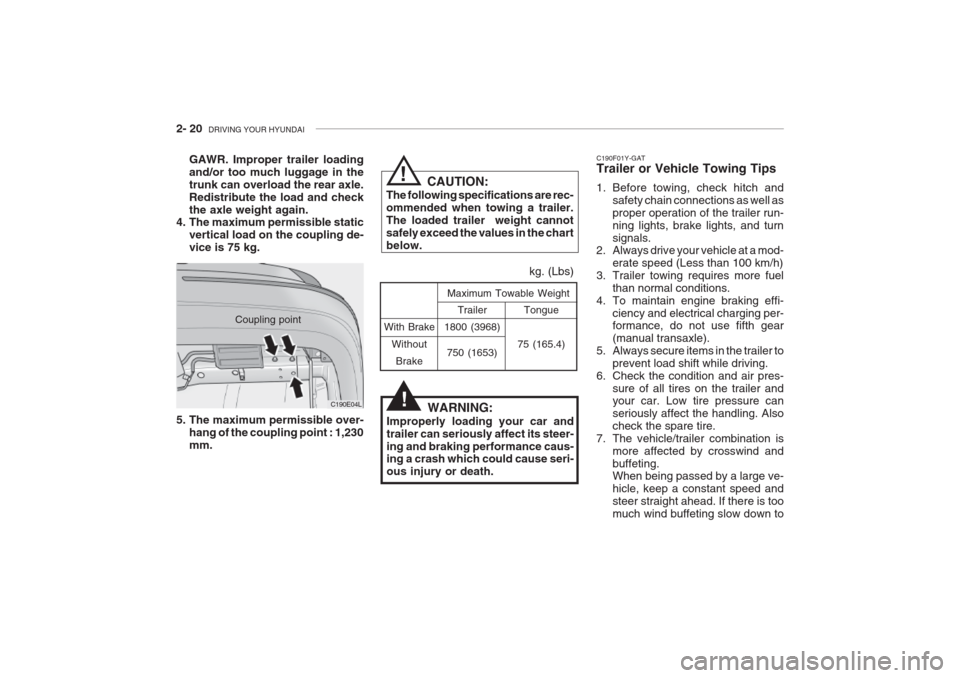
With Brake
WithoutBrake Tongue
75 (165.4)
Maximum Towable Weight
kg. (Lbs)
Trailer
1800 (3968)
750 (1653)
WARNING:
Improperly loading your car and trailer can seriously affect its steer-ing and braking performance caus- ing a crash which could cause seri- ous injury or death. C190F01Y-GAT Trailer or Vehicle Towing Tips
1. Before towing, check hitch and
safety chain connections as well as proper operation of the trailer run-ning lights, brake lights, and turnsignals.
2. Always drive your vehicle at a mod-
erate speed (Less than 100 km/h)
3. Trailer towing requires more fuel
than normal conditions.
4. To maintain engine braking effi-
ciency and electrical charging per- formance, do not use fifth gear (manual transaxle).
5. Always secure items in the trailer to prevent load shift while driving.
6. Check the condition and air pres-
sure of all tires on the trailer and your car. Low tire pressure can seriously affect the handling. Alsocheck the spare tire.
7. The vehicle/trailer combination is more affected by crosswind andbuffeting. When being passed by a large ve- hicle, keep a constant speed andsteer straight ahead. If there is toomuch wind buffeting slow down to
Coupling point
C190E04L
GAWR. Improper trailer loadingand/or too much luggage in thetrunk can overload the rear axle.Redistribute the load and checkthe axle weight again.
4. The maximum permissible static
vertical load on the coupling de-vice is 75 kg. CAUTION:
The following specifications are rec-ommended when towing a trailer.The loaded trailer weight cannotsafely exceed the values in the chartbelow.
!
!
5. The maximum permissible over- hang of the coupling point : 1,230 mm.
Page 153 of 230
WHAT TO DO IN AN EMERGENCY 3- 3
WARNING:
The gas produced by the battery during the jump-start operation ishighly explosive. If these instruc-tions are not followed exactly, seri- ous personal injury and damage to the vehicle may occur! If you arenot sure how to follow this proce-dure, seek qualified assistance.Automobile batteries contain sul-furic acid. This is poisonous and highly corrosive. When jump start- ing, wear protective glasses and becareful not to get acid on yourself,your clothing or on the car.
o If you should accidentally get acid on your skin or in your eyes, immediately remove any contami-nated clothing and flush the areawith clear water for at least 15 min- utes. Then promptly obtain medical attention. If you must be transportedto an emergency facility, continue toapply water to the affected areawith a sponge or cloth. o The gas produced by the battery
during the jump-start operation ishighly explosive. Do not smoke orallow a spark or open flame in thevicinity.
o The battery being used to provide
the jump start must be 12-volt. If youcannot determine that it is a 12-voltbattery, do not attempt to use it forthe jump start.
o To jump start a car with a discharged battery, follow this procedure ex-actly:
1. If the booster battery is installed in another vehicle, be sure the twovehicles are not touching.
2. Turn off all unnecessary lights and
accessories in both vehicles.
3. Attach the clamps of the jumper
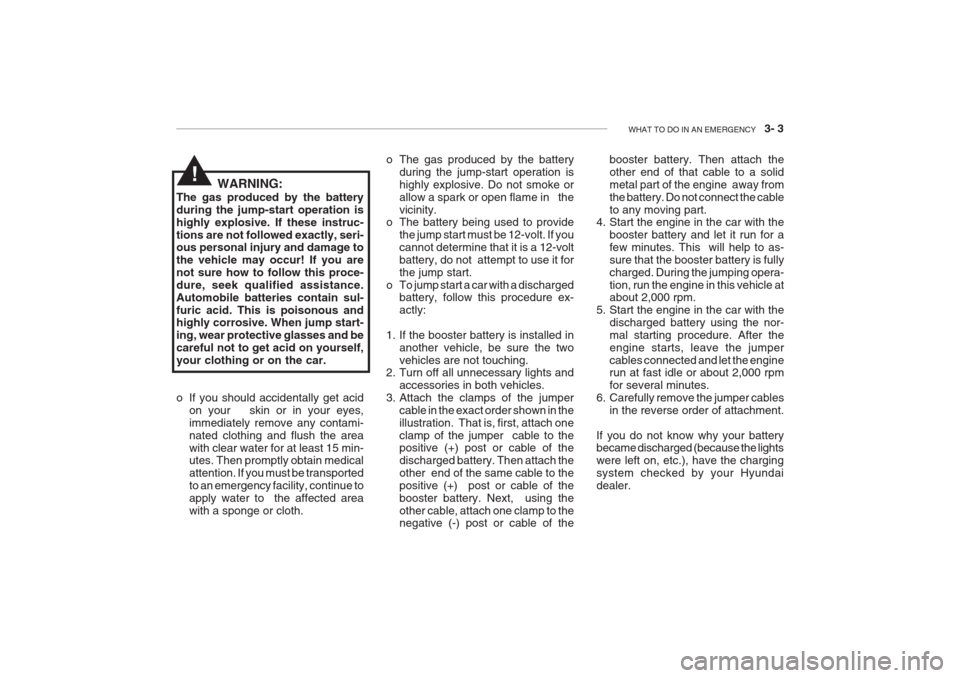
cable in the exact order shown in theillustration. That is, first, attach oneclamp of the jumper cable to the positive (+) post or cable of the discharged battery. Then attach theother end of the same cable to thepositive (+) post or cable of thebooster battery. Next, using theother cable, attach one clamp to the negative (-) post or cable of the booster battery. Then attach the other end of that cable to a solidmetal part of the engine away fromthe battery. Do not connect the cableto any moving part.
4. Start the engine in the car with the
booster battery and let it run for afew minutes. This will help to as-sure that the booster battery is fullycharged. During the jumping opera-tion, run the engine in this vehicle at about 2,000 rpm.
5. Start the engine in the car with the discharged battery using the nor- mal starting procedure. After theengine starts, leave the jumpercables connected and let the engine run at fast idle or about 2,000 rpm for several minutes.
6. Carefully remove the jumper cables
in the reverse order of attachment.
If you do not know why your battery became discharged (because the lights were left on, etc.), have the chargingsystem checked by your Hyundaidealer.!